- 3,615

- Liverpool
- leeislee
GT5 Photomode Reflection Tutorial
If anyone is interested in this then please, read on, if not then don't!
")
-----------------------------------------------------------------------
Having had the pleasure to view some of the great Rain edits here on GTPlanet, I have noticed that a lot of people can get some great rain and wet weather effects but amongst the brilliant and successful attempts at reflections, there are a few who struggle with getting it looking Real.
Im not a fan of the good staying good and the bad staying bad, were all here to learn and improve so that means everybody should be able to have a go at stuff like this because, contrary to any beliefs you all may have, the physics of it is really straight forward, Its just angles and lines.
Many of you know how to go about creating realistic looking reflections and will no doubt have came up with your own solution and techniques to the perfect reflection so this tutorial is ONE of the techniques I use. To a lot of you this tutorial will seem a bit over the top but to me getting the angles right first will ensure your reflection will look spot on at the end.
Of course, I have other ways of achieving a great reflection and I can get it done pretty fast but for a lot of people reading this and who are willing to give it a go, you can learn what steps are needed and with a bit of practise you can achieve great results really fast
So at first glance there seems to be a lot of steps in this tutorial, but sometimes, a little forward planning helps in the long run and before you know it you can dispense with most of this tutorial and nail it first time, every time.
As always, I have to say that this technique isnt the definitive way, my way isnt the only way and Im not saying Im right and everyone else is wrong, feel free to share your own techniques and maybe I can learn a bit more myself!
I use Photoshop CS4. Ive never used Gimp or anything else but, from what Ive heard, Gimp can do pretty much everything Photoshop can and because Gimp is FREE, there is no excuse not to give this a go.
Oh, Im not going to go into the ins and outs of Photoshop and what all the buttons do. Im not going to explain the laws of physics in detail, and Im presuming that most of you know what perspective is. If any of you dont know but still want to try this tutorial then may I point you HERE for all your Photoshop, Physics and Perspective needs.
Right, before we start the tutorial, abit of thinking is needed ..
-----------------------------------------------------------------------
When you create a reflection you need to keep in mind what you can see in the reflection. Imagine you are holding a camera to take a photo and you are looking down onto a car. You will see parts of the top of the car of course but you will not be able to see underneath the car. (D'uh!)
The only way to see underneath is to place the car on a mirror. In essence, that is what a reflection in water is, a wet mirror.

As you can see in this diagram the camera can see the car fine but by following the purple line of sight (named 'looking down') you will notice that it cannot see the top of the car in the reflection.
The reflection can only bounce that line of sight upwards like a mirror showing details underneath the car and obscuring the top of the car.
This is not the easiest to explain easily but you will see this fact shown in the steps below.
-----------------------------------------------------------------------
Ok, here is the tutorial...
I took this rather uninspired, or as some of you may think, Crap photo in GT5...

Even though it was taken in the rain at Le Mans it has almost no wet weather features in it apart from a rather smokey looking spray coming from the back of the Ferrari and because we have to wait for some better graphics it is down to us to make it look a bit wetter.
-----------------------------------------------------------------------
The first thing to do Is to find the perspective lines. This will help us to create the reflection according to the way the real world works and not some insane, made up universe where things go off at any and every angle!

The best way to find the perspective is to draw lines (on a new layer) marking the horizontal and vertical planes, as you can see in this picture its easier that it sounds. I drew lines that go off into the distance showing me where things go and why.
-----------------------------------------------------------------------
Next I cut out the car using my PEN tool then copied and pasted it onto a new layer, This will be my reflection. But before I started to create the reflection itself I first had to hack away at it so I had three pieces of car to fit on my three axis lines. I divided the car into the front, Side and top (windows, roof etc) sections, this mess will all be explained, dont worry.

Once i have cut these parts out i then flip them vertically (each bit on a seperate layer of course!)

-----------------------------------------------------------------------
Now that we have our car sliced and ready to go, we can start to move the peices around below the car to the approximate position they should be, using the guide lines of course to keep things correct.

-----------------------------------------------------------------------
As you can see in the above picture, parts of the car don't quite line up, this isn't something we need to fix so it is 100% correct because the reflection will be blurred at the end and you wont really see any mistakes in the body but because it's the proper thing to do we should at least try and correct this as much as possible.
I selected the bits that don't meet up, then i used the transform tool to move them around so they at least look a little bit better.

And this is the result...

-----------------------------------------------------------------------
Now, this is the part that many leave out and just one of the reasons that makes a reflection look a bit wrong.
Looking down from our position into the reflection we wouldn't be able to see the top of the bonnet/hood and up into the window, It's just physically impossible so we need to delete the bits we wouldn't see. I've highlighted them with these arrows.

Select the bits we don't want and just delete them...

-----------------------------------------------------------------------
Next we need to put the roof back into our reflection, again like the last step we wouldn't be able to see it all due to the angle of the reflection, so without trying to be too perfect we can just put it in so it's just visable.

The reason i split the roof is to allow me to rotate the windscreen a little to follow the guide lines and keep it looking more realistic.
Update: The lower you are when you take a picture (The closer you are to the road or floor) the more the windows and roof would be visable in the reflection. Obviously, the higher you are when you take the photo (The higher you are above the road or floor) the less you would be able to see the windows and roof in the relfection.
-----------------------------------------------------------------------
Now we can start with cleaning up the underneath of the car and add in our shadow. Again, this is where the guide lines will help to get it looking good.
But first we need to remove the bits of the road that are attached to the reflection. I've shown the bits to remove with the arrows.

Then i can draw the shape of the shadow in and fill it with black then delete any parts that cover up the actual car (around the front wheel)

-----------------------------------------------------------------------
Don't forget the wing mirror!

I also cleaned up the vent on the bumper/fender/skirt (etc) that didn't quite line up.

-----------------------------------------------------------------------
Now that we have a decent enough reflection we can go ahead and start to blur it to make it look more convincing. I've done this in stages so i can have varying degrees of blur, i settled on the reflection being very blurry due to the wet road and speed of the car would mean there would less detail visable.
I added a Gaussian Blur, Then i added a bit more Gaussian Blur and then finally i added a motion blur and set the blur angle to the same as the yellow vertical lines on my guide.

After blurring it i slightly desaturated the layer and set the opacity (visibility) of the reflection to about 40/50%.
-----------------------------------------------------------------------
During this step i noticed that the bump on the far wing wouldn't be that visable in the reflection so i deleted most of it.

-----------------------------------------------------------------------
When you look into a nice shiny puddle you can often see that it will reflect more light, this is due to the difference in the viewing angle and the fact that water can twinkle and bounce the light around a little bit more than the actual thing it's reflecting.
So to 'Reflect' that (pun intended) i added some glow to the reflection.

-----------------------------------------------------------------------
Without going into detail about adding water spray, lens effects and all the extras that make up a great rain effect i will leave this tutorial as it is and i may one day put up a Rain effect tutorial. (unless someone else wants to do one!)
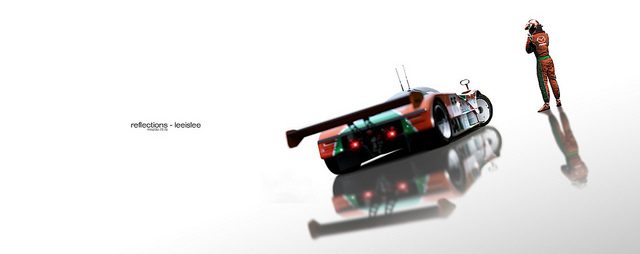
Anyway, here is the final image of the finished reflection, using the same techniques i've shared above i decided to add a reflection of the barrier and trees, no need to share how i did that, you should find it easy to do yourself by following the guide

-----------------------------------------------------------------------
For those who want to get really into creating a realistic reflection you can add various guides to get it perfectly lined up, This is the full process i use but i didn't go into detail in this tutorial due to not wanting to put people off.
Here are the additional steps i use, feel free to have a go yourself....or not!

-----------------------------------------------------------------------
Well i hope you have gained a better insight into creating realistic reflections. Of course, not everyone wants to devote time to editing photos so this tutorial may not be for everyone. Feel free to completely ignore and/or laugh or disagree with it!

If you want to add some great reflections to your own shots then give it a go, it's really not hard as long as you line things up first.
Good Luck 👍
-----------------------------------------------------------------------
Feel free to share your own techniques and finished edits, i'd love to see the ways you all create reflections and i'll look forward to seeing those pics!
Last edited:
")
 👍
👍

