Hi all GT-fans!
This is a story about yet another project of mine (OH NO.. not again 💡 ).
And once again, I've told my friends about it, and their reactions (of course): yeah sure...right... well what about it?? When do you start? DO you actually plan to start??
It happens alot to me... Just can't stop dreaming!
Well the difference this time, is that, while writing this story, that project has actually materialized into the real world, and has taken up about 1,5 squaremeters of space in my livingroom.
And YES.... my girlfriend has actually APPROVED IT!!!! YES! 👍 👍 👍
----SO DON'T WORRY.. IF THE MODERATORS LET ME IN WITH THIS THREAD, I PROMISE THAT THIS THREAD WILL NOT DIE OUT, BECAUSE THE FRIGGIN MONSTER IS IN MY LIVING ROOM, AND I'VE GOT 38 PICS TO SHOW YOU ALL---")
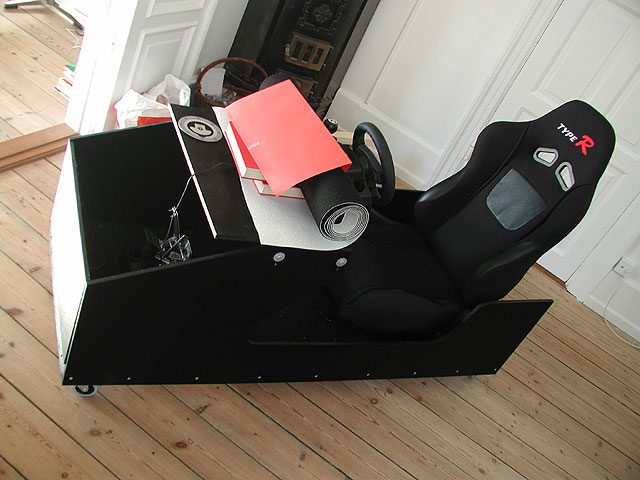
It's my very own GRAN TURISMO Racing Seat. featuring:
Solid frame on wheels
real racingseat -fully adjustable
Driving Force Pro
modified DFP-pedals featuring angled aluminum pedals with rubbergrip
real lotuslogo from a lotus super seven racecar.
fake fuelcap
aluminum plates fitted inside of cockpit
black carpet
aluminum hood
"bodyshaker" installed in back of racingseat
I will be posting pictures and descriptions of the project the next couple of days.
Until then, here are the first couple of pics.
(I have optimized the pictures, to minimize downloadtime.)
*********************************************
Updates:
Update 1: 2 pics posted
Update 2: 1 pic posted
Update 3: 3 pics posted
Update 4: 4 pics posted
Update 5: 2 blueprints posted
Update 6: 9 pics posted
Update 7: 6 pics posted *the opening*
Update 8: 4 pics posted
Update 9: 4 pics posted *DFP FIX.... finally*
Best regards,
Jesper
*********************************************
Update 1: 2 pics posted
It's about 1st of january. I have chased every internet news about GRAN TURISMO 4, for the last three years. And I have now decided to start my racingseat-project. I have until 9th of march. Have already invited a bunch of friends for the gran opening the 9th of March (GT4 european release), but they seem a bit skeptic. Hope I get that seat ready.
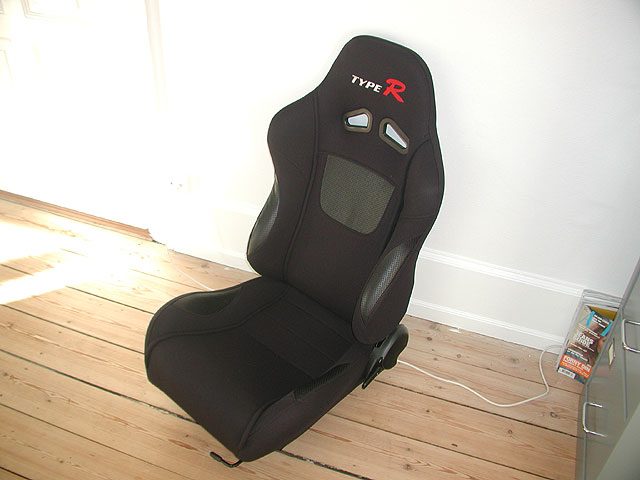
Racing seat.. bought and paid for!
Now, there is NO WAY BACK.
Invested in a real racing seat. And it's SO ****** cool! 👍
It has a sliding frame, so that you can adjust the position of the seat.
You can also change the angle of the back.
"TYPE-R" it says on the back-rest... can it get any better?
MDF... I can see it all coming alive!!!

Yep, Medium Density Fiber, nice material. But that DUST... oh my god (what happened to abbrevations jesper??? well.. just wanted to try something oldschool! hehe so here it is again) OH MY GOD!...
Two pieces of MDF and a racingseat. I'm AAALMOST there.
*********************************************
Update 2: 1 pic posted
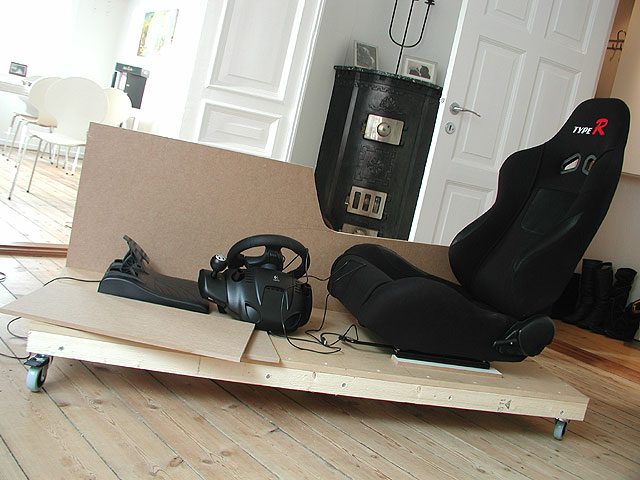
Have invested in that DFP. What a wonderful product.
A little bit worried about that issue with the risk of the pedal-potentiometers getting damaged, if pressing the pedals too hard, but hey... 2years warranty... I'll see what happens... I mean, you cannot live without that wheel, when playing gt4.
Driving wheel, and alot of MDF.

Let's just face it, they could just have sold that game bundled with DFP from the start, hehe.
You can see the beginning of the driving-shaft-wall in MDF, behind the wheel.
That's all for now. I'll provide this article to GTP, if they want it. And an article almost every day for the next couple of weeks.
So why not just post it all now you might think? Well I haven't written anymore than this, but the pics are ready!
see you all..
*********************************************
Update 3: 3 pics posted
Driving seat beginning to take shape
Wheels have been fitted underneath the seatbase, so that my girlfriend can roll me into the other room, when she gets tired of the rrroooooaaring....
Sides fitted onto the racingseat-base
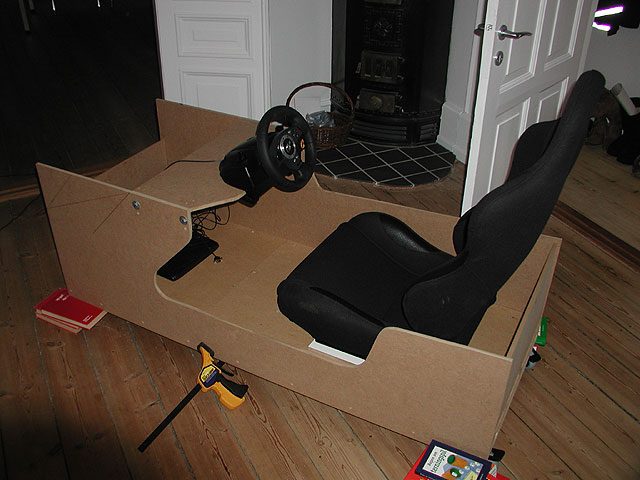
Cutting out the MDF-sides with a electric saw was quite easy, but again very very dusty. Dono what it's called in english, but in denmark we call that electric saw with a little blade going up and down, a "rabbits dick" hehe.
Black carpet fitted onto the floor and the whole MDF-thing painted

This was acutally one of the cheaper things in my seat-project. Only about 22 dollars. And then I got 4 meters of it. YEAH!
Decided to paint the whole thing black.
Special modding of the DFP-pedals... but more about that in next update. Have to go to bed now. I'm tired. Have been to a family birthday all day long.
Talk to you all.... sleep tight.
*********************************************
Update 4: 4 pics posted
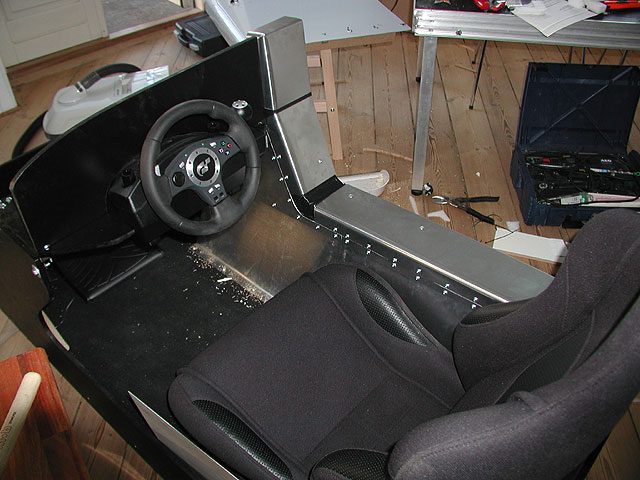
Closeup of DFP
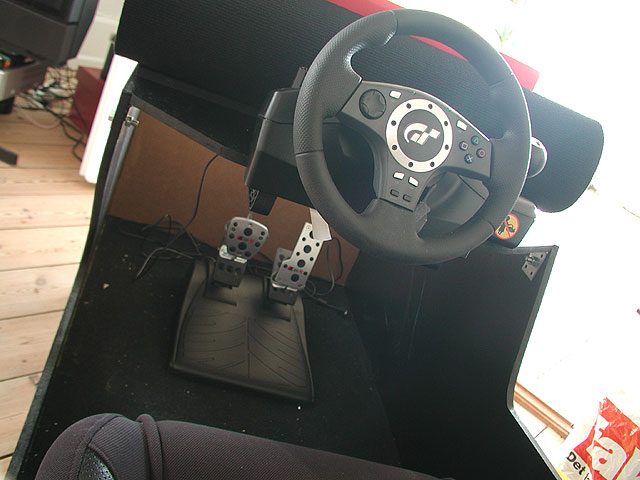
Trying to find out how high I wanted the dashboard to be, by putting the rest of the carpet roll behind the wheel.
The RacingSeat! Look at that wonderful "type-R" logo. 👍
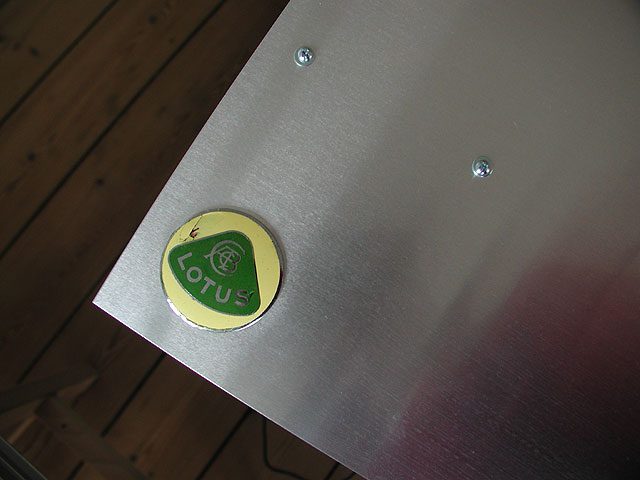
Closeup of Fuel cap

I was visiting my local carshop, and found that, for about 5 dollars, this wonderful fuel cap-sticker could be mine. Normally made for a real car, to look more racecar-like, but why not put a fake fuel-cap on a fake car! 💡
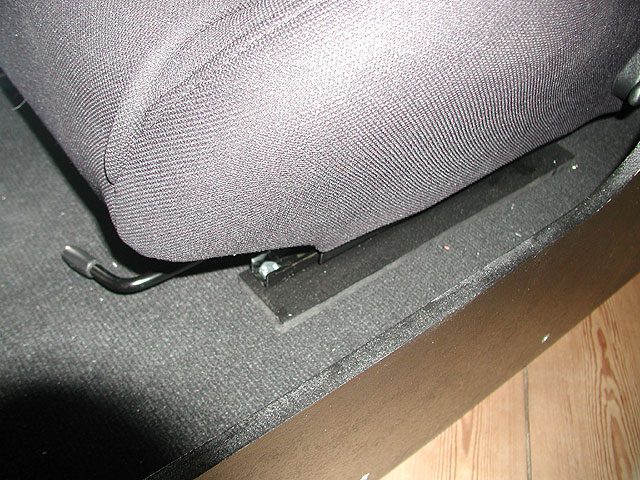
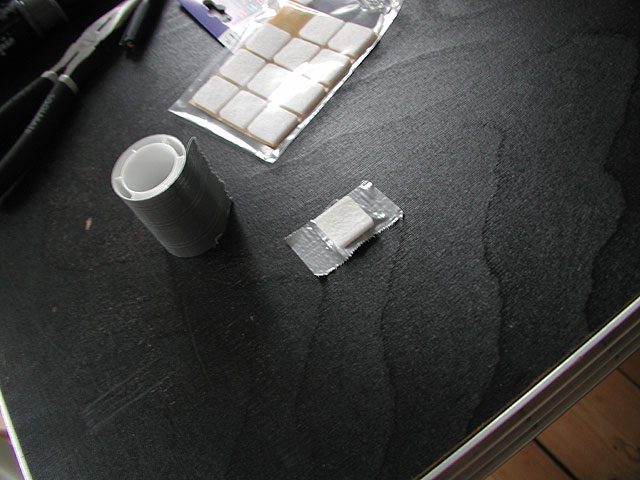
Closeup of DFP-pedals
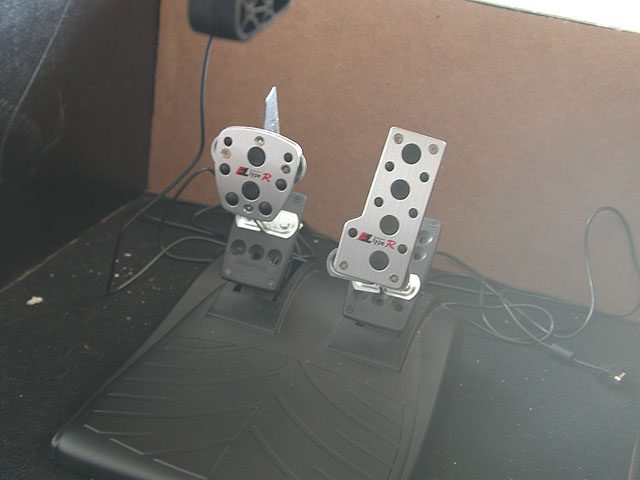
This is my DIY-pride. Aluminum pedals (also with matching "type-R" logos incl. rubber grip, mounted on to aluminum plates, mounted onto the DFP-plastic pedals. If you look closely, you can see one of the felt-cushins under the brake pedal, just sticking out one corner. Remember to put the bolts thru one of these, and also a washer, so that you do not damage the plastic pedals. And tighten the bolts, but not too hard. If you take these precautions, you still have the warranty on the DFP!
Talk to you all.... Jesper 👍
*********************************************
Update 5: 2 Blueprints posted
If you want to get the measurements for the base and sides, here they are.
Well in centimeters, that is, but should be easy to do a conversion, by searching for a conversion program on the net. Try searching "cm to inches conversion".
Blueprint without measures
Blueprint with measures
Materials: Base plate has to be thick. 2cm MDF. When screwing it onto the frame, remember to recess the screws. Its easier to put carpet on later.
Frame is made out of one long wooden supportbeam. Doesn't have to be nice, just not too crooked. Very cheap. 3,5 cm * 5,5 cm.
Sides: 0,9cm MDF.
Wheels: bought at IKEA. hehe. Nice if you buy some with "stoppers", so that you dont roll around too much, when entering or exiting the seat.
Do the frame first, then screw the base plate onto it, and then the sides, AFTER cutting them out. The sides should be screwed into the underlying frame.
I have done extra holes in the sides, so that I can unscrew four big nuts/bolts, and adjust the whole dashboard in height.
Notice, that I have put extra beams in the frame, with wheels under (don't put stoppers on these two wheels), and located closer to the seat, because thats where all the weight from my fat ass goes!


Next batch of pics will include one of my favourites of this project: ALUMINUM!!!! YEAH!!!!
C.u. later, Best regards, Jesper
*********************************************
Update 6: 9 pics posted
Yep that's me!

Finally, I got my aluminum-plates, pre-cut... And that's a nice thing, because it's not that easy to cut aluminum with plate-scissors. 👎
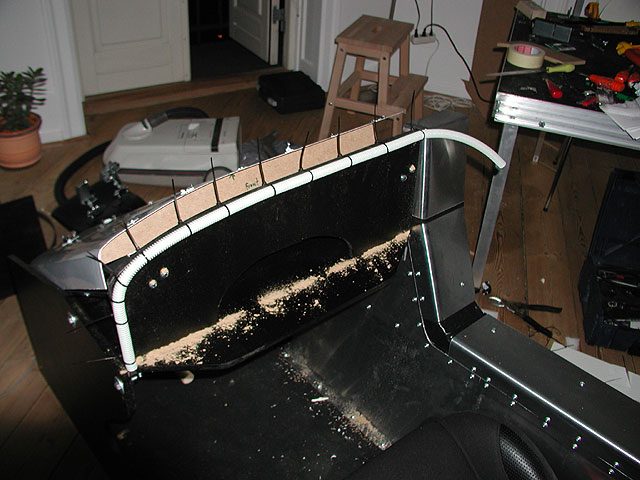
Actually, you can also see the dashboard, with the hole for DFP-wheel.
And YES, it IS a powertool, I am holding between my legs hehehe...
Voilla! First plate gets the rubberhammer-treatment...


Remember to fasten the plate, and bend it around some CURVEY hard surface. If you want big curves, it's sometimes easier, just to grab hold of the plate with a hand in each side and bend it out in the air.
BINGO!!! yes, it looked nice, just as it were, but look at that piece of aluminum in the side... Can you imagine more plates like that?? well I can!

Here, I went for nails at first, but later I changed them to screws, it was almost imossible to hammer the nails into the MDF, when having no hard surface behind the MDF-side. Even when I pre-drilled holes for the nails, so I pulled them out, and screwed the aluminum onto the MDF-side, with a screw and a little washer. Looks Fu**** cool. Have a look at the next couple of pics. I'll post a close-up of the screws later on.
Here you can also see the dashboard more clearly.
And YES! if you have good eyes..... YES it IS actually a real Lotus Super Seven - racecar-front-hood-logo.. given generously to me, by my girlfriends mothers husband (long sentence ) , and it has actually been sitting on one of his Lotus racecars.
Close-up of first aluminum plate.

Here you can see the nails, that I then replaced.
Because I put the aluminum plates in an angle, it made the old "soapbox"-feel disappear 👍
ALUMINUM CHOCK CHOCK CHOCK!!!

Aluminum fitted plates (screwed onto with the screws and washers - looks almost better than rivetts I think...), and black bicycle-handlebar-tape in the seperations, taped onto pieces of styrofoam. For the top-piece of the shaft-tunnel (where the gearshift and handbrake will be implemented..well, these are actually still just dreams hehe...) I did a little wooden shelf first out of a piece of wooden supportbeam, like the ones I used for the base-frame. First I carved one corner, so that the aluminum could "follow" the curve of the beam. And then I screwed the aluminum plate onto the little "shelf".
Another angle... pic says it all, I guess.
Yes, this is actually an aluminum hood!
If I continue like this, I will have my very own fake lotus super seven, hehehe...
Notice, that you get the aluminum pieces with white plastic on one side. Remember to use the white side, as the one, that should be seen, and then take the plastic of last, and you will have an amazing finish.
This piece, I actually bendt by holding it in the air, with one hand on each end of the plate, and then just bending it. When bending aluminum plates over a hard surface, you will easilly get the underlying sharp edges to show thru, that's why I bend this in the air, because, i did not want any sharp edges, just a nice curve.
A piece of plastic tubing attached with plastic strips, and later on, some bicycle-handlebar-tape, to cover it, gives a nice rough finish between the dashboard and hood.
Remember to always have your vaacum cleaner within two meters. All the sawdust, is only from the holes drilled in the dashboard, for the plastic-strips. But if you have some assisting you, do like the dentist: One drills or cuts, and the other one holds the vaacumcleaner tubing close to the action 💡
The RaceSeat with all the aluminum attached.
Watch the table. This gets messy, so clear the mess up once every day, or else you will surelly drown
Check that hood with the fuel cap on, and the lotus logo in the far end, and that aluminumside!!!
Well, I just love it. And I do not think it's a wooden soapbox painted black, anymore. 👍 👍 👍
Enjoy, and post comments or questions, until next time
Next update will cover: The final 9.march-setup, the opening party, the TACTILE-TRANSDUCER 👍 👍 👍 EVERYBODYS FAVOURITE, and other secrets, incl. how to secure lifetime of your DFP-pedals.
So some of the best is still to come.
But for now, I say "sov godt", and that means sleep well in danish.
Have to go to bed now. Gotta get up early and get some GT4 practice.
Best regards, Jesper
*********************************************
Update 7: 6 pics posted *THE OPENING*
--9th of March 2005--
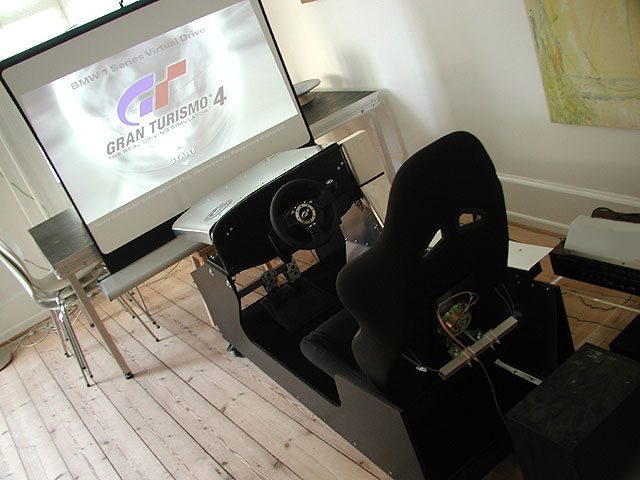
The final setup. I have just been on my bike, getting the game, I've been waiting for, for years. Funny thing, when I went a quarter to opening of the stores, I saw this funny sight in front of some computer-stores. Men between the age of 16 - 30 years, were standing there, trying to look as if they were NOT WAITING FOR A COMPUTER GAME! No queues, just men scattered around. hehehe....

I borrowed a tv-projector and a canvas from one of my friends. WOW... gotta save money up for getting that too. That's the best way of playing this game, I think
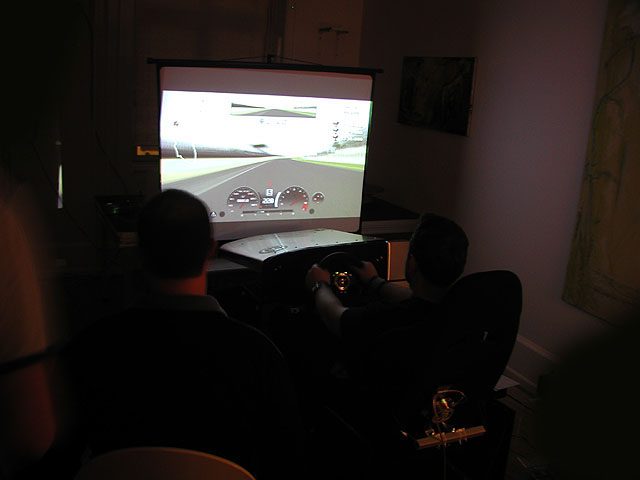
-More of the same kind, just without the flash.
My brother as test driver.

-And my girlfriend, cheering.
My sisters husband also testing the setup. Gives it a big smile 👍

The welcome-drinks -70's style! btw.check our funky wallpaper. Either you hate it, or you love it to death hehe...

And more friends came, we were about 14 people, driving into the night.
Big Success!
And my god, a special course I have been waiting to see in the GT-series for the last 5 years, was Le Sarthe, and WOW that's for me, one of the best moments in my long gaming history. Doing 350 km/h down the Mulsanne, with tha DFP shaking so much, you had to hold on really tight, and the "bodyshaker" doing it's work, sending vibrations into your body, getting stronger, the faster you went!!! 
This was it.... NO ONE... I repeat, NO ONE who sat in that seat that night, could hold back their enthusiasm, trying that. Even not my girlfriend!
I went to bed really late on the 9th of March.
Talk to you all... Feel free to drop comments, or Q's
Next post, covers the DFP-fix, closeups n stuff.
Jesper
*********************************************
This is a story about yet another project of mine (OH NO.. not again 💡 ).
And once again, I've told my friends about it, and their reactions (of course): yeah sure...right... well what about it?? When do you start? DO you actually plan to start??
It happens alot to me... Just can't stop dreaming!
Well the difference this time, is that, while writing this story, that project has actually materialized into the real world, and has taken up about 1,5 squaremeters of space in my livingroom.
And YES.... my girlfriend has actually APPROVED IT!!!! YES! 👍 👍 👍
----SO DON'T WORRY.. IF THE MODERATORS LET ME IN WITH THIS THREAD, I PROMISE THAT THIS THREAD WILL NOT DIE OUT, BECAUSE THE FRIGGIN MONSTER IS IN MY LIVING ROOM, AND I'VE GOT 38 PICS TO SHOW YOU ALL---
It's my very own GRAN TURISMO Racing Seat. featuring:
Solid frame on wheels
real racingseat -fully adjustable
Driving Force Pro
modified DFP-pedals featuring angled aluminum pedals with rubbergrip
real lotuslogo from a lotus super seven racecar.
fake fuelcap
aluminum plates fitted inside of cockpit
black carpet
aluminum hood
"bodyshaker" installed in back of racingseat
I will be posting pictures and descriptions of the project the next couple of days.
Until then, here are the first couple of pics.
(I have optimized the pictures, to minimize downloadtime.)
*********************************************
Updates:
Update 1: 2 pics posted
Update 2: 1 pic posted
Update 3: 3 pics posted
Update 4: 4 pics posted
Update 5: 2 blueprints posted
Update 6: 9 pics posted
Update 7: 6 pics posted *the opening*
Update 8: 4 pics posted
Update 9: 4 pics posted *DFP FIX.... finally*
Best regards,
Jesper
*********************************************
Update 1: 2 pics posted
It's about 1st of january. I have chased every internet news about GRAN TURISMO 4, for the last three years. And I have now decided to start my racingseat-project. I have until 9th of march. Have already invited a bunch of friends for the gran opening the 9th of March (GT4 european release), but they seem a bit skeptic. Hope I get that seat ready.
Racing seat.. bought and paid for!
Now, there is NO WAY BACK.
Invested in a real racing seat. And it's SO ****** cool! 👍
It has a sliding frame, so that you can adjust the position of the seat.
You can also change the angle of the back.
"TYPE-R" it says on the back-rest... can it get any better?
MDF... I can see it all coming alive!!!
Yep, Medium Density Fiber, nice material. But that DUST... oh my god (what happened to abbrevations jesper??? well.. just wanted to try something oldschool! hehe so here it is again) OH MY GOD!...
Two pieces of MDF and a racingseat. I'm AAALMOST there.
*********************************************
Update 2: 1 pic posted
Have invested in that DFP. What a wonderful product.
A little bit worried about that issue with the risk of the pedal-potentiometers getting damaged, if pressing the pedals too hard, but hey... 2years warranty... I'll see what happens... I mean, you cannot live without that wheel, when playing gt4.
Driving wheel, and alot of MDF.
Let's just face it, they could just have sold that game bundled with DFP from the start, hehe.
You can see the beginning of the driving-shaft-wall in MDF, behind the wheel.
That's all for now. I'll provide this article to GTP, if they want it. And an article almost every day for the next couple of weeks.
So why not just post it all now you might think? Well I haven't written anymore than this, but the pics are ready!
see you all..
*********************************************
Update 3: 3 pics posted
Driving seat beginning to take shape
Wheels have been fitted underneath the seatbase, so that my girlfriend can roll me into the other room, when she gets tired of the rrroooooaaring....
Sides fitted onto the racingseat-base
Cutting out the MDF-sides with a electric saw was quite easy, but again very very dusty. Dono what it's called in english, but in denmark we call that electric saw with a little blade going up and down, a "rabbits dick" hehe.
Black carpet fitted onto the floor and the whole MDF-thing painted
This was acutally one of the cheaper things in my seat-project. Only about 22 dollars. And then I got 4 meters of it. YEAH!
Decided to paint the whole thing black.
Special modding of the DFP-pedals... but more about that in next update. Have to go to bed now. I'm tired. Have been to a family birthday all day long.
Talk to you all.... sleep tight.
*********************************************
Update 4: 4 pics posted
Closeup of DFP
Trying to find out how high I wanted the dashboard to be, by putting the rest of the carpet roll behind the wheel.
The RacingSeat! Look at that wonderful "type-R" logo. 👍
Closeup of Fuel cap
I was visiting my local carshop, and found that, for about 5 dollars, this wonderful fuel cap-sticker could be mine. Normally made for a real car, to look more racecar-like, but why not put a fake fuel-cap on a fake car! 💡
Closeup of DFP-pedals
This is my DIY-pride. Aluminum pedals (also with matching "type-R" logos incl. rubber grip, mounted on to aluminum plates, mounted onto the DFP-plastic pedals. If you look closely, you can see one of the felt-cushins under the brake pedal, just sticking out one corner. Remember to put the bolts thru one of these, and also a washer, so that you do not damage the plastic pedals. And tighten the bolts, but not too hard. If you take these precautions, you still have the warranty on the DFP!
Talk to you all.... Jesper
👍 *********************************************
Update 5: 2 Blueprints posted
If you want to get the measurements for the base and sides, here they are.
Well in centimeters, that is, but should be easy to do a conversion, by searching for a conversion program on the net. Try searching "cm to inches conversion".
Blueprint without measures
Blueprint with measures
Materials: Base plate has to be thick. 2cm MDF. When screwing it onto the frame, remember to recess the screws. Its easier to put carpet on later.
Frame is made out of one long wooden supportbeam. Doesn't have to be nice, just not too crooked. Very cheap. 3,5 cm * 5,5 cm.
Sides: 0,9cm MDF.
Wheels: bought at IKEA. hehe. Nice if you buy some with "stoppers", so that you dont roll around too much, when entering or exiting the seat.
Do the frame first, then screw the base plate onto it, and then the sides, AFTER cutting them out. The sides should be screwed into the underlying frame.
I have done extra holes in the sides, so that I can unscrew four big nuts/bolts, and adjust the whole dashboard in height.
Notice, that I have put extra beams in the frame, with wheels under (don't put stoppers on these two wheels), and located closer to the seat, because thats where all the weight from my fat ass goes!
Next batch of pics will include one of my favourites of this project: ALUMINUM!!!! YEAH!!!!
C.u. later, Best regards, Jesper
*********************************************
Update 6: 9 pics posted
Yep that's me!
Finally, I got my aluminum-plates, pre-cut... And that's a nice thing, because it's not that easy to cut aluminum with plate-scissors. 👎
Actually, you can also see the dashboard, with the hole for DFP-wheel.
And YES, it IS a powertool, I am holding between my legs hehehe...
Voilla! First plate gets the rubberhammer-treatment...
Remember to fasten the plate, and bend it around some CURVEY hard surface. If you want big curves, it's sometimes easier, just to grab hold of the plate with a hand in each side and bend it out in the air.
BINGO!!! yes, it looked nice, just as it were, but look at that piece of aluminum in the side... Can you imagine more plates like that?? well I can!
Here, I went for nails at first, but later I changed them to screws, it was almost imossible to hammer the nails into the MDF, when having no hard surface behind the MDF-side. Even when I pre-drilled holes for the nails, so I pulled them out, and screwed the aluminum onto the MDF-side, with a screw and a little washer. Looks Fu**** cool. Have a look at the next couple of pics. I'll post a close-up of the screws later on.
Here you can also see the dashboard more clearly.
And YES! if you have good eyes..... YES it IS actually a real Lotus Super Seven - racecar-front-hood-logo.. given generously to me, by my girlfriends mothers husband (long sentence
) , and it has actually been sitting on one of his Lotus racecars.Close-up of first aluminum plate.
Here you can see the nails, that I then replaced.
Because I put the aluminum plates in an angle, it made the old "soapbox"-feel disappear 👍
ALUMINUM CHOCK CHOCK CHOCK!!!
Aluminum fitted plates (screwed onto with the screws and washers - looks almost better than rivetts I think...), and black bicycle-handlebar-tape in the seperations, taped onto pieces of styrofoam. For the top-piece of the shaft-tunnel (where the gearshift and handbrake will be implemented..well, these are actually still just dreams hehe...) I did a little wooden shelf first out of a piece of wooden supportbeam, like the ones I used for the base-frame. First I carved one corner, so that the aluminum could "follow" the curve of the beam. And then I screwed the aluminum plate onto the little "shelf".
Another angle... pic says it all, I guess.
Yes, this is actually an aluminum hood!
If I continue like this, I will have my very own fake lotus super seven, hehehe...
Notice, that you get the aluminum pieces with white plastic on one side. Remember to use the white side, as the one, that should be seen, and then take the plastic of last, and you will have an amazing finish.
This piece, I actually bendt by holding it in the air, with one hand on each end of the plate, and then just bending it. When bending aluminum plates over a hard surface, you will easilly get the underlying sharp edges to show thru, that's why I bend this in the air, because, i did not want any sharp edges, just a nice curve.
A piece of plastic tubing attached with plastic strips, and later on, some bicycle-handlebar-tape, to cover it, gives a nice rough finish between the dashboard and hood.
Remember to always have your vaacum cleaner within two meters. All the sawdust, is only from the holes drilled in the dashboard, for the plastic-strips. But if you have some assisting you, do like the dentist: One drills or cuts, and the other one holds the vaacumcleaner tubing close to the action 💡
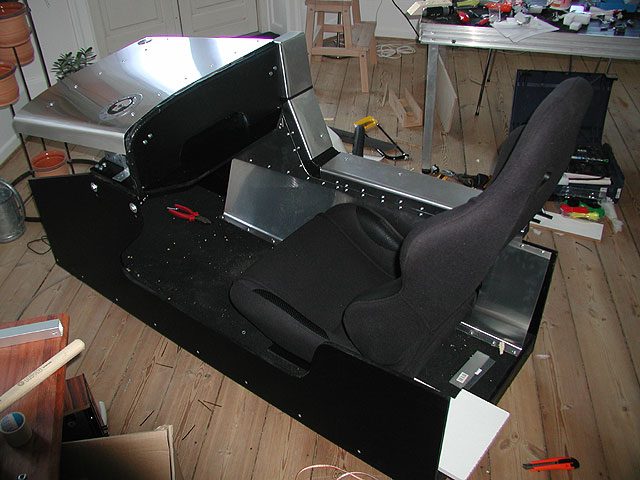
The RaceSeat with all the aluminum attached.
Watch the table. This gets messy, so clear the mess up once every day, or else you will surelly drown
Check that hood with the fuel cap on, and the lotus logo in the far end, and that aluminumside!!!
Well, I just love it. And I do not think it's a wooden soapbox painted black, anymore. 👍 👍 👍
Enjoy, and post comments or questions, until next time
Next update will cover: The final 9.march-setup, the opening party, the TACTILE-TRANSDUCER
👍 👍 👍 EVERYBODYS FAVOURITE, and other secrets, incl. how to secure lifetime of your DFP-pedals.So some of the best is still to come.
But for now, I say "sov godt", and that means sleep well in danish.
Have to go to bed now. Gotta get up early and get some GT4 practice.
Best regards, Jesper
*********************************************
Update 7: 6 pics posted *THE OPENING*
--9th of March 2005--
The final setup. I have just been on my bike, getting the game, I've been waiting for, for years. Funny thing, when I went a quarter to opening of the stores, I saw this funny sight in front of some computer-stores. Men between the age of 16 - 30 years, were standing there, trying to look as if they were NOT WAITING FOR A COMPUTER GAME! No queues, just men scattered around. hehehe....
I borrowed a tv-projector and a canvas from one of my friends. WOW... gotta save money up for getting that too. That's the best way of playing this game, I think
-More of the same kind, just without the flash.
My brother as test driver.
-And my girlfriend, cheering.
My sisters husband also testing the setup. Gives it a big smile 👍
The welcome-drinks -70's style! btw.check our funky wallpaper. Either you hate it, or you love it to death hehe...
And more friends came, we were about 14 people, driving into the night.
Big Success!
And my god, a special course I have been waiting to see in the GT-series for the last 5 years, was Le Sarthe, and WOW that's for me, one of the best moments in my long gaming history. Doing 350 km/h down the Mulsanne, with tha DFP shaking so much, you had to hold on really tight, and the "bodyshaker" doing it's work, sending vibrations into your body, getting stronger, the faster you went!!!
This was it.... NO ONE... I repeat, NO ONE who sat in that seat that night, could hold back their enthusiasm, trying that. Even not my girlfriend!
I went to bed really late on the 9th of March.
Talk to you all... Feel free to drop comments, or Q's
Next post, covers the DFP-fix, closeups n stuff.
Jesper
*********************************************
Last edited by a moderator:


 . I would like to invest into a racing seat, but I don't know what kind of cost that would be. I would like to hear some numbers.
")