General Model Kit Building Thread

Well, guys, the wait is over, and it’s finally happening:

top.jpg


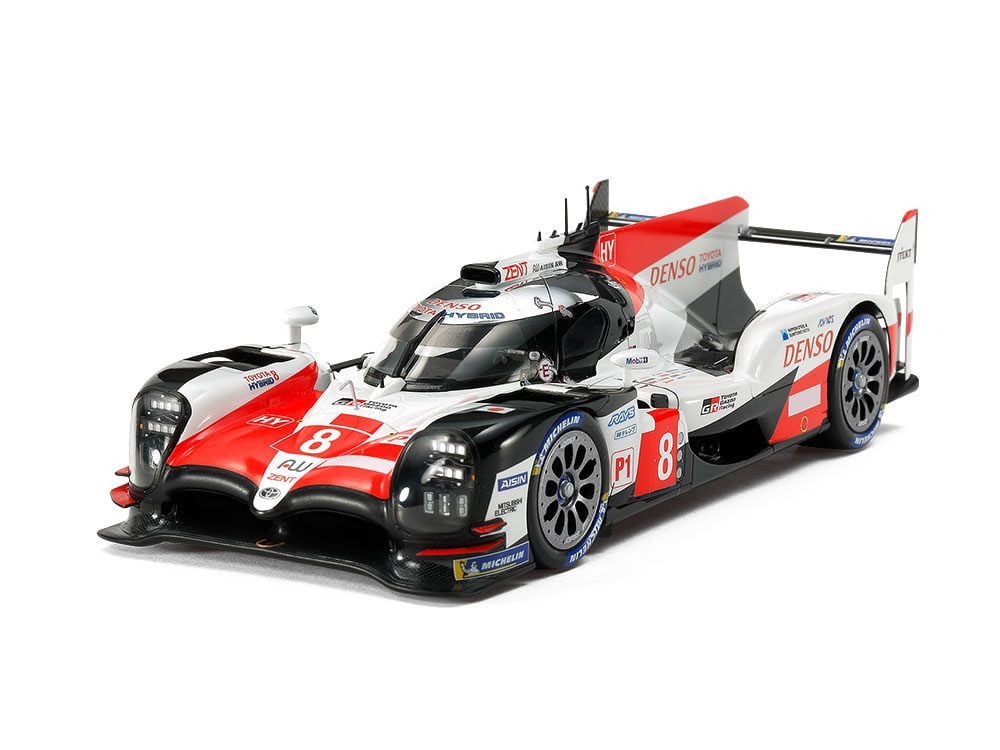
Some of you probably have heard the news already (or at least saw it coming), but for those of you who didn’t, Tamiya is going to release the model kit version of the Le Mans-winning TS050 in late May. Details are scarce now (at least on the official website), but the instruction manual is available here already. No engine featured, as is often the case nowadays with modern racecars, but I’m sure the aftermarket manufacturers will cater to that after its release. The brakes are detailed though, from looking at the instruction manual.
 
This was a 1/32 Arii kit I built a few years ago of a 1962 Mazda Carol 360 DeLuxe. It's box stock, used some Bare Metal Foil and used a liquid chrome pen for trim. It's definitely not the neatest due to the size of the model but I tried my best. The side trim below the door handles was scratch built with some styrene rod and was covered in Bare Metal Foil. The paint is Tamiya.
DSCN0695.thumb.JPG.a38d104fdd2cc1d2f314e04b49942f6c.JPG
DSCN0692.thumb.JPG.117a0b74a728e1ffe5f44e2b6b8c8570.JPG
DSCN0693.thumb.JPG.fe0a4f171a5a09ffc57633859ad7d540.JPG
 
Figured I would share the Safari Scooby WRC and what I've been workin' (slowly) on after the Scoob. . .

Built oob and rattle cans and paint brush.

enhance


enhance


enhance


Up next: Carlos Checa's No.7 MotoGP bike

enhance


enhance


Engine, Frame, and Fuel Injection/Rail Primed

enhance


Engine Assembled

enhance


Working on body panels; priming, inside black, outside red & silver.

enhance


Test fit the exhaust

enhance


Decals started... trying to be patient.

enhance


Engine, exhaust and rear cowling on frame

enhance


Working on the wheels and other bits right now. Should have her done in a week or so... been busy with my step-dad who is having to go into assisted living and trying to get all his affairs in order.

Anyway, thanks for looking.
 
Doesn't look like much, but got the "lines" done; throttle lines, clutch cable, and F/R brake lines all done up. Tank and seat done, and also done, but done after the picture is the rear brake foot lever and gear change selector. Added dashboard and got a little more of the decals done.

Hoping to have a final finished bike in a couple of days. 👍

enhance
 
Slightly off topic here, but how does everyone feel about posting plastic kits here that are not of model cars, but also planes and such? There's an old thread about model aircraft kits that hasn't had replies for years and as far as I can tell none for tanks and other war tech. None for boats either.

I'm building a 1/72 scale airplane and am wondering if I should just post it here since it's not super active or revive the dead aircraft thread.

Well, technically, my bike I've posted recently isn't a 1/24 model car - it's a 1/12 two wheeler. :lol:

And, I certainly don't have a problem with it - maybe would could ask the mods to change the title to "Plastic model Kits", or you could just start a Thread with, say, "Planes & Armor plastic model kits", or something along that line. I'm good either way (it's not my thread... ;) )
 
Finally finished her up... Got the mask wrong on the right side front fairing to side fairing, and had a "boo boo" with a bit of glue on my thumb... frame on the left side - but other than that she came out pretty good. [and I'll mask the frame off and respray that in the next few days]

enhance


enhance


enhance


enhance


enhance


enhance


Good shot of where I screwed the masking job up in the one below - :lol:

enhance


Thanks for looking!!
Beautiful work! Great model!
 
Looks like nobody minds, so here goes.

Started building a 1/72 P-51B Mustang. While not as famous as the better known P-51D which had the better bubble canopy it was an important stepping stone in the progression of the aircraft, as it was fitted with the Rolls Royce Merlin engine making it usable for more than just low level operation.

The model I am building is a rebox from 1999 of a Revell kit originally sold in 1998. The 1999 rebox had fancy new things like... um. Slightly changed box art? Yay

115007-11185-60-pristine.jpg


I didn't take pictures of the sprues, but the parts look alright for an older model. Some flash here and there, but I was pleasantly surprised at the surface details. In 1999 models weren't quite as refined as nowadays and sometimes these kits are harder to build, but the details were already at a good level.

So far I've painted and built the cockpit. It's only 5 parts and both sides of the body, so quite simple but at this scale you can't really see much through the canopy anyway.

20190710_214147.jpg


I primed the parts, but I decided to just brush the paint on since like I said, the details really won't be very visible at the end anyway. I also did a bit of drybrushing to bring out the details.

20190712_120803.jpg


Opted not to use the instrument decal since they can be fiddly to apply. I like the look of a drybrushed instrument panel anyway.

20190712_121532.jpg


Assembled the interior and put it onto one side of the shell. I'll admit I was a little hasty while painting the interior and could've done better.

20190712_122723.jpg


But having built quite a few 1/72 aircraft before I know that in the end you're lucky if even the seat belts are visible through the canopy. Sorry about the blurry picture.

20190712_123236.jpg


20190712_123332.jpg


And speaking of the canopy, it's one of the worst parts of the model. I don't know why, but one side comes up a little short and is quite uneven, meaning there's a gap between the body and the clear part. I've added a bit of black plastic at the rear and used some cyanoacrylate glue (superglue) to build up the body, but there are still gaps present.

20190712_122312.jpg


That's all the progress so far. Next up is adding all the wings, fixing up the seam along the two body sides and trying to fix the canopy issue better.
 
I've changed the thread title to incorporate other types of model kit builds.

I can't see any other active threads that this thread would make redundant, but please let me know if there are any threads that could/should be merged with this one.
 
Thanks @barryf1fan. Will certainly keep updating.

I have actually been working on it quite a bit. I've put on all the wings and started filling and sanding all the gaps with superglue. Here's the front end after sanding.

20190712_213905.jpg


Annoyingly after sanding you're likely to lose some surface detail. It's unavoidable if a panel line wraps around the plane or the wing for example, so I tried my best to redo those lines with a scriber, so from this:

20190713_135012.jpg


to this:

20190713_135159.jpg


Looks kind of bad on the picture, but that's not really visible under the naked eye. Should be even better when painted. There are probably some extra scratches where I slipped sometimes, but that'll be fixed once I put on a coat of primer so I can see the issues better.

I also sanded down the moulded in guns and glued in some brass tube instead.

20190715_131740.jpg


I also built up the area around the canopy a bit more and glued it on. I filled in the rest of the gaps with epoxy putty. After that was dry I went to work masking. The rear window was interesting due to the curve, but with a very thin strip of flexible masking tape I managed it. The rest was done with tamiya masking tape.

20190715_150033.jpg


20190715_164353.jpg


It looks a bit wonky, but I really struggled figuring out where I'm even supposed to mask since the moulded in details you're supposed to work off of are not very visible.

That's it for now. Primer next, then fixing any gaps I've missed or mistakes I've made with the scriber. Then even more primer and paint.
 
Man, that looks like a ton of work - but as they say, the devil is in the details. Just like with real life vehicles, the more time you put into prep the better the finish will be. Looking awesome so far (even if, as you say, looks a bit wonky). I always can find all the flaws or my work - whether it be a model or a tile job I did in the bathroom. Most people don't look that close.

Looking good though!! :cheers:
 
Grabbed a couple of shots with my good camera and got rid of all the clutter on my workbench

enhance


enhance


enhance


And next on the build list (ran by the LHS at lunch and grabbed necessary paints, etc.) is the Benetton Ford B188 F1 car.

enhance


enhance


This one will be built up OOB and with rattle cans and paint brushes - looking to get an airbrush in the next few months or so.

The bike looks awesome. Did you polish it at all? Looks like it could use a bit more shine, but other than that it really looks fantastic.
I can guarantee that you'll not regret the airbrush at all when you build a couple of kits. It's an excellent tool to have.
 
The bike looks awesome. Did you polish it at all? Looks like it could use a bit more shine, but other than that it really looks fantastic.
I can guarantee that you'll not regret the airbrush at all when you build a couple of kits. It's an excellent tool to have.

Didn't clear the bike - I don't like the way it comes out of the cans, and there's too much of a chance on "breaking" a piece of one of the panels, etc... off of it so just left it the way it is. I had an airbrush over 20 years ago and just need to invest. It's just that an airbrush... is that, plus a compressor, plus a spray booth, plus some space. :irked: Soon, hopefully. 👍
 
Didn't clear the bike - I don't like the way it comes out of the cans, and there's too much of a chance on "breaking" a piece of one of the panels, etc... off of it so just left it the way it is. I had an airbrush over 20 years ago and just need to invest. It's just that an airbrush... is that, plus a compressor, plus a spray booth, plus some space. :irked: Soon, hopefully. 👍

Oh I see. So are the decals unprotected? :scared: I'd be paranoid since I'm clumsy when handling finished models. :lol:
Yup can agree that an airbrush can take some investment, both financial and space wise. I'm lucky enough to have a small room just for it, but it's also used as sort of a storage room, so cleaning it when I want to paint is a bit of a nightmare with all the odds and ends that end up in the room.
 
I like those Tamiya 1/20th F1 kits, and their 1/12 bikes! I have several of their 1/12 F1 cars, as well.

Here's a later Benetton, Schumacher's. The green is all decal, not paint, and those bulges around the suspension arms and on the side of the body were a total PITA!!!! Using hot water to apply helped greatly, and patting down with a watered paint brush, as well. Kit is as boxed, nothing added.

48316236612_a82c2d46be_b.jpg


48316236572_3fa0a1ceb1_b.jpg
 
Looks great!! And yeah, it seems like the larger the decal the bigger the PITA they are. :lol:

How long ago was this B192 built?? Show off your other ones too, I love looking at these things.
 
OK, here's one. Bimota Tesi 1D, Tamiya kit. Hub-centered steering.

Motorcycle front ends are awful, from a suspension control standpoint. Braking forces are transmitted to the frame through the steering head, which is two feet or more above the front axle, which puts a serious moment arm on the forks. That's where that severe front dive comes from that you see on bikes. Using a swingarm lets the brake send force straight back to the frame, for much better control of the front wheel. The downside is limited steering angle, and a very complex linkage to get that steering done. The steering linkage works on the model, though!!! Go, Tamiya!!!

48318861996_4502c97a54.jpg


Frame, before suspension and engine
48318861951_3cca548a8f.jpg


The bike used a Ducati 90-degree V-twin
48318861971_9862a3df10.jpg


Assembled chassis. The red bar above the swingarm is a parallel arm to set the rake of the steering hub. There's one of those on each side. The actual steering arm that pushes the front wheel left or right is on the other side of the bike. Under the steering hub, you can make out a red bar disappearing into the bike's guts, going behind the shock. That's the first steering link. It connects to an arm that turns a shaft running across the bike between the cylinders, moving an arm on the other side which connects to the steering link that pushes or pulls an arm coming out of the hub.
48318981652_83b45e4778.jpg


Here's Wikipedia's drawing of the steering system
48326335856_b0d95f36e2.jpg


More bike
48318981642_ded3e3fbe0.jpg
 
Last edited:
Grabbed a couple of shots with my good camera and got rid of all the clutter on my workbench

enhance


enhance


enhance


And next on the build list (ran by the LHS at lunch and grabbed necessary paints, etc.) is the Benetton Ford B188 F1 car.

enhance


enhance


This one will be built up OOB and with rattle cans and paint brushes - looking to get an airbrush in the next few months or so.

That Benneton kit is very nice, I made one years ago.
Yep thought there may have been a pic in this thread.
 
That Benneton kit is very nice, I made one years ago.
Yep thought there may have been a pic in this thread.

Man, I hope my rendition of the Benetton B188 comes out half as good as yours!! Very nice! I am struggling a bit, for instance the kit is 31 years old and I don't think it has been stored in a "climate controlled" environment the whole time. The decals are yellowed (I've found some replacements) and some of the parts are on the brittle side. Have already broken a couple of pieces. :banghead: :irked:

For me, this will be the toughest paint job I do. Here are few progress pics.

Wheels primed and painted
enhance


Front Susp, started helmet, and the engine ass. started
enhance


Exhaust built up, front susp built up, rear wing built up and primed/painted.
enhance


enhance


enhance
 
Got a bit more done last night, little painting and such - mostly on the rear "assemble". Also got all the wires cut for the ignition.

Cleaned up the tires and mounted them on the wheels. I'm waiting on the replacement decals to come in, from Japan or something, so haven't been able to get ahead in the finishing department. Wheels and tires came out nice, though.

You could tell the tires were 31 years old, and they had a massive seam in the middle... old on left, cleaned up on the right.

enhance


enhance


enhance


I'm gonna try the kit tire decals, but if they don't want to "stick" I'm gonna order a Goodyear stencil.
 
@barryf1fan I found the tyres to exactly the same on my Benneton kit and others of that era.

Not sure how you cleaned them (it looks fine 👍 ) but my solution was to slip them over a tight fitting holesaw, spin the holesaw up to speed in a cordless dry while holding some sand paper against the the tread.

Voila tyre cleaned up in 10 seconds.
 
Back