Duke Racing Celica GT-Four Time Attack Racecar

  • Thread starter Punknoodle
  • 1,059 comments
  • 134,908 views
Man I'm getting good at dropping the rear subframe from the car. I've removed it and separated the diff from it as it's going to be a lot easier to weld those plates with it off the car. Taking it to work with me tomorrow so I can use the MIG there.

In other news, my new fuel pressure sensor is on board for delivery tomorrow so I'm happy about that, one more thing to cross off the list.
 
Well I'm really glad I removed the subframe to weld these plates, it was so much easier to weld. I welded them at work today using the good MIG we have there, then cleaned them up and painted it.


So my new fuel pressure sensor also arrived today.

Prior to this I had the gauge plumbed in to the line and had the FPR set to 40psi. When I replaced the gauge with the sensor and configured the ECU to look at it, the sensor was reading 63psi. I believe that the sensor is more accurate than the gauge so I figure I was probably running with an inaccurate fuel pressure previously.

I won't know until I run the car again with intake pipes and everything on so I can vary between vacuum and boost to ensure that the fuel pressure differential is consistent with manifold pressure.
 
Last edited:
Shiny stuff!!!

Can you test the gauge and the sensor using an air compressor? Not sure how accurate the gauge on a portable air compressor is but that might help you find the difference. 23psi is a lot. That's around 30% out.
 
Shiny stuff!!!

Can you test the gauge and the sensor using an air compressor? Not sure how accurate the gauge on a portable air compressor is but that might help you find the difference. 23psi is a lot. That's around 30% out.
I agree, it is a lot, I'm thinking I'll put my oil pressure sensor on the fuel pressure line and see what figure it reads.
 
I have all the components at the rear end fitted now, just have the driveshaft to install. Everything is snugged up nice and tight except for one end of the lower control arms and each end of the trailing arms as these need to be tightened at normal ride height.

I'm really happy with the whole set up now, everything fitted nicely and it's solid. The new arms make adjusting the toe angle super easy. I can't wait to take it for a drive to see how it all feels now.

Regarding the fuel pressure sensor reading a higher pressure than the gauge, I ended up installing the oil pressure sensor which is a different sensor with a different calibration and it backed up my new sensor to within 1psi so I'm confident that the old gauge was kaput. The main thing is I've proven that my new one is accurate so I can trust it.

To finish off I have something really gross to show you...

I can't stand seeing it like this after having it on Professors for so long. The sooner I get these RPF1s the better!
 
What's the reason for wanting to tighten the arms at standard ride height? I thought you had all new poly bushes? Stock arms have teeth in the centre crush tube and that is molded to the rubber bush, this definitely requires this as the crush tube doesn't rotate with the arm movement. When lowering the car you need to reset the bushes. But with poly doesn't everything spin freely inside the bush allowing the arms to be tightened at raised level? Or have I got this completely wrong with your car?
 
No fair point, you are right. I was thinking of the way you do it with oem bushes but I suppose it doesnt really matter in this instance. That makes it easier I can do it without lowering it :)
 
Drove it out and washed it tonight :)


Also took a little video of it idling, because it sounds sweet lol.


So I've got it back in the garage now, and it sits and waits for it's intercooler piping, which is the next thing that will be happening.
 
So I was a little annoyed on Friday. I went and dropped off a little hose barb and a drawing off to the fabricator I've been using for a really simple intake pipe. I basically wanted a straight pipe with a bead either end, a certain length then the hose barb put on the side 75mm down from the end.

Well, I got back and the barb was in the centre. I took it anyway but I'm a little annoyed about it and I think I'll get the guy doing the intercooler pipework to change it. Basically it now places the idle air hose up against the starter and I wanted it in the space beside it. It's not the end of the world but it bugs me.

Anyway, here is how the sensors look mounted. It's just a simple little bracket with holes drilled in it for cable ties to go through. The sensors are wrapped in a little bit of rubber.

Not the most elegant thing but it works. The whole engine bay isn't as nice as it used to be. The piping will make it look more complete but it's a real mess of hoses at the back. The thing is, it's simple, should be reliable and it's easy to work on. Because Racecar.

It still needs the heat shielding around the filter once the intercooler piping is done but it's looking close now.
 
Looks good. Don't you hate it when 'professionals' can't listen or follow instructions. If it was me I wouldn't have accepted that. For me, you build it how I designed it unless you can give me a reason why the change that was made is better and it still works.
 
Looks good. Don't you hate it when 'professionals' can't listen or follow instructions. If it was me I wouldn't have accepted that. For me, you build it how I designed it unless you can give me a reason why the change that was made is better and it still works.
Yeah I was contemplating not taking it but I didn't have another barb for him to remake it. Anyhow, it fits and its not a huge deal but I'll probably get a new one made at some stage, I'll just order another barb.
 
Well this is what a custom built ST185 front mount intercooler kit looks like off the shelf....

Was going to wait until the weekend... but I couldn't wait lol. Here's the start of the top section. There will be a join at the end of this (although this will end up being cut back a little bit).

Here is where the BOV flange is compared to the scoop with the bonnet shut. Because PSHHHHHHHHH.

I haven't got any photos of how the piping looks at the bottom exiting the intercooler because the angle to take a photo didn't really do it justice. I need to get it up a hoist or something to get a better photo. I'm really happy with it though, plenty of clearance to the bumper and tow hooks etc. It's a perfect fit. Like I couldn't go 5mm either forwards or rearwards. I feel quite proud actually, the intercooler is in the perfect position. It fits exactly within the hole it's in and the pipework also fits precisely within the area it needs to as well.

Still plenty to do before welding, I have this weekend off (well, kinda, the wife is going away so I'll be wrangling the 3 little ones during the day) but I hope to get the majority of it cut and ready for welding.
 
Productive day in the workshop today. I've finished cutting and shaping the top section of pipework and the hot side pipe from turbo to intercooler. I was really worried about how I was going to do the hot side pipe, the angles and clearances looked a little daunting to me but I am SUPER happy with the way it came out. There is plenty of clearance to everything and its a nice short and reasonably free flowing run. So much better than if I hadn't of clocked the turbo or welded on that bend on to the compressor housing. Getting the angles and everything working ok was a little bit of a struggle; I don't have the right tools to do this properly like a drop saw or an angle gauge, so everything is by eye pretty much. To get the cuts straight I placed a thick rubber band around the pipe and marked the cuts. It worked ok I think.

Top pipe:

This join is for ease of installation and also to provide flex:

This is the clearance of the piping on the cold side outlet of the intercooler to the bumper. Nice.

And clearance on the hot side:


Finished top pipe and hot side pipes ready for welding:


So these pipes are going off to get welded next. When I get them back I'll finish the cold side bottom pipe, which is effectively just going from the outlet of the intercooler up to the join behind the air filter. Then obviously start on the ducting and the cold air box etc. Test drive soon :)
 
The two pieces above have been all welded up and they fit really well. I've finished mocking up the last section so it's now getting welded.

Hopefully when it's all done and fitted it looks good and works well. It's been one of the more fiddly jobs I've done on the car but I think I did an ok job.

Should be ready by the weekend but I found out today I have to go to Melbourne at the end of the week so it might have to wait.

Anyway, I've been wanting a new wheel for ages and wanted the first time I drive the car properly with the cage, harness etc to feel special so I went and bought the one I've had my eye on..

Looks so damn good!
 
Two out of the three pipes I had welded fitted up perfectly, one of them however didn't fit. All it took was for one join to be rotated around 2 or 3 degrees from the mark and it was way off. So I cut the weld, rotated it, remarked it, got it re-welded and pressure tested and now it fits beautifully too.

Here is how it all looks now that it's finished:


Considering it was my first time doing pipework I'm fairly happy with the outcome.

I started the car up and went for a little drive. I was being very gentle, only boost I gave it was very brief and only half throttle, to around 4 or 5k rpm. It was misfiring and driving like a bag of crap. Checked the logs, it was rich at idle and around target AFR when at part throttle cruise, but up in to boost it was running really lean, like 16.2 AFR. I've added some base fuel pressure and done another quick test and that helped a lot but the car really needs a retune before it can be driven properly. I think before my fuel pressure was really high and the tuning was done to suit, now I've dropped the fuel pressure.

I can say though that the car sounds a lot different. The induction noise has changed dramatically, it sounds pretty mongrel now, a fair bit lower and louder. The exhaust is also a bit raspier and louder. Felt so weird going from my company car (Ford Ranger Hi Rider, with a further lift) to the GT-Four. It feels like a go kart. The steering is a little off centre which is weird. It's not the steering wheel as it was put on in exactly the same place as the other one. Will have to look at the alignment but I'm not too worried about it until the car is all finished and I have the proper wheels and tires on it.

Anyway, next month hopefully I'll get the cage done and after that will be the bigger injectors and retune.

EDIT: Oh and you may have noticed the plain black bumper up against the wall. It's from the naturally aspirated ST184 so has no bonnet scoop. I'm going to cut a dirty big hole in it for a vent and get it vinyl wrapped. A vent will work a lot better than a scoop for getting rid of heat post radiator. Also thinking of making a custom duct to channel direct air to the alternator to keep it cool.
 
Last edited:
I had a major win tonight!

I was looking at the logs and found that my fuel pressure was rising way too high compared to manifold pressure. It's supposed to be a 1:1 ratio but I was getting about 15psi of added fuel pressure at around 8psi of boost.

I decided the first job was to test the sensor again to ensure it's calibrated correctly. I'd already swapped it with the oil pressure sensor that time to test it so I was pretty confident that it would be ok but to test it this time I got a vacuum tee and connected the ECU map sensor and the fuel pressure sensor together up to a compressed air gun. I regulated the air supply down to 20psi to avoid damaging the map sensor. All I had to do was pull the trigger whilst logging the two inputs and the lines should sit on top of each other on in the log.

Problem was, when I blew air in I could hear it hissing out somewhere. I traced it to a tee in the vacuum hose which goes to the ECU. The tee was for my boost gauge, it was leaking. So my fuel pressure was accurate, it was actually my map sensor which was reading low!

This would have caused all of the strange problems I've been seeing with the car and would have been the reason for the lean conditions at the last test day and why the car ran like a nun's nasty.

I fixed it (deleted the boost gauge tee all together and will remove the gauge too - will run a better digital display for the entire ECU later), ran the test I originally tried to do and yep, the lines are on top of each other, so the sensor calibration was spot on. Took the car for a drive and it is 100 times better, except now its really rich (because I'd cranked the fuel pressure).

Really happy to have found that, explains a lot! So to recap, issues at the last test day were:
- Loose head studs (now torqued back to spec)
- Cracked exhaust manifold (replaced)
- Leaking MAP sensor reference line so ECU was getting reduced value (fixed)
- High IATs (now have FMIC).

Really looking forward to testing again now I'm confident I've ironed out those issues.
 
That's great news. It's amazing how something so small can mess with something so big and ruin everything.
Exactly. About a 5c part. Potentially could have blown the engine if I didn't have a Wideband monitoring the AFR looking after it.
 
Some better shots of the intercooler piping:


Interior shot whilst it was out in the sun:

Boost gauge has since been removed.

So today I started work on the cooling ducting, starting with the new undertray to suit the front mount intercooler. I started with a scrap piece of aluminium I saved being thrown out at work and took it round to my friendly neighborhood sheet metal place and got it bent up how I needed it. I then used the old one as a template, cutting out bits where I needed etc. After a few trial and errors, installing some new riv nuts in the body work to support it (I love that tool), this is what I came up with:


I decided that this is also strong enough to double as the lower intercooler support, so I ditched the old ones I made. I already know what I'm going to do to fill in the ends which should ensure all air is directed in to the radiator. The aluminium I used is thicker than the last one I made and it fits a lot nicer in under the lip of the bumper, and because it's also connected at the intercooler, unlike the last one, it will ensure that it doesn't fail at 170+kph like my last one did!

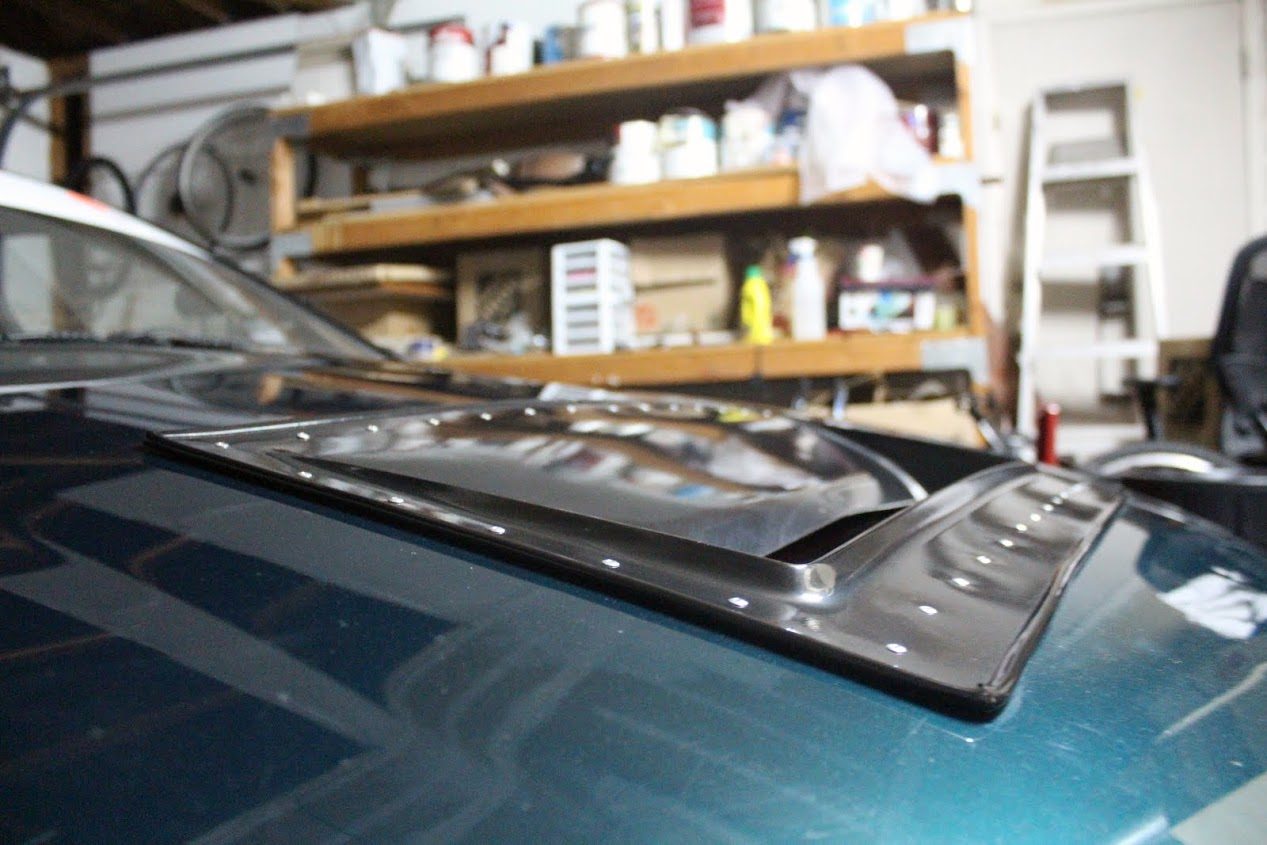
I had a bit of a play around with the black bonnet, cutting a hole in it where the supports allowed. I wasn't terribly impressed with it so I went scouring the internet and found this:
IMG_0659.jpg

IMG_0672.jpg

I ordered it, and I'm going to see if I have enough clearance to fit it from underneath and use filler to make it appear part of the bonnet, then paint. If I'm struggling for room though (I thought I was so clever putting that BOV where it is but it might be my undoing lol) I think it should still be able to go on top like this one. Hard to be sure until it gets here and I have a bit of a play around.

Good ducting and a reverse vent like this should definitely help with air flow through the radiator.
 
Your piping and ducting looks epic.

Maybe you can cut the bonnet vent around the BOV and have it vent out the bonnet like a NOS purge valve. :sly:
Although you wouldn't see anything coming out.
 
I ordered it, and I'm going to see if I have enough clearance to fit it from underneath and use filler to make it appear part of the bonnet, then paint. If I'm struggling for room though (I thought I was so clever putting that BOV where it is but it might be my undoing lol) I think it should still be able to go on top like this one. Hard to be sure until it gets here and I have a bit of a play around.

Good ducting and a reverse vent like this should definitely help with air flow through the radiator.
I bought the exact same vent for my ST165 a couple of months ago with the same intent to blend it with the bonnet and paint over it (Although I'll be paying a professional to do it for me, because I will definitely ruin it). I'm looking forward to see how it will turn out on your car, and what the clearance is underneath. You can be my test guinea pig. :lol:

https://farm5.staticflickr.com/4523/38731672842_0bdd27041b_k.jpg

https://farm5.staticflickr.com/4515/24889829408_2a0050584c_z.jpg

Your car is looking amazing as always. 👍
 
Last edited:
I've done a little more work on my ducting today, boxing in the sides. First I made the shapes I wanted with some paper, then transferred these on to some old thin aluminium I had lying around from my last lower duct design. I cut them out with tin snips it's that thin, and it bends really easily so it's good to work with. It's obviously nice and light, too.


I put some riv nuts in the plates as well as where it bolts on to the frame rails and front bumper support so the threads are nice and secure.


It's not the prettiest but it should serve it's purpose.

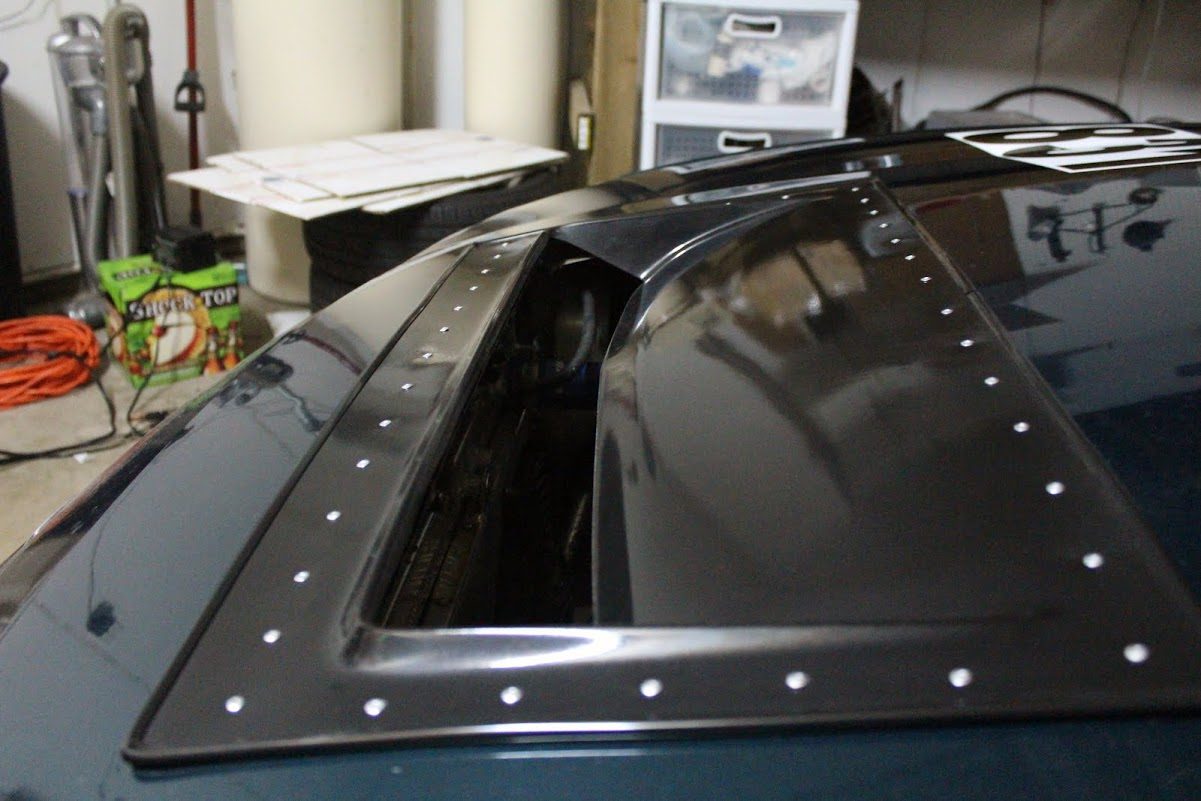
The other thing I've been working on is my bonnet. It's still obviously very much a work in progress, but I now have the hole cut out and the vent positioned where it needs to be. I've drilled holes along the rear of the vent for rivets to go in, these will only be for when the epoxy panel bond is drying, after which I will take the heads off the rivets. The front of the duct can be held by clamps. Then the cut out around the vent needs to be filled and smoothed up to the vent to make it appear like it's part of the bonnet.

I've photoshopped on the aerolatch bonnet latches and the white sections behind the central vent are my propsed locations for some louvres but I don't know if I'll do them yet. Probably.


Here's a quick video which makes it a little easier to see what the cooling efforts are so far.

I drove a mate's GT-Four today who's just got his car retuned on E85. He's running a larger turbo, Chinese aluminium radiator, the same water pump, a smaller pwr intercooler and a smaller oil cooler. The ducting is similar to mine but a little different, and he's running a group a bonnet. His coolant temps were actually probably a little low at Cruise because the system works so well so I'm hoping that with my system it performs similar.
 
I bonded the vent to the bonnet last night and today it's hard enough to work on so I set about cutting out the holes for the bonnet latches. This took quite a bit of time with the die grinder so I'm happy it's over and done with!


This is how the vent looks from the rear.


So now the work begins on smoothing it and trying to blend it in nicely. Hopefully it comes out ok but I'm pretty happy with it so far. I think it's good to have something no one else has done before, rather than if I had of just got a group a bonnet like everyone else.


Bonnet is smoothed and primered up. It's not perfectly smooth but it's good enough. Ready for proper paint, which I've actually decided on being a Charcoal metallic colour. I'll tie it in with the rest of the car by having a racing stripe down the bonnet only, offset to the side, one wide, one narrow, in a maroon coloured vinyl. I think it will end up looking pretty damn good.

Merry Christmas everyone!
 
Last edited:
Before I go on, I'm currently in Christchurch until the 5th, so if anyone here is from Christchurch and is keen on meeting up, send me a PM!

Anyway, on topic, I gave the car a scrub up and fitted the bumper again.


I really can't wait to lose the stock wheels they just ruin these photos. I've been looking them up again. Previously I've had my heart set on a set of RPF1s but I've changed my mind. The RPF1s are really nice and super lightweight but I'm now leaning towards the Enkei PF01 instead.

pf01eneki_L.jpg


They weigh around 900 grams extra per wheel than the RPF1s, but are still regarded as a light weight racing wheel and are lighter than the SSR Professors I used to run. They do have a lot better brake clearance though, and I like that I haven't seen a GT-Four with them on it yet I've seen dozens with RPF1s.

IMG_5393.jpg


Another sample shot of how good the PF01s can look. I think they'll suit the body shape of the Celica quite nicely. Looking at placing my order for these in the next week or so as there is an 8 week wait time. What do you all think of them?
 
Back