- 2,862

- Italy
- Clydeyellow
Prefaction (which will also likely be the longes section of this tutorial because I tend to be verbose)
As you may already know, ladies and gents, watermarks have been a blight for Forzatographers since time immemorial (well, actually, since they released FM2, but I digress). They cover up things and make our shots look a lot more like they came out of, well, a videogame and we can all generally agree they're a bad thing.
Forza Horizon 2 originally shipped without the devilish feature, and a heavenly choir played as the community rejoyced. But then, for no apparent reason but to spite us, Playground Games/Turn 10 decided to reintroduce the dreaded huge, ugly-as-sin logo to our beautiful and less beautiful shots with a patch released in 23/10/2014. Tears were shed and promises of vengeance made.
But what if I told you that there is a way to remove the ugly watermark without much hassle and with no knowledge of photo retouching tools?
Table of contents
Requirements
The method
Well, it's simple. You need to take the shot you want in game and save it. Do not quit the photomode or alter the settings afterward. Thanks to the magic of the X1 you can actually turn off the console, but that's it.
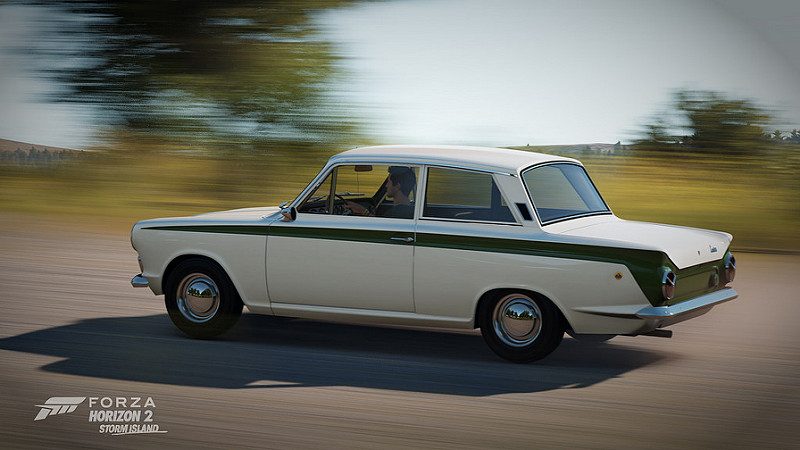
As an example we're going to use this photo. Its name is test003 (because it was the third shot I took while trying this method - I am that creative).

It's a mighty fine shot, if I can say so myself. Makes me yearn for a tall glass of a cold, hoppy beer and a powerslide at 180 MPH, but I digress.
Notice that the watermark is there. Staring at you. Mocking you. Ignoring your accomplishments and laughing at your failures. He knows your fears, your weaknesses. And he got some mean yo mama jokes, too.
Now here starts the part where we start puching this miserable soab in the face.
Still there in the photomode? Good. Now what you need to do is to rotate your camera exactly 180°. Not 179.9, nor 180.1 - exactly a half turn. If you changed something, or by mistake you move the camera, start over. A bit of patience may be required at first. Then take another shot and save it separatedly. I actually called it test003flip. Download both shots from fm.net and using any tool of your choice (Windows Image Viewer will do) flip the second again.

You may already see where we are heading. As a matter of fact, if you already know how to use GIMP and never thought of it you may have just facepalmed yourself so hard we'll talk in a couple of years, when you'll wake up from the coma you just induced yourself.
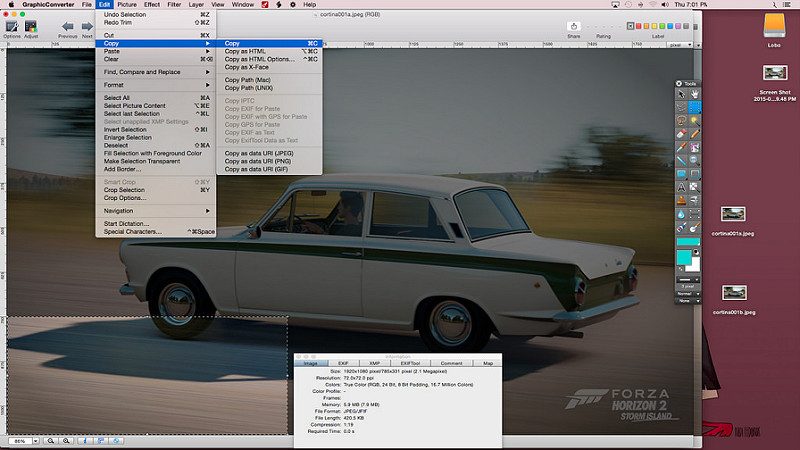
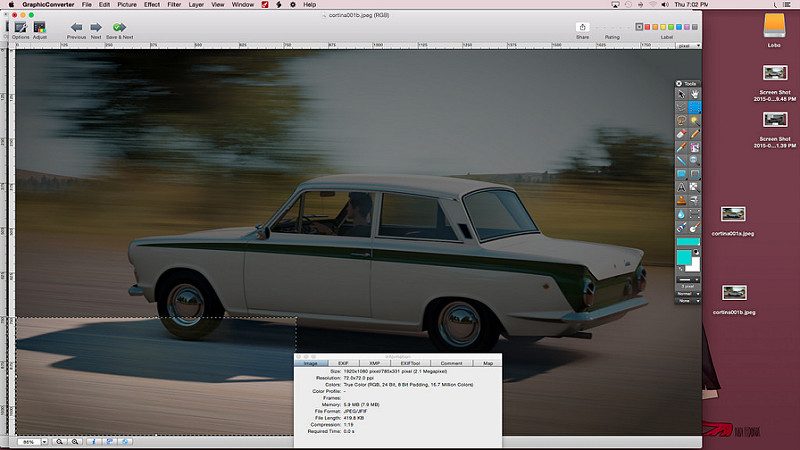
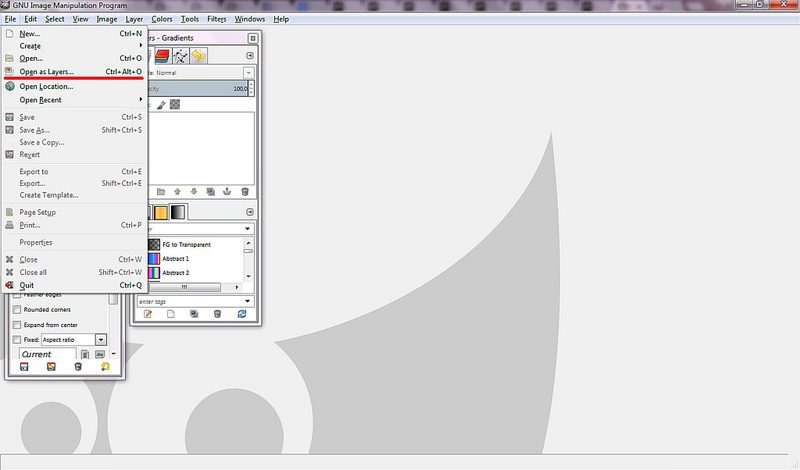
Save both photos on your PC and open GIMP. Select Files>Open As Layers (pict. 1), and choose both of your pictures (pict. 2).

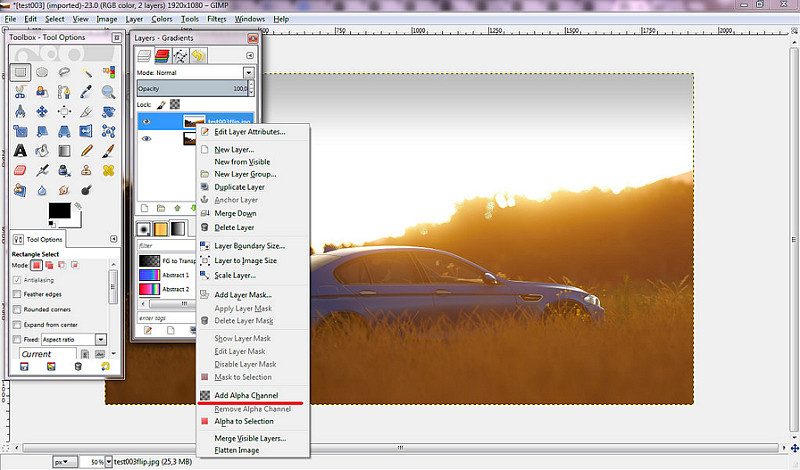
Now comes the tricky part for the uninitiated. You'll need to create an Alpha Channel for the top layer; this will basically allow you to cut the half of the photo with the watermark visible so that the relative, un-watermarked side of the other photo will show in its place. Yay! Why half? Well, that's because apparently under the layer there's a gradient. They have to make things that complicated.
To add an Alpha Channel, in the dock labeled as Layers - Gradients right-click the top layer and select Add Alpha Channel.
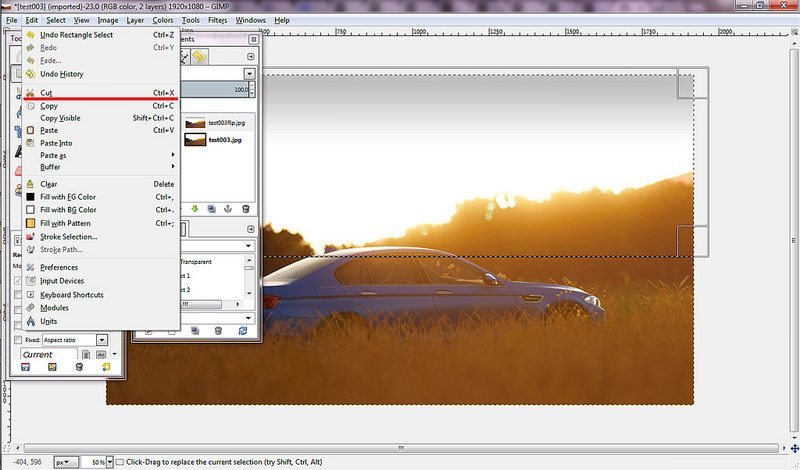
You're now ready to make magic happen. With the top layer still selected, select the half of the photo in which the watermark rests, and cut it by selecting Edit>Cut.
See? That's what the game would've given you pre-23/10/14 patch.
All that's left to do is to flatten the image so that it will be ready to export. Select Image>Flatten Image to do this.

Voilà, done. Now it's ready to be exported by clicking File>Export... and uploaded, or further edited, or whatever. The finished result will look like this - no watermarks, no seams, no pink unicorns and no Volkswagen Jettas in sight!

In about 45 seconds, you have created an independent strong photo who don't need no watermark, which is like curing cancer for Forza pictures. That means you should totally get a Nobel Prize for Forzatography!
(I never got the hang of how the Nobel Prize works, either).
Q&A
Q: Does this method work for all photos I'll take in Horizon 2?
A: It should. Lens flares may pose a problem, tho; for some photos you'll have to find another way (or deal with the watermark). Also, smoke/dirt plumes may give some problems. It works in the rain just fine.
Q: Does this method work on past Forza games?
A: I actually have no clue. Feel free to try and report on it! It should work on FM4, but I don't know if the Magic EXXXTREME Rays of God in FM5 are symmetrical. The lighting of FH2 is undoubtedly far more advanced, and this could be what makes the difference AFAIK.
Q: Can I use another application? I hate GIMP.
A: Technically speaking, any layered image editor that allows you to create an alpha channel (which is fancy speak for "add transparency") for a layer should to the trick. And I'm quite sure there are some such editors for tablets nowadays.
Q: I already knew how to do this from ages! This is nothing new!
A: Go ahead. Point me to the same tutorial, written before today. As far as I know this could be a method used by all the top Forzatographers and I may be dumb for not knowing it. But I didn't write this tut for those who know.
Q: Why go to such greath lenghts to remove watermarks?
A: Because they killed my father, and now they must prepare to die.
Q: Why is this tutorial is so poorly written?
A: Because I don't know how to write tutorials, and have also taken one too many hits to the head.
As you may already know, ladies and gents, watermarks have been a blight for Forzatographers since time immemorial (well, actually, since they released FM2, but I digress). They cover up things and make our shots look a lot more like they came out of, well, a videogame and we can all generally agree they're a bad thing.
Forza Horizon 2 originally shipped without the devilish feature, and a heavenly choir played as the community rejoyced. But then, for no apparent reason but to spite us, Playground Games/Turn 10 decided to reintroduce the dreaded huge, ugly-as-sin logo to our beautiful and less beautiful shots with a patch released in 23/10/2014. Tears were shed and promises of vengeance made.
But what if I told you that there is a way to remove the ugly watermark without much hassle and with no knowledge of photo retouching tools?
Table of contents
- Getting rid of your watermarks
- ???
- Profit
Requirements
- FH2 (and all the necessary to take and import to your PC a shot);
- GIMP (which you can download here)
The method
Well, it's simple. You need to take the shot you want in game and save it. Do not quit the photomode or alter the settings afterward. Thanks to the magic of the X1 you can actually turn off the console, but that's it.
As an example we're going to use this photo. Its name is test003 (because it was the third shot I took while trying this method - I am that creative).
It's a mighty fine shot, if I can say so myself. Makes me yearn for a tall glass of a cold, hoppy beer and a powerslide at 180 MPH, but I digress.
Notice that the watermark is there. Staring at you. Mocking you. Ignoring your accomplishments and laughing at your failures. He knows your fears, your weaknesses. And he got some mean yo mama jokes, too.
Now here starts the part where we start puching this miserable soab in the face.
Still there in the photomode? Good. Now what you need to do is to rotate your camera exactly 180°. Not 179.9, nor 180.1 - exactly a half turn. If you changed something, or by mistake you move the camera, start over. A bit of patience may be required at first. Then take another shot and save it separatedly. I actually called it test003flip. Download both shots from fm.net and using any tool of your choice (Windows Image Viewer will do) flip the second again.
You may already see where we are heading. As a matter of fact, if you already know how to use GIMP and never thought of it you may have just facepalmed yourself so hard we'll talk in a couple of years, when you'll wake up from the coma you just induced yourself.
Save both photos on your PC and open GIMP. Select Files>Open As Layers (pict. 1), and choose both of your pictures (pict. 2).
Now comes the tricky part for the uninitiated. You'll need to create an Alpha Channel for the top layer; this will basically allow you to cut the half of the photo with the watermark visible so that the relative, un-watermarked side of the other photo will show in its place. Yay! Why half? Well, that's because apparently under the layer there's a gradient. They have to make things that complicated.
To add an Alpha Channel, in the dock labeled as Layers - Gradients right-click the top layer and select Add Alpha Channel.
You're now ready to make magic happen. With the top layer still selected, select the half of the photo in which the watermark rests, and cut it by selecting Edit>Cut.
See? That's what the game would've given you pre-23/10/14 patch.
All that's left to do is to flatten the image so that it will be ready to export. Select Image>Flatten Image to do this.
Voilà, done. Now it's ready to be exported by clicking File>Export... and uploaded, or further edited, or whatever. The finished result will look like this - no watermarks, no seams, no pink unicorns and no Volkswagen Jettas in sight!
In about 45 seconds, you have created an independent strong photo who don't need no watermark, which is like curing cancer for Forza pictures. That means you should totally get a Nobel Prize for Forzatography!
(I never got the hang of how the Nobel Prize works, either).
Q&A
Q: Does this method work for all photos I'll take in Horizon 2?
A: It should. Lens flares may pose a problem, tho; for some photos you'll have to find another way (or deal with the watermark). Also, smoke/dirt plumes may give some problems. It works in the rain just fine.
Q: Does this method work on past Forza games?
A: I actually have no clue. Feel free to try and report on it! It should work on FM4, but I don't know if the Magic EXXXTREME Rays of God in FM5 are symmetrical. The lighting of FH2 is undoubtedly far more advanced, and this could be what makes the difference AFAIK.
Q: Can I use another application? I hate GIMP.
A: Technically speaking, any layered image editor that allows you to create an alpha channel (which is fancy speak for "add transparency") for a layer should to the trick. And I'm quite sure there are some such editors for tablets nowadays.
Q: I already knew how to do this from ages! This is nothing new!
A: Go ahead. Point me to the same tutorial, written before today. As far as I know this could be a method used by all the top Forzatographers and I may be dumb for not knowing it. But I didn't write this tut for those who know.
Q: Why go to such greath lenghts to remove watermarks?
A: Because they killed my father, and now they must prepare to die.
Q: Why is this tutorial is so poorly written?
A: Because I don't know how to write tutorials, and have also taken one too many hits to the head.
Last edited: