Fourthstreet’s DIY Sim Racing Cockpit

8
United States
United States
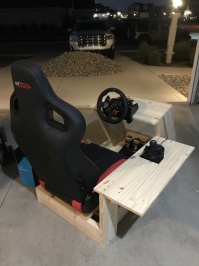
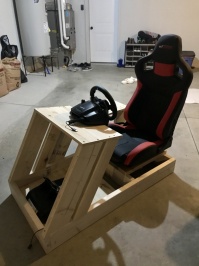
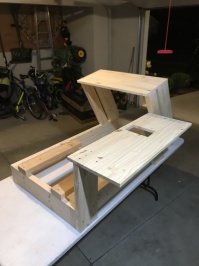
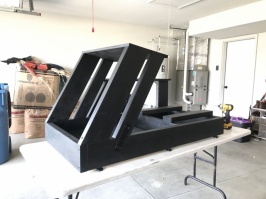
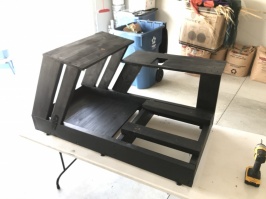
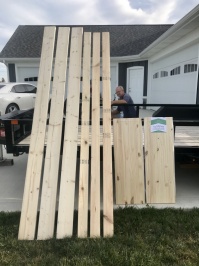
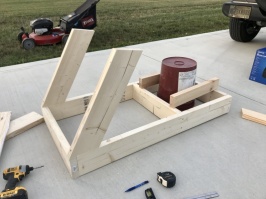
Hello! The other day I was searching DIY cockpit's in hopes to land on a plan. I came across Wayside's DIY cockpit which inspired me to take the plunge into 9 hours(so far) of worthwhile but what seems like endless work. It will come to a head within the next 24 hours though!

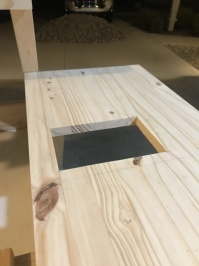
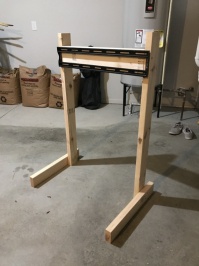
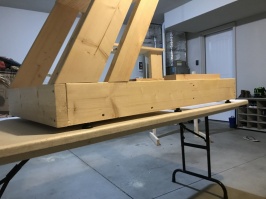
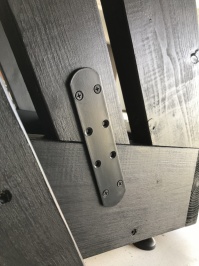
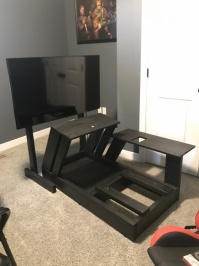
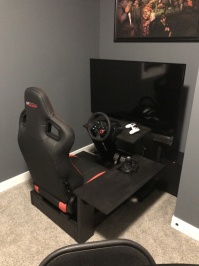
I made some adjustments to the steering wheel arms/base because I felt Wayside's design had a couple of weak connection points. I also used a mixture of 2x6's and 2x4's instead of just 2x4's to increase the rigidity. I changed the design of the shifter mount which did not jeopardize the stability but allowed for less material. Lastly, my DIY monitor mount is not attached to the rig so, it is easily maneuverable(pics soon).

Check it out! I jumped the gun to post this so I could share with all of you! When I'm 100% finished I'll post dimensions, and final pics.
 

Attachments

  • C0F8B4FE-F4B0-44C5-9830-E36A9D75A40C.jpeg
    C0F8B4FE-F4B0-44C5-9830-E36A9D75A40C.jpeg
    87.9 KB · Views: 55
  • 12791D12-E415-472F-AB10-18BD5946D749.jpeg
    12791D12-E415-472F-AB10-18BD5946D749.jpeg
    67.8 KB · Views: 51
  • 65EABA56-C956-42E8-BA6A-F721402A9D34.jpeg
    65EABA56-C956-42E8-BA6A-F721402A9D34.jpeg
    75.9 KB · Views: 52
  • C75782A6-F13D-46AF-9FC0-62FACDB852A3.jpeg
    C75782A6-F13D-46AF-9FC0-62FACDB852A3.jpeg
    76.7 KB · Views: 56
  • 8C061B8A-DC99-4E85-A5E5-382597FE539F.jpeg
    8C061B8A-DC99-4E85-A5E5-382597FE539F.jpeg
    75.8 KB · Views: 55
HARDWARE!!! Logitech G29 pedals/wheel amd shifter and a GT Omega R6 seat to keep me planted! My youngest was more eager than I was! No time wasted :lol:
 

Attachments

  • 871F3D1D-E292-460F-8DBF-551928975D07.jpeg
    871F3D1D-E292-460F-8DBF-551928975D07.jpeg
    57.1 KB · Views: 32
  • 8E176427-A988-4E0F-8A69-070EF484FF4C.jpeg
    8E176427-A988-4E0F-8A69-070EF484FF4C.jpeg
    89.7 KB · Views: 29
  • 97329274-BDF0-4B21-84E1-8C4B4D9BF233.jpeg
    97329274-BDF0-4B21-84E1-8C4B4D9BF233.jpeg
    63.3 KB · Views: 28
  • BEED7213-5EF3-4955-9870-7FD0EE9C6E1A.jpeg
    BEED7213-5EF3-4955-9870-7FD0EE9C6E1A.jpeg
    55.8 KB · Views: 31
  • B80E3F04-36F6-4BE1-B37C-0C9F18172A44.jpeg
    B80E3F04-36F6-4BE1-B37C-0C9F18172A44.jpeg
    66.3 KB · Views: 32
After sanding this is where I left off last night! Tonight we install the floor for the pedals, drill a hole in the wheel table for cord management, and install adjustable feet to help with any leveling needed. Then, it's headed to PAINT!
 

Attachments

  • A0FA9654-D45D-4F59-867F-D5613C337D6B.jpeg
    A0FA9654-D45D-4F59-867F-D5613C337D6B.jpeg
    56.9 KB · Views: 38
  • 3CD67E39-196D-4876-813E-CBB8DAFCF5C1.jpeg
    3CD67E39-196D-4876-813E-CBB8DAFCF5C1.jpeg
    58.5 KB · Views: 38
  • D9DF9193-A92A-4566-82BB-86D909C7584A.jpeg
    D9DF9193-A92A-4566-82BB-86D909C7584A.jpeg
    62.6 KB · Views: 39
  • E393D41A-7686-4FF8-BEEC-02025BF6D492.jpeg
    E393D41A-7686-4FF8-BEEC-02025BF6D492.jpeg
    53.9 KB · Views: 39
  • 1745CA6A-53AA-413E-9E13-CAB68413E4E0.jpeg
    1745CA6A-53AA-413E-9E13-CAB68413E4E0.jpeg
    43.2 KB · Views: 37
  • 526CE444-F9FE-443B-8062-31F205D7B502.jpeg
    526CE444-F9FE-443B-8062-31F205D7B502.jpeg
    53.7 KB · Views: 38
Last edited:
Monitor stand!
 

Attachments

  • FA5B7AB2-82B6-4370-971E-7BC0B035FF88.jpeg
    FA5B7AB2-82B6-4370-971E-7BC0B035FF88.jpeg
    61.4 KB · Views: 26
  • 61BABD45-A1F8-478B-8908-3B7A9EF78548.jpeg
    61BABD45-A1F8-478B-8908-3B7A9EF78548.jpeg
    67.4 KB · Views: 27
  • D2C1C8CB-F520-4709-9BD9-3B5AD8274D8B.jpeg
    D2C1C8CB-F520-4709-9BD9-3B5AD8274D8B.jpeg
    67.7 KB · Views: 26
Adjustable feet!!! 👍
 

Attachments

  • 111DEBA6-5456-457D-A461-0BA0E225670A.jpeg
    111DEBA6-5456-457D-A461-0BA0E225670A.jpeg
    39.5 KB · Views: 25
  • 61F6FA7B-E6CA-46D1-8BC4-E071F6DB9D7F.jpeg
    61F6FA7B-E6CA-46D1-8BC4-E071F6DB9D7F.jpeg
    43.7 KB · Views: 25
  • 6C7703DC-997F-4B92-AF43-8B5DA7BC5F46.jpeg
    6C7703DC-997F-4B92-AF43-8B5DA7BC5F46.jpeg
    57.6 KB · Views: 26
  • 42CBD281-403A-438D-90C2-088D998762A2.jpeg
    42CBD281-403A-438D-90C2-088D998762A2.jpeg
    62.4 KB · Views: 26
Painting is finished!!! I installed a couple brackets to eliminate any side to side movement.
 

Attachments

  • A3B487A3-7791-46F6-A731-B3006A00C99D.jpeg
    A3B487A3-7791-46F6-A731-B3006A00C99D.jpeg
    101 KB · Views: 36
  • 899F930B-3A57-47D1-A2F6-556B630B2582.jpeg
    899F930B-3A57-47D1-A2F6-556B630B2582.jpeg
    68.4 KB · Views: 33
  • 563F4600-E7DF-48D4-A036-90823375228C.jpeg
    563F4600-E7DF-48D4-A036-90823375228C.jpeg
    60.5 KB · Views: 36
  • 6C1A96B9-7F4E-4265-937A-5D7B23FD1995.jpeg
    6C1A96B9-7F4E-4265-937A-5D7B23FD1995.jpeg
    56.7 KB · Views: 37
Securing the seat and adding some back lighting to the monitor.
 

Attachments

  • B7C8AFD3-7273-4050-81C4-BC1C3C452526.jpeg
    B7C8AFD3-7273-4050-81C4-BC1C3C452526.jpeg
    61.7 KB · Views: 35
  • DDFCB8D2-CA4C-4095-B6E5-3E5B06EF731A.jpeg
    DDFCB8D2-CA4C-4095-B6E5-3E5B06EF731A.jpeg
    43.7 KB · Views: 34
15 hours later... Drumrolllllllllllll! Finished. Cable management could use some work but other than that I’m psyched. It is a ROCK. Doesn’t flex, or bend.

Feel free to comment or message me with any questions regarding the build!!! I’ll try to post dimensions of everything within the next few days.
 

Attachments

  • 526949A6-A327-4603-BB25-897F1CB90389.jpeg
    526949A6-A327-4603-BB25-897F1CB90389.jpeg
    60.1 KB · Views: 71
  • 1F9BB5A7-BB75-4999-B90E-EF08C324BDE1.jpeg
    1F9BB5A7-BB75-4999-B90E-EF08C324BDE1.jpeg
    62 KB · Views: 72
Back