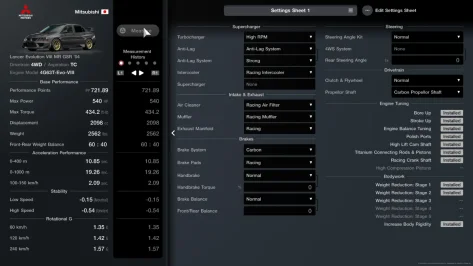
- 31

- United States
The best race cars are the ones that are easy to push at it's limit.
The fastest race cars have higher limits.
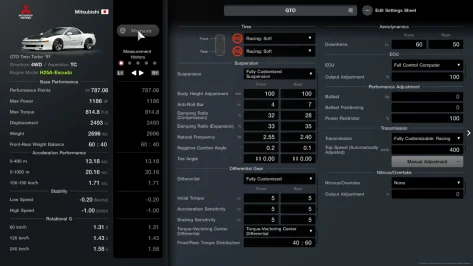
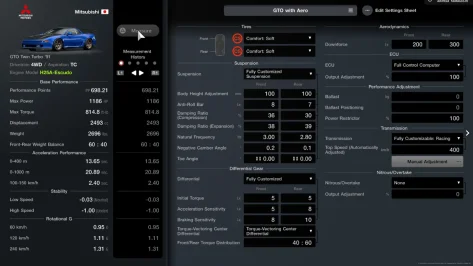
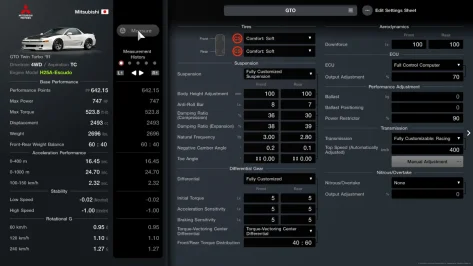
I've found a way to consistently build suspensions in this game that do both by utilizing the game's physics to utilize energy transfer efficiently and cleanly to make these cars perform like cars would in real life. You can momentum drive these very well. And it is surprisingly easy to replicate on any car. These tunes will feel very grounded, very planted, and will allow you to feel the road as much as the game allows.
Keep in mind that I am a horrible "tuner", I only see and understand the system very well. So I guess you can say I'm more of a builder as I care more about the engineering.
Scroll down to see **** to set up a car properly. Read on to understand more about tuning a suspension and why these tunes work so great, and why I call it "proper". I've included a few tunes to demonstrate how well my tuning system works. This is a lot of info so I'm going to get right into it.
First off, I’m not sure how much of this has been done before, but I doubt I’m the first to figure any of this out. I have learned balance tuning before but I never got it to work well, but that's where I got the idea to look at the sway bars at all.
My tuning philosophy is "simple". Any resistance is bad, and I am looking for not only balance, but harmony amongst all of the parts. They need to be working properly, together.
But that’s also why bad tunes can still work. While the parts are not doing their respective jobs well, they work well together as one part or adjustment will compensate for another’s failures. And then there are the many tunes that rely on aides to do the heavy work your suspension should be doing.
A car with an engine and properly matched transmission with a chassis that is balanced and in harmony with its suspension does not need an LSD, brake bias controller, or other driving aides like excess camber or rear toe as all of them only slow the car down for momentary control. Possibly a little throttle control is necessary if you like to build your transmissions to be just a little aggressive and angry like I do.
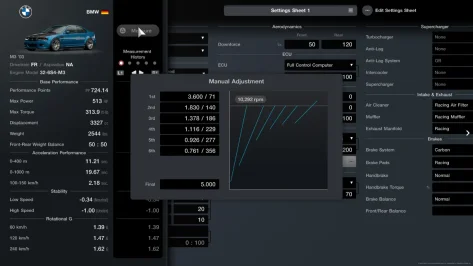
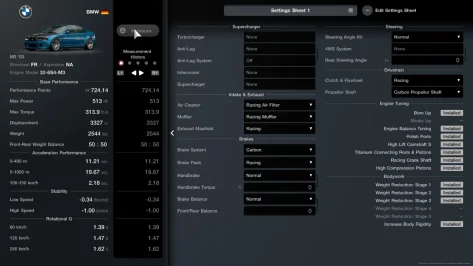
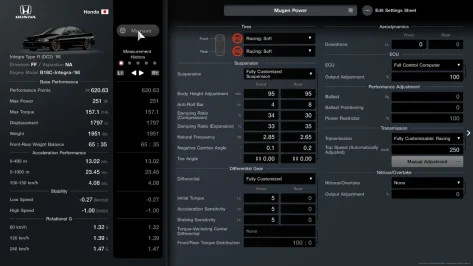
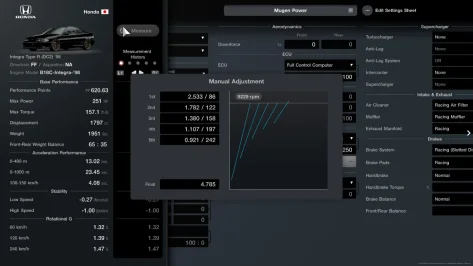
Yes, I've learned a lot from Tatsuru Ichishima about harmony, balance, cohesion, with simplicity and efficiency as he has always been one of my favorite tuners. I even built the Integra with Spoon gear ratios and final in a smaller box. I've also included a less aggressively tuned black Integra with Mugen gear ratios for fun.
When we step back from all the components and take everything in as a whole system, a car is just a giant weight transfer machine, and your suspension’s job is to control that weight transfer. And every car more or less begins looking exactly the same.
Except for older Porsches, they are special with that swinging hammer in the rear.
But even if you just want to dial in some parts to tune a car, it helps to understand what is going on with the parts as they are working when you need them to. And the order of events matters here.
A turn can be broken down into four sections - braking, turn in, mid-corner, and exit. Your suspension needs to be doing different things through each of these phases.
When you brake for a turn, inertia causes load to transfer to the front tires and away from the rear tires. The front suspension compresses while the rear suspension extends, increasing front tire grip potential while reducing rear tire grip potential.
During this phase, load is transferring forward, the front suspension is compressing, and the rear suspension is extending. The suspension's job is to control this transfer and keep the tires loaded.
Front too soft → energy crashes into the nose.
Front too stiff → energy can't get into the front tires.
Rear rebound too soft → energy throws the rear upward.
Rear rebound too stiff → energy gets trapped in the rear.
When you begin turning into a corner, lateral load transfer is added to the forward load transfer from braking. The outside tires gain load while the inside tires lose load, and the car begins to rotate toward the apex.
During this phase, the remaining braking load is blending into cornering load. The outside suspension is compressing while the inside suspension is extending. The suspension's job is to control this transition and keep the car balanced as it changes direction.
Outside too soft → energy falls onto the outside tires and the car feels slow or lazy to respond.
Outside too stiff → energy cannot settle into the outside tires and the car feels nervous or twitchy.
Inside too soft → the chassis rolls excessively and feels vague.
Inside too stiff → the car resists weight transfer and may refuse to rotate.
Too much front authority → understeer and a reluctance to turn.
Too much rear authority → oversteer and excessive rotation.
In mid-corner, most of the load transfer has already occurred and the car has taken a set. The outside tires are carrying the majority of the load while the inside tires are lightly loaded. The suspension is holding the chassis stable while the tires generate the grip needed to maintain the turn.
During this phase, the suspension is no longer managing a large transfer of load. Instead, it is controlling and supporting the load that is already on the outside tires. The sway bars, springs, and dampers work together to maintain balance and keep the chassis composed.
Front too much authority → understeer and a reluctance to rotate.
Rear too much authority → oversteer and excessive rotation.
Front too little authority → the front feels vague and lacks support.
Rear too little authority → the rear feels lazy and unwilling to follow the front.
Sway bars too stiff → the loaded tires become overloaded and lose grip.
Sway bars are too soft → the chassis rolls excessively and responds slowly.
When you apply throttle and begin exiting the corner, load transfers from the front tires to the rear tires. The rear suspension compresses while the front suspension extends, increasing rear tire grip potential while reducing front tire grip potential.
During this phase, load is transferring rearward, the rear suspension is compressing, and the front suspension is extending. The suspension's job is to control this transfer and keep the drive tires loaded while maintaining balance as the car accelerates.
Rear compression is too soft → energy crashes into the rear and the car squats excessively.
Rear compression too stiff → energy cannot get into the rear tires and traction suffers.
Front rebound too soft → the nose rises too quickly and the car feels loose or unsettled.
Front rebound too stiff → energy gets trapped in the front and the car resists transferring load rearward.
Too much front authority → wheelspin, instability, and poor drive off the corner.
Too much rear authority → the car feels planted but may be reluctant to rotate or complete the corner.
A properly balanced suspension allows the rear tires to accept load smoothly, put power to the ground, and drive the car out of the corner without upsetting its balance.
Looking at that, we should be able to see that a car is a giant machine that transfers load between four tires. The tires create the grip. The suspension's job is to help the tires accept, hold, and release that load in a controlled manner. Every suspension adjustment affects how load moves through the car during braking, turn-in, mid-corner, and corner exit.
When tuning, the suspension should be viewed as a system. Sway bars balance the car, springs support the balance, compression accepts the load. Rebound releases the load. If any one of those is not doing its job properly, the car becomes unbalanced and the problems begin.
The goal is not to make the suspension stiff or soft. The goal is to make the suspension balanced. When the suspension is balanced, load moves through the car smoothly and predictably. When it isn't balanced, the car becomes unstable, refuses to rotate, or loses traction.
Understanding what each suspension component does is only half of the process. The real goal is to learn how to use those components to balance the car. To do that, you need to first identify where in the corner the problem occurs. Every phase of a corner places different demands on the suspension.
During braking, the front suspension must accept load while the rear releases it. During turn-in, load begins moving to the outside tires and the car starts to rotate. In mid-corner, the suspension must support and balance the load already on the outside tires. During corner exit, the rear suspension must accept load while the front releases it as power is applied.
Rather than adjusting parts at random, identify the phase of the corner where the problem occurs. Once you know where the problem is happening, you can identify which suspension component is failing to control the load.
Before tuning springs and dampers, the car must first be balanced. This is why I begin with sway bars.
I came to this conclusion because of authority. The more I tuned cars in GT7, the more I realized that most handling problems came from one axle having too much authority compared to the other. Before I could tune anything else, I needed to balance the front and rear axles.
It also made sense to use sway bars because they are directly tied to axle authority. By matching the sway bars to the weight distribution of the car and then flipping them, I could balance the authority of the front and rear axles. Once that balance was established, the car became much easier to understand and tune.
An unexpected benefit of this approach was that it gave me a reference point for the rest of the suspension. Since the sway bars were already reflecting the weight distribution of the car, I could use that information to guide the spring frequencies. The sliders were no longer random numbers, they became measurements of the car's weight bias and how much support each end of the car needed.
From there, the process became simple. First I balance axle authority with the sway bars. Then I support that balance with the springs. Finally, I use the dampers to control how load moves through the suspension during braking, turn-in, mid-corner, and corner exit.
First I balance the car. Then I support the balance. Then I control the balance.
So here’s the workflow, the step by step:
**********
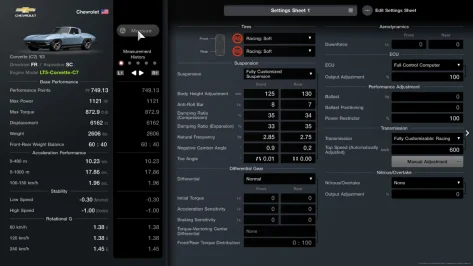
Lower the car to 5-15 above the lowest height for a base to begin with. You might choose to slam it or lift it more. You get to tune this to the car or truck.
Find the weight distribution of the car, match the sway bars to the tenths digit. You can round up or down, that is up to you. I round up to properly support the chassis.
Match damper Compression and spring Natural Frequency sliders to the sway bar sliders. 1 sway bar adjustment = 2 compression = 10 spring. *For most cars. Some are a little different.
Add 5-15 spring Natural Frequency all around to give compression space to work. You get to tune this. Spring frequency must always be above compression. But too much spring frequency will restrict compression from working.
Flip the sway bars - front to rear, and rear to front. If the car is RWD or AWD, add 1 to the front sway bar. If it is FWD, add 1 to the rear sway bar. Or you can turn the dominant side up to 8. You need to dial this in later anyways.
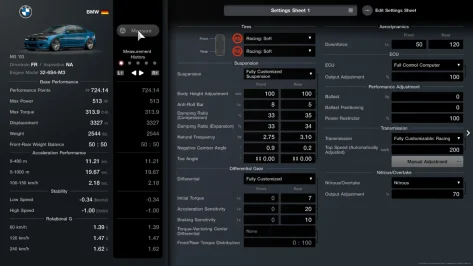
Rebound: 33 front, 35 rear
Camber: 0.2 front, 0.1 rear
Toe: 0.00 front, 0.00 rear
LSD: either 0, 0, 0 or 5, 5, 5
Now you can tune the car
**********
Now you have a balanced car with a properly supported platform that manages load transfer correctly. The car should feel planted, predictable, and easy to drive. But it won't be free of problems. Every car still has its own characteristics.
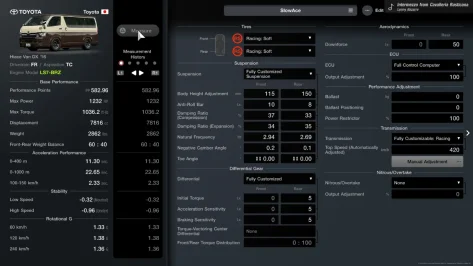
A Hiace is tall and wants to dip and squat excessively. A Porsche still has that hammer hanging off the rear axle. Heavy engine swaps can still create understeer, instability, or traction problems once the car starts rotating. The list goes on.
This is the tuning you want to be doing.
For example, if the Hiace squats too much, stiffen the rear suspension until it stops. Then bring the rear sway bar up to match. After that, support the front with springs to match the front sway bar. If the front now dives too much under braking, add a click of front compression. At this point, you're no longer fixing a broken setup. You're refining a balanced one. This is proper, old-school tuning.
The most misunderstood adjustment in GT7 is Natural Frequency. Many people call it spring rate, but while they are related, they are not the same thing. Spring rate is how stiff the spring is. Natural Frequency is how the spring supports the weight placed on it. Because of this, Natural Frequency needs to be matched to the weight of the car if it is going to work correctly. Too little frequency leaves the suspension relying on the dampers for support, making the car feel loose, floaty, or slidy.
Ride height is another adjustment that is often misunderstood. I used to believe cars should never be too low because the suspension needs room to work. Real cars also benefit from airflow underneath the chassis. But in GT7, we've already built the suspension travel we need into the setup, and the game does not appear to model underbody airflow in a way that limits ride height the same way real life does. Because of that, most of the ride-height slider becomes usable. Some cars, like the Amuse S2000, still dislike being too low, but that's something you tune on a case-by-case basis.
But the car must be balanced before tuning springs and dampers, this is why I begin with sway bars.
Sway bars need to be matched to the weight of the car because the rest of the suspension is built from that foundation. If a car has a 58/42 weight distribution, you may have the choice of rounding one side up and the other down, or rounding both up. Both setups can work, but they will feel different. This becomes a tuning choice rather than a right or wrong answer.
Once the sway bars are flipped, axle authority is distributed more appropriately for the car. This is why you begin seeing sway bar combinations like 6/8 or even 6/6 on RWD cars that traditionally would be expected to run a stiffer front bar. The goal is not to follow convention. The goal is to balance the car.
Rebound damping should be low enough that the suspension remains fluid and can move where it needs to be when it needs to be there. It is not responsible for carrying the load. The springs, compression damping, and sway bars are doing the heavy work. Rebound's job is to control the release of energy and support the rest of the suspension. Keeping rebound close to compression helps maintain balance and allows the car to rotate naturally rather than fighting its own movement.
Ultimately, all of these adjustments are trying to control slip angle. A tire does not produce its maximum grip when it is pointed exactly where it is traveling. Instead, it develops a small slip angle as it deforms and loads up during a turn. Too little slip angle and the tire is not working hard enough. Too much slip angle and the tire begins to slide. The suspension's job is not to simply hold the car up. Its job is to manage weight transfer so each tire can reach and maintain its ideal slip angle. When a car feels planted and takes a set through a corner, the tires are operating within that window. When a car understeers or oversteers, one end of the car has exceeded it.
Alignment is used to fine-tune how the tires reach and maintain their slip angles. Camber helps the tire maintain contact as the chassis rolls, while toe changes how quickly the tire develops slip angle and how responsive the car feels. Because of this, alignment should be viewed as a refinement rather than a primary tuning tool. If large alignment changes are required to make a car work, the suspension and weight transfer should be evaluated first. Springs, dampers, and sway bars determine how the load reaches the tire. Alignment simply helps the tire make the most of that load.
Alignment is another area where less is often more. Camber angles the tire and reduces the amount of tire available for braking and acceleration. We only need enough camber to catch the slip angle and keep the tire working through the corner. Any more than that is trading away traction that could be used elsewhere. Additional camber can make a car feel better because it acts as a turning aid and helps the tire stay loaded while cornering, but it is not free grip. Toe works in a similar way. It can improve response and stability, but it also creates drag and costs speed. The goal is not to use as much alignment as possible. The goal is to use the least amount necessary to support a balanced suspension and keep the tires operating within their ideal slip angle window.
Front toe-out can help initiate turn-in and keep the car committed to a corner, but it also creates drag and slows the car down. Rear toe adds stability, which is why most real cars use some amount of rear toe-in. We only want the minimum amount necessary. Anything beyond that is trading speed for control, and I prefer to build control into the suspension first.
The same philosophy applies to the differential. Always begin with low values, not high ones. I prefer to run the differential as close to open as possible and only add lock when the car proves it needs it.
This is how I believe a car should be tuned. Build a balanced suspension first. Support the weight properly. Control the load transfer properly. Then tune the unique characteristics of the car. Don't spend your time chasing traction, understeer, oversteer, or instability that are being caused by a suspension that was never balanced to begin with.
Once the car is balanced and properly supported, tuning becomes much simpler. At this point, you are no longer trying to compensate for a suspension that is fundamentally mismatched to the car. Instead, you are tuning the individual characteristics that make each car unique. A Porsche still has a heavy engine hanging behind the rear axle. A Hiace is still tall. A front-heavy car can still understeer. A powerful car can still struggle for traction. The difference is that these are now the actual characteristics of the car rather than problems created by an unbalanced suspension, which means these can actually be tuned out.
The first step is identifying where in the corner the problem occurs. The phase of the corner usually tells you which part of the suspension is responsible. If the problem occurs under braking, look at how the front suspension is accepting load and how the rear suspension is releasing it. Excessive dive usually means the front lacks support, while a loose rear often means the rear is releasing load too quickly. If the problem occurs during turn-in, the suspension may not be accepting lateral load properly, or the front and rear axles may not be sharing authority correctly. A car that refuses to rotate usually has too much front authority, while a car that rotates too aggressively often has too much rear authority.
Mid-corner problems are usually balance problems. This is where sway bars, spring support, and axle authority become most important. If the car understeers in the middle of the corner, the front may have too much authority or the rear may not have enough. If the car oversteers, the opposite is often true. When a car feels vague, disconnected, or unsupported in the middle of the turn, it is usually a sign that the platform itself needs more support rather than more rotation or more grip.
Corner exit is where the rear suspension takes over. If the rear squats excessively under power, it usually needs more support. If the car struggles for traction, the rear suspension may not be accepting load properly. If the nose rises too quickly, the front may be releasing load too quickly. A well-balanced car should accept load into the rear smoothly and put power down without feeling lazy, unstable, or unpredictable.
The car will usually tell you what it needs if you pay attention to when the problem occurs. Rather than adjusting parts at random, identify the phase of the corner where the behavior appears, understand how load is moving through the car during that phase, and then make the adjustment that supports or controls that movement. Once the suspension is balanced, tuning becomes less about fixing problems and more about refining the character of the car.
All you need now is a good transmission. Luckily, I took those classes too.
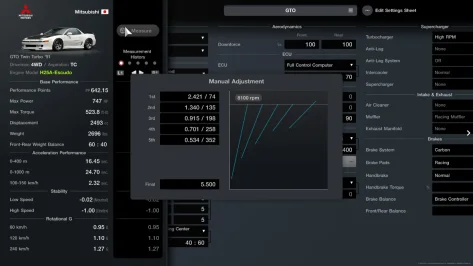
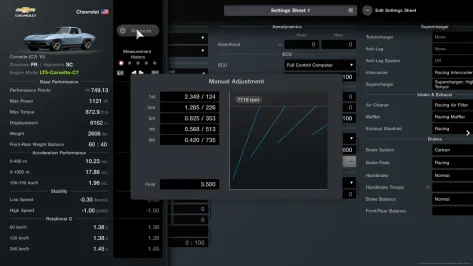
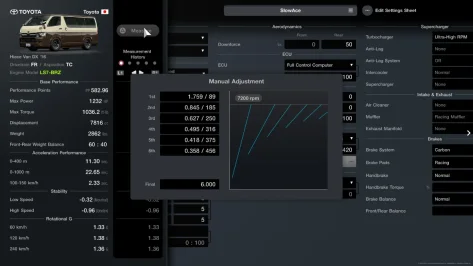
When it comes to transmissions we have three tuning tools: the size of the box, the final drive, and the shape of the individual gears.
The gearbox size or Top Speed (Automatically Adjusted) determines how spread out the entire transmission is, and is always the first thing to set when you build a transmission. A bigger box gives the engine more room to pull and smooths out aggressive power delivery. A smaller box packs everything together and makes the car feel more responsive, but it can become busy and run out of gear too quickly. I set the box based on the car's power and where I want it to reach top speed. The box decides the overall character of the transmission.
The final drive is the power multiplier. Once the box is the right size, the final drive lets me move the entire transmission shorter or longer without changing the spacing between the gears. A shorter final drive gives more acceleration everywhere. A longer final drive gives more speed but takes some urgency away. This is usually where I fine-tune how hard the car pulls after I've already decided what kind of transmission I want.
The individual gears are where the personality comes from. This is where I decide what gear is the hero gear, which is usually second. First gear is there to get the car moving and build momentum. Second is often where the car really comes alive. Then I stack the remaining gears based on how I want the engine to stay in its powerband. Tight spacing keeps the engine on the cam and makes the car feel aggressive. Wider spacing calms the car down and gives each gear more range. This is also where I fix problem areas like a slow downshift, a dead spot between gears, or a gear that runs out too early in a corner.
So my process is simple. First I choose the size of the box. Then I use the final drive to adjust how hard the transmission pulls. Finally, I build the individual gears around the way I actually drive the car. The box determines the character, the final drive determines the strength, and the gears determine how the car feels.
If you don't want to completely rebuild the transmission but just want to turn it up, copy the top speeds of the stock transmission and put that into a smaller box with a higher final drive.
When I tune a transmission, I think of it as a torque management system. The engine makes power, but the transmission decides how that power reaches the tires. Every gear ratio and the final drive multiply torque. More multiplication gives more acceleration, but it also makes it easier to overwhelm the tires. The goal is not simply to make the transmission aggressive. The goal is to make the car accelerate as hard as possible while staying connected to the pavement.
Because I'm building race cars, I usually start with the smallest gearbox I think I can get away with. A smaller box keeps the gears close together, keeps the engine in the powerband, and makes the car more responsive. If the box is too small, the car will run out of gear or become difficult to drive. If the box is too large, the engine spends too much time away from its best power. The trick is finding the smallest box that still lets the car reach the speed it needs to reach.
Once I have the box size where I want it, I immediately turn the final drive all the way up. This gives me the maximum amount of torque multiplication available and establishes the most aggressive version of the transmission. From there, I can begin shaping the gears to control how that power is delivered. Rather than using the final drive to tune acceleration, I use it as a starting point and build the transmission around it.
First gear exists to get the car moving. You do not want first to be so short that it instantly blows the tires away even though I build my transmissions like that sometimes, but I also do not want it so tall that the car struggles to launch. Its job is simply to create momentum and hand the car off to the next gear.
Second gear is the hero gear. This is where the car spends much of its time accelerating, exiting corners, and building speed. If a powerful car struggles for traction, I usually start by making second gear longer. A longer second gear reduces torque multiplication, smooths power delivery, and allows the car to accelerate harder because the tires can stay hooked up. Many of the fastest transmissions I have built rely on a large second gear and then stack the remaining gears on top of it.
The remaining gears are used to keep the engine where it makes power. Tight spacing keeps the engine on the cam and makes the car feel aggressive. Wider spacing calms the car down and gives each gear more range. The spacing between these gears determines how the car feels as it accelerates through the rest of the speed range.
When a high-power car spins the tires, I no longer immediately reach for a larger gearbox. Instead, I start by looking at the gears themselves. I will usually lengthen first gear, lengthen second gear, or both. If the transmission still feels too aggressive after that, then I may increase the box size. The box is no longer my first solution. It is my last solution.
My process is simple. Build the smallest box that will do the job. Turn the final drive all the way up. Use first gear to create momentum. Use second gear as the hero gear. Then stack the remaining gears to keep the engine in its powerband. If the car struggles for traction, control the torque with the gears before making the box larger. The fastest transmission is not the one that delivers the most torque. It is the one that allows the tires to use all of it.
Then go test it for it's top speed in it's top gear, set that as low or as high as you either want or need. Then tighten the gears as much as possible to clean up the spacing between each gear without changing the overall shape to make the gears as fast as possible. I opt for the lowest top speed necessary to keep more torque in the lower gears.
I think I’ve covered everything and edited out all of the rambling... And I didn’t even make one dirty joke, I’m quite proud of myself.
The fastest race cars have higher limits.
I've found a way to consistently build suspensions in this game that do both by utilizing the game's physics to utilize energy transfer efficiently and cleanly to make these cars perform like cars would in real life. You can momentum drive these very well. And it is surprisingly easy to replicate on any car. These tunes will feel very grounded, very planted, and will allow you to feel the road as much as the game allows.
Keep in mind that I am a horrible "tuner", I only see and understand the system very well. So I guess you can say I'm more of a builder as I care more about the engineering.
Scroll down to see **** to set up a car properly. Read on to understand more about tuning a suspension and why these tunes work so great, and why I call it "proper". I've included a few tunes to demonstrate how well my tuning system works. This is a lot of info so I'm going to get right into it.
First off, I’m not sure how much of this has been done before, but I doubt I’m the first to figure any of this out. I have learned balance tuning before but I never got it to work well, but that's where I got the idea to look at the sway bars at all.
My tuning philosophy is "simple". Any resistance is bad, and I am looking for not only balance, but harmony amongst all of the parts. They need to be working properly, together.
But that’s also why bad tunes can still work. While the parts are not doing their respective jobs well, they work well together as one part or adjustment will compensate for another’s failures. And then there are the many tunes that rely on aides to do the heavy work your suspension should be doing.
A car with an engine and properly matched transmission with a chassis that is balanced and in harmony with its suspension does not need an LSD, brake bias controller, or other driving aides like excess camber or rear toe as all of them only slow the car down for momentary control. Possibly a little throttle control is necessary if you like to build your transmissions to be just a little aggressive and angry like I do.
Yes, I've learned a lot from Tatsuru Ichishima about harmony, balance, cohesion, with simplicity and efficiency as he has always been one of my favorite tuners. I even built the Integra with Spoon gear ratios and final in a smaller box. I've also included a less aggressively tuned black Integra with Mugen gear ratios for fun.
When we step back from all the components and take everything in as a whole system, a car is just a giant weight transfer machine, and your suspension’s job is to control that weight transfer. And every car more or less begins looking exactly the same.
Except for older Porsches, they are special with that swinging hammer in the rear.
But even if you just want to dial in some parts to tune a car, it helps to understand what is going on with the parts as they are working when you need them to. And the order of events matters here.
A turn can be broken down into four sections - braking, turn in, mid-corner, and exit. Your suspension needs to be doing different things through each of these phases.
When you brake for a turn, inertia causes load to transfer to the front tires and away from the rear tires. The front suspension compresses while the rear suspension extends, increasing front tire grip potential while reducing rear tire grip potential.
During this phase, load is transferring forward, the front suspension is compressing, and the rear suspension is extending. The suspension's job is to control this transfer and keep the tires loaded.
Front too soft → energy crashes into the nose.
Front too stiff → energy can't get into the front tires.
Rear rebound too soft → energy throws the rear upward.
Rear rebound too stiff → energy gets trapped in the rear.
When you begin turning into a corner, lateral load transfer is added to the forward load transfer from braking. The outside tires gain load while the inside tires lose load, and the car begins to rotate toward the apex.
During this phase, the remaining braking load is blending into cornering load. The outside suspension is compressing while the inside suspension is extending. The suspension's job is to control this transition and keep the car balanced as it changes direction.
Outside too soft → energy falls onto the outside tires and the car feels slow or lazy to respond.
Outside too stiff → energy cannot settle into the outside tires and the car feels nervous or twitchy.
Inside too soft → the chassis rolls excessively and feels vague.
Inside too stiff → the car resists weight transfer and may refuse to rotate.
Too much front authority → understeer and a reluctance to turn.
Too much rear authority → oversteer and excessive rotation.
In mid-corner, most of the load transfer has already occurred and the car has taken a set. The outside tires are carrying the majority of the load while the inside tires are lightly loaded. The suspension is holding the chassis stable while the tires generate the grip needed to maintain the turn.
During this phase, the suspension is no longer managing a large transfer of load. Instead, it is controlling and supporting the load that is already on the outside tires. The sway bars, springs, and dampers work together to maintain balance and keep the chassis composed.
Front too much authority → understeer and a reluctance to rotate.
Rear too much authority → oversteer and excessive rotation.
Front too little authority → the front feels vague and lacks support.
Rear too little authority → the rear feels lazy and unwilling to follow the front.
Sway bars too stiff → the loaded tires become overloaded and lose grip.
Sway bars are too soft → the chassis rolls excessively and responds slowly.
When you apply throttle and begin exiting the corner, load transfers from the front tires to the rear tires. The rear suspension compresses while the front suspension extends, increasing rear tire grip potential while reducing front tire grip potential.
During this phase, load is transferring rearward, the rear suspension is compressing, and the front suspension is extending. The suspension's job is to control this transfer and keep the drive tires loaded while maintaining balance as the car accelerates.
Rear compression is too soft → energy crashes into the rear and the car squats excessively.
Rear compression too stiff → energy cannot get into the rear tires and traction suffers.
Front rebound too soft → the nose rises too quickly and the car feels loose or unsettled.
Front rebound too stiff → energy gets trapped in the front and the car resists transferring load rearward.
Too much front authority → wheelspin, instability, and poor drive off the corner.
Too much rear authority → the car feels planted but may be reluctant to rotate or complete the corner.
A properly balanced suspension allows the rear tires to accept load smoothly, put power to the ground, and drive the car out of the corner without upsetting its balance.
Looking at that, we should be able to see that a car is a giant machine that transfers load between four tires. The tires create the grip. The suspension's job is to help the tires accept, hold, and release that load in a controlled manner. Every suspension adjustment affects how load moves through the car during braking, turn-in, mid-corner, and corner exit.
When tuning, the suspension should be viewed as a system. Sway bars balance the car, springs support the balance, compression accepts the load. Rebound releases the load. If any one of those is not doing its job properly, the car becomes unbalanced and the problems begin.
The goal is not to make the suspension stiff or soft. The goal is to make the suspension balanced. When the suspension is balanced, load moves through the car smoothly and predictably. When it isn't balanced, the car becomes unstable, refuses to rotate, or loses traction.
Understanding what each suspension component does is only half of the process. The real goal is to learn how to use those components to balance the car. To do that, you need to first identify where in the corner the problem occurs. Every phase of a corner places different demands on the suspension.
During braking, the front suspension must accept load while the rear releases it. During turn-in, load begins moving to the outside tires and the car starts to rotate. In mid-corner, the suspension must support and balance the load already on the outside tires. During corner exit, the rear suspension must accept load while the front releases it as power is applied.
Rather than adjusting parts at random, identify the phase of the corner where the problem occurs. Once you know where the problem is happening, you can identify which suspension component is failing to control the load.
Before tuning springs and dampers, the car must first be balanced. This is why I begin with sway bars.
I came to this conclusion because of authority. The more I tuned cars in GT7, the more I realized that most handling problems came from one axle having too much authority compared to the other. Before I could tune anything else, I needed to balance the front and rear axles.
It also made sense to use sway bars because they are directly tied to axle authority. By matching the sway bars to the weight distribution of the car and then flipping them, I could balance the authority of the front and rear axles. Once that balance was established, the car became much easier to understand and tune.
An unexpected benefit of this approach was that it gave me a reference point for the rest of the suspension. Since the sway bars were already reflecting the weight distribution of the car, I could use that information to guide the spring frequencies. The sliders were no longer random numbers, they became measurements of the car's weight bias and how much support each end of the car needed.
From there, the process became simple. First I balance axle authority with the sway bars. Then I support that balance with the springs. Finally, I use the dampers to control how load moves through the suspension during braking, turn-in, mid-corner, and corner exit.
First I balance the car. Then I support the balance. Then I control the balance.
So here’s the workflow, the step by step:
**********
Lower the car to 5-15 above the lowest height for a base to begin with. You might choose to slam it or lift it more. You get to tune this to the car or truck.
Find the weight distribution of the car, match the sway bars to the tenths digit. You can round up or down, that is up to you. I round up to properly support the chassis.
Match damper Compression and spring Natural Frequency sliders to the sway bar sliders. 1 sway bar adjustment = 2 compression = 10 spring. *For most cars. Some are a little different.
Add 5-15 spring Natural Frequency all around to give compression space to work. You get to tune this. Spring frequency must always be above compression. But too much spring frequency will restrict compression from working.
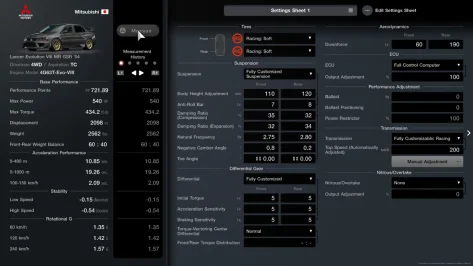
Flip the sway bars - front to rear, and rear to front. If the car is RWD or AWD, add 1 to the front sway bar. If it is FWD, add 1 to the rear sway bar. Or you can turn the dominant side up to 8. You need to dial this in later anyways.
Rebound: 33 front, 35 rear
Camber: 0.2 front, 0.1 rear
Toe: 0.00 front, 0.00 rear
LSD: either 0, 0, 0 or 5, 5, 5
Now you can tune the car
**********
Now you have a balanced car with a properly supported platform that manages load transfer correctly. The car should feel planted, predictable, and easy to drive. But it won't be free of problems. Every car still has its own characteristics.
A Hiace is tall and wants to dip and squat excessively. A Porsche still has that hammer hanging off the rear axle. Heavy engine swaps can still create understeer, instability, or traction problems once the car starts rotating. The list goes on.
This is the tuning you want to be doing.
For example, if the Hiace squats too much, stiffen the rear suspension until it stops. Then bring the rear sway bar up to match. After that, support the front with springs to match the front sway bar. If the front now dives too much under braking, add a click of front compression. At this point, you're no longer fixing a broken setup. You're refining a balanced one. This is proper, old-school tuning.
The most misunderstood adjustment in GT7 is Natural Frequency. Many people call it spring rate, but while they are related, they are not the same thing. Spring rate is how stiff the spring is. Natural Frequency is how the spring supports the weight placed on it. Because of this, Natural Frequency needs to be matched to the weight of the car if it is going to work correctly. Too little frequency leaves the suspension relying on the dampers for support, making the car feel loose, floaty, or slidy.
Ride height is another adjustment that is often misunderstood. I used to believe cars should never be too low because the suspension needs room to work. Real cars also benefit from airflow underneath the chassis. But in GT7, we've already built the suspension travel we need into the setup, and the game does not appear to model underbody airflow in a way that limits ride height the same way real life does. Because of that, most of the ride-height slider becomes usable. Some cars, like the Amuse S2000, still dislike being too low, but that's something you tune on a case-by-case basis.
But the car must be balanced before tuning springs and dampers, this is why I begin with sway bars.
Sway bars need to be matched to the weight of the car because the rest of the suspension is built from that foundation. If a car has a 58/42 weight distribution, you may have the choice of rounding one side up and the other down, or rounding both up. Both setups can work, but they will feel different. This becomes a tuning choice rather than a right or wrong answer.
Once the sway bars are flipped, axle authority is distributed more appropriately for the car. This is why you begin seeing sway bar combinations like 6/8 or even 6/6 on RWD cars that traditionally would be expected to run a stiffer front bar. The goal is not to follow convention. The goal is to balance the car.
Rebound damping should be low enough that the suspension remains fluid and can move where it needs to be when it needs to be there. It is not responsible for carrying the load. The springs, compression damping, and sway bars are doing the heavy work. Rebound's job is to control the release of energy and support the rest of the suspension. Keeping rebound close to compression helps maintain balance and allows the car to rotate naturally rather than fighting its own movement.
Ultimately, all of these adjustments are trying to control slip angle. A tire does not produce its maximum grip when it is pointed exactly where it is traveling. Instead, it develops a small slip angle as it deforms and loads up during a turn. Too little slip angle and the tire is not working hard enough. Too much slip angle and the tire begins to slide. The suspension's job is not to simply hold the car up. Its job is to manage weight transfer so each tire can reach and maintain its ideal slip angle. When a car feels planted and takes a set through a corner, the tires are operating within that window. When a car understeers or oversteers, one end of the car has exceeded it.
Alignment is used to fine-tune how the tires reach and maintain their slip angles. Camber helps the tire maintain contact as the chassis rolls, while toe changes how quickly the tire develops slip angle and how responsive the car feels. Because of this, alignment should be viewed as a refinement rather than a primary tuning tool. If large alignment changes are required to make a car work, the suspension and weight transfer should be evaluated first. Springs, dampers, and sway bars determine how the load reaches the tire. Alignment simply helps the tire make the most of that load.
Alignment is another area where less is often more. Camber angles the tire and reduces the amount of tire available for braking and acceleration. We only need enough camber to catch the slip angle and keep the tire working through the corner. Any more than that is trading away traction that could be used elsewhere. Additional camber can make a car feel better because it acts as a turning aid and helps the tire stay loaded while cornering, but it is not free grip. Toe works in a similar way. It can improve response and stability, but it also creates drag and costs speed. The goal is not to use as much alignment as possible. The goal is to use the least amount necessary to support a balanced suspension and keep the tires operating within their ideal slip angle window.
Front toe-out can help initiate turn-in and keep the car committed to a corner, but it also creates drag and slows the car down. Rear toe adds stability, which is why most real cars use some amount of rear toe-in. We only want the minimum amount necessary. Anything beyond that is trading speed for control, and I prefer to build control into the suspension first.
The same philosophy applies to the differential. Always begin with low values, not high ones. I prefer to run the differential as close to open as possible and only add lock when the car proves it needs it.
This is how I believe a car should be tuned. Build a balanced suspension first. Support the weight properly. Control the load transfer properly. Then tune the unique characteristics of the car. Don't spend your time chasing traction, understeer, oversteer, or instability that are being caused by a suspension that was never balanced to begin with.
Once the car is balanced and properly supported, tuning becomes much simpler. At this point, you are no longer trying to compensate for a suspension that is fundamentally mismatched to the car. Instead, you are tuning the individual characteristics that make each car unique. A Porsche still has a heavy engine hanging behind the rear axle. A Hiace is still tall. A front-heavy car can still understeer. A powerful car can still struggle for traction. The difference is that these are now the actual characteristics of the car rather than problems created by an unbalanced suspension, which means these can actually be tuned out.
The first step is identifying where in the corner the problem occurs. The phase of the corner usually tells you which part of the suspension is responsible. If the problem occurs under braking, look at how the front suspension is accepting load and how the rear suspension is releasing it. Excessive dive usually means the front lacks support, while a loose rear often means the rear is releasing load too quickly. If the problem occurs during turn-in, the suspension may not be accepting lateral load properly, or the front and rear axles may not be sharing authority correctly. A car that refuses to rotate usually has too much front authority, while a car that rotates too aggressively often has too much rear authority.
Mid-corner problems are usually balance problems. This is where sway bars, spring support, and axle authority become most important. If the car understeers in the middle of the corner, the front may have too much authority or the rear may not have enough. If the car oversteers, the opposite is often true. When a car feels vague, disconnected, or unsupported in the middle of the turn, it is usually a sign that the platform itself needs more support rather than more rotation or more grip.
Corner exit is where the rear suspension takes over. If the rear squats excessively under power, it usually needs more support. If the car struggles for traction, the rear suspension may not be accepting load properly. If the nose rises too quickly, the front may be releasing load too quickly. A well-balanced car should accept load into the rear smoothly and put power down without feeling lazy, unstable, or unpredictable.
The car will usually tell you what it needs if you pay attention to when the problem occurs. Rather than adjusting parts at random, identify the phase of the corner where the behavior appears, understand how load is moving through the car during that phase, and then make the adjustment that supports or controls that movement. Once the suspension is balanced, tuning becomes less about fixing problems and more about refining the character of the car.
All you need now is a good transmission. Luckily, I took those classes too.
When it comes to transmissions we have three tuning tools: the size of the box, the final drive, and the shape of the individual gears.
The gearbox size or Top Speed (Automatically Adjusted) determines how spread out the entire transmission is, and is always the first thing to set when you build a transmission. A bigger box gives the engine more room to pull and smooths out aggressive power delivery. A smaller box packs everything together and makes the car feel more responsive, but it can become busy and run out of gear too quickly. I set the box based on the car's power and where I want it to reach top speed. The box decides the overall character of the transmission.
The final drive is the power multiplier. Once the box is the right size, the final drive lets me move the entire transmission shorter or longer without changing the spacing between the gears. A shorter final drive gives more acceleration everywhere. A longer final drive gives more speed but takes some urgency away. This is usually where I fine-tune how hard the car pulls after I've already decided what kind of transmission I want.
The individual gears are where the personality comes from. This is where I decide what gear is the hero gear, which is usually second. First gear is there to get the car moving and build momentum. Second is often where the car really comes alive. Then I stack the remaining gears based on how I want the engine to stay in its powerband. Tight spacing keeps the engine on the cam and makes the car feel aggressive. Wider spacing calms the car down and gives each gear more range. This is also where I fix problem areas like a slow downshift, a dead spot between gears, or a gear that runs out too early in a corner.
So my process is simple. First I choose the size of the box. Then I use the final drive to adjust how hard the transmission pulls. Finally, I build the individual gears around the way I actually drive the car. The box determines the character, the final drive determines the strength, and the gears determine how the car feels.
If you don't want to completely rebuild the transmission but just want to turn it up, copy the top speeds of the stock transmission and put that into a smaller box with a higher final drive.
When I tune a transmission, I think of it as a torque management system. The engine makes power, but the transmission decides how that power reaches the tires. Every gear ratio and the final drive multiply torque. More multiplication gives more acceleration, but it also makes it easier to overwhelm the tires. The goal is not simply to make the transmission aggressive. The goal is to make the car accelerate as hard as possible while staying connected to the pavement.
Because I'm building race cars, I usually start with the smallest gearbox I think I can get away with. A smaller box keeps the gears close together, keeps the engine in the powerband, and makes the car more responsive. If the box is too small, the car will run out of gear or become difficult to drive. If the box is too large, the engine spends too much time away from its best power. The trick is finding the smallest box that still lets the car reach the speed it needs to reach.
Once I have the box size where I want it, I immediately turn the final drive all the way up. This gives me the maximum amount of torque multiplication available and establishes the most aggressive version of the transmission. From there, I can begin shaping the gears to control how that power is delivered. Rather than using the final drive to tune acceleration, I use it as a starting point and build the transmission around it.
First gear exists to get the car moving. You do not want first to be so short that it instantly blows the tires away even though I build my transmissions like that sometimes, but I also do not want it so tall that the car struggles to launch. Its job is simply to create momentum and hand the car off to the next gear.
Second gear is the hero gear. This is where the car spends much of its time accelerating, exiting corners, and building speed. If a powerful car struggles for traction, I usually start by making second gear longer. A longer second gear reduces torque multiplication, smooths power delivery, and allows the car to accelerate harder because the tires can stay hooked up. Many of the fastest transmissions I have built rely on a large second gear and then stack the remaining gears on top of it.
The remaining gears are used to keep the engine where it makes power. Tight spacing keeps the engine on the cam and makes the car feel aggressive. Wider spacing calms the car down and gives each gear more range. The spacing between these gears determines how the car feels as it accelerates through the rest of the speed range.
When a high-power car spins the tires, I no longer immediately reach for a larger gearbox. Instead, I start by looking at the gears themselves. I will usually lengthen first gear, lengthen second gear, or both. If the transmission still feels too aggressive after that, then I may increase the box size. The box is no longer my first solution. It is my last solution.
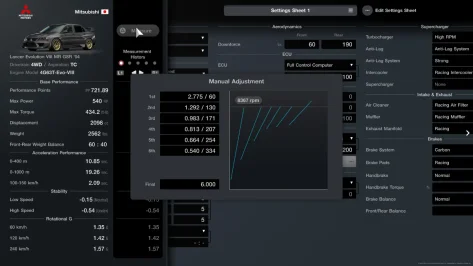
My process is simple. Build the smallest box that will do the job. Turn the final drive all the way up. Use first gear to create momentum. Use second gear as the hero gear. Then stack the remaining gears to keep the engine in its powerband. If the car struggles for traction, control the torque with the gears before making the box larger. The fastest transmission is not the one that delivers the most torque. It is the one that allows the tires to use all of it.
Then go test it for it's top speed in it's top gear, set that as low or as high as you either want or need. Then tighten the gears as much as possible to clean up the spacing between each gear without changing the overall shape to make the gears as fast as possible. I opt for the lowest top speed necessary to keep more torque in the lower gears.
I think I’ve covered everything and edited out all of the rambling... And I didn’t even make one dirty joke, I’m quite proud of myself.
Attachments
-
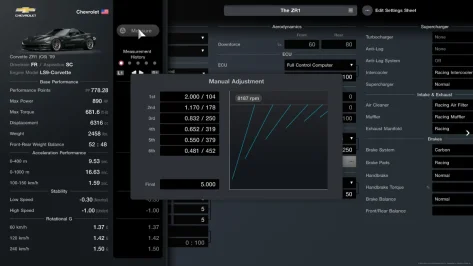 The ZR1 Transmission.webp49.1 KB · Views: 15
 -
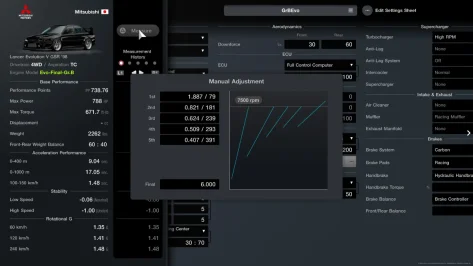 GrEvo Transmission.webp49 KB · Views: 13
 -
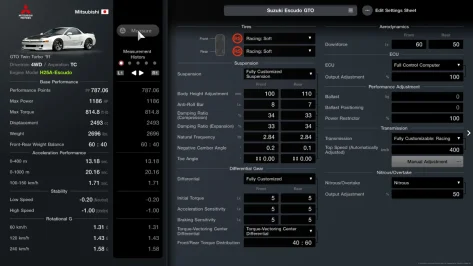 GTO Suspension.webp60 KB · Views: 17
 -
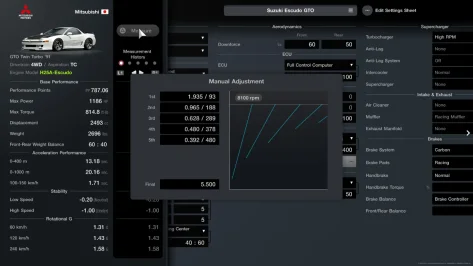 GTO Transmission.webp50.2 KB · Views: 16
 -
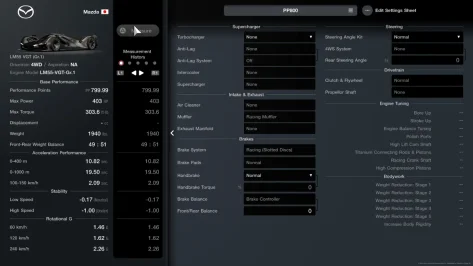 LM55 Modifications.webp48.5 KB · Views: 12
 -
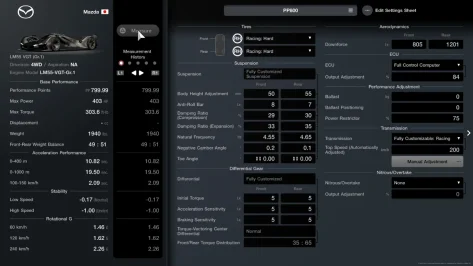 LM55 Suspension.webp56.8 KB · Views: 16
 -
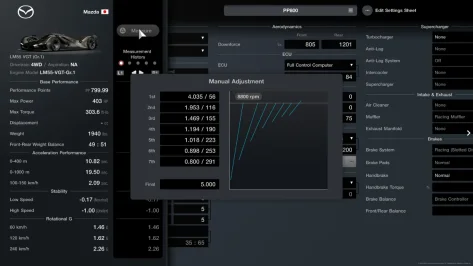 LM55 Transmission.webp48.5 KB · Views: 14
 -
 Mugen Suspension.webp57.7 KB · Views: 16
 -
 Mugen Transmission.webp47.8 KB · Views: 17
 -
 SlowAce Suspension.webp60.6 KB · Views: 16
 -
 SlowAce Transmission.webp50.8 KB · Views: 15
 -
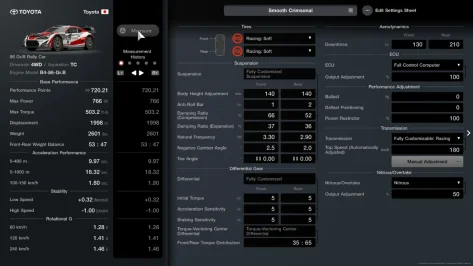 Smooth Crimsonal Suspension.webp60.3 KB · Views: 16
 -
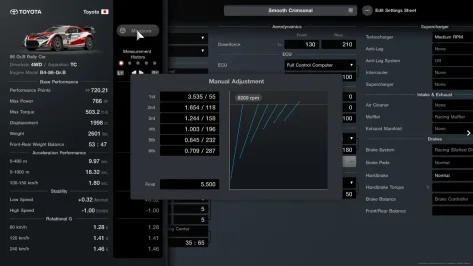 Smooth Crimsonal Transmission.webp51.5 KB · Views: 17
 -
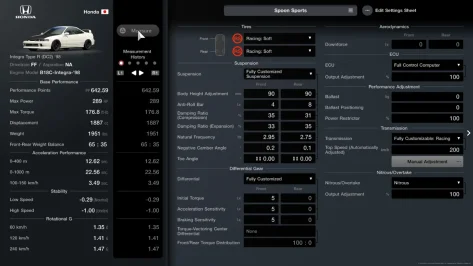 Spoon Suspension.webp58.2 KB · Views: 18
 -
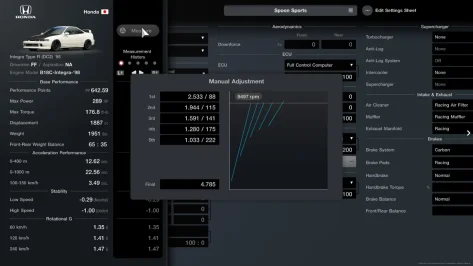 Spoon Transmission.webp47.9 KB · Views: 16
 -
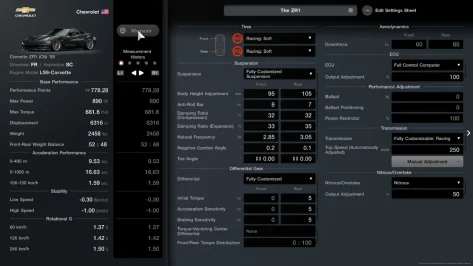 The ZR1 Suspension.webp58 KB · Views: 14
 -
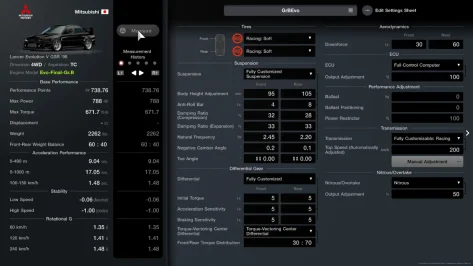 GrEvo Suspension.webp59.2 KB · Views: 15
 -
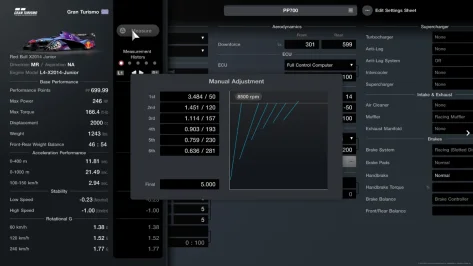 Fighting Bull Transmission.webp49.9 KB · Views: 15
 -
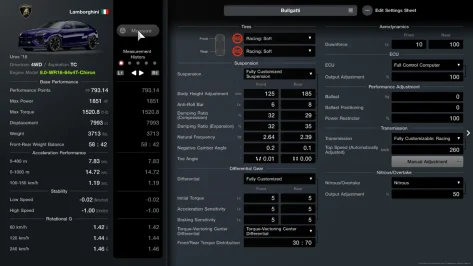 Bullgatti Suspension.webp60.7 KB · Views: 17
 -
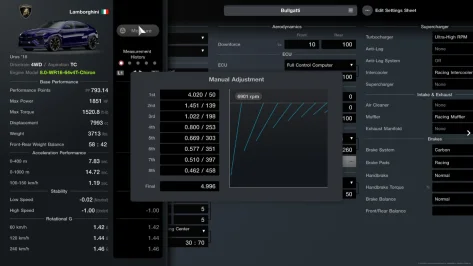 Bullgatti Transmission.webp52.6 KB · Views: 19
 -
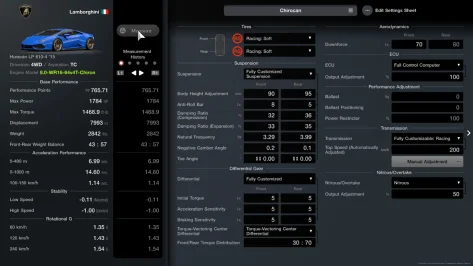 Chirocan Suspension.webp60.5 KB · Views: 14
 -
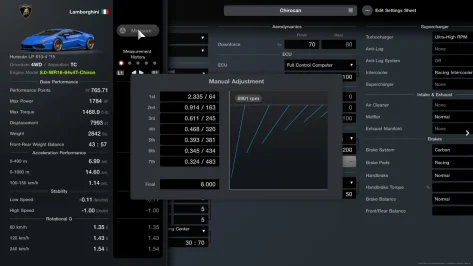 Chirocan Transmission.webp51.7 KB · Views: 18
 -
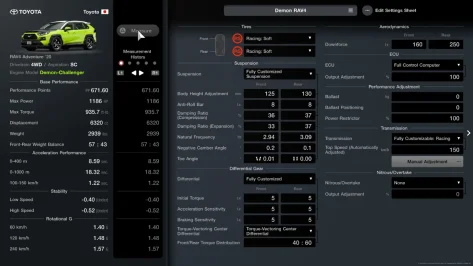 Demon RAV4 Suspension.webp61.2 KB · Views: 17
 -
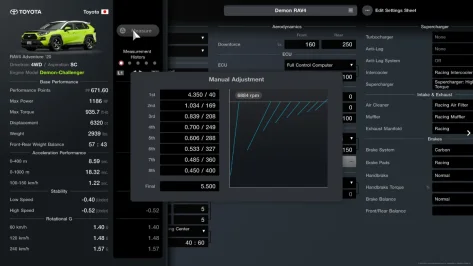 Demon RAV4 Transmission.webp53.6 KB · Views: 17
 -
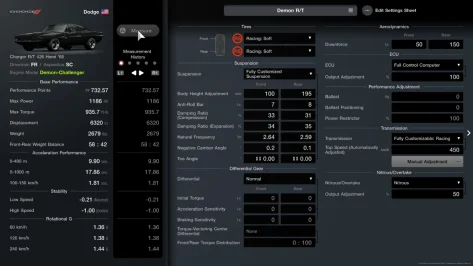 Demon RT Suspension.webp57.9 KB · Views: 18
 -
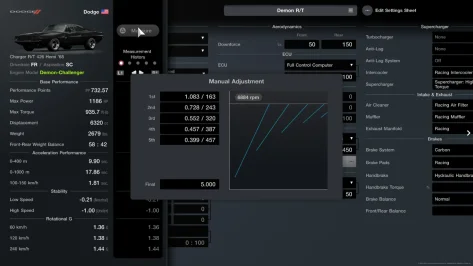 Demon RT Transmission.webp49.2 KB · Views: 13
 -
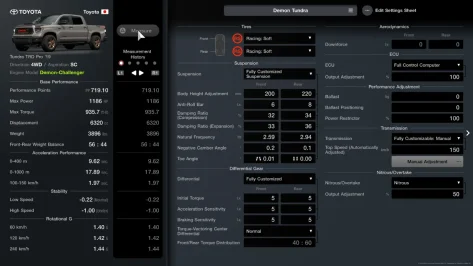 Demon Tundra Suspension.webp60.1 KB · Views: 20
 -
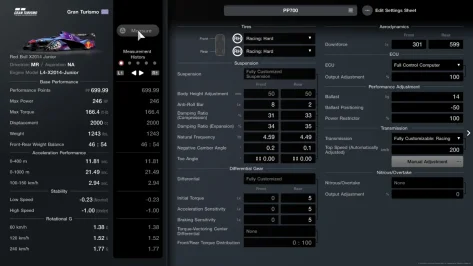 Fighting Bull Suspension.webp58 KB · Views: 14
 -
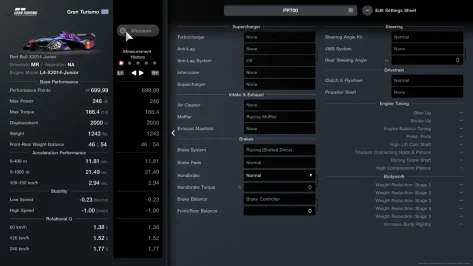 Fighting Bull Modifications.webp50.8 KB · Views: 16
 -
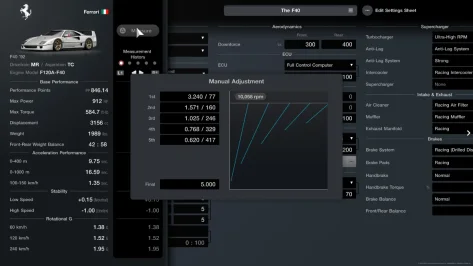 F40 Transmission.webp50.2 KB · Views: 17
 -
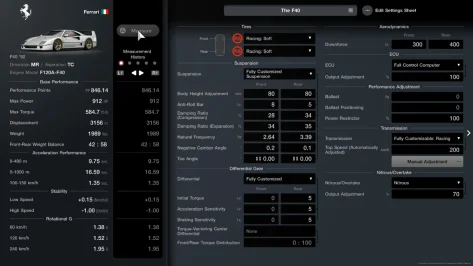 F40 Suspension.webp57.7 KB · Views: 16
 -
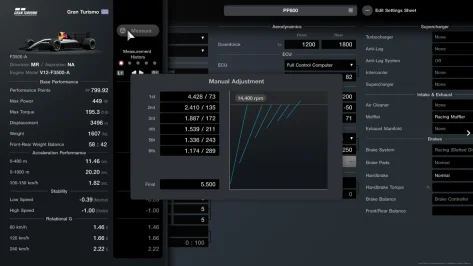 F1 Transmission.webp48.7 KB · Views: 16
 -
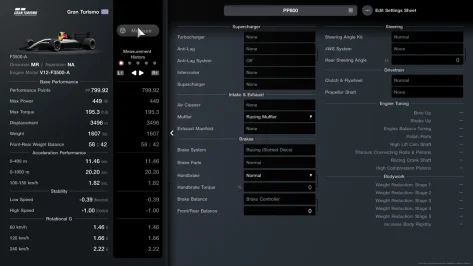 F1 Modifications.webp49.2 KB · Views: 14
 -
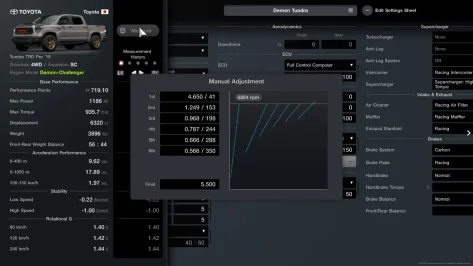 Demon Tundra Transmission.webp52.2 KB · Views: 11
Last edited: