Gran Turismo World Series 2026
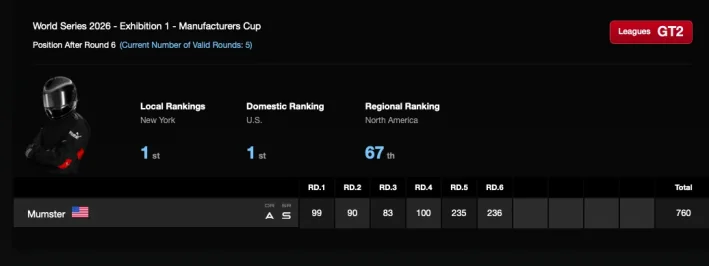
Exhibition 1 — Manufacturers Cup — Season Summary
Driver: Mumster
Manufacturer: Subaru
Final DR/SR: A / S
Exhibition 1 was less a sprint than a study in setup discipline, tire strategy, weather reading, I drove for Subaru, alternating between the high downforce BRZ GT300 and the high power WRX Gr.3/Gr.4 depending on what each circuit demanded. (and which one the aliens picked 😂)
Round 1
Barcelona-Catalunya GP (No Chicane)
BRZ GT300 '21
P4
Round 2
Fuji Short
WRX Gr.4
P6
Round 3
Dragon Trail Gardens
BRZ GT300 '21
P7
Round 4
Sardegna Road Track A
WRX Gr.3
P4
Round 5
Bathurst (Mount Panorama)
WRX Gr.4
P5
Round 6
Nurburgring Endurance
BRZ GT300 '21
P5
Rounds 1–3: Finding the System
The series opened at Barcelona with a discovery that would shape every round after it. After running the conventional strategy in race one, medium tires first, a late stop for hards, and losing three positions in a traffic choked pit cycle, we reversed it: start on the mandatory hard, pit at the end of lap one, then run the remaining laps on mediums with a lighter fuel load reducing tire wear. The reverse strategy turned a P7 into a P4. The principle, do the mandatory compound when it costs least, became a recurring theme.
Barcelona also surfaced the technical thread that ran through the entire season: a brake ramp rate habit. Telemetry showed I was braking earlier than the reference with a slower pressure build, arriving at the correct release point but surrendering forty plus feet of acceleration distance every zone. Not a peak pressure problem, a shape of the brake curve problem. It would resurface at Fuji, Sardegna, and Bathurst, and chipping away at it became the quiet through line of development.
Fuji Short brought the WRX Gr.4 and a setup fight. Carrying +5 rear brake balance over from the BRZ left the all wheel drive car nervous and forced long, stabilizing brake holds. Dropping to +1, then to -1, reasoned out from trail braking physics, where a loaded front tire both steers and scrubs, transformed the car. A P6. Dragon Trail Gardens then delivered the season's first taste of weather: a wet to dry race where the BRZ's downforce became a genuine weapon and a P15 to P7 recovery proved that clean racecraft in chaos was worth more than raw pace.
Round 4: The System Pays Off
Sardegna was where preparation and execution converged.
@Moose78 with tire wear modeling on the forums pointed to a counterintuitive 6RS-9RM split, start on the faster soft, pit early, finish on the durable medium. In the second race we executed it perfectly: the only driver to pit after lap six, emerging on fresh rubber with a one second cushion that grew to three by the flag. A P4. The round also crystallized a recurring weakness, a slow qualifying warm up that needed roughly five laps to reach pace, a problem that a four minute session would punish hard at the next round.
Round 5: Bathurst and the Breakthrough
Mount Panorama was a track I hadn't driven seriously since my D rated days, effectively a new circuit, and one of the most unforgiving. The preparation here was the most disciplined of the season: I studied the layout sector by sector, learning which kerbs could be attacked and which would end a race, and crucially, diagnosing a hardware fault. A brake pedal dead zone issue, fixed with help from
@LOGI_Rich and rebuilding the PS5 database, had been quietly corrupting brake inputs, meaning much of the season's earlier brake balance data had been gathered on faulty hardware. With the fix in place, the car finally responded predictably.
Two findings defined the round. First, the qualifying fix: running hot laps right up to the session rather than starting cold. Back to back races proved it, P14 to P9 cold, then P9 to P5 with fifteen minutes of warmup immediately beforehand. Second, dynamic brake balance: starting at -3 on cold tires to avoid front lock, then moving to -5 once they warmed for maximum turn in. A P5 finish, and somewhere in the middle of it all, the driver rating went from B to A.
Round 6: The Green Hell Finale
The Nurburgring Endurance closed the season the way it deserved to be closed, with my best drive of the season. The round threw genuinely random weather, different in every session, predictable only by reading the animated radar on the pre race menu. The car choice was settled decisively: independent testing, alien leaderboard data, and the BRZ's class leading tire preservation and downforce all pointed the same direction, and the wet conditions only sharpened the case.
Then qualifying was ruined by a collision that dropped me to last on the grid. What followed was a bit of luck in weather and tire strategy. Seeing yellow on the rain map, I started on full wets and went from last to seventh in two laps. A two lap gamble on hards as the track dried, then returning rain prompted a switch to intermediates for the final lap. That call won the race within the race: while the cars ahead struggled on hards, I gained three positions to finish P5, almost catching fourth. Last to fifth on the most demanding track in the game, in changing weather, felt amazing.
Behind the Result: The Team
No strong season is run alone, and this one leaned heavily on the GTPlanet community.
@Moose78 was indispensable. His tire wear testing and strategy modeling underpinned the most important calls of the season: the 6RS-9RM split that delivered P4 at Sardegna, the lap six pit window and tire life data at Bathurst, and the weather pattern and tire life findings that made the Nurburgring finale navigable. Time and again, the right strategy started with Moose’s numbers and was refined from there.
@BGreenFace and the wider forum contributed race reports, brake balance notes, and the tire selection thresholds that proved their worth in the wet at the Nurburgring and elsewhere, and L. Burton served as a consistent benchmark on the leaderboards. The data first discipline that defined the season was a collaborative effort, community testing setting the direction, telemetry refining the detail.
Car Selection Verdict
@Tidgney did independent profiling and confirmed what the season's results already suggested: Subaru's two car flexibility is a structural advantage. The WRX is the straight line and fuel weapon, strong at high speed, fuel heavy circuits. The BRZ GT300 is the cornering and tire preservation specialist, dominant on technical, wear limited, and wet tracks thanks to class leading downforce. The finale proved the point emphatically, where the two cars were dead even in the dry, the BRZ's tire life and wet stability made it the only sensible choice.
Exhibition 1 complete. On to the next one.