You are using an out of date browser. It may not display this or other websites correctly.
You should upgrade or use an alternative browser.
You should upgrade or use an alternative browser.
need help fine-tuning the gears of my Minolta @ 'Ring
- Thread starter Flynn77
- 7 comments
- 2,765 views
")
- 1,034

- Portugal
- fabmaru
See this: https://www.gtplanet.net/forum/showthread.php?t=100545
or this:https://www.gtplanet.net/forum/showthread.php?t=60395
or maybe this:https://www.gtplanet.net/forum/showthread.php?t=98888
or you could use the search bar and look for more.
or this:https://www.gtplanet.net/forum/showthread.php?t=60395
or maybe this:https://www.gtplanet.net/forum/showthread.php?t=98888
or you could use the search bar and look for more.
- 379

- Florissant, MO
Fab: He's looking for something specific that has not really been laid out in great detail. Your first and second link are to suspension tunes, and only the first one really addresses the 'Ring. The third link was to the top speed setup. None of those are what he's seeking.
If you have specific transmission suggestions, I'm certain that they'd be welcomed.
That said, there's a useful tool called the "tranny trick" and no, it does NOT require you to compromise your morals and do something you would otherwise find unacceptable. You go into the transmission setup and set the final gear ratio all the way to the right (usually 5.500 or some such figure) then set the autoset slider to 25 then back to 1. Do NOT touch the autoset slider again. Adjust the final gear to suit your needs for the track. I typically start testing prototypes with the tranny trick and a final drive of 3.73 or so, but you can season it to flavor. You can also go into the individual gears and fine tune (as you're already aware). Just DON'T TOUCH THE AUTOSET SLIDER AGAIN, or you will reverse the effect of the 'tranny trick.'
Now, with your needs for the 'Ring, you probably need something with quick acceleration out of the hole, since there are more low-speed corners than high-speed. That said, I would recommend a lower final gearset, something at or around 4.00 to 4.11. That should give you a top speed approaching 200 or so, but will get you lots of oomph out of the tight spaces. The only real section where you can stretch your legs is Dottinger-Hohe, and the top speed of ~200mph should be sufficient there. Anything less, and it'll be TOO slow on the straights, and anything more, and it won't have the kick you need for the tight spaces.
Hope this helps.
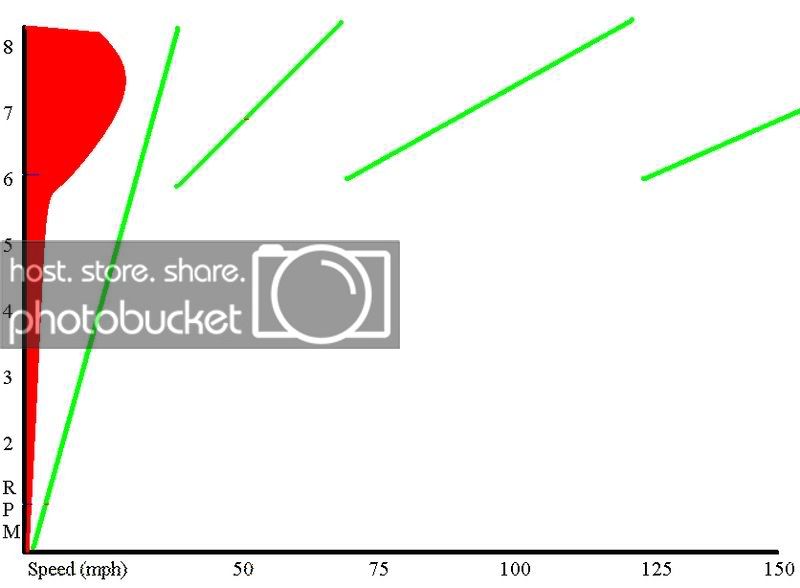
EDIT: (just in case ANYONE is unaware) The graph that shows the relative spacing of the gears is more than just a funny looking picture with green lines. If you can superimpose somewhat of a graph, with both sides approaching zero as you near the bottom left corner, you can make some more sense of it. The x-axis (horizontal orientation) denotes forward velocity and the y-axis (vertical orientation) denotes engine revolutions. Theoretically, the uppermost right corner of the graph represents the car at max revs and 200 mph (320 km/h for us metric users).
Additionally, the green bars represent not the maximum effective rev range for the gear, but the usable rev range for the gear. In other words, the next gear will pick up where the previous gear left off and continue to max revs.
This is further illustrated by manipulating a single gear: take 4th for example. If you were to go into the gear itself and set it all the way to maximum, you'd shorten the effective range of 5th by a substantial margin. In addition, you would also notice that the lower end of 4th's marker would begin to extend downward quite a bit, which may make the gap between 3rd and 4th too wide for the engine's powerband to handle. Furthermore, if you set it to minimum, you'd extend the usable range of 5th, probably beyond its actual effective range, much as 4th in the previous step.
You can use this to your advantage when you are wanting to tune the transmission to more effectively match your power map. Of course, you have to have a pretty decent working knowledge of that, and the mental ability to superimpose the dyno chart from the main setup page over the transmission chart on the settings page will go a long way toward aiding in that customization.
...whew. That was a lot.
And here's a visual that may potentially help you see it as I've tried to describe (not to perfect scale, naturally):
If you have specific transmission suggestions, I'm certain that they'd be welcomed.
That said, there's a useful tool called the "tranny trick" and no, it does NOT require you to compromise your morals and do something you would otherwise find unacceptable. You go into the transmission setup and set the final gear ratio all the way to the right (usually 5.500 or some such figure) then set the autoset slider to 25 then back to 1. Do NOT touch the autoset slider again. Adjust the final gear to suit your needs for the track. I typically start testing prototypes with the tranny trick and a final drive of 3.73 or so, but you can season it to flavor. You can also go into the individual gears and fine tune (as you're already aware). Just DON'T TOUCH THE AUTOSET SLIDER AGAIN, or you will reverse the effect of the 'tranny trick.'
Now, with your needs for the 'Ring, you probably need something with quick acceleration out of the hole, since there are more low-speed corners than high-speed. That said, I would recommend a lower final gearset, something at or around 4.00 to 4.11. That should give you a top speed approaching 200 or so, but will get you lots of oomph out of the tight spaces. The only real section where you can stretch your legs is Dottinger-Hohe, and the top speed of ~200mph should be sufficient there. Anything less, and it'll be TOO slow on the straights, and anything more, and it won't have the kick you need for the tight spaces.
Hope this helps.
EDIT: (just in case ANYONE is unaware) The graph that shows the relative spacing of the gears is more than just a funny looking picture with green lines. If you can superimpose somewhat of a graph, with both sides approaching zero as you near the bottom left corner, you can make some more sense of it. The x-axis (horizontal orientation) denotes forward velocity and the y-axis (vertical orientation) denotes engine revolutions. Theoretically, the uppermost right corner of the graph represents the car at max revs and 200 mph (320 km/h for us metric users).
Additionally, the green bars represent not the maximum effective rev range for the gear, but the usable rev range for the gear. In other words, the next gear will pick up where the previous gear left off and continue to max revs.
This is further illustrated by manipulating a single gear: take 4th for example. If you were to go into the gear itself and set it all the way to maximum, you'd shorten the effective range of 5th by a substantial margin. In addition, you would also notice that the lower end of 4th's marker would begin to extend downward quite a bit, which may make the gap between 3rd and 4th too wide for the engine's powerband to handle. Furthermore, if you set it to minimum, you'd extend the usable range of 5th, probably beyond its actual effective range, much as 4th in the previous step.
You can use this to your advantage when you are wanting to tune the transmission to more effectively match your power map. Of course, you have to have a pretty decent working knowledge of that, and the mental ability to superimpose the dyno chart from the main setup page over the transmission chart on the settings page will go a long way toward aiding in that customization.
...whew. That was a lot.
And here's a visual that may potentially help you see it as I've tried to describe (not to perfect scale, naturally):
Last edited:
- 379
- Florissant, MO
Prevailing theory is that lower gears net higher acceleration at the expense of top speed, and taller gears net higher speed at the expense of acceleration. It is an inverse theorem. However, it is sometimes JUST theoretical. Best bet is to try it and see.
I would suggest give both transmission setups a shot at a standard track of your choice, such as Infineon (which has many of the same features as the 'Ring, like rough surface, altitude changes mid-corner, etc) and see which one gives you a lower time. Then take it to the 1000m acceleration test and see which one nets you a higher top speed and/or lower time.
I would suggest give both transmission setups a shot at a standard track of your choice, such as Infineon (which has many of the same features as the 'Ring, like rough surface, altitude changes mid-corner, etc) and see which one gives you a lower time. Then take it to the 1000m acceleration test and see which one nets you a higher top speed and/or lower time.
- 379
- Florissant, MO
Not a bad idea. I think I might also have to start looking at splits on the 'Ring.
T1 - T3 runs from the low spot just before Flugplatz to just after Adenaur Forst. Long, high-speed section with some quick, sharp turns interspersed. If you start topping out before reaching Schwedenkreuz (kink just before the tight right-hand Auremburg), then your gears are too low to be effective.
On the converse, if your car is not in at least 5th before the tight, uphill left-hander just before the Adenaur Forst complex, your gears are too high. Gotta balance the acceleration and top speed to get the most out of the course.
Last edited: