Photoshop 'Badboy' bonnet look

  • Thread starter Thread starter donbenni
  • 17 comments
  • 1,070 views
Messages
4,247
I've been asked how to do this, and thought i'd post a tut so everyone else can see too.

I know i can't cover everything in just four posts (i'll try though), so ask if there's something else you need to know.

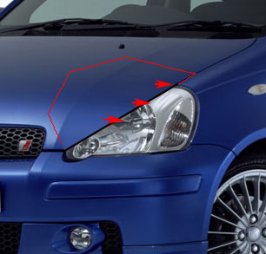
Right well firstly, using the line tool (i had 2 pixel weight) and with black selected draw a line where you want the 'brow' to go. For this Yaris, as in most of my pics where i use this, i drew a line connecting the bonnet lines :odd: ... i dunno ... just look in the pic V V V

 

Attachments

  • 1.jpg
    1.jpg
    16.5 KB · Views: 108
Second you need to select your working area on the background layer. This area only matters on the right side (where the black line is) as the smudge tool that we're gonna use drags info from outside your selected area into your area, but not the other way around... pic V V V
 

Attachments

  • 3.jpg
    3.jpg
    17.2 KB · Views: 109
You use the polygonal lasso tool for that, not a red line tool ;)

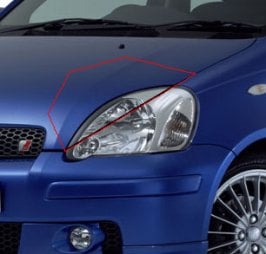
Lastly select the smudge tool. Shift+R will get you this tool if you press it enough times. It's under the blur/sharpen/smudge list and looks like a pointing hand.

I had the settings of brush size 19 hard and strength 85. Then pretty much just drag from just to the left of the light (see pic) to the black line. Work your way down from top to bottom making sure that there are no dodgy areas.

If done properly, it should nice, and menacing (hence 'badboy'... i didn't make that up you know)

Questions?
 

Attachments

  • 4.jpg
    4.jpg
    16.4 KB · Views: 108
Couldn't you just use a pixel-stretching technique to accomplish the same thing as the blurring?
 
I do all of that except I use the Air Brush instead of the smudge tool. Good tutorial though. 👍
 
Thanks man 👍 I was gonna include pictures of what i was doing, but that would've taken too long :p
 
Originally posted by Jpec07
Couldn't you just use a pixel-stretching technique to accomplish the same thing as the blurring?

Yes you could... congratulations, would you like a Blue Peter badge?
 
Originally posted by donbenni
Thanks man 👍 I was gonna include pictures of what i was doing, but that would've taken too long :p


No problem. :) If you need anymore help, just ask. :)
 
i dont understand till step 2 :(
 
donbenni, that is the best tutorial I have seen on performing this procedure in a while. Thank you.
 
I think maybe he is wondering how to make a work area in more detail than you described it earlier (step 2 I believe), I actually don't know what you did either.
 
I dont understand step 2 and 3 , english isnt my first language.I understand a lot, but i didnt understand the step 2 and 3
 
Step2: Using the polygonal lasso tool (the one that draws straight lines [can be selected by right clicking on the lasso tool]), draw an area similar to what i've shown. This area is merely to keep all those pixels that we're gonna move in the next step in a confined space.

Step3: Using the smudge tool (the pointy hand[shift+r]), smudge from left to right (basically towards the black you drew initially). BUT only start just to the left of the light, so that the colours you are smudging are as similar to the ones you want as possible. I.e. if you started smudging too far to the left you would be selecting a lighter colour (the wrong colour therefore) than you want.

I really can't explain much better, sorry
 
Thats good i understand now 👍
 
Back