Took the laptop apart last weekend (56k warning)

  • Thread starter Thread starter Geeky1
  • 25 comments
  • 1,004 views
Messages
229
Took it apart to clean out the 3rd heatsink and fan assembly, which is not externally accessible, and because I wanted to try a much slower CPU in it (I'm thinking about buying a mobile CPU for it, and the slower CPU I was going to put in it has about the same power requirements and heat output that the mobile I'm looking at does... unfortunately the slower CPU didn't work), AND because I've been dying to tear it apart since I got it anyhow.

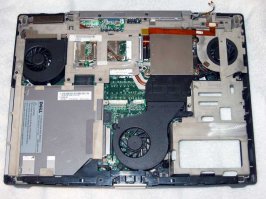
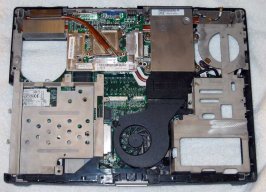
The first two thumbnails are what it would look like if you pulled the LCD, keyboard, and wrist rest, then reinstalled the keyboard bracket (has to be uninstalled to get the wrist rest off). So basically it's what it'd look like if you could look into the laptop with it assembled. The first pic has the DVD/CD-RW drive installed, the second one has it removed, showing just the corner of the hard drive underneath it.

Then a partially disassembled pic with the bracket out, all the drives out, and the two externally accessible fans out.

After that, there's a pic of the top of the motherboard in its magnesium chassis (which fits inside the plastic outer shell) and one of the bottom in the chassis.

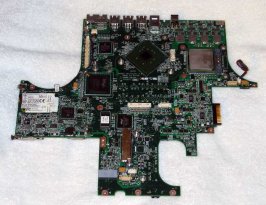
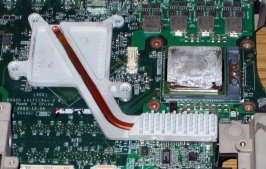
Finally there are a couple of the top and bottom of the motherboard itself, removed from the chassis, one of the video card (Radeon 9800m/256mb), the top and bottom sides of the CPU heatsink assembly with the shroud removed, and one of the chipset heatsink.

11 pics coming up...
//EDIT
You can find the complete specs of the laptop (along with my other computers) in this thread... the laptop pictured here is the Dell XPS...
https://www.gtplanet.net/forum/showpost.php?p=1548433&postcount=17

Briefly though, it has a 3.4GHz P4E, 1GB of dual channel DDR400, and a 256MB Radeon 9800m (which is a Radeon X800se with power saving features... don't ask me why they didn't call it the X800se-m, because I don't know, but they didn't)
 

Attachments

  • crossection_withdvd.jpg
    crossection_withdvd.jpg
    62.6 KB · Views: 32
  • crossection_nodvd.jpg
    crossection_nodvd.jpg
    61.7 KB · Views: 16
  • partially_disassembled.jpg
    partially_disassembled.jpg
    65.4 KB · Views: 12
  • chassis_top.jpg
    chassis_top.jpg
    75.3 KB · Views: 15
  • chassis_bottom.jpg
    chassis_bottom.jpg
    61.8 KB · Views: 20
Next 5 pics... as I mentioned in the 1st post, they are, in order:
1. top of the mobo
2. bottom of the mobo
3. video card (the XPS has a modular video card)
4. top side of the CPU heatsink assembly
5. bottom side of the CPU heatsink assembly
 

Attachments

  • heatsink_bottom.jpg
    heatsink_bottom.jpg
    31.4 KB · Views: 10
  • heatsink_top.jpg
    heatsink_top.jpg
    24.9 KB · Views: 12
  • video_card.jpg
    video_card.jpg
    88.9 KB · Views: 16
  • mobo_bottom.jpg
    mobo_bottom.jpg
    78.3 KB · Views: 13
  • mobo_top.jpg
    mobo_top.jpg
    78.8 KB · Views: 12
One of these days I'll pull the Sager apart again and get some pics of that. Laptops aren't like desktops... there are very few, if any, industry standards governing the size, shape, and location of the parts in them. No two laptops are exactly alike... the XPS has a hell of a lot of space taken up for cooling purposes (the consequences of having a 3.4GHz desktop P4 and an X800SE in a laptop)... pull apart a smaller notebook and it'll be entirely different. :)

The one nice thing about Dell (if nothing else) is that they publish the service manuals for their notebooks. This makes disassembling them MUCH easier, especially since the service manuals have a page you can print out called a "screw identification guide". It lists the size and quantity of screws holding everything in the notebook in place. And it gives you a grid to put them in to keep them organized while you're pulling the notebook apart. Very cool- managed to get the notebook apart and back together with no extra screws, no missing screws, and all the screws went back exactly where they belonged :)
 
Cool! Never seen the inside of a laptop before.
I'd love to take mine apart, but my mum would kill me, regardless of whether i put it back together again.
 
:lol:

Not to start anything or anything, but my motto has always been that old "what my parents don't know can't hurt them" thing...

However, if it's not a Dell I suggest you don't take it apart unless you've got a lot of experience with desktops... you'll never get it back together without the service manual (and dell is the only one that publishes those for free that i know of) unless you do...

I do, however, suggest you download, install, and use one of the following programs
http://www.diefer.de/i8kfan/index.html -I8K (for Dell laptops ONLY)
or
http://dssc3031.ece.cmu.edu/~tamaru/mobilemeter/mobilemeterreadme-e.htm Mobilemeter (works with most laptops... It doesn't seem to be able to get any info from Toshibas but it doesn't cause problems with them)
http://www.geocities.co.jp/SiliconValley-Oakland/8259/release/0310/mm0310.zip (download link for Mobilemeter)
 
I took apart an older Compaq one time, but I ran into a few problems. They decided, unfortunately, to use odd-ball screws that required "special" tools. I pretty much flat out declined to think such a thought.. Got the handy philips out, starting turning away. I did get the screws out, however I also stripped the stuffing out of them... Never did get that thing back together.

But that's not really a back thing, it didn't actually work. The whole battery assembly friend, the screen was half dead, the CD drive nor the floppy drive worked, which is why I did do such a stupid thing like using a philips on the screw heads.
 
Compaq does that. I suggest you get a security bit set. They're dirt cheap and they come in handy for all sorts of things.
 
i fix notebook computers all the time :) how many screws did you have left over? ;) some of them are really easy to work on and very modular, notably dells and newer IBMs and HPs

alot of older notebooks are bastards to work on, having in excess of 50 screws, and small shaped pieces of metal to hold in cables and as stoppers or holders or for no discernable reason whatsoever. sometimes a few of those find their way into the bin at the end of the fixing session :p
 
If you like this thread you'l love the crazy guy who takes brand new apple computers / laptops apart the minute he gets them! ........I hope he knows how to put them back together......!!!!!!

On the webpage below scroll down the right hand side and find the special coloum
.......then choose what you fancy.........Apple stuff looks so cool inside!

http://www.kodawarisan.com/
 
Super Jamie
i fix notebook computers all the time :) how many screws did you have left over? ;)

As scary as it seemed only one after the first time but I took it apart about 20 times just to fix the damn power adaptor plug hole on the motherboard. Each time I took it apart however some screws had different locations somehow. :dopey:
 
neat. Got any ideas how to take apart my Toshiba? The main problem is that the screws to the body were all pretty badly stripped and now no screwdriver will grip them :(. I tried an extractor tool but it's too wide to fit all the way in there.
 
emad
neat. Got any ideas how to take apart my Toshiba? The main problem is that the screws to the body were all pretty badly stripped and now no screwdriver will grip them :(. I tried an extractor tool but it's too wide to fit all the way in there.

:scared: How did that happen?! I stripped one but it wasn't a crucial area and it was plastic so I just don't tighten it all the way.
 
How do you guys manage to strip ANY of them? Am I the only one that uses correctly sized screwdrivers? :p

try using a flathead screwdriver. If it's not completely rounded off you should be able to get a grip on something and get it out.
 
VipFREAK
:scared: How did that happen?! I stripped one but it wasn't a crucial area and it was plastic so I just don't tighten it all the way.
poorly manufactured and the people at toshiba's tech support 8 years ago were idiots 👍
 
emad
poorly manufactured and the people at toshiba's tech support 8 years ago were idiots 👍

Sweet, I'll believe that one then... I didn't think they were that bad. I guess I'm glad I did go with HP. :crazy:👍
 
VipFREAK
Sweet, I'll believe that one then... I didn't think they were that bad. I guess I'm glad I did go with HP. :crazy:👍
But it's an 8 year old laptop. They've seriously improved over the years. They're still some of the best business use laptops around
 
emad
But it's an 8 year old laptop. They've seriously improved over the years. They're still some of the best business use laptops around

Well... ok I guess because mine is only 3-4 yrs. old.
 
That looks like the innards of my brother's Dell Inspiron 9100. He takes it apart to clean it all the time and also installed copper heatsinks and arctic silver on the CPU and GPU. He's overclocking his 9700m now.
 
Event Horizon
That looks like the innards of my brother's Dell Inspiron 9100. He takes it apart to clean it all the time and also installed copper heatsinks and arctic silver on the CPU and GPU. He's overclocking his 9700m now.

That would be because the 9100 is the same basic notebook as the XPS, with one or two differences... the main one being that the XPS was offered with a 9800m/256mb graphics card, while the 9100 was only offered with a 9700m/128mb graphics card. :)
 
some inspirons/latitudes even use the same systemboard with a different bios image. i'd often get a motherboard from spares for one, with the others' bios image on it. the wierd thing is, one model's bios would be at, say, revision 5 and the sister product would be at revision 18. on the same piece of hardware. wtf?
 

Latest Posts

Back