ANNIHILATOR90's Course Maker Tracks

796
Belgium
Belgium
ANNIHILATOR90
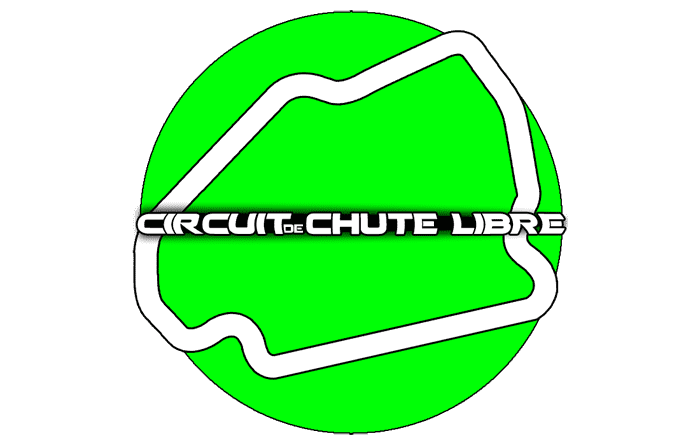
Hello, and welcome to the thread with all my tracks from the Course Maker.

So first of all what can you expect from my tracks, what are they like. I'd consider my tracks realistic to perhaps semi-realistic, but hopefully that doesn't scare you without even giving them a try. I have no such thing as jumps, extreme camber, steep downhill corners... in general, design flaws.

Most real tracks aren't a Nürburgring Nordschleife, and that's what I also opt for, normal length circuits. Also because the different sections are easier to remember that way. It prevents the tracks from feeling tedious, and gives them a better replay value for other players I think.

I try to make tracks that have a bit of a unique feel to it, for as far as that is possible in the Course Maker. I select tracks on how they feel and how much I enjoy them, not on how they look or simply because I want to make a new track, no. I also make sure to try out all the different parameters of the different sections once I have a layout that I like.
A few corners do have some banking, and there are sections with elevation changes, though my main goal is to keep it both credible and fun without design flaws.

Hopefully you will enjoy my tracks, take a look around.


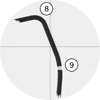
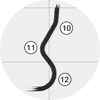
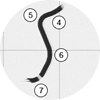
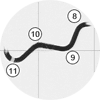
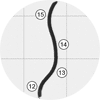
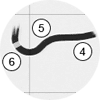
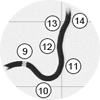
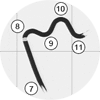
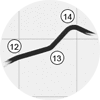
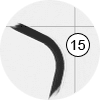
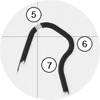
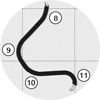
Here's a list of my tracks, click on the icons below to jump to a post with more information.


If you want to obtain any of these tracks please post a message in here and send a FR (friend request) to ANNIHILATOR90 on PSN (Playstation Network). Include what track(s) you would like to obtain and please, in case you choose to not leave a message in here, don't send a blank FR. If I don't know who you are or what your intentions are you risk being ignored.
If you want to download more than one track, please notify me (by PSN message, GT5 mail, PM, etc.) when you've downloaded the track that was currently online, so I know when I can put the next track up for you.


In case you don't know how to download a track from another player, I've explained it below.
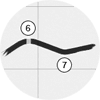
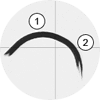
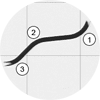
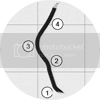
  • So first of all you have to be friends on PSN, if that's the case start Gran Turismo 5 and go to GT Mode.
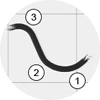
  • Choose either the PROFILE or COMMUNITY tab (1) and scroll to my account; ANNIHILATOR90 (2). I'm most likely somewhere at the top of the list since I'm A-Spec Level 40 and my account starts with a capital A.
  • Go to the Track List button, the button with the circuit (3), select the circuit and click Download.
  • You now have the track. However if you want to use it in Arcade Mode, Practice or an Online Lobby you must first add the track to your favourites. You can add a track as a favourite by going to your Track List where the track will be listed now, here you can choose to add to Favourite.
 
Last edited:
CircuitDeChuteLibre-ArtworkA.png
SHORT DESCRIPTION

Circuit De Chute Libre - Eifel (Circuit) - is a rather short to normal length circuit, with some fast parts. It's a circuit good for all cars, but preferably faster sports cars or race cars.
Short but intense.


LAP STATS AND VIDEO

TRACK LENGTH
4157.0 m / 2.58 miles
STRAIGHT LENGTH
871.5 m / 0.54 miles
ELEVATION DIFFERENCE
92.7 m / 304.2 ft
CORNERS
12

I'm using a stock Lamborghini Aventador LP 700-4 ’11 in this video.


LAP TIMES

All cars are as always entirely stock, never claiming to be an extremely good driver.
  • 1:18.946 - Lister Storm V12 Race Car ’99
  • 1:25.776 - Lamborghini Aventador LP 700-4 ’11
  • 1.31.177 - Honda NSX Type R '02


A TOUR AROUND THE TRACK

A full map of the track is available here.

SECTION 1 - So, after the long start / finish straight we have to brake hard shifting back to 3rd or 2nd gear for corner 1, which is a really good corner to mess up already. I’ve messed up a lot here, and still do from time to time if I’m not familiar with the car.
You might want to use a bit of an aid to know when to start braking. A guideline like that could be the pit stop line in the middle right of the tarmac.
It's not easy, especially because you only see the corner when you should already be braking, but getting it perfect is satisfying.

Corner 2 is similar to the 1st corner but it goes left and with the lower speed it's harder to mess up, wait just a little longer before accelerating since this corner is a little sharper.

Corner 3 is not very special, but it can be a bit hard to find a good line at first. It’s attempting to go too fast sometimes.
CDCL-1-2-3.png

I take the next two corners, corners 4 and 5, as one big corner even though they're not that close to each other. You want to take corner 4 in a way so you can successfully take corner 5, don't cut corner 4 on the inside.
At first this was an annoying part for me because the cars I used couldn't make up their minds if they wanted to oversteer or understeer. You start out good, but then halfway through you start to oversteer or go too wide if you keep your foot on the gas. You also can’t see too far up ahead since it goes uphill. Nor is it easy to turn in a constant line, which you should try to do, because you don't see corner 5 yet when going into corner 4.
I suggest that you keep left as long as possible and only cut the inside at the very end of corner 5, if the car allows you to cut it on the inside. Control your throttle, try not to slide if the car is quirky or understeers. As I said, take it as one smooth corner, practice it.
It is possible to take turns 4 and 5 with full throttle but it depends on the car, and the driving line. I myself take this corner mostly so that I’m sure I’m gonna make it through in one piece. Rarely do I take it perfect because it is risky. You don’t want to go off the track right before the next part.


SECTION 2 - After this we get a straight and steep downhill, which makes the speeds climb easily and allows some overtaking. It also gives you a nice overview of the cars ahead of you. If the start / finish straight doesn’t allow you to overtake, here’s your next chance. Chances for overtaking start at section 2 again and end after corner 8 from my experience.
CDCL-4-5.png

SECTION 3 - Corners 6 and 7 really allow you to brake before turning, and accelerate when starting to dive in the corner if the car is stable enough. 6 is definitely my favourite corner of all tracks. You’ll need a bit of a feel for it, go too fast and you’ll hit the barrier. Corner 7 doesn’t even require you to brake in most of the situations actually, you can just dive through it there aren't any other drivers next to you.
CDCL-6-7.png

After another small straight we’re at corner 8, not extremely difficult although you might need to brake pretty hard. You can easily take it in 3rd gear mostly. Coming out of the corner shouldn't be a problem as there's some banking at the exit.


SECTION 4 - Now watch out for corner 9. It’s not a sharp corner but it’s the top of the hill and speed that is dangerous. You can easily lose control, be it when you’re about to reach the top – still going up, or right after – when descending. I suggest you go to the right early and turn the car a bit before reaching the top so that you don’t have to steer while the car doesn't have enough grip, which can easily make the car uncontrollable.
If the car isn’t grippy you’ll automatically slide a little to the left after the top because of the changing altitude percentage and the speed. Perhaps also let go off the throttle for a split second.
CDCL-8-9.png

Turn 10 can be taken in two different ways. I mostly take it by slightly braking before the turn and accelerating when diving in the corner. I mainly do this to keep the car stable, especially after the previous part, just to be safe.
A bit risky, however it can also be taken at full speed, but you’ll need to brake early and hard for the next corner then. It’s fun if you can take it full throttle, especially if you can overtake someone else that way, but mess up and you could crash.

11, go in slow and stick to the inside, starting on the outside makes it hard to go back to the inside. It’s easy to underestimate it.

At 12 keep the car at a steady speed, I personally stay somewhere in the middle of the track. You can easily go too wide when going a little bit too fast, and don’t accelerate too early for the straight either. Also be prepared for the car to bring it's tail out when exiting if there's a lot of power on the back wheels.

CDCL-10-11-12.png

CREATOR'S NOTE

I made this track somewhere in the last quarter of 2011. It was my first time to really mess with the Course Maker, and till this day it's my favourite track. I didn't have to change much about the layout once I got it at the time, though by now I've made several minor changes here and there to make it better overall. At the time I mainly drove with the Lamborghini Aventador on this track, as I got both at around the same time, and therefore the Aventador is also my car of choice here. It's not a walk in the park with this car, though I think the car is very good if you know how it reacts, and on this track it can be very satisfying. In general I like to drive with fast sports cars on my tracks, here it's no different. Although for races with other drivers I prefer race cars that have a bit better handling, don't go too wide and aren't as unpredictable in the corners.
How did I come up with this name? I got it from the steep downhill straight, which made me think of a waterfall at first. I didn't want to call the track to have the word waterfall in its name as that seemed a bit too simplistic. I then thought of free fall, the downhill part makes the cars go into a free fall (well, not really). And in French free fall is chute libre, not that I'm French, nor am I that good at it.

CircuitDeChuteLibre-FooterA.png
 
Last edited:
HorsesForce-ArtworkA.png
SHORT DESCRIPTION

Horses' Force - Eifel (Circuit) - is a normal length circuit, also not long. It has some interesting corner combinations which put the driver with a RWD car to the test. You need good handling for the technical corners, but you're going to need power as well for the area before and after the start/finish line.


LAP STATS AND VIDEO

TRACK LENGTH
4451.4 m / 2.77 miles
STRAIGHT LENGTH
814.0 m / 0.51 miles
ELEVATION DIFFERENCE
76.8 m / 251.9 ft
CORNERS
15

I'm using a stock Dodge Viper SRT10 ACR '08 in this video.


LAP TIMES

All cars are as always entirely stock, never claiming to be an extremely good driver.
  • 1:18.787 - Ford Ford GT LM Race Car
  • 1:30.061 - Dodge Viper SRT10 ACR '08
  • 1.36.803 - Ford Mustang SVT Cobra R '00


A TOUR AROUND THE TRACK

You can find a full map of the track here.

SECTION 1 - After the straight comes one long bend, two turns actually, but it’s barely noticeable that the bend consists out of corners 1 and 2. If the speed is right you can take it in one go without any trouble. If you don’t have the correct speed or driving line, there’s still some room for adjustments. I normally shift 1 or 2 gears before the turn.
HF-1-2.png

SECTION 2 - Corner 3 is a slight right-hander, depending on what car you’re driving with it can be taken without braking.
HF-3.png

Now we have corner 4 and immediately after that a blind corner going left, number 5. Corner 4 doesn’t really involve steering and isn’t really the problem, but it’s the combination with corner 5. If you don’t know the track corner 5 will - literally - surprise you and you’ll most likely go off the track. You want to brake early and hard in corner 4 to tackle corner 5.
If you have problems with finding out where to start braking this is what I always do; I start braking right before the front of my car is about to reach the curbstones on the right of corner 4, the braking point might differ a little between cars. Learn to position the car so that after the braking you can immediately accelerate and turn in the next corner again. You might want to go easy on the gas when exiting corner 5 though, a rear wheel driven car might want to go sideways.

Next is a fast bend going right, corner 6 this one really doesn't involve much explaining... don't touch the brakes.


SECTION 3 - Another corner going right, corner 7. This one is perhaps easy to overestimate. You can, with some cars, take it without braking. If not, brake before the corner and make sure you're as much to the left as possible before starting to turn. Go to the inside and watch out as it goes up when exiting, your car might start to spin a backwheel.
HF-4-5-6-7.png

The next corner to the left is corner 8. There is some banking which facilitates it all, although braking is required. It can also be tricky with other cars around you.

Corner 9 should be taken cautiously, it's easy too go to fast when diving into the corner, and you might 180 your car when exiting with too much power.
So make sure you slow down, and while in the corner just maintain your speed, don't try to speed up already. As always the combination of turning and going downhill will easily make the wheels spin, this turn is a good example of that. When exiting prepare to counter-steer if it likes kicking its tail out.

Corner 10 has again some camber and with many cars you're not required to brake if you pick a good racing line. If the car doesn't have enough grip do brake though, hitting the grass on the outside could make a wheel spin.

The last corner of this section, 11, is not extremely interesting although it's not that easy to see a good driving line here. Practice a little and try to find the limits.

HF-8-9-10-11.png

SECTION 4 - I’m not going to spill too many words on the last few corners in this last section, corners 12, 13, 14 and 15. You can finally start overtaking again without taking too many risks. The worst thing that can happen is losing a bit of time because you picked a not too optimal racing line, but other than that there's a lot of room for mistakes.
Do watch out for the very last corner, with most cars you should brake or at least release the throttle before taking it. It's very easy to underestimate it and going full throttle through it will make you end up in the grass. It'd be a shame to mess up right before the finish line.

HF-12-13-14-15.png

CREATOR'S NOTE

I've only recently made some changes to the first and last section of this circuit. It didn't have the long first turn at first, but instead it had a slight bend and a sharp turn a little further. The first slight bend was more or less a guess of how fast you could take it after the high speeds you got from the straight. I also had a lot of trouble in the sharper corner to get the correct speed. I was either too slow or the tail was kicking out while trying to maintain a speed for that corner.
About the last part, it used to have the same layout, however, it was as wide as the rest of the track. This section bothered me from the start. Besides the very last bend, which was my main issue, the rest of the section wasn't interesting. They were just corners like you have so many corners in the Course Maker. It was also hard to keep a good racing line there, because the turns are rather long you were actually forced to brake halfway, which I hate. Trying out different settings didn't help as I got a downhill corner which I hate even more.
I think the section is better now by widening it a lot, it gives a bit of a unique feel to the section and track and you don't have to brake halfway through a corner.

You might wonder why I came up with the name Horses' Force as it's a bit of a weird name. It didn't have definite name for a long time, I just named it Force D. I also had Force A, B, C, and so on, they were the same track but with different settings when I was still comparing what layout worked best.
So, it was Force D that interested me, and when trying to find a name for it I thought Force had to be part of the name now. I was thinking of something like Driving Force but that's the name of a steering wheel if I'm correct. As I mainly drove the track with American RWD cars it, in some way, it reminded me of a horse. You should probably also know that several decades ago they used to race horses here (well, not really of course).

HorsesForce-FooterA.png
 
Last edited:
StoneHillRaceway-ArtworkA.png
SHORT DESCRIPTION

Stone Hill Raceway - Eifel (Circuit) - is what I would consider one of the closer-to-reality tracks. The first part has elevation changes while the second half is pretty flat. I think this track works better for races than for time trials.


LAP STATS AND VIDEO

TRACK LENGTH
4526.2 m / 2.81 miles
STRAIGHT LENGTH
914.8 m / 0.57 miles
ELEVATION DIFFERENCE
95.1 m / 312.1 ft
CORNERS
23

I'm using a stock Lexus Weds Sport IS350 '08 in this video.


LAP TIMES

All cars are as always entirely stock, never claiming to be an extremely good driver.
  • 1:35.666 - Honda NSX-R Prototype LM Race Car
  • 1:41.110 - Lexus Weds Sport IS350 '08
  • 1:47.398 - Pagani Zonda C12S 7.3 '02


A TOUR AROUND THE TRACK

A full map of the track is available here.

Quick note, I went with 21 corners instead of 23. Some corners are barely noticeable or too close too each other to distinguish.


SECTION 1 - Corners 1 and 2 should be taken as one smooth corner, although you'll need to brake for both corner 1 and corner 2, and perhaps taking it in one smooth line might not really be possible. It's a bit of a guess sometimes.

Corner 3 doesn't require too much braking, it's a pretty fast corner although try not to hit the grass when exiting or that could end up catastrophic.
SHR-1-2-3.png

Corner 4 is a slight bend, just go flat out, cutting it on the inside. You can do this for corner 5 as well but immediately brake hard after it. If you're with multiple drivers near each other you might want to brake here and there for the previous corners to prevent collisions.

Turn 6 is a hard one, and a long turn. As I said earlier, you should brake hard right after or already in corner 5. If the braking was good that's one part done. You now need to maintain a good speed through the corner. You can easily start speeding up too early as you can't see the exit yet, you'll have to wait longer than you might expect. And when speeding up, the steep hill can make the entire car spin out, so be careful. If you don't know the when to start speeding up I suggest you simply wait until you see it's not turning any longer.

SHR-4-5-6.png

SECTION 2 - This section only consist of a small straight good for a first time of overtaking. Corner 7 also starts here but since the bigger half of that corner is in the next section I've explained it there.

SECTION 2 - So after the straight we have a long turn again, corner 7. It can be taken at relatively fast speeds however you should probably brake a little harder as you might expect. It should be possible to brake and then accelerate in one go, so try not to brake again halfway through or simply lift the gas. Unless of course if it's either that or hitting the side, perhaps you could also quickly shift back and up again if you're starting to go wide.

Followed after corner 7 is an even longer bend, corner 8. Stay on the left side unless you can overtake someone else.

SHR-7-8.png

SECTION 4 - Section 4 contains many corners, half of them are barely noticeable however. Brake hard for corner 9, but try not to turn too early as the corner lasts a while and you'll want to be on the right side for the next two corners.

Corner 10 and corner 11 are again corners you'd want to take as one entire turn. Find and practice a good line while controlling your throttle. As you'll be at a low speed when exiting, be careful when accelerating, try not to spin the wheels too much.

I'll describe corners 12, 13 and 14 in one go, they're barely noticeable. Just hit the curbstones and avoid unnecessary steering.
SHR-9-10-11-12-13-14.png

15 and 16 are rather annoying corners, again, take them as one big turn. I still have some problems with finding the good speed and line at times, but I suggest you try not to cut it in the inside.

Corners 17 and 18 are not that much of a problem. If you took the previous two corners well you should be able to go through them full throttle cutting the inside.
SHR-15-16-17-18.png

Depending on the car you can probably go full throttle through corner 19. At certain occasions I do have to lift off the gas as I could go too wide.

Corners 20 and 21 are somewhat similar to corners 4 and 5 on Horses' Force. You need to focus on corner 21 by braking in or even before starting corner 20. It's the last corner for the finish line but try not to take too much risk or you'll brake too late. In corner 21 control your throttle and be prepared for wheelspin when accelerating.

SHR-19-20-21.png

CREATOR'S NOTE

Stone Hill Raceway is my latest track - of the first 5 tracks in case more are added later on. At first it didn't feel like a good-enough track, I didn't really have the feeling of it being something unique, which I always had with the previous 4 tracks. Although the feeling of it being a good circuit grew the more I raced on it. It might also have to do with the fact that during testing and such I always do laps my own. And I don't think this circuit is that interesting for cruising or time trials, it's really for races with other drivers.
I came up with Stone Hill Raceway because to begin with, I thought the tracks was a bit more serious than the other tracks. So I wanted a name the could be real, although it's still rather simplistic. The first part of the track, with the elevation reminded me of both Scotland and Stonehenge. The track also made me think of Apricot Hill Raceway... so the result was Stone Hill Raceway.

StoneHillRaceway-FooterA.png
 
Last edited:
RouteDesChampsOuverts-ArtworkA.png
SHORT DESCRIPTION

Route Des Champs Ouverts - Toscana Tarmac - is I think the best choice if you seek for a realistic track, depending if you can cope with the Toscana (Tarmac) theme. It has very decent corners without anything weird, yet it's very challenging. I think the layout in general, and not too extreme height differences make it the most interesting for those who want a realistic track.


LAP STATS AND VIDEO

TRACK LENGTH
4627.2 m / 2.88 miles
STRAIGHT LENGTH
954.0 m / 0.57 miles
ELEVATION DIFFERENCE
40.4 m / 132.6 ft
CORNERS
15

I'm using a stock Ford Ford GT LM Spec II Test Car in this video.


LAP TIMES

All cars are as always entirely stock, never claiming to be an extremely good driver.
  • 1:32.840 - Ford Ford GT LM Spec II Test Car
  • 1:35.159 - Nissan MOTUL AUTECH GT-R '08
  • 1:48.855 - Citroën C4 WRC '08


A TOUR AROUND THE TRACK

A full map of the track is available here.

SECTION 1 - You must brake for corner 1, though it's still a fast corner, time your braking and accelerating right.
Corner 2 and 3 are pretty similar, besides that 2 is left and 3 is right. If your car has enough grip these corners can be taken flat out, although you might want to let go of the pedal for a split second or shift one gear back and up to be sure.

RDCO-1-2-3.png

SECTION 2 - Corner 4 requires pretty hard braking, try not to brake too late and maintain a constant speed in the corner.

You can take corner 5 at around 3rd gear. After braking you should be able to immediately accelerate again. I'm going to ignore bend 6 as it doesn't influence much besides your racing line.
RDCO-4-5-6.png

Also skipping the unnoticeable bend on the straight, corner 7. It's a good place for overtaking but be carefull of the sand strokes at both sides... moving on to the next section.


SECTION 3 - A hard brake follows after the straight. Surprisingly, I rarely miscalculate when to start braking for 8, I hope the same applies to you.
When accelerating again, and this counts for corners 9, 10 and 11 as well, be easy on the gas. You don't want to lose time spinning the wheels, and definitely don't want to go sideways - when racing at least. For 9 and 10 go in slow, maintain a speed in the corner and once your car is right-angled start speeding up for a short distance until the next corner.
For corner 11 do the same only be extra cautious when exiting. You can't see the exit and it's a dangerous exit. Wait with speeding up once the car is right-angled for the short straight. If you accelerate too hard and early the entire car could spin out.

RDCO-7-8-9-10-11.png

SECTION 4 - 12 is a very slight bend, make sure you're at the right side after this bend for corner 13. Here you can either decide to brake or lift off the gas, or go through it flat out. Most cars allow you to go flat out, it's pretty exciting. If you go flat out you have to brake very hard for corner 14 though. If the car is not able to handle it or you took turn 13, ironic number, with too much speed or a bad racing line you'll hit the sand stroke and could loose control.
As I said, for corner 14 you should brake hard and fairly early, but don't brake when the car is on a sand stroke, nor before it's going go over a sand stroke.

So finally corner 14, let's assume we've already done the braking, this one is still easy to underestimate and you could go too wide at the exit.
RDCO-12-13-14.png

Here's the final corner, number 15, don't go too fast or you could mess up, nor go too slow as you want as much speed as you can starting at the start / finish straight.

RDCO-15.png

CREATOR'S NOTE

Route Des Champs Ouverts is, I think, my 2nd Toscana (Tarmac) track. The first Toscana track is not included here as there are a few things about it that bug me. I wanted to create a realistic track in the Toscana theme as I've rarely come across Toscana circuits that are realistic, yet exciting and don't have design flaws nor extreme corner camber... and aren't 10 kilometres long with 100 turns which are impossible to remember or learn. I'm very satisfied with how Route Des Champs Ouverts turned out. It has flat straights and interesting corners.
Route Des Champs Ouverts in English would be route of the open fields. I didn't want an English name seeing as where Toscana is set. However, I barely know a word Italian so I went with French, assuming this track is also set in France somewhere.

RouteDesChampsOuverts-FooterA.png
 
Last edited:
LowCountriesCourse-ArtworkA.png
SHORT DESCRIPTION

Low Countries Course - Eifel (Kart) - is a smaller, fun track perfect for those smaller and lighter cars; like the Alfa Romeo GIULIA TZ2 carrozzata da ZAGATO CN.AR750106 '65, Ginetta G4 '64, Suzuki GSX-R/4 Concept '01, Caterham Seven Fireblade '02, and so on. It has interesting corners which you may not expect from an Eifel (Kart) circuit.
I honestly don't know how good it is for karting as I rarely race with these, sorry.


LAP STATS AND VIDEO

TRACK LENGTH
2346.2 m / 1.46 miles
STRAIGHT LENGTH
338.2 m / 0.21 miles
ELEVATION DIFFERENCE
15.6 m / 51.1 ft
CORNERS
14

I'm using a stock Alfa Romeo GIULIA TZ2 carrozzata da ZAGATO CN.AR750106 '65 in this video.


LAP TIMES

All cars are as always entirely stock, never claiming to be an extremely good driver.

  • 1:05.196 - Alfa Romeo GIULIA TZ2 carrozzata da ZAGATO CN.AR750106 '65
  • 1:08.032 - Suzuki GSX-R/4 Concept '01
  • 1:12.642 - Caterham Seven Fireblade '02


A TOUR AROUND THE TRACK

A full map of the track is available here.

Just a quick note before we start our tour, I was only able to count 13 corners on this track, not 14 like the game says. Also remember there's no pit lane, in case any of you are planning to race with damage or fuel and tyre wear.


SECTION 1 - Alright. Starting at the 1st corner, which you can take without letting go off the gas pedal. Neither does corner 2 require you to slow down if you pick a good racing line.

Corner 3 does require a bit of braking and playing with the throttle but it shouldn't be a problem. In general this course isn't very hard, due to the lower speed cars.

A very slight bend going left is next, also known as corner 4.


SECTION 2 - This section includes the longest straight of the course and is probably the best place to overtake if you have the faster car.
LCC-1-2-3-4.png

SECTION 3 - Corner 5 is the first corner which is a bit harder. You'll need to learn and practice when to start braking. There's not really any reference for when to start braking, though I personally don't mess up here either.

Corner 6 is a sharper corner. Try to really start as much as you can on the outside, and then go as much as possible to the inside so you can easily manoeuvre through corner 7 where you also stay to the inside as long as possible.
LCC-5-6-7.png

Again we have a minor bend, corner 8, going right. You shouldn't need to brake.

Corners 9 and 10 should be taken in one smooth go. It might require a bit of practice but with these cars it's easier to get it right. You shouldn't have to brake that hard. In the corner you should simply control the throttle.

Corner 11 is another sharp corner, you should brake pretty hard. Don't accelerate too early but instead maintain the same speed for a while and while you go under the last checkpoint start to speed up.

LCC-8-9-10-11.png

SECTION 4 - Corner 12 is the last slight bend, if you're lucky and close to another driver you can still overtake someone.

The last turn, corner 13, is easy to underestimate, it's sharp and you should only start to accelerate when exiting and seeing the start / finish straight. As it's definitely possible to mess up, you can still gain or lose places here. Also note that the actual finish line is earlier than the finish line which you see on the tarmac.

LCC-12-13.png

CREATOR'S NOTE

I think this was my 2nd track, although I'm not even entirely sure, made in January. I thought it was pretty challenging to make a good and fun Eifel (Kart) circuit, and I think I succeeded. As I said in the description, I'm not familiar with karting and thus I only drive with the smaller or lighter cars.
Low Countries Course is, as it says, named after where it could be located; the Low Countries, which includes The Netherlands and Belgium. I simply pasted course behind it because it fits the first two words and to have something different from circuit, raceway, track, etc.

LowCountriesCourse-FooterA.png
 
Last edited:
These tracks look great! I'll send you a FR today. I'm sure I'll want all of them!
Thanks for posting this thread.
 
I really liked the Circuit de Chute Libre track.
Good job 👍
I'll send FR for the track. Thanks and keep up the good work :)
 
Fantastic work on the presentation side of this thread and the tracks all look quite realistic and very nice 👍
 
Fantastic work on the presentation side of this thread and the tracks all look quite realistic and very nice 👍
Thank you for the compliments, and yeah I tried my best to make it look interesting. Although I also hope that doesn't give an "inverted" effect when people eventually try them out, while I certainly like my tracks, someone else is free to think otherwise and you can only really decide once you've tried them. :)
 
Hey,
all you're tracks look awsome , ide like to get them all like other people ,i'll be sending a request it will be from psn name : FAI-HUN1209 please accept as ide like to have most or all of the tracks . they look wonderful to drive.
Thanks
 
Thanks again ANNIHILATOR. I've only spent a few laps on each to try them out but they're well planned and fun. No "impossible" hidden corners or other gimmicks. Just ran some laps on Low Country and the Toscano tracks in my tuned Caterham on sport softs. Both were a blast. Nice to have a high speed Toscano to run-most of mine are super twisty.
 
Hey,
all you're tracks look awsome , ide like to get them all like other people ,i'll be sending a request it will be from psn name : FAI-HUN1209 please accept as ide like to have most or all of the tracks . they look wonderful to drive.
Thanks
FR accepted, and sure you can have all tracks. Sent you a PM as well. :)

Thanks again ANNIHILATOR. I've only spent a few laps on each to try them out but they're well planned and fun. No "impossible" hidden corners or other gimmicks. Just ran some laps on Low Country and the Toscano tracks in my tuned Caterham on sport softs. Both were a blast. Nice to have a high speed Toscano to run-most of mine are super twisty.
Thank you as well ncrthree!
It's nice to hear that. :)
 
Back