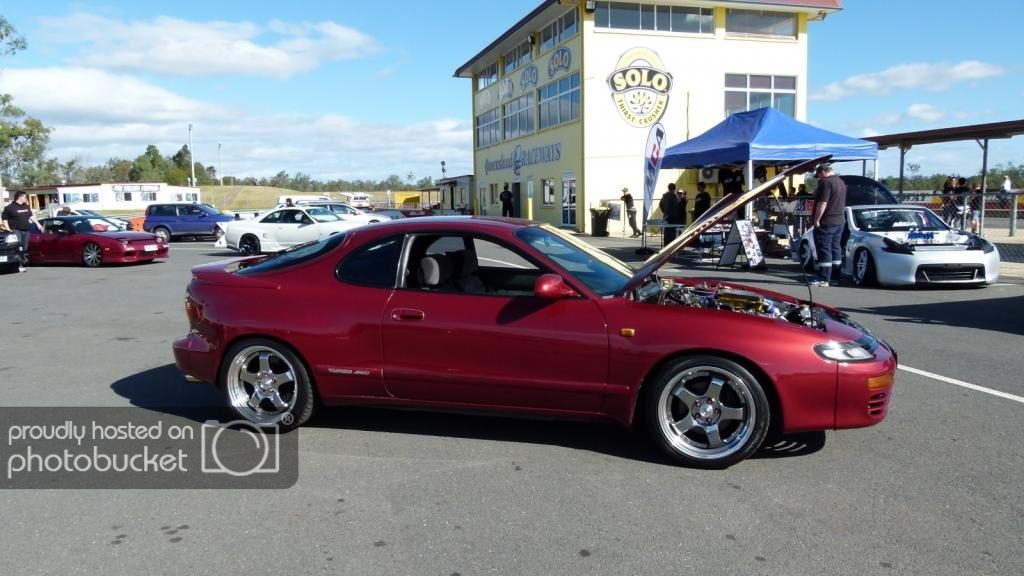
Duke Racing Celica GT-Four Time Attack Racecar

  • Thread starter Thread starter Punknoodle
  • 1,059 comments
  • 153,933 views
What are the laws about splitters in Brisbane? That looks like a proper motorsports lip without the splitter... Are you allowed to have a "detachable" splitter, which can be used on a track and taken off on the street?

Its just a lip for the front bumper.
 
Its just a lip for the front bumper.

Yes, yes it is. But that doesn't mean that he can't later attach a splitter...:


16310d1142354373-fs-real-cf-front-bumper-splitter-struts3.jpg


to that lip for track use.
 
The rules are just regarding vehicle height from the road. The new bumper is slightly lower than my current one, and the lip would obviously make it lower still, but when you look at this shot:

I think the front needs a bit of a chin.

I wasn't planning on making it easily detachable. I love the look of those splitters with the stays coming down from the bumper, but this is more of a downward lip as opposed to a lip that juts out from the front, requiring those stays. If it had a flat section coming out from the bottom of it I could use those but that would look a bit overkill I think, compared to the rest of the car.

This is just something to make it look a bit more low and menacing from the front.
 
:lol: Don't get me wrong, I like the look, but if you're at a track, don't you want a little more front-end downforce?


Forget about how it looks :lol: and get yourself a nice aluminum sheet... I kid you not, that lip looks flat enough to put a flat sheet of aluminum for a splitter on, if you want. A lot of guys do that up here from the local racing forums... Time-attack, autocross... Everyone seems to have a splitter nowadays. I'm really just mentioning the possibility of getting a little more high-speed grip/turn-in out of her.

To be clear, the lip cant stay on, but those "stays" that you mention are there because the chassis of the car and the splitter (the carbon fiber piece below the lip on the M5) are being pulled apart by the aerodynamic force pushing the car down a bit. If you want, you can bolt it up to the frame behind the fascia (red bumper) and unbolt it when you come off of the track, then take the stays out...


I really am just tossing the idea out, just in case.


splitter-front-under-alum-gen1-01-600.jpg


Bolts in, makes downforce, unbolts, looks stock. 👍
 
I'd be worried about it making the front end look excessively more low and bulky than the rest of the car with that lip on. That Haltech dash would look awesome.
 
I will be buying some sheeting, regardless. I'm going to make some ducting for the new bumper to channel all of the air through the radiator. Might even relocate the heat exchanger for the air temp to the very front just behind the bumper. It's going to be a fun little project that hopefully works as well as looks good.
 
How are you liking your CT20b? I finally threw the cash down for one with a steel wheel. My goal is 300whp with 800cc injectors and Megasquirt.
 
Nice early boost and it holds steady, but in my opinion it's too small for 300 wheel horse power, even with the steel wheel so you can boost it higher, it will be out of its efficiency range and because the boost is high so are your intake temps, I think to make that power safely and reliably you are better off running a larger turbo and lower boost.

The reason I got this turbo was purely to increase drivability, the stock one looses boost up high in the rev range and doesn't spool up as nice as this one.

I replaced my thermostat not long ago with a genuine Toyota one but I think when I drain the coolant to fit the new sensor I'll fit a new Tridon High Flow thermostat in its place. Apparently a high flow is more effective than a lower temp thermostat, which makes sense as the temperature mine has been running at it should be fully open anyway.

Also ordering a couple of new hoses from Toyota, my old ones are fine but aren't quite the right size (they are generic) and you have to clamp the **** out of them for them not to leak, I had to get them in a jam when my original ones split one weekend. I just want genuine hoses for a perfect fit.

Also thinking of buying a new bigger SPAL radiator fan to replace my original one. I know it's not my fan that's causing my over heating, but it will help in hot weather in traffic to have a better fan. I'll change the triggering of it to be done by the ECU and get my tuner to set it up quickly when he does the sensor calibration. At the moment my old fan just runs full time, which is shortening the life of it, I think it is showing signs of age.

Couple all of that with a new bumper, intake ducting, probably relocating the heat exchanger away from the radiator and a good flush and new coolant (with a higher water percentage) and my overheating issues should be gone hopefully
 
Actually in MR2s CT20bs have been dyno proven to push well over 300WHP with supporting mods, mainly fuel and cams on a Gen2. I think the record is 380ish on E85, but I've seen 310-340 on pump gas with cams and fuel mods.

I know that the CT26 turbos lose power up top and are basically useless after 12 pounds and past 5500RPM, but a CT20b is comparable to the GT28 in terms of power and spool.

Plus I got a deal for a basically brand new turbo, if I had more money I would have gone with either a GTX2867 or GTX3071, but I don't have $2500-$3000 to spend on just the turbo kit.

But you should totally get the Carlos Sans front bumper. I didn't realize you could have bought everything you needed from the dealer here in the US up until a few years ago. I think you could also buy the RC hood as well.
 
Do you already have head work done? 300 wheel horses on an MR2 is a lot different to 300 wheel horses on a GT-Four with 4wd losses, which is why I said it was a little ambitious. Still, what kind of boost is required for that figure? I don't like the idea of running high boost without a rebuilt engine.
 
Wow lots of updates...

First congrats on the little pooper 👍

Second : Awesome Haltech dash

Thirdly : Very cool pics on the last 2 pages.

The lip you posted looks nice, It isn't too big as they sometimes are....

👍 👍 👍 :cheers:
 
Do you already have head work done? 300 wheel horses on an MR2 is a lot different to 300 wheel horses on a GT-Four with 4wd losses, which is why I said it was a little ambitious. Still, what kind of boost is required for that figure? I don't like the idea of running high boost without a rebuilt engine.

My engine is completely stock and unopened (as far as I know). But I do have a spare Gen2 head on the side that I originally intended on putting valve springs and GSC 268 cams.

I've seen others push the ct20b to 16psi and got over 300 with the right supporting mods. But I have too much things that needs to be done to the engine as of now.
 
Well, I just ordered my new Group A bumper from Toyota, with new support bars top and bottom for it too!

About 4 weeks for delivery, and then I have to get it painted but I'm really excited to be getting it and can't wait to work on the radiator cooling.
 
Well, I just ordered my new Group A bumper from Toyota, with new support bars top and bottom for it too!

About 4 weeks for delivery, and then I have to get it painted but I'm really excited to be getting it and can't wait to work on the radiator cooling.

I almost don't want to ask how much it cost you knowing what Toyota charge for parts. :lol:
 
Well, my tachometer stopped working in the car a little while back, it was reading very, very low.

So I was researching solutions for this and found that the capacitors on these tachometers fail, and then they read low. Also found that if you replace the 43K Ohm resistor with an 18K Ohm resistor, it enables you to run a straight 12V square wave as opposed to using a tach adapter which simulates the old coil negative signal.


So off to Jaycar I went, and bought the required conponents and soldered them in place. Got home tonight, unwired the tach adapter (which is this ugly little black box which was under my dash) and sent the tachometer signal from the ECU straight in to the tachometer signal wire, and hey presto! Working tachometer without the adapter!


Just have to put the dash together now but that's tomorrow's job.
 
Nice work. I had the same problem with my SW20 MR2. Swapping the capacitors out for new ones made it so much better, now that it actually reads correctly. My car would reach redline but only read 2500rpm :lol:.
 
Yeah, that's about what mine would go to as well, and it would idle at about 100 rpm. Plugged my laptop in to read the revs from the ECU and it's bang on with the new resistor and caps so I'm stoked.

I'm even more stoked that I got a call today to tell me I could go and pick this lot up:
 
That arrived rather quickly considering it was ex-Japan. Can't wait to see it painted and on the car. 👍
 
9 days from Japan to your door? That's awesome! Can't wait to see it painted and on, I'm sure it'll look fantastic 👍

Edit: Tree'd :lol:
 
Yeah it really surprised me too - it was even cheaper than I was quoted as well, so perfect result really.

I'm going to fit the bar and reinforcement first, mount the pump, heat exchanger and make a strong mounting point for the tow hook then dummy fit the bumper to make up the ducting. Won't be painting it till all that's done to avoid scratching the paint :)

Not long now though. Will post updates of the ducting.
 
Normally it doesn't take long to get to Australia, it all depends on how lucky you get with customs. Some things will sit there for a couple weeks.
 

Bumperless...

Here's a shot of behind the old bumper:

That reinforcement bar is so huge, and it's heavy steel. The thin aluminium bar is what replaces it, and it sits right behind the thin central strip in the bumper:

So, I've removed the heat exchanger from in front of the radiator, and it is going to sit right in behind the bar, in the lower half of the opening. The top opening of the bumper (which was previously all bumper and reinforcement, no airflow at all) will remain clear, affording a completely unobstructed flow of air to the radiator.

My goal is to also create some ducting to force the air through the radiator and hopefully stop it from flowing sideways behind the bumper. It's not going to be as easy as I thought but I should be able to come up with something. The pump for the heat exchanger is going to sit behind the heat exchanger, still off to the side as it is now but out of sight and down low.

If I get time tomorrow I'll start making mounts for the heat exchanger.
 
Mounted the heat exchanger up, made up some steel brackets to secure it top and bottom.

And here is what it looks like behind the bumper now..

Who else thinks I should paint the heat exchanger matte black for stealth? That's what I was planning to do. Love how you can see the PWR logo of the radiator through the top of the radiator. Will eventually install some black mesh but there is no urgency.

I think it looks kinda cool without the bumper, makes it look kind of menacing :)
 
Back