- 1,166

- Zagreb,Croatia
Last summer I've had enough of my Alfa Romeo 166 V6 and bought two Centos for fun.

As I moved to a capital of the Croatia, Zagreb I needed a smaller car for parking so I went Italian once again.
They are simple, parts anywhere for cheap etc.
First I bought the Cinquecento Sporting that previous owners used for autocrossing.
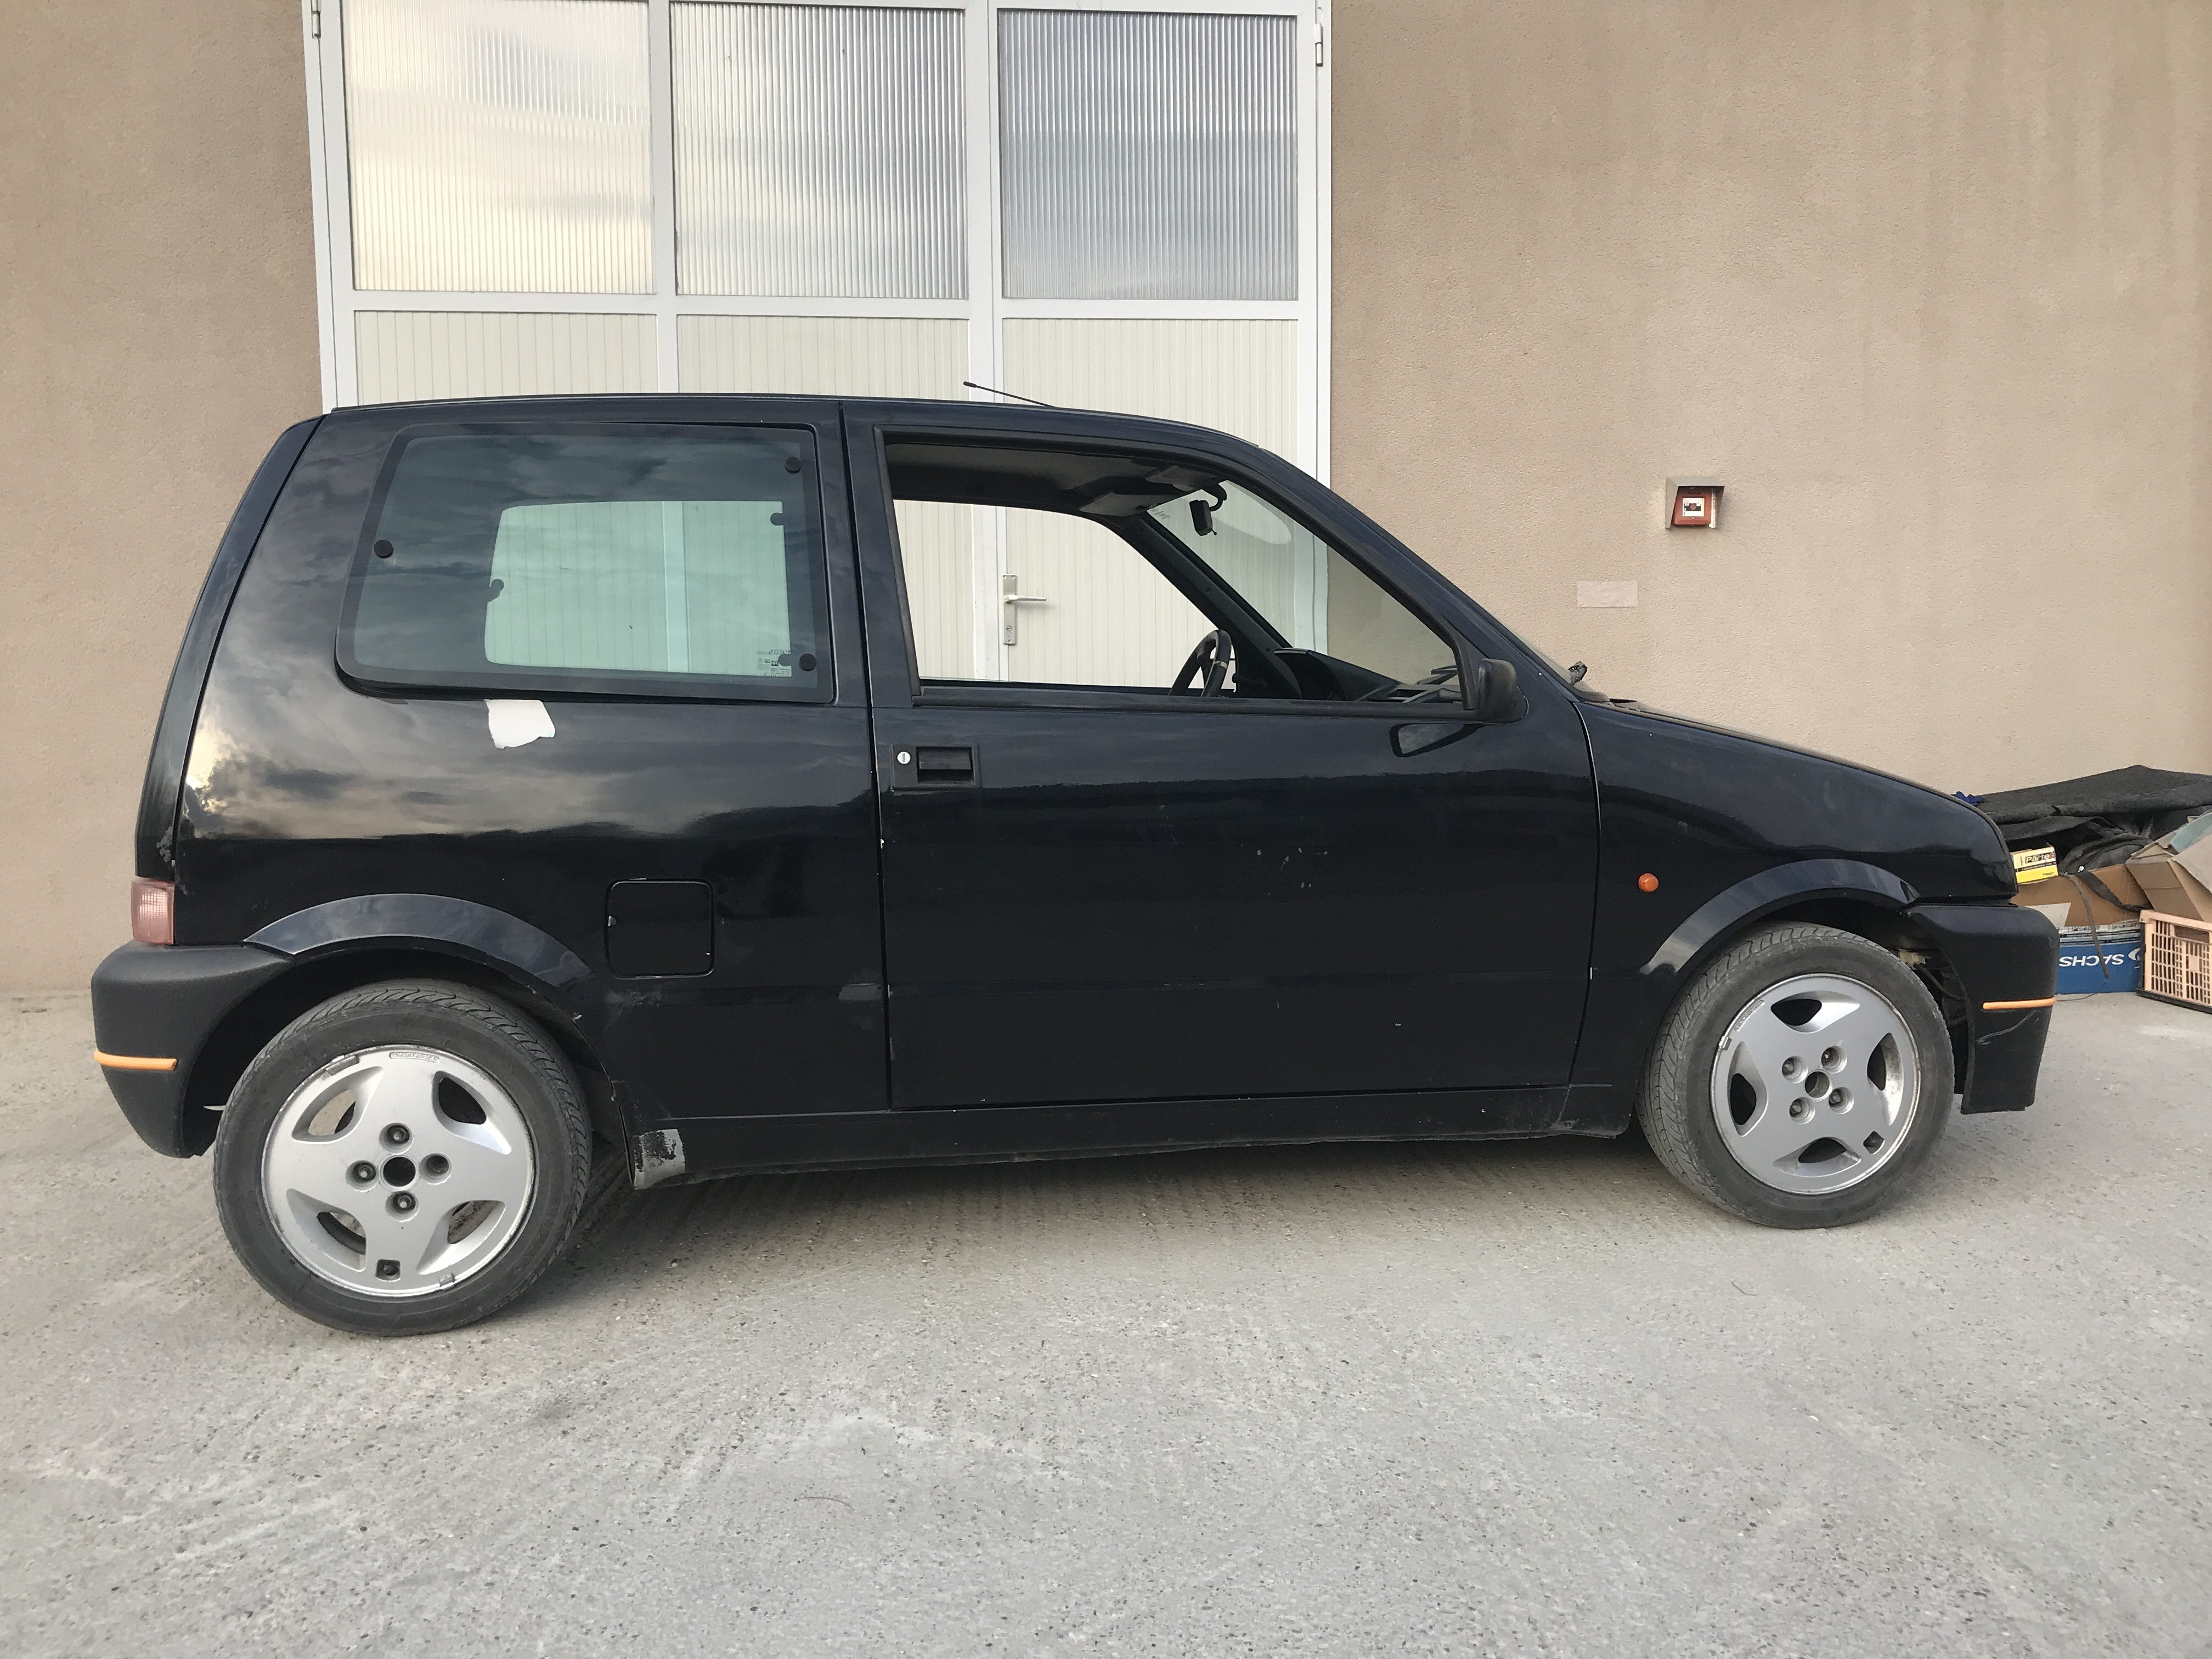
It was already uprated with a 75Hp engine from a Fiat Punto and had some poorly done mods to it, I decided to buy a Seicento for daily driving and use this for a project car.

Over the last 10 years I was mostly reading stuff and gathering information and never had a chance to do a project like this with my Japanese cars due to various reasons.
I always upgraded suspension and brakes on my cars so I wanted to go backwards with this car - everything is about engine building here.
Main purpose of the car was to make a hot street toy but it eventually progressed to a potential track day car that will probably see the track eventually.
My personal goals to be made:
1. Use almost no off the shelf parts
2. Adapt parts from other vehicles
3. Run Bike Carburetors
4. Make as much power as possible through the whole rev range and not emphasize on peak numbers
5. Use 8 valve engine to retain original look and simplicity
6. Use the biggest displacement engine from the same family
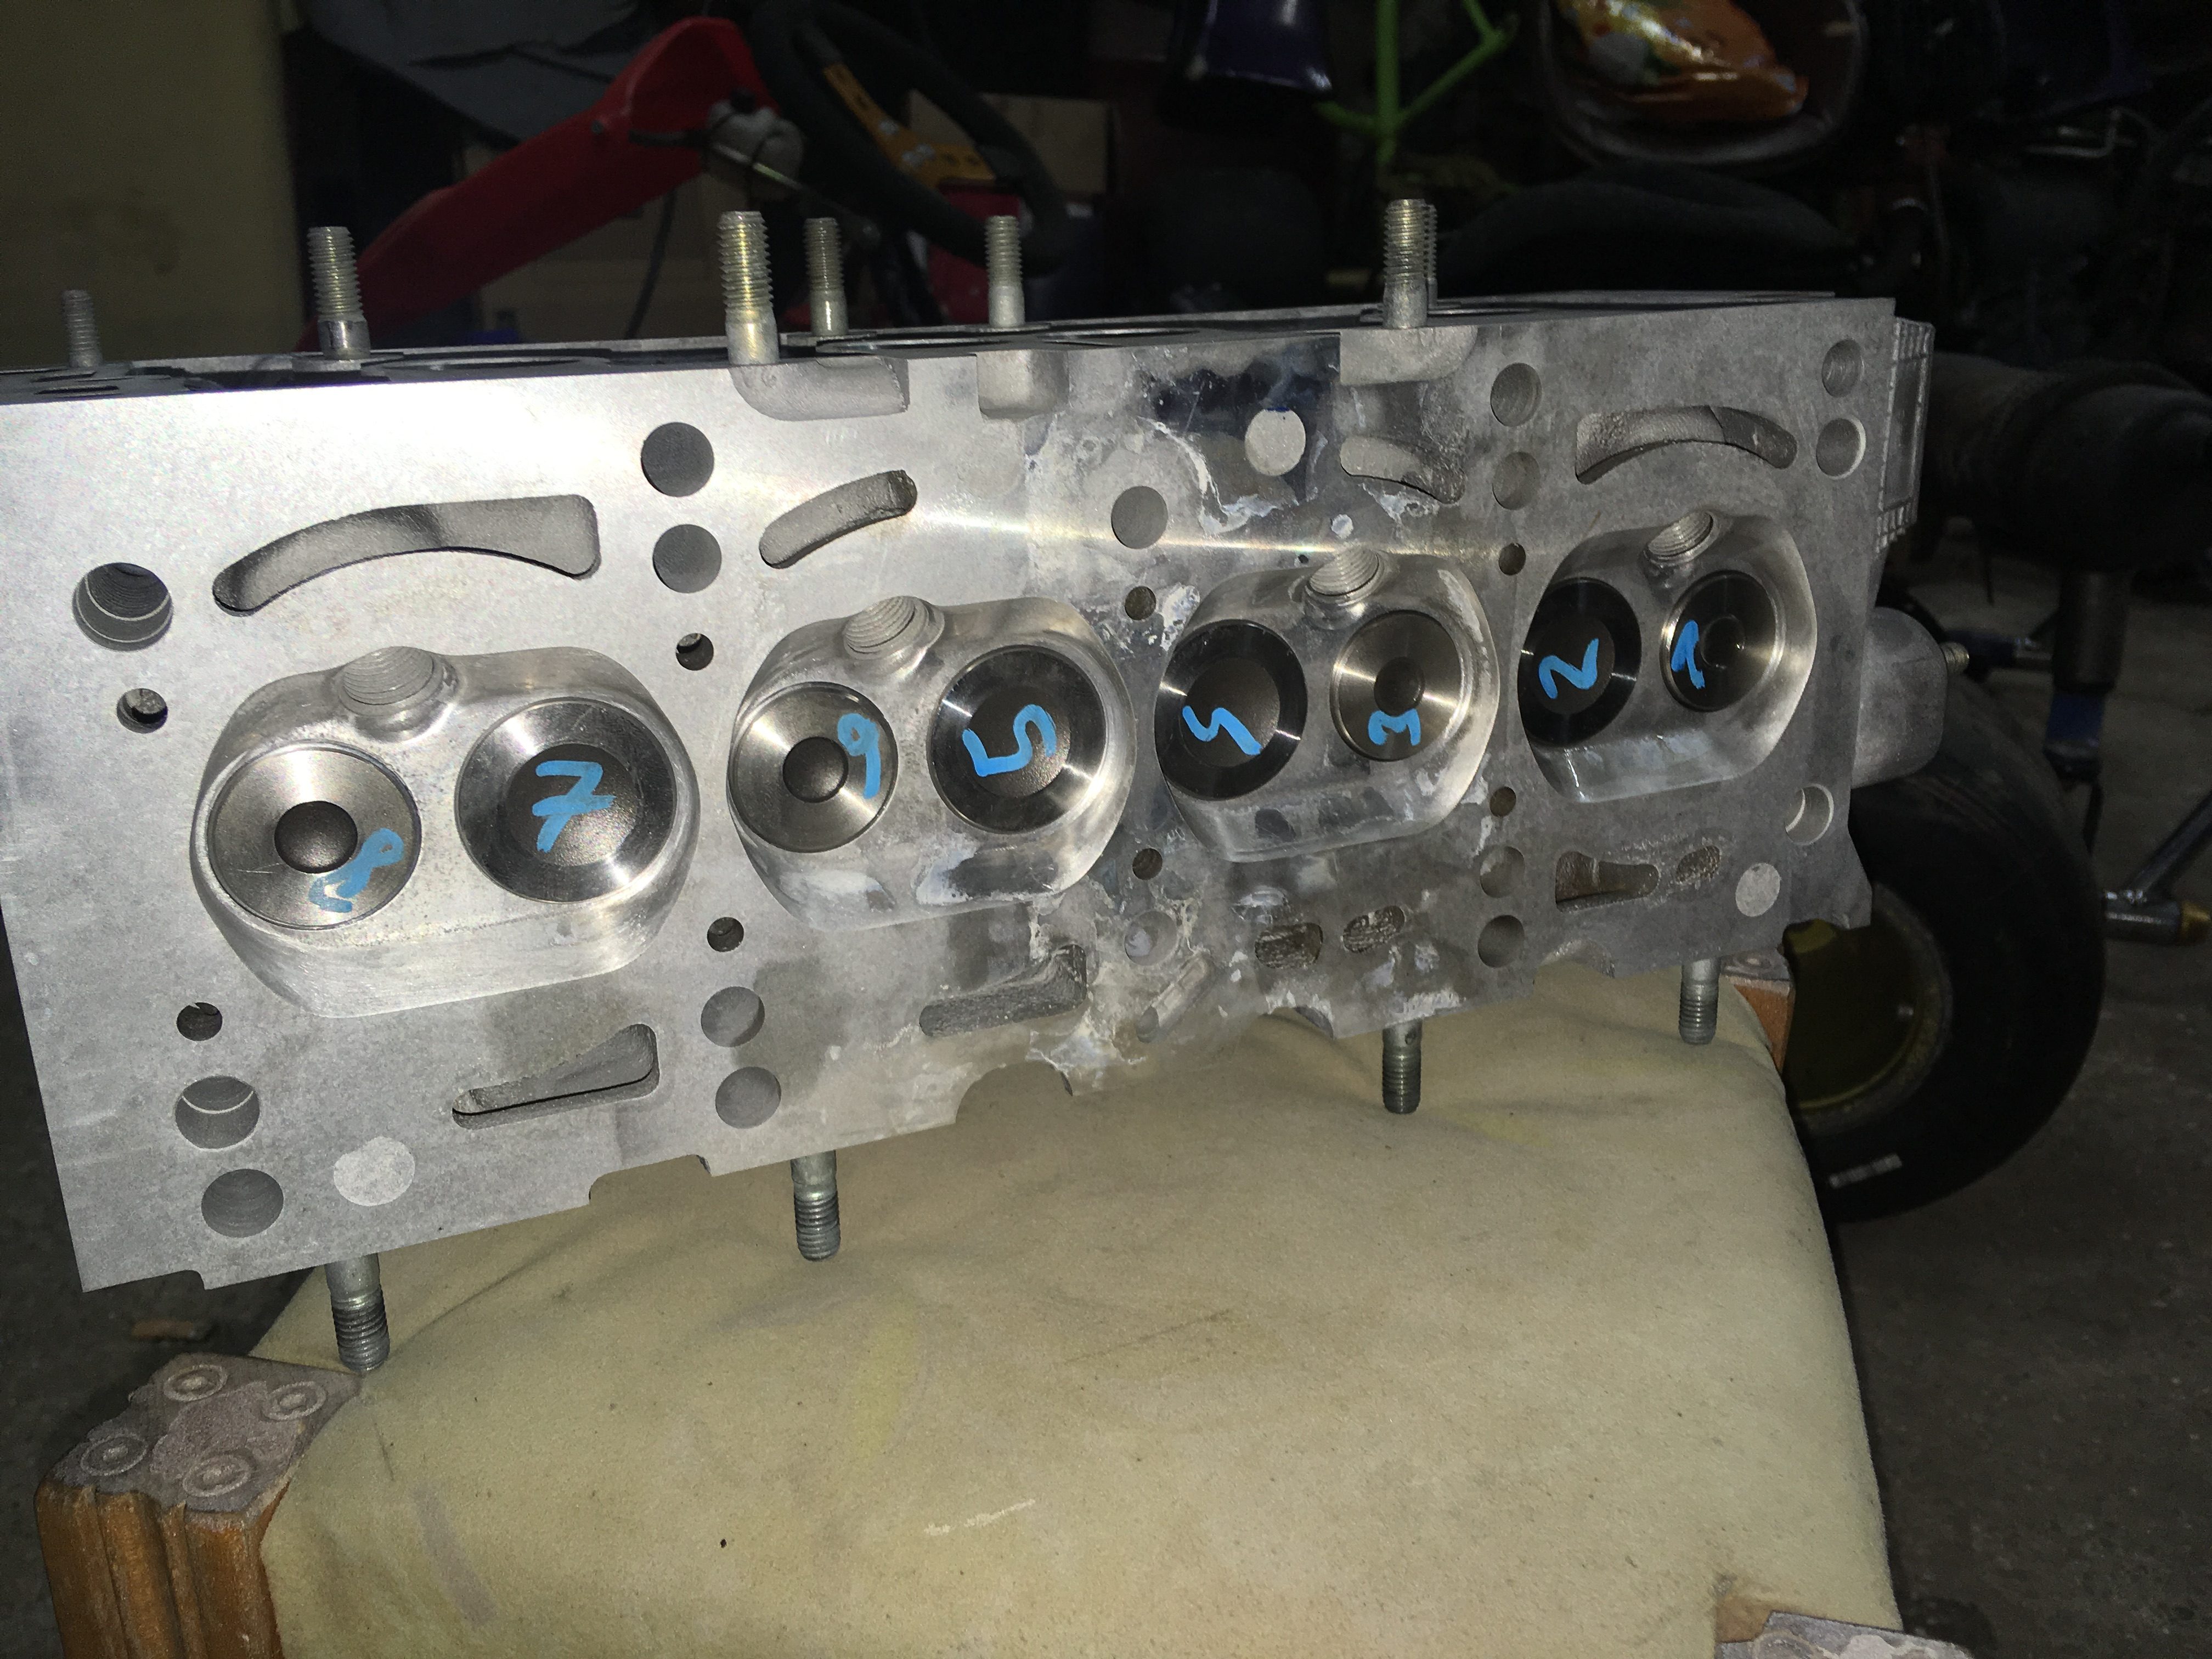
7. Cylinder head porting needed to be done by myself by hand
8. Achieve something in the range of 120-140 horsepower if possible
So first I bought 4-5 engines for parts and stock.
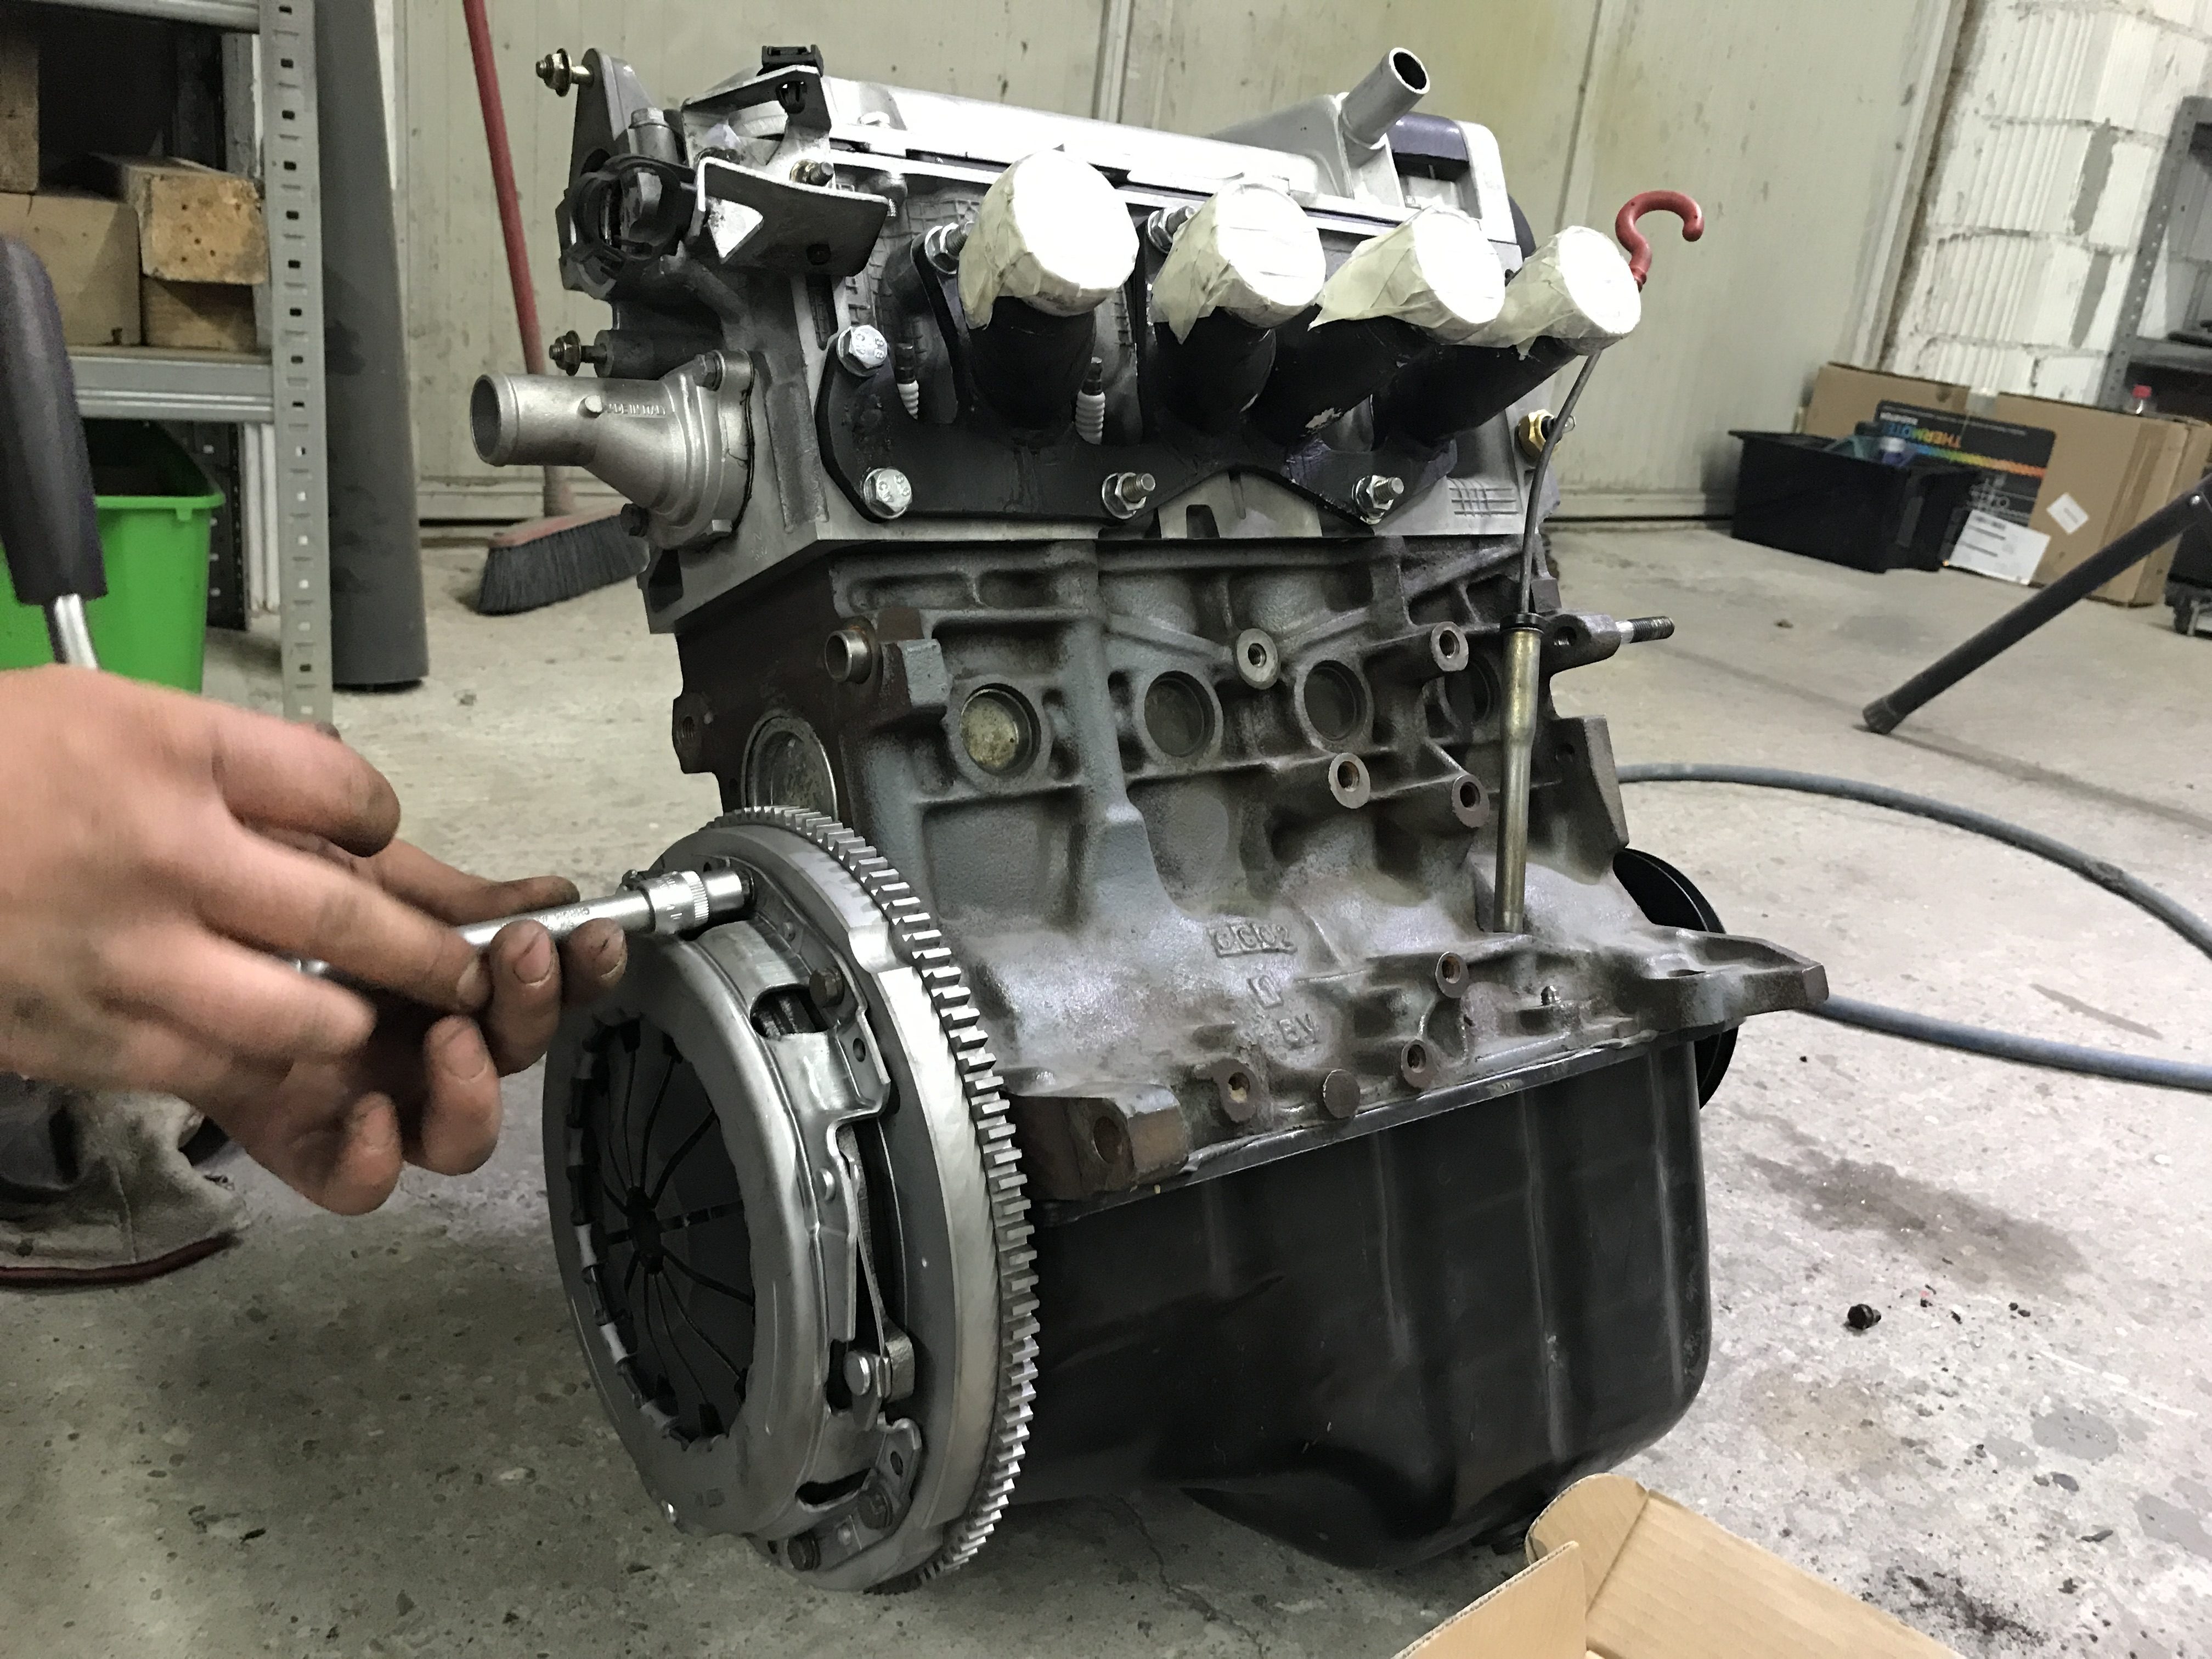
Grande Punto 1.4 8V engine purchased for the bottom end and few Punto 1.2 8V 75hp engines bought for the cylinder head and spares.
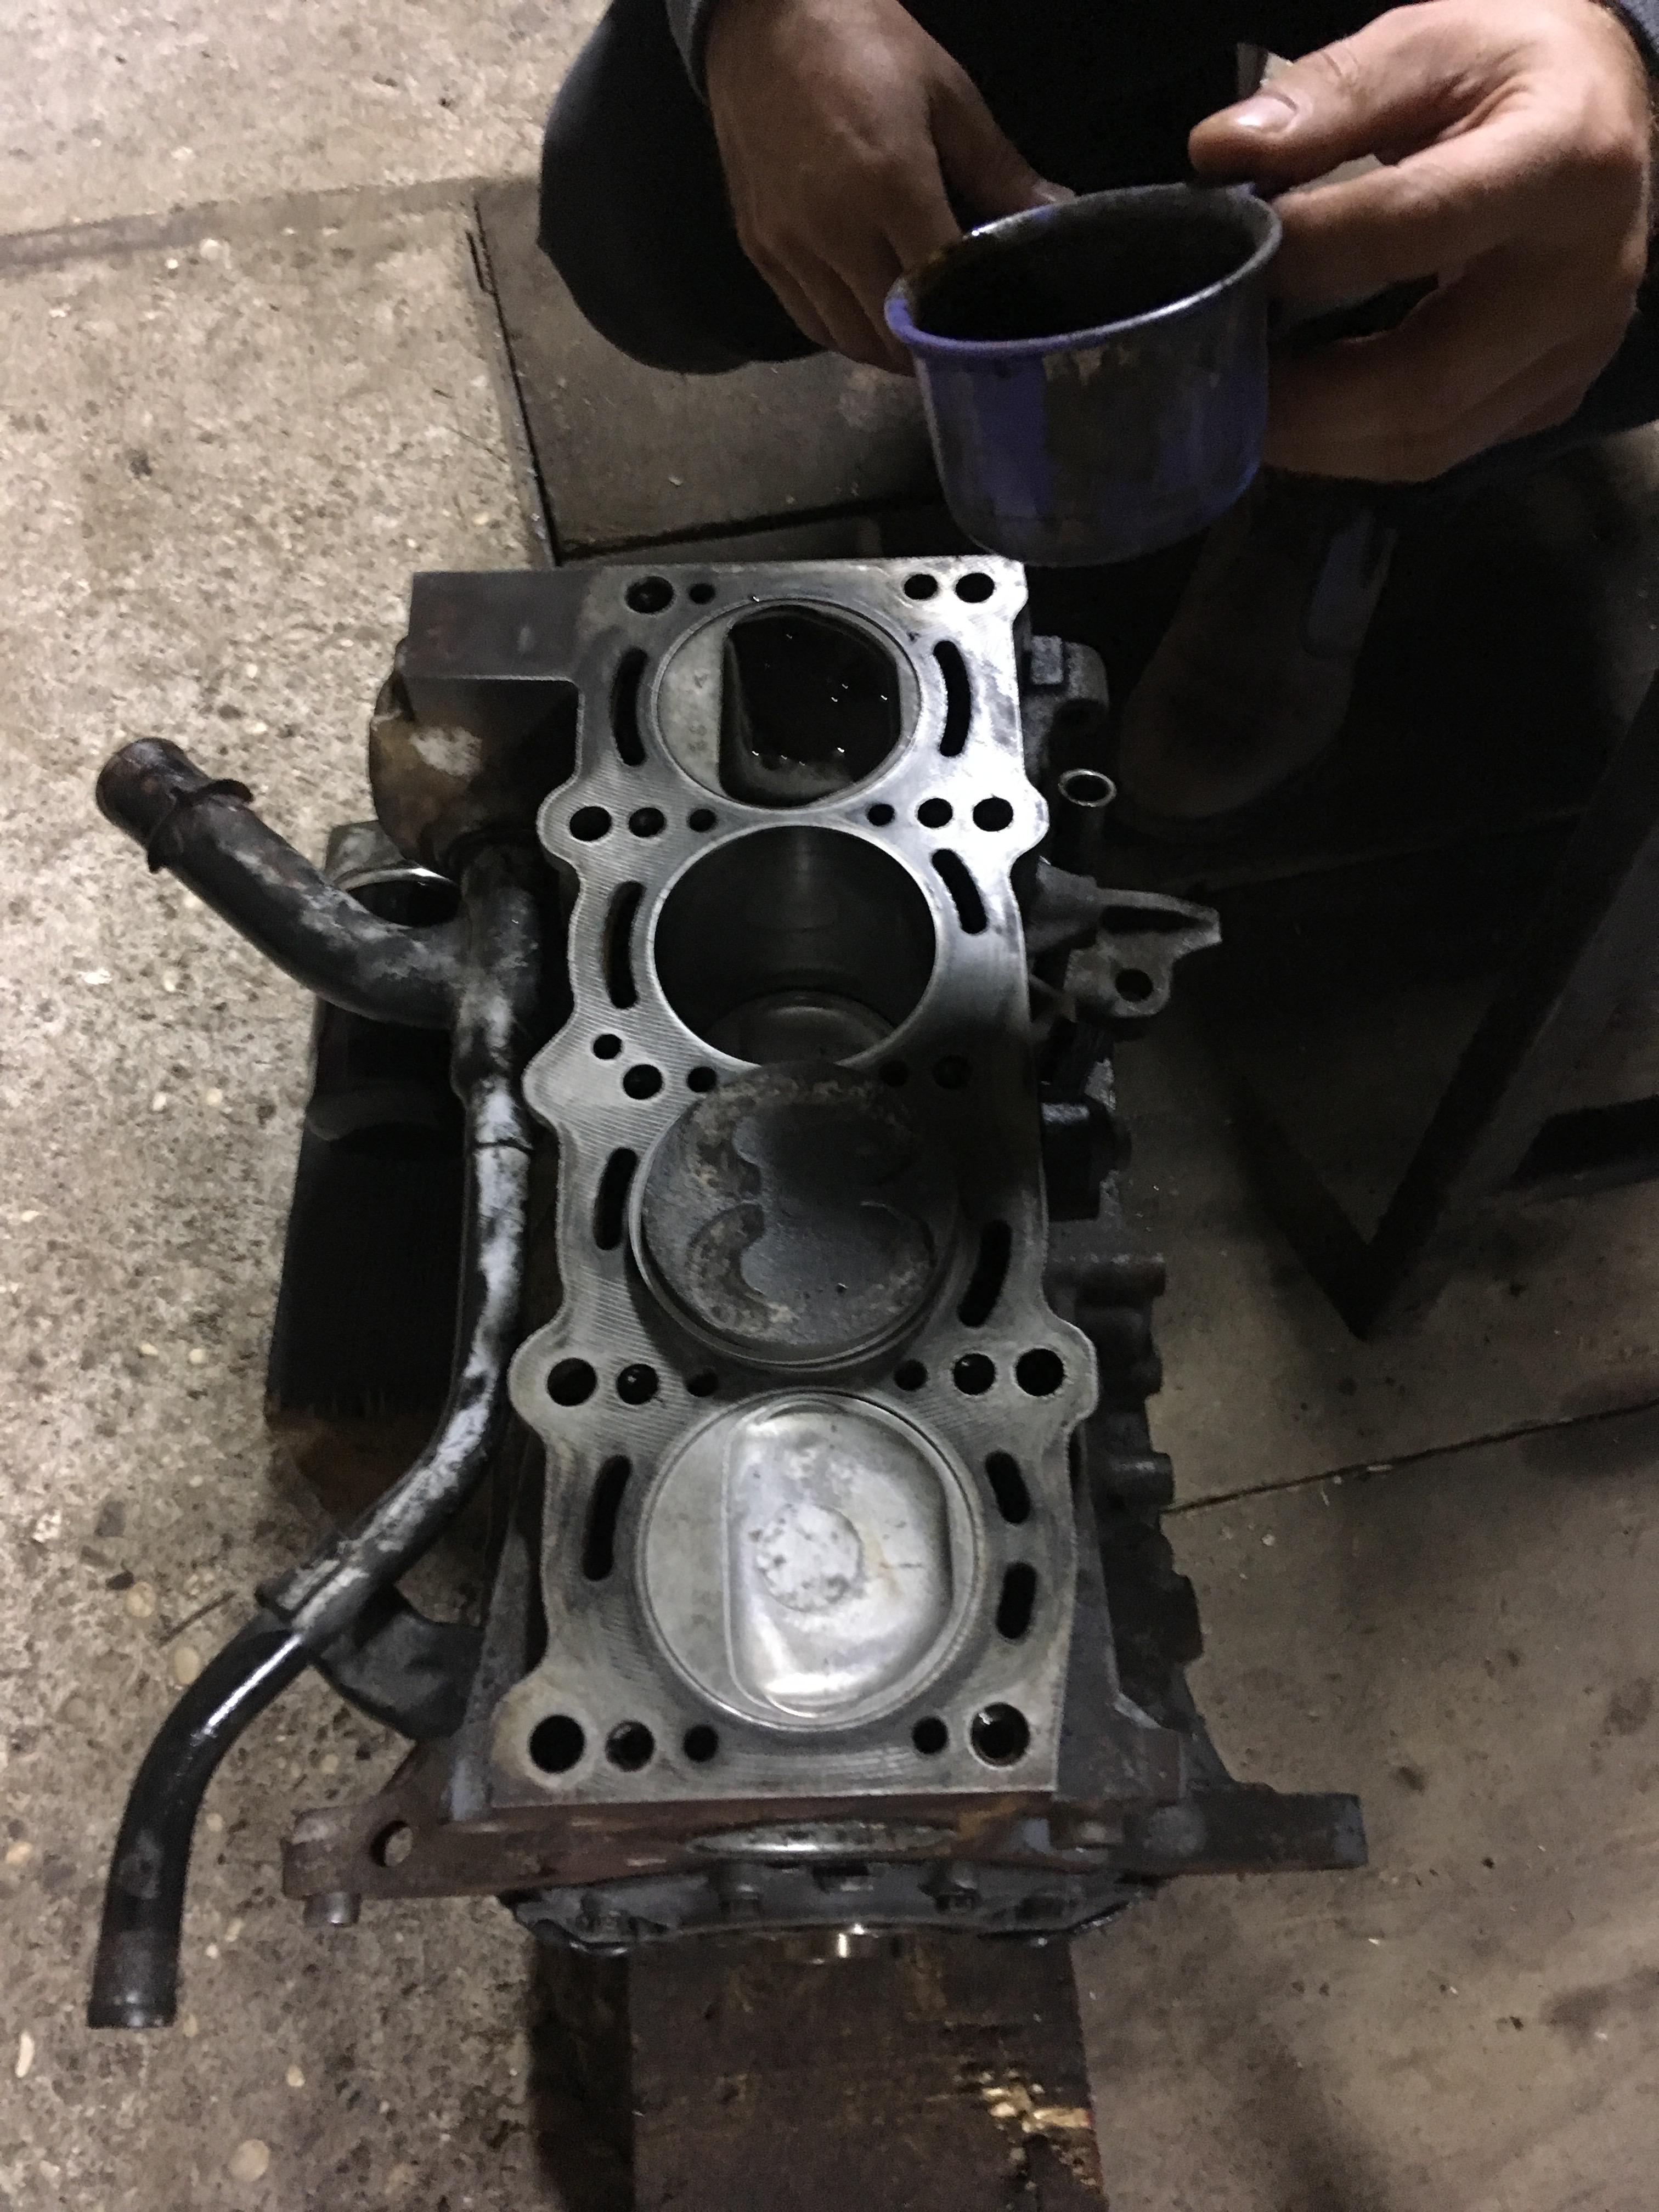
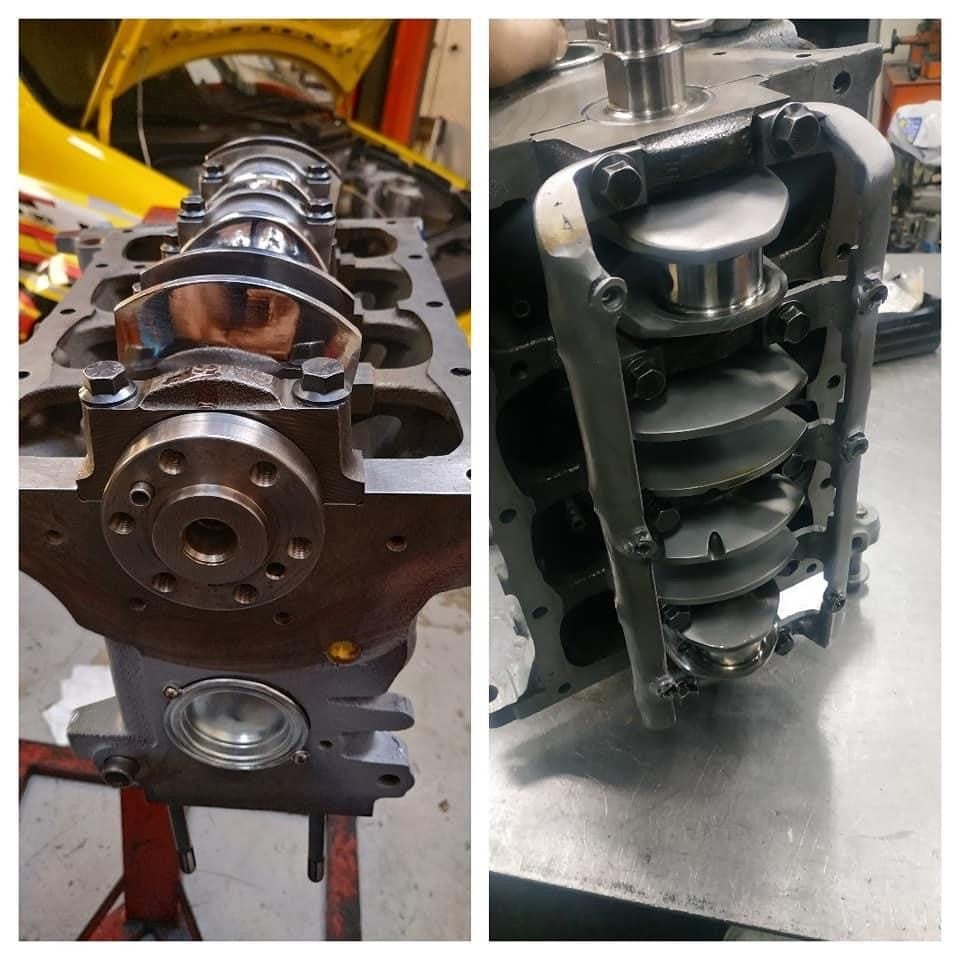
Those engines have bad bore/stroke relationship with 72mm bore and 84mm stroke with a lousy rod ratio and short rod in general so I didn't want to put any money whatsoever in modifying the bottom end before we test it in the car.
As the bottom end had 60000 kilometers we only put new rings in it and left the original bearing shells so I don't need to clearance it and everything ( and they were as good as new)
General idea was to use high compression pistons to achieve desired Compression Ratio, but due to block/head combo and bigger stroke we achieved something in range of 11.x :1 with standard pistons and I didn't want to go overboard with pump gas.
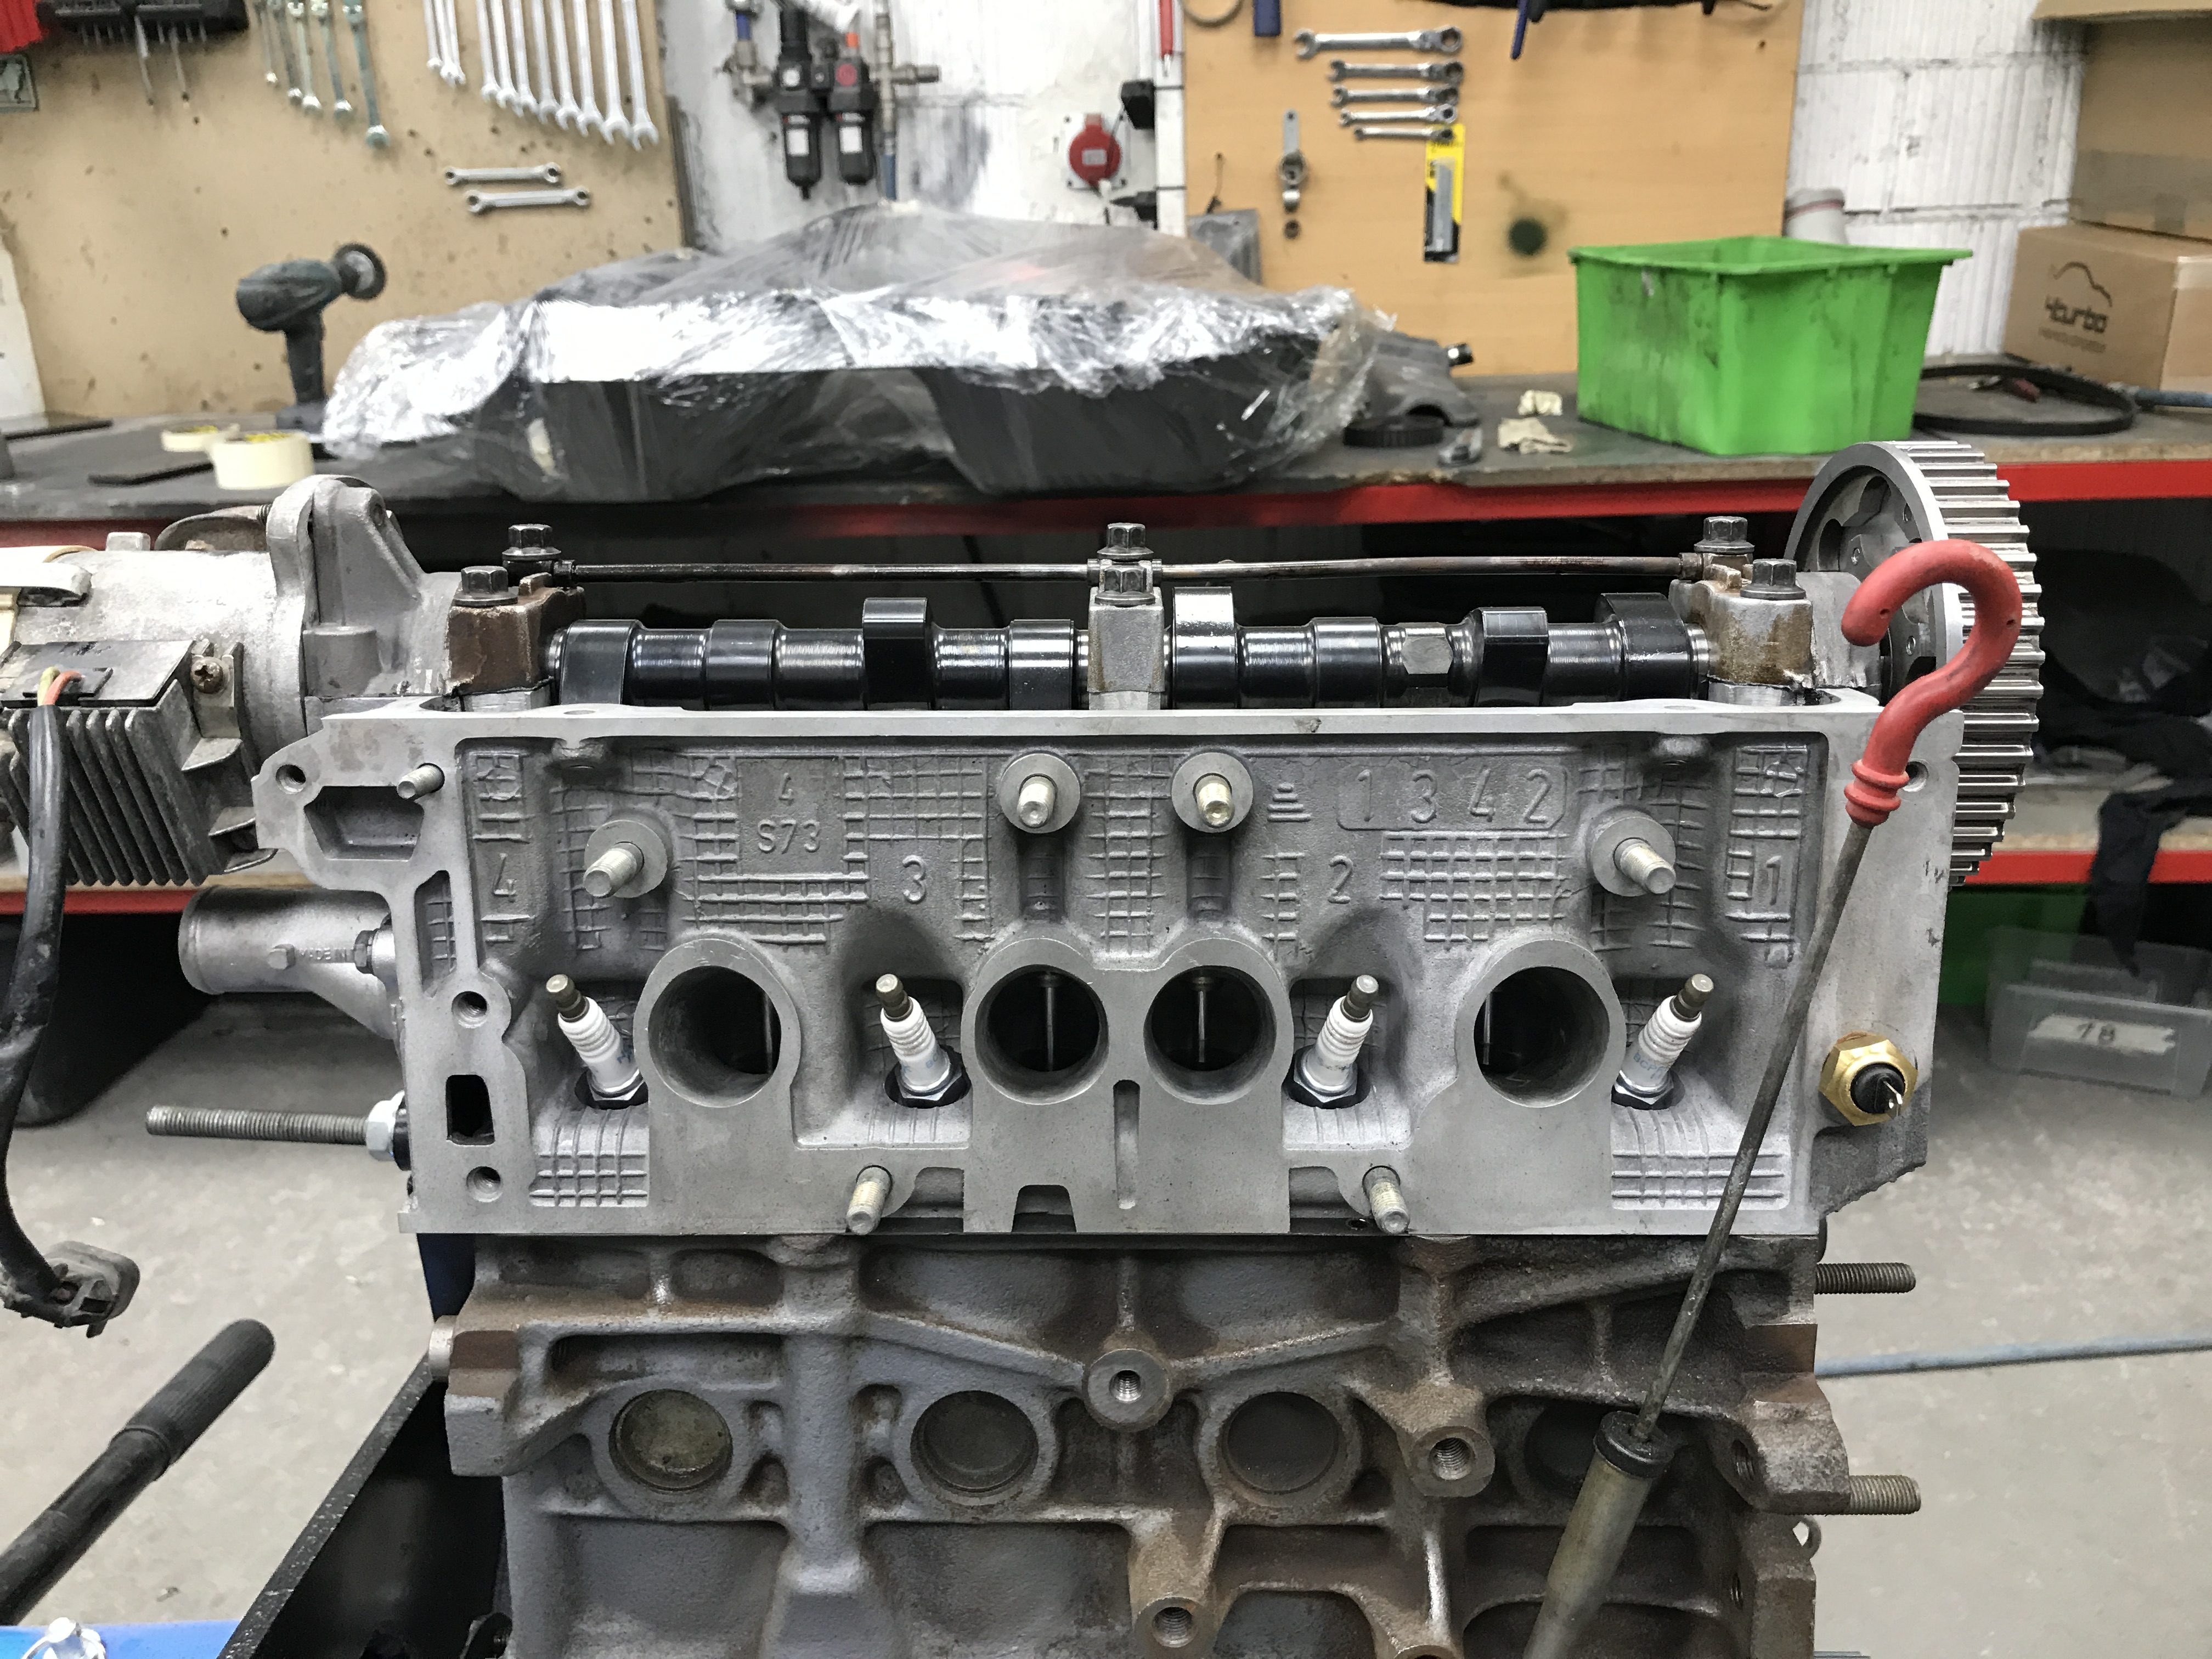
Decision was made to mate it to an older style cylinder head as the head design is much better and selection of cams for newer style head is virtually nonexistent.
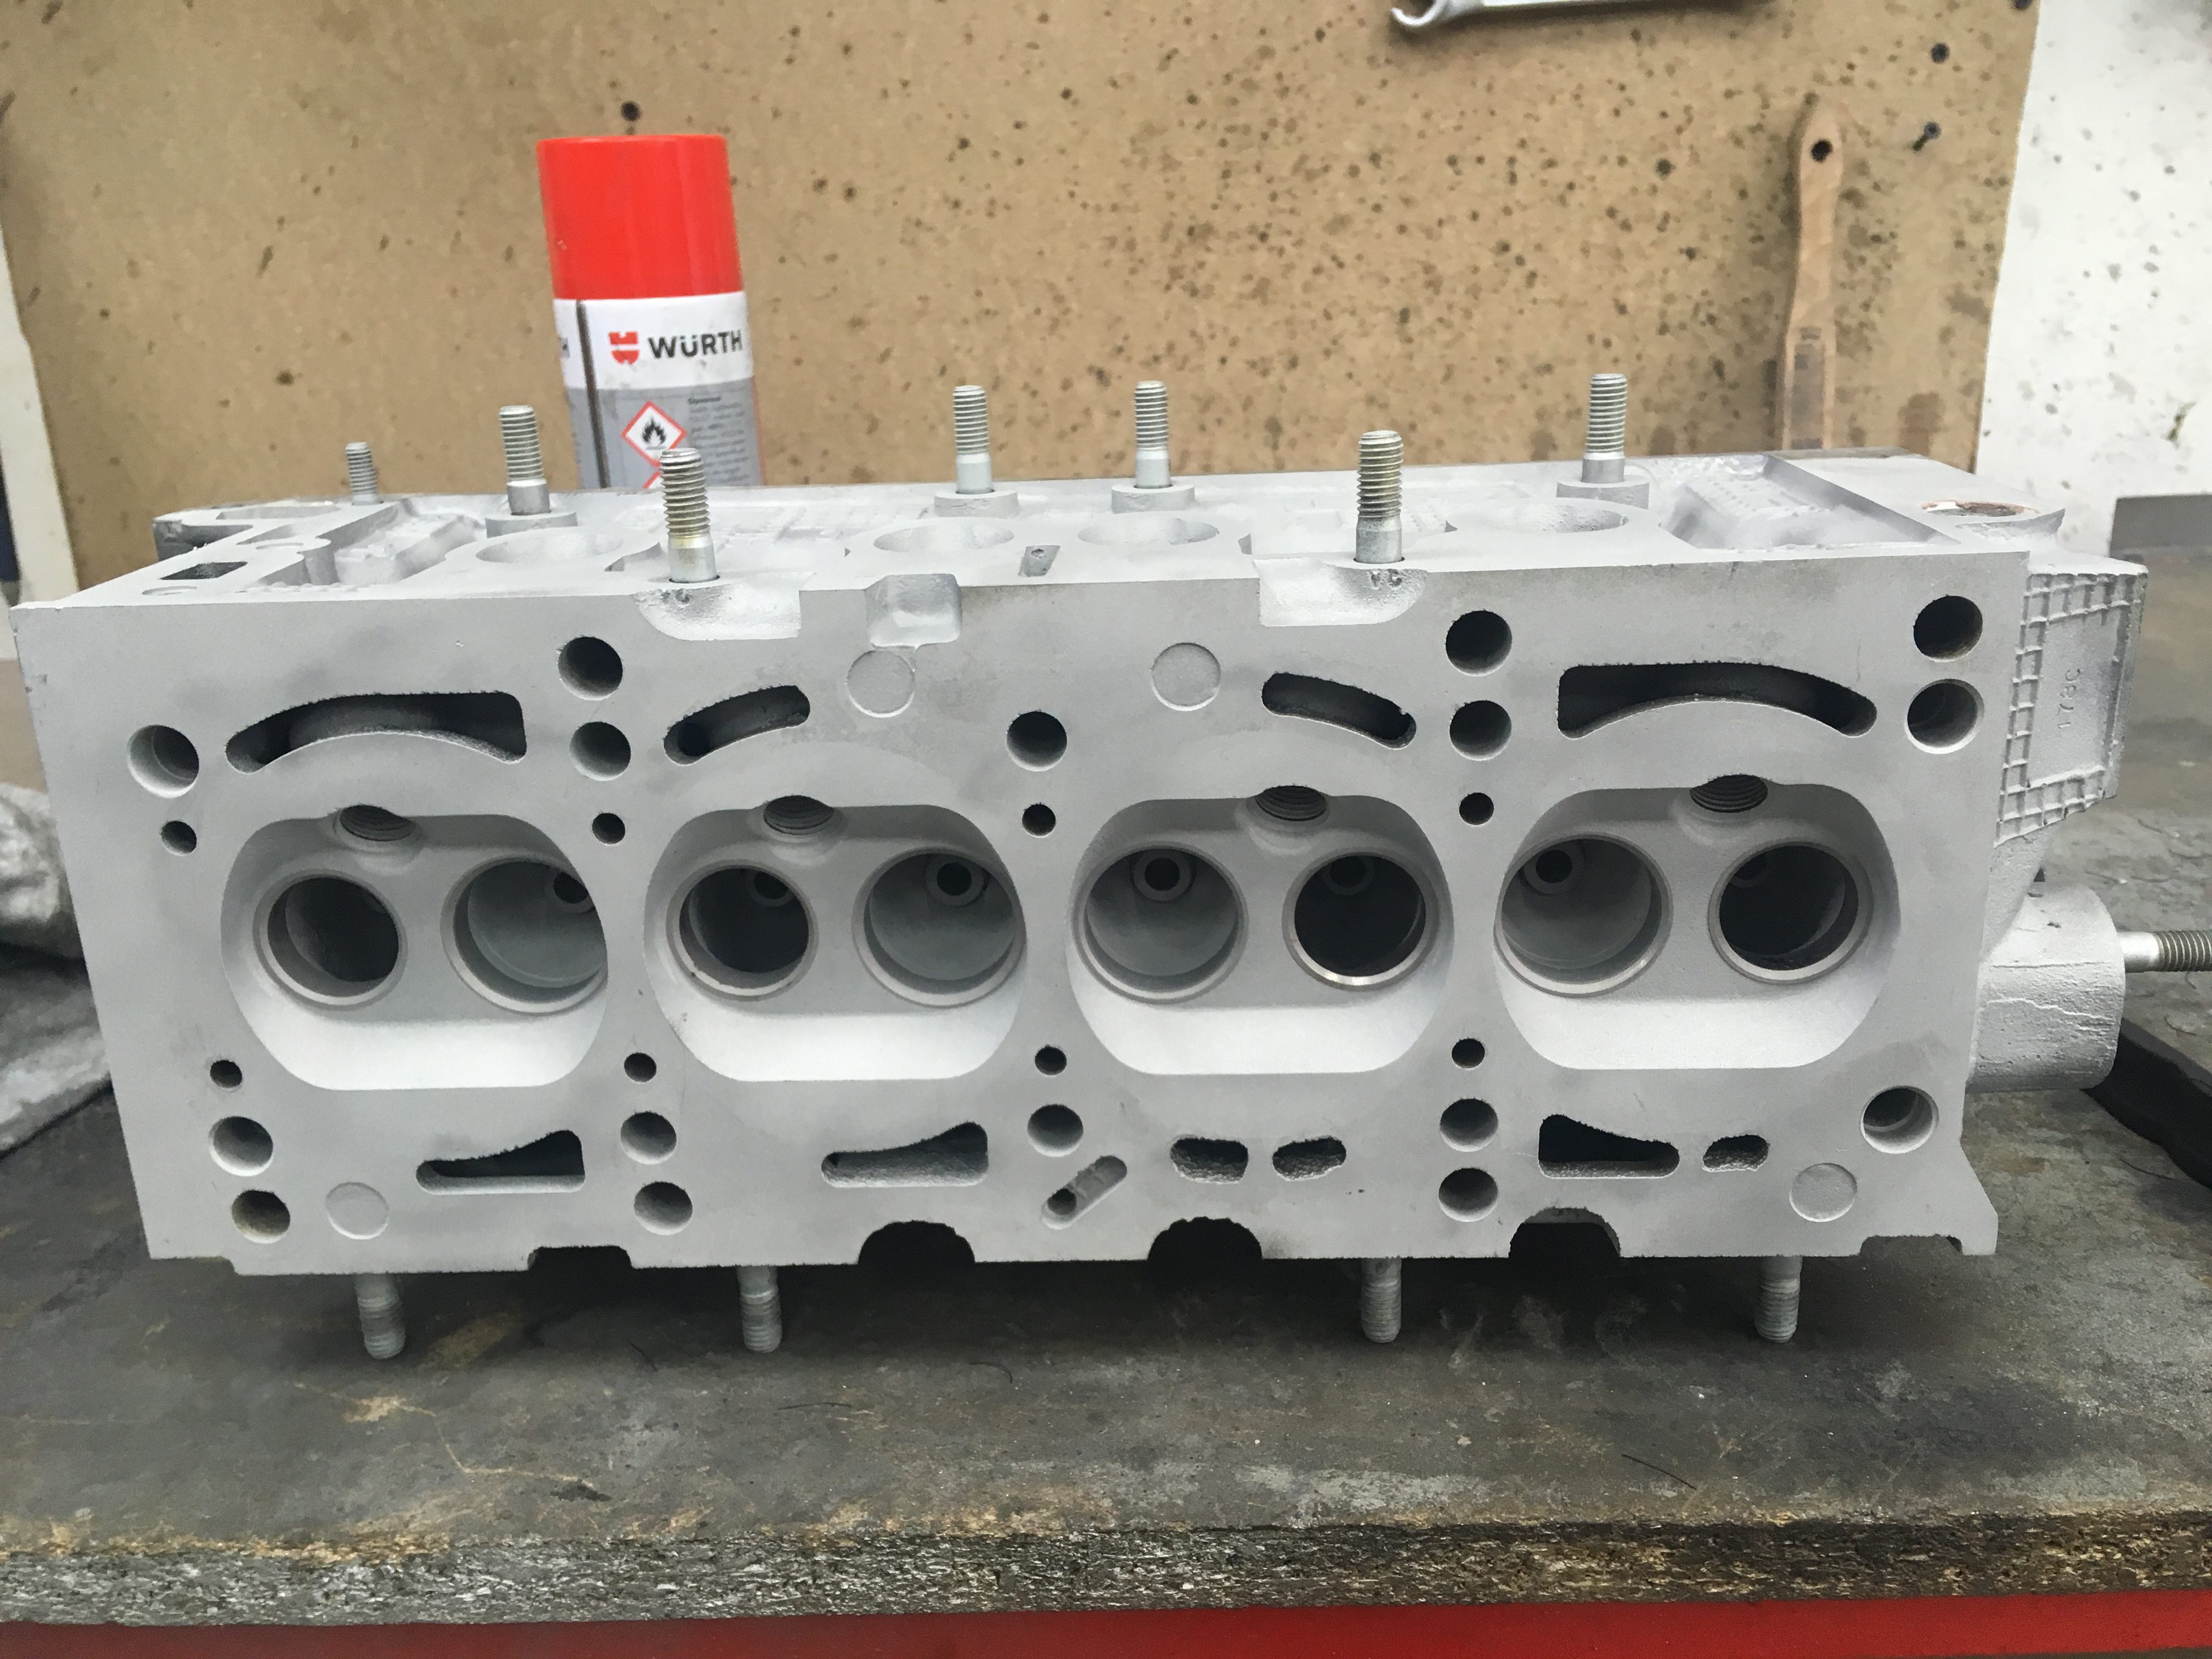
After going through the FIA papers for the Panda Kit Rally car that used the same combination of block/head castings and following common sense, camshaft selection was determined as well as the port sizing/shape and valve sizing.
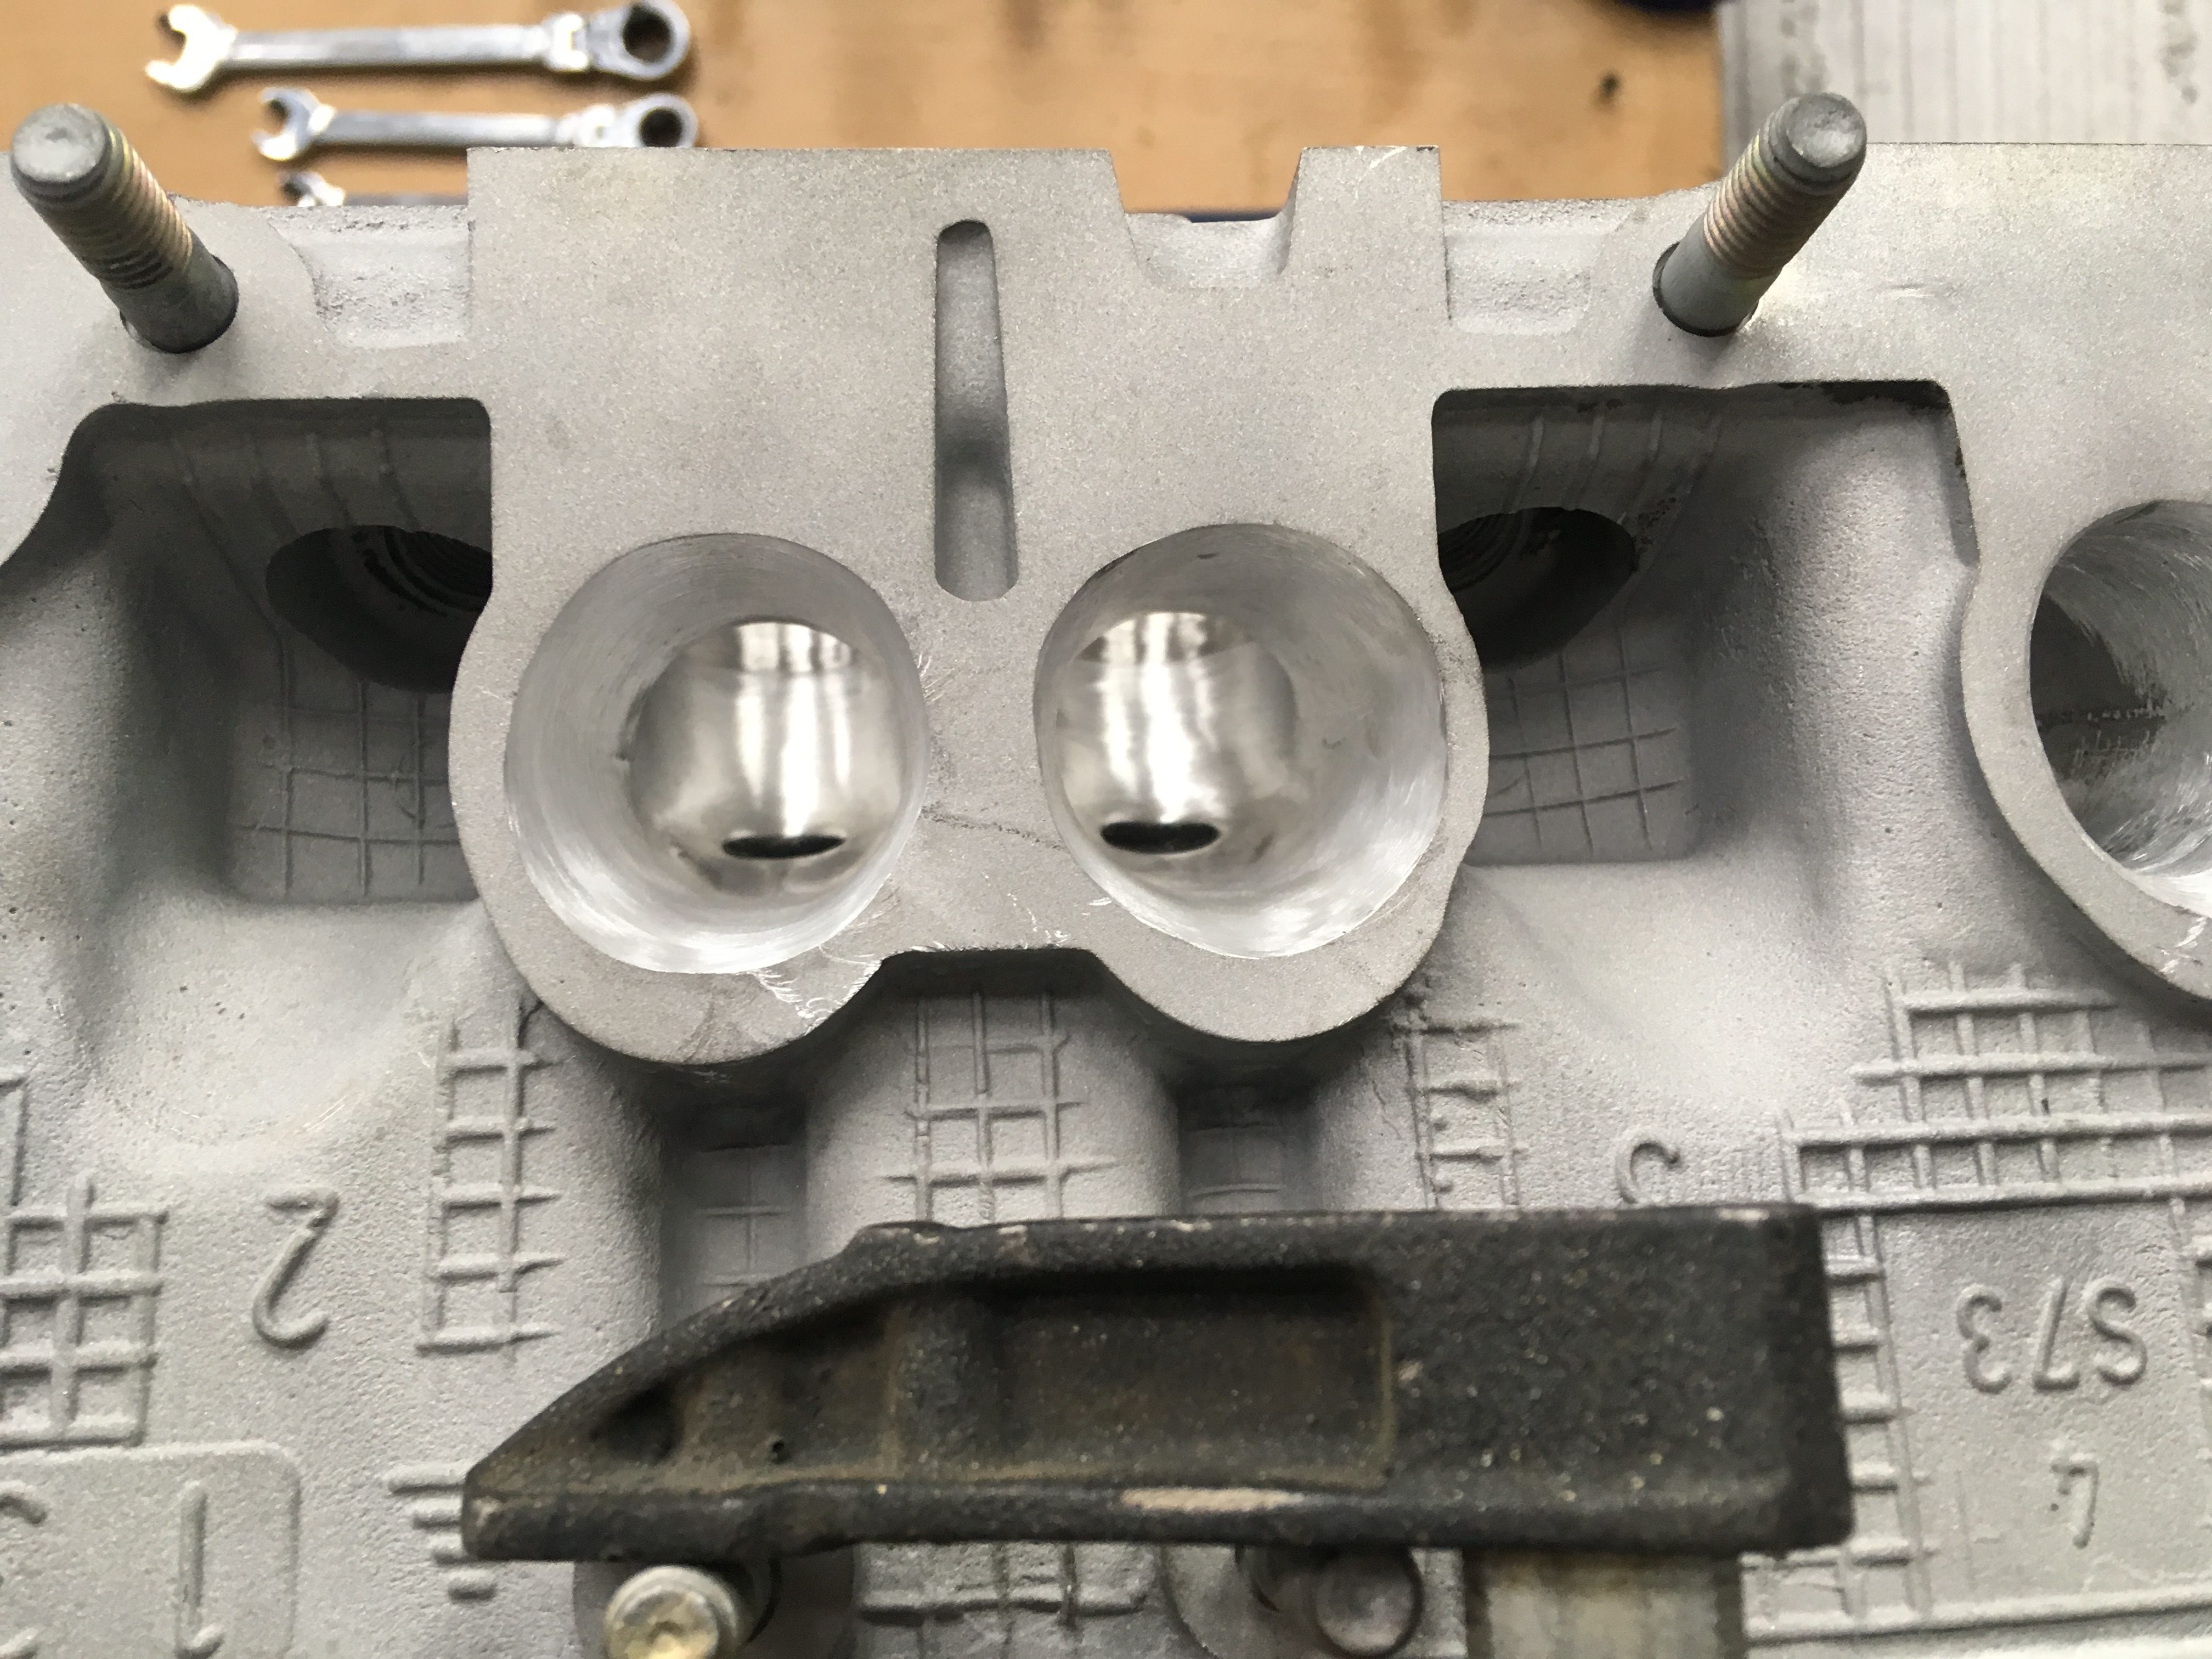
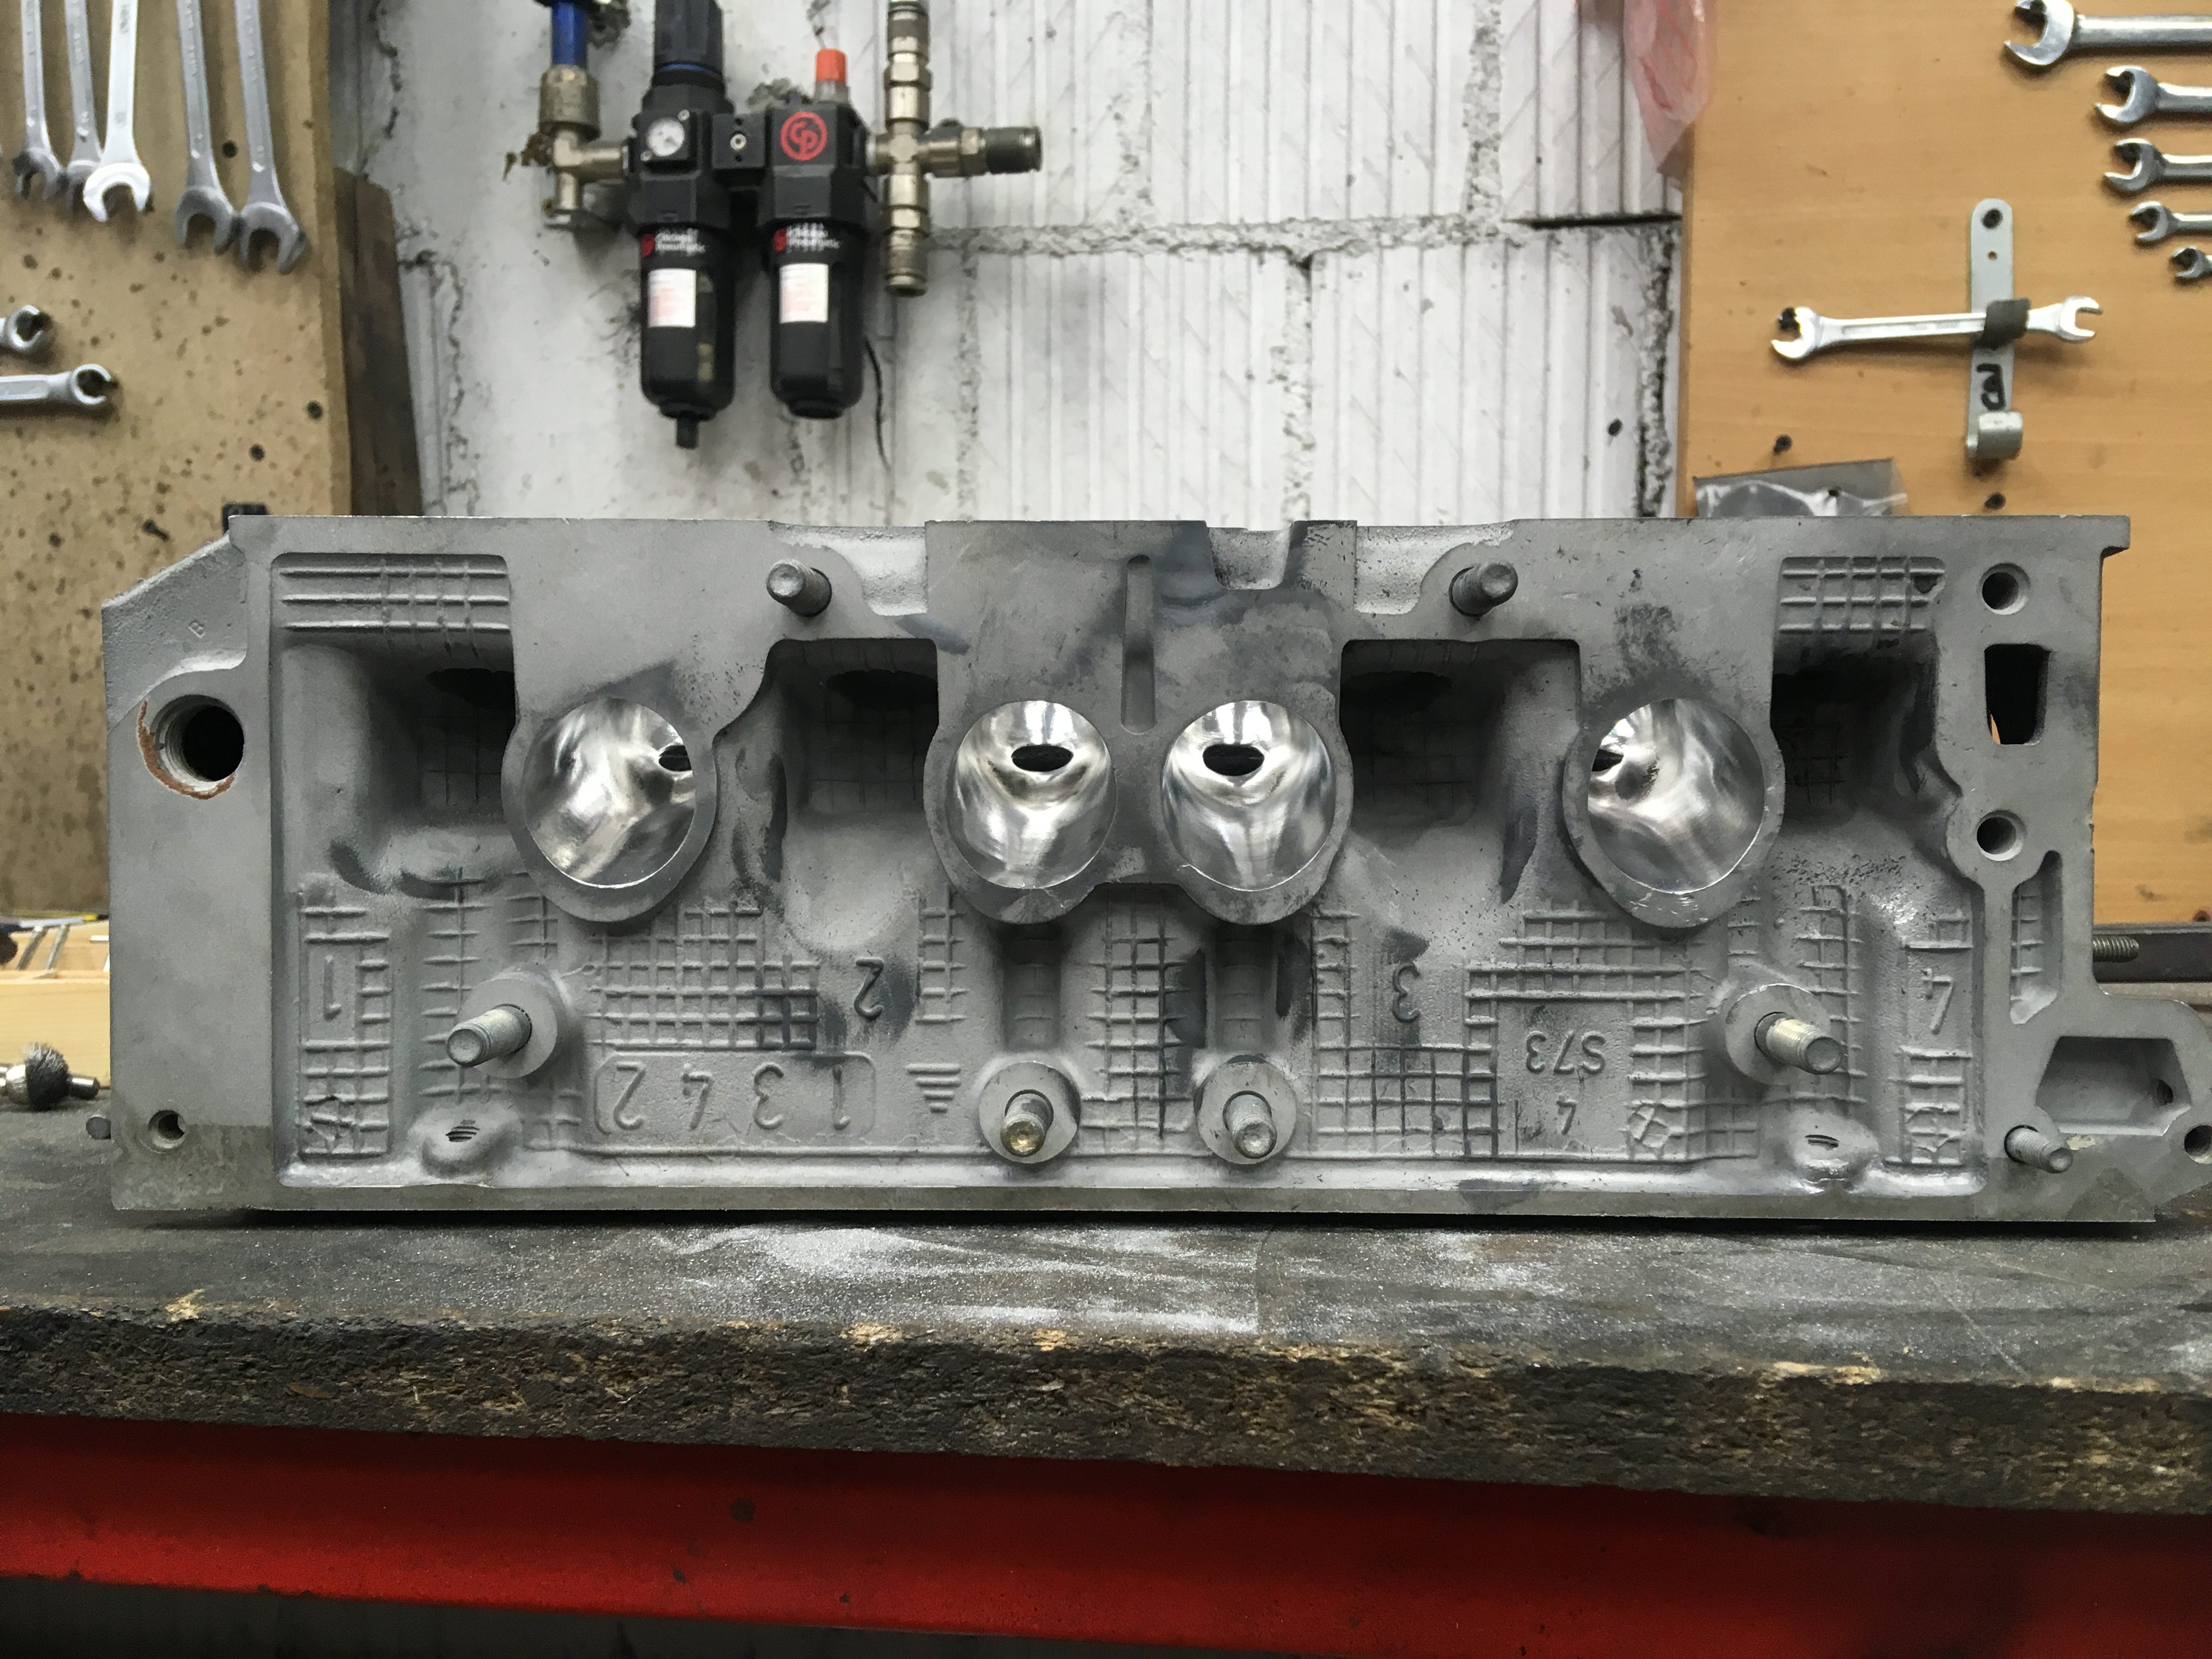
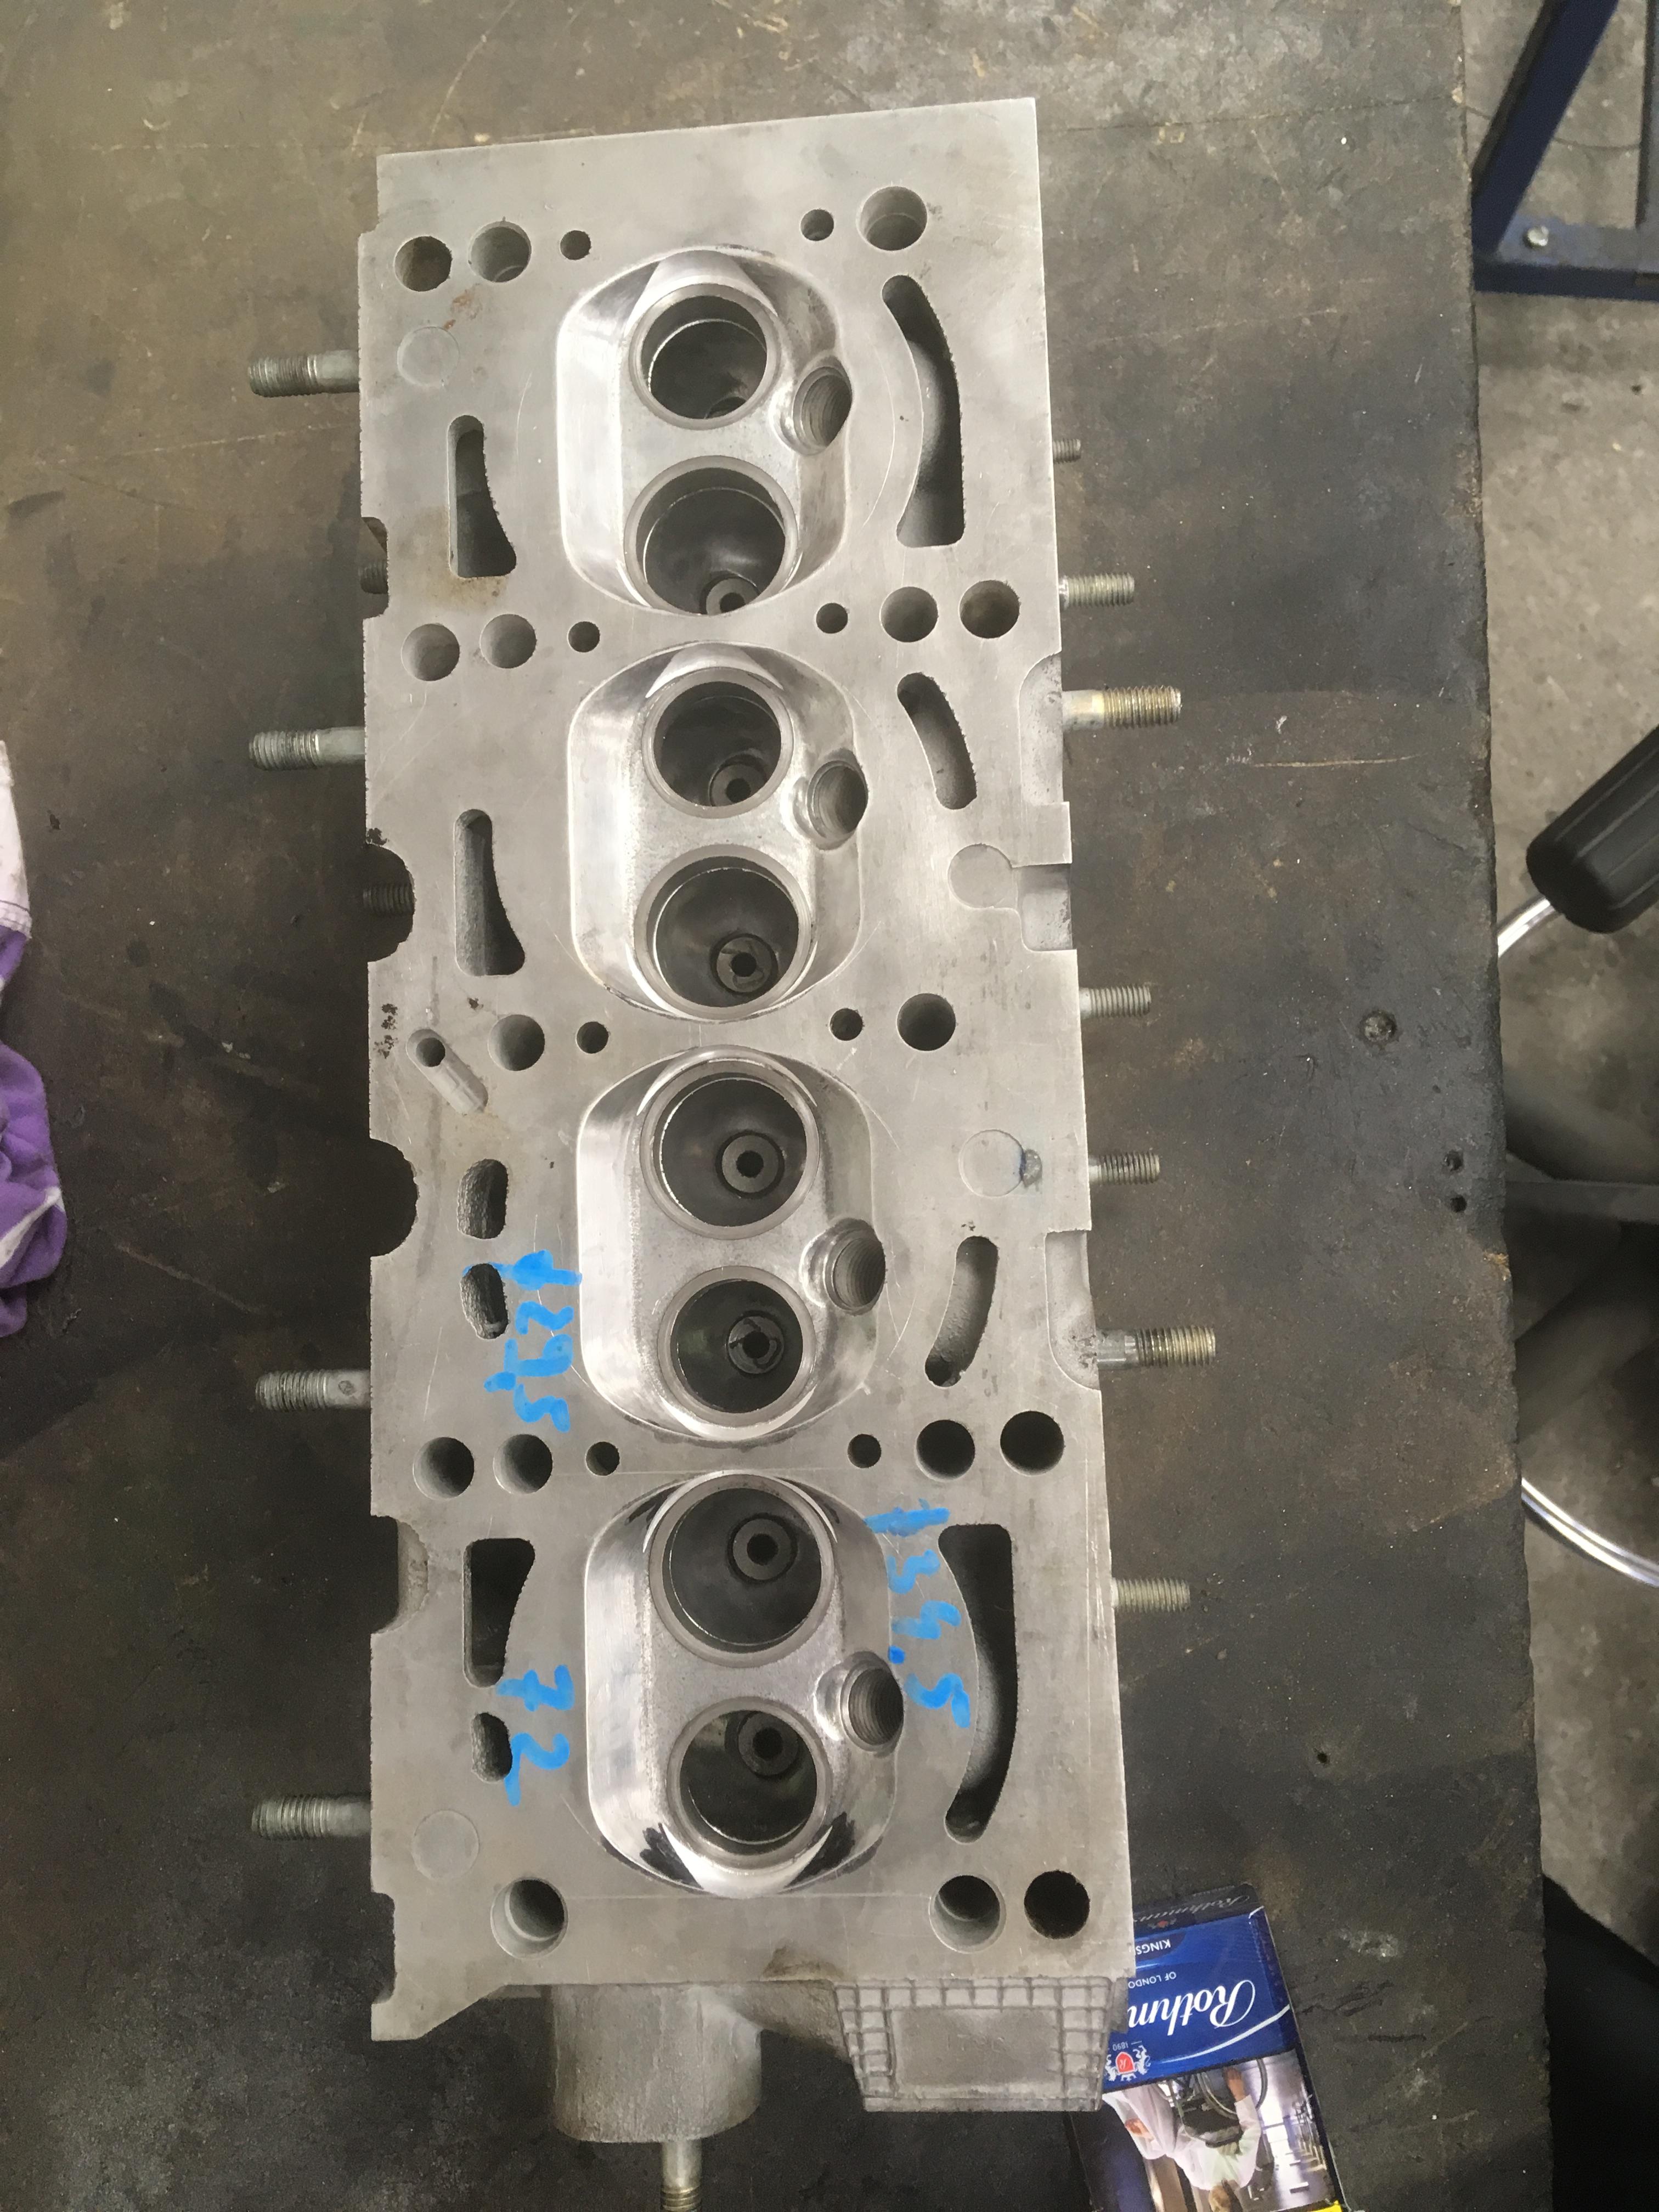
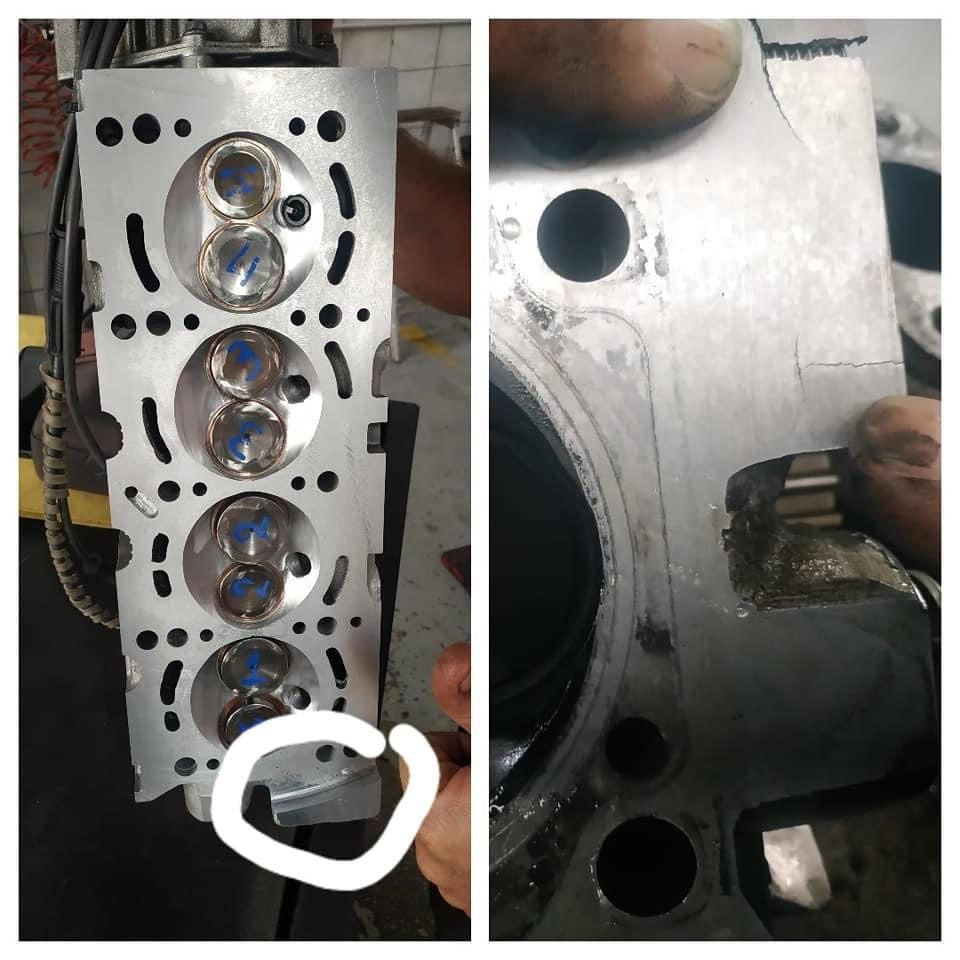
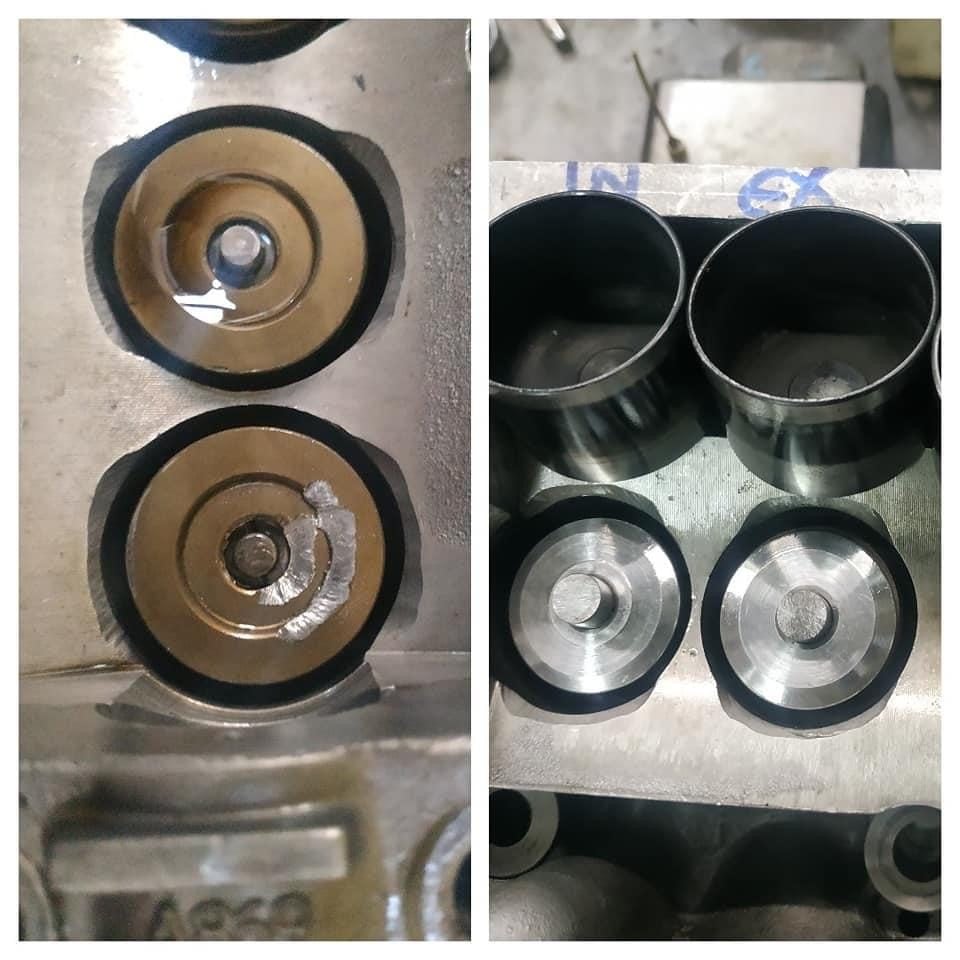
From that I resorted to valves that were commercially available - Grande Punto 1.4 8V valves that were bigger in size (I 33,5mm vs 31,5mm stock and E 28,1mm vs 27,5mm stock) and smaller in stem diameter (5mm vs 7mm stock) that made them noticeably lighter as well.
For this modification a custom set of valve guides needed to be made as well as new valve seats needed to be pressed in and machined at 3 angles for better flow.
I wanted to go larger on the intake valves but it's a far more custom job as it involves eccentric guides and custom valves so that will wait for a new cylinder head build sometimes in the future.
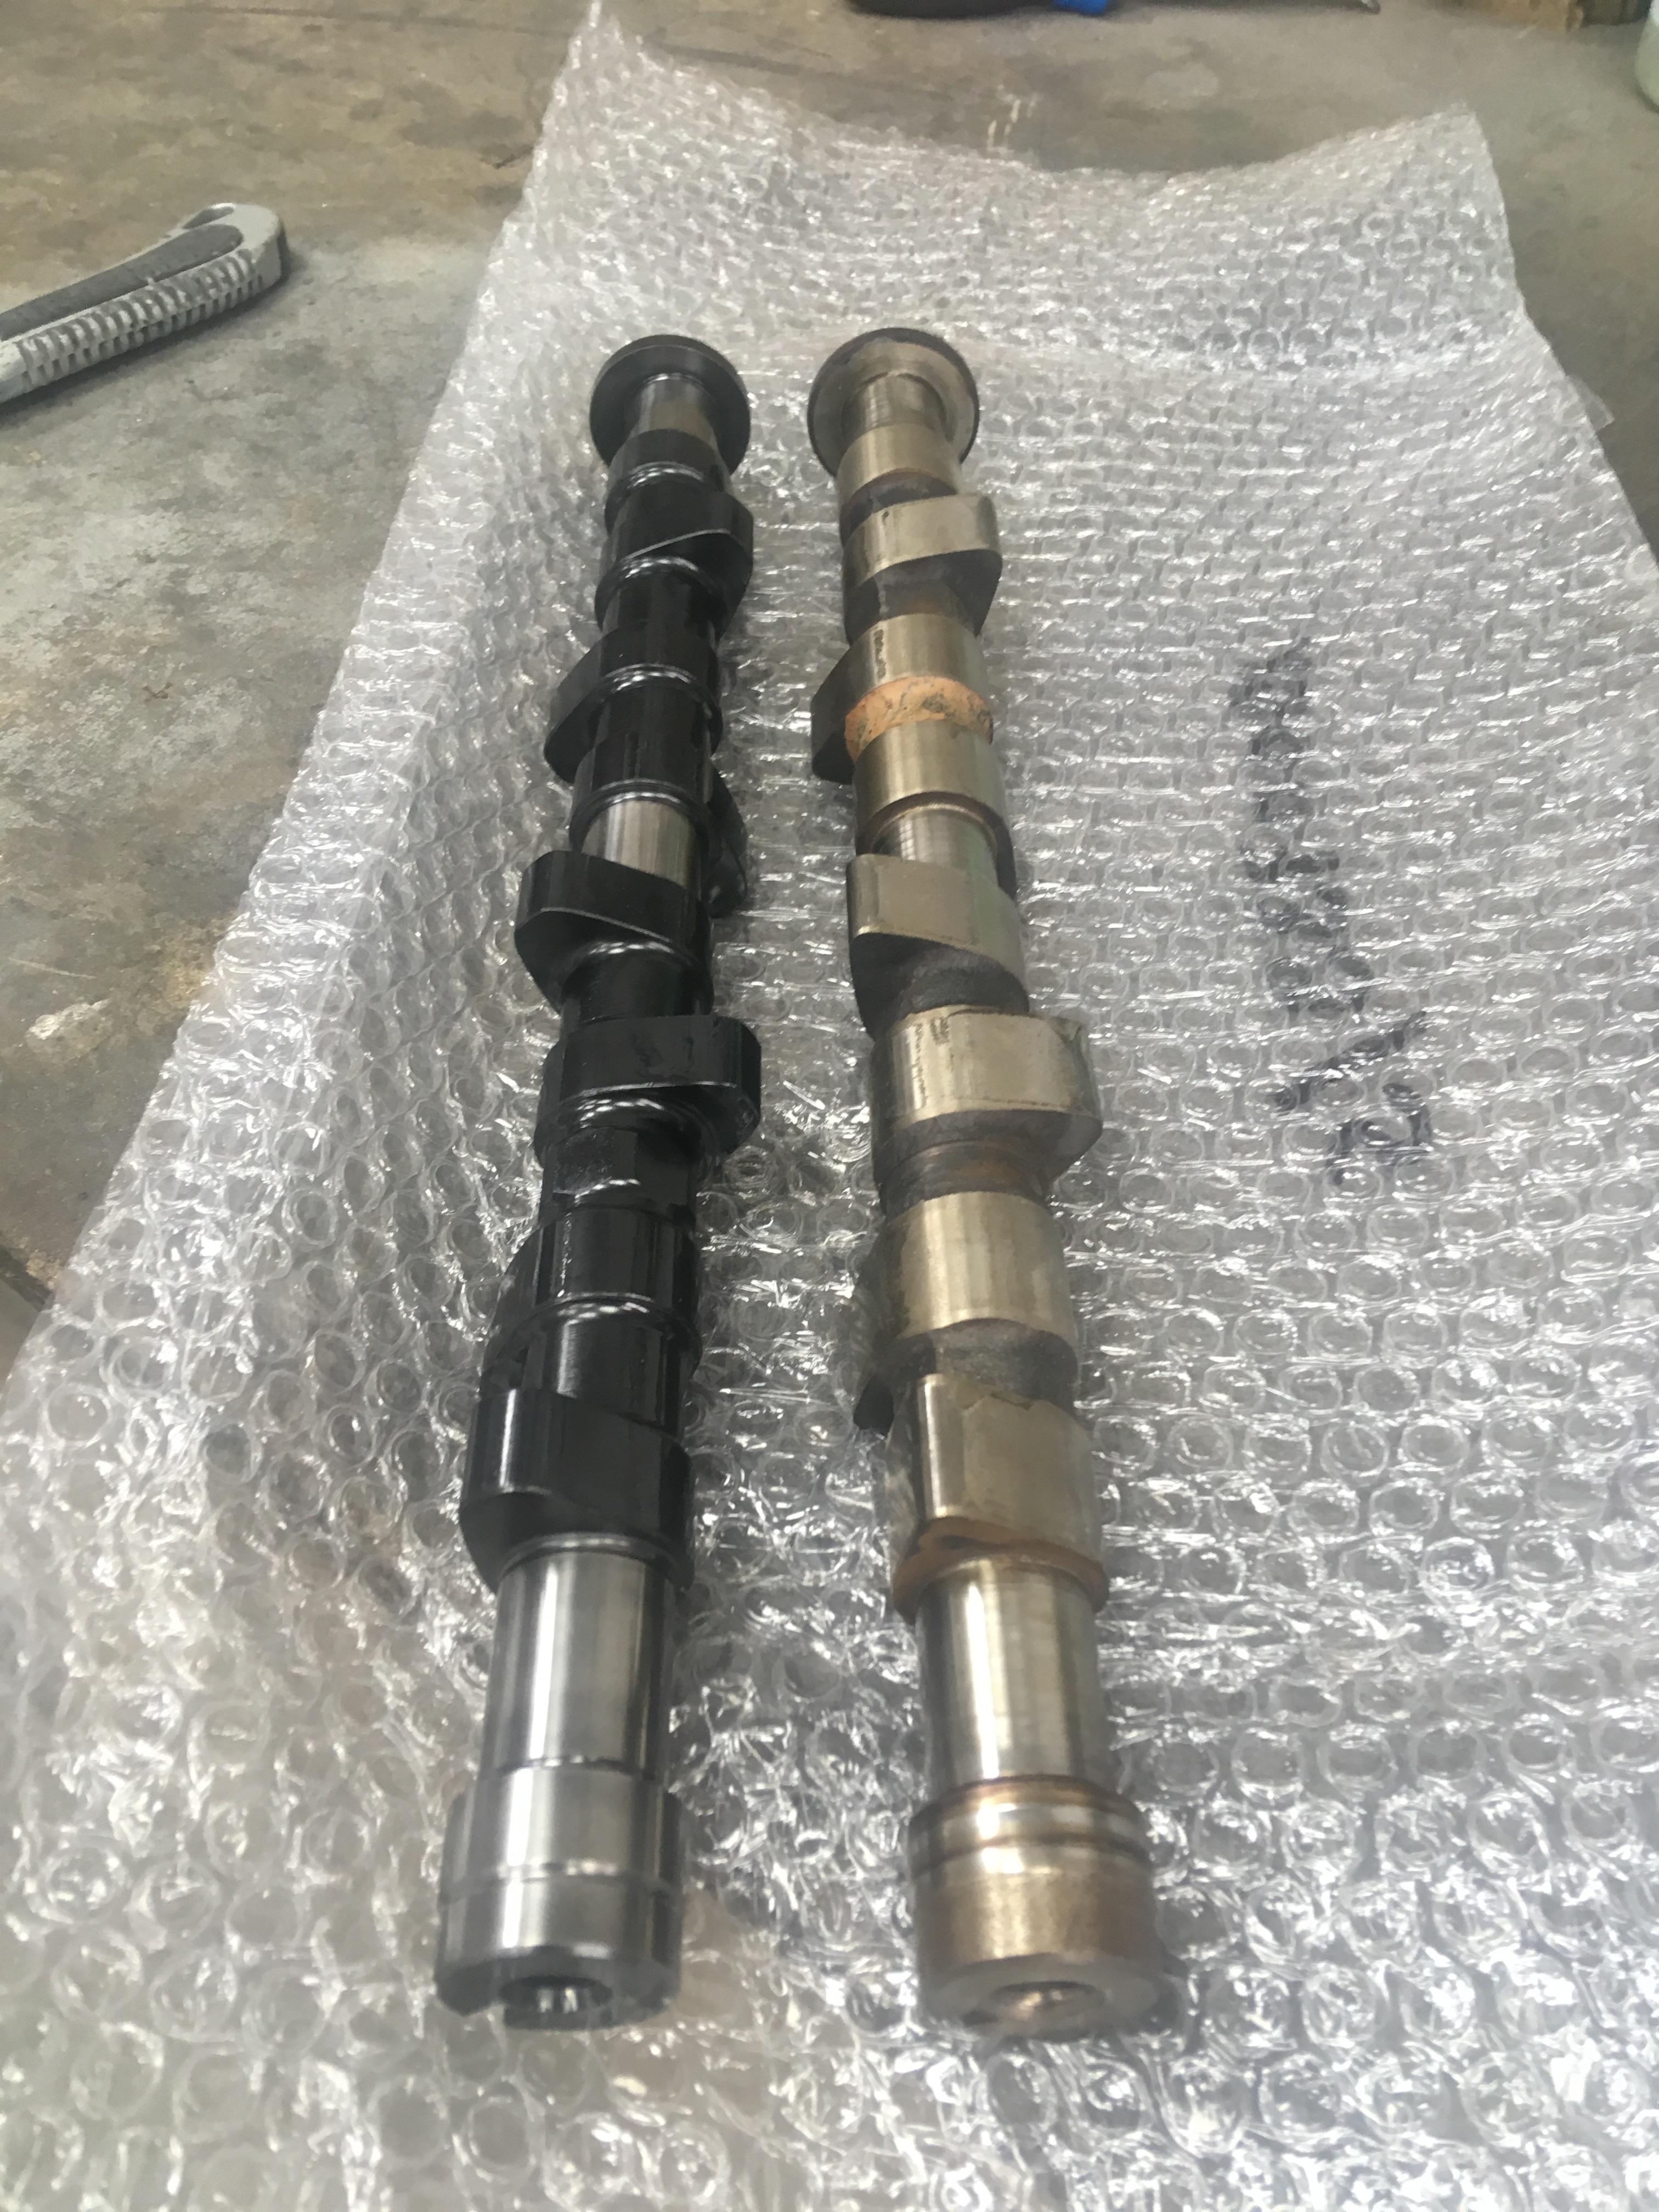
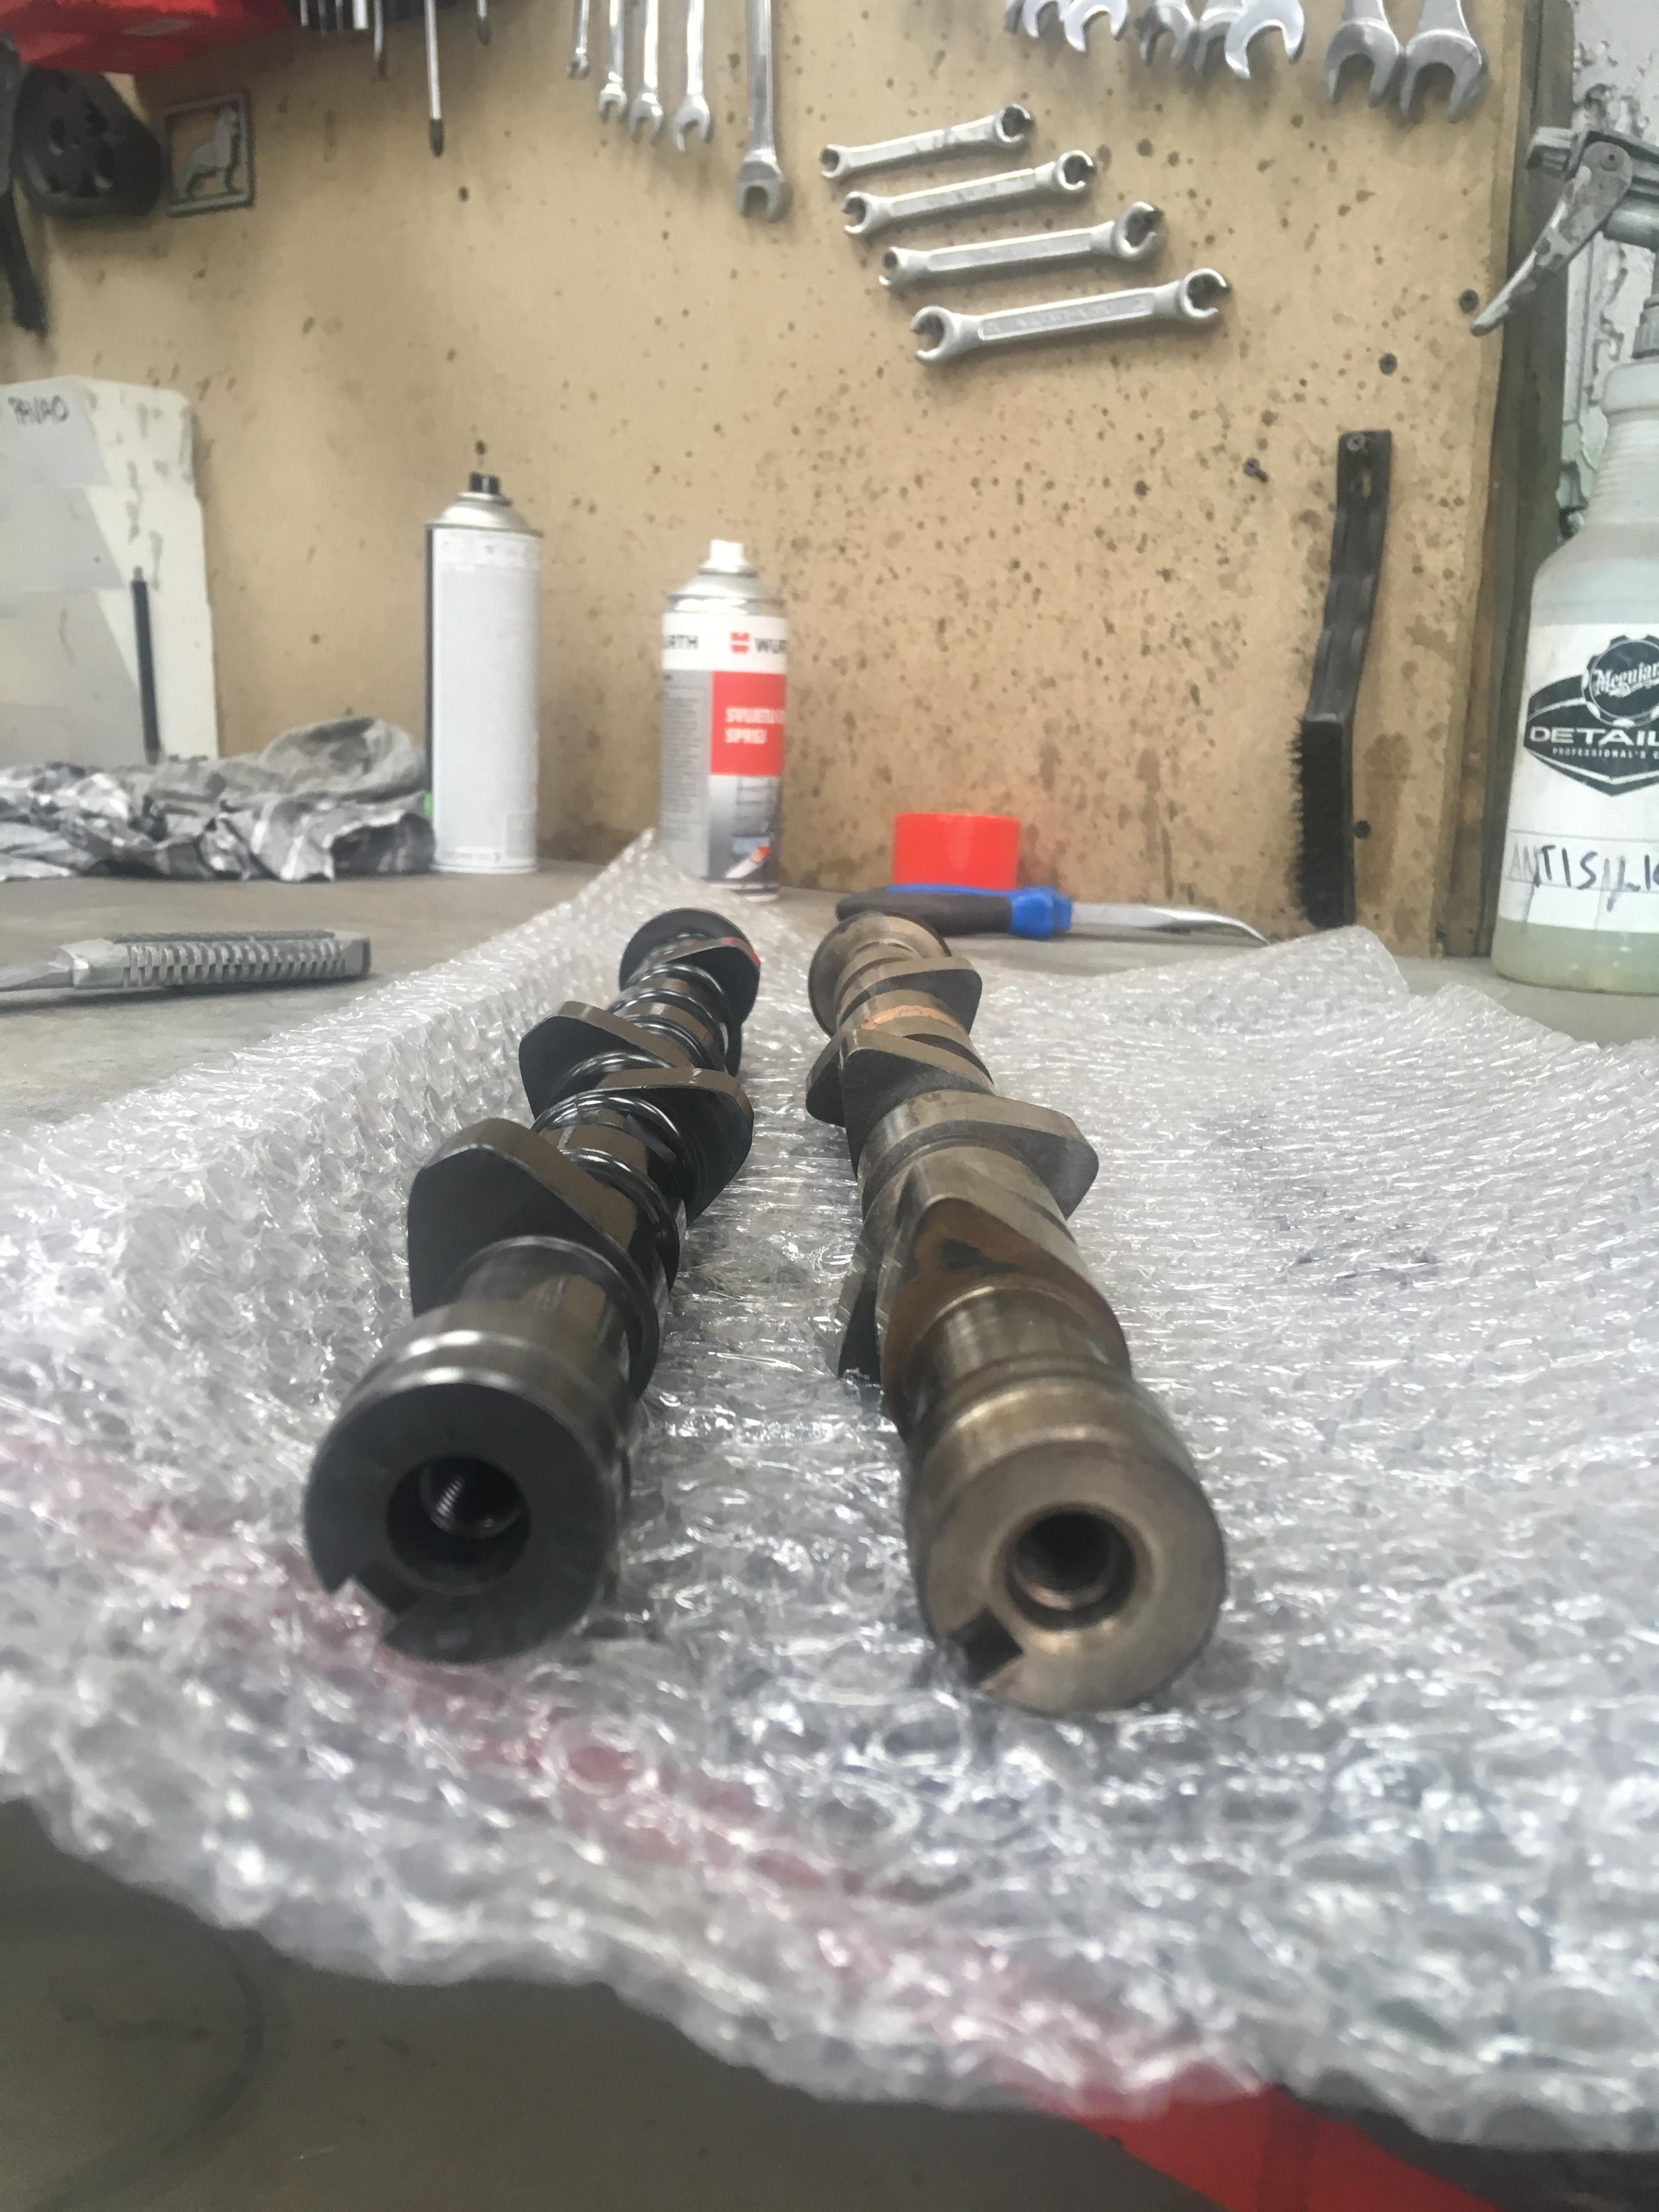
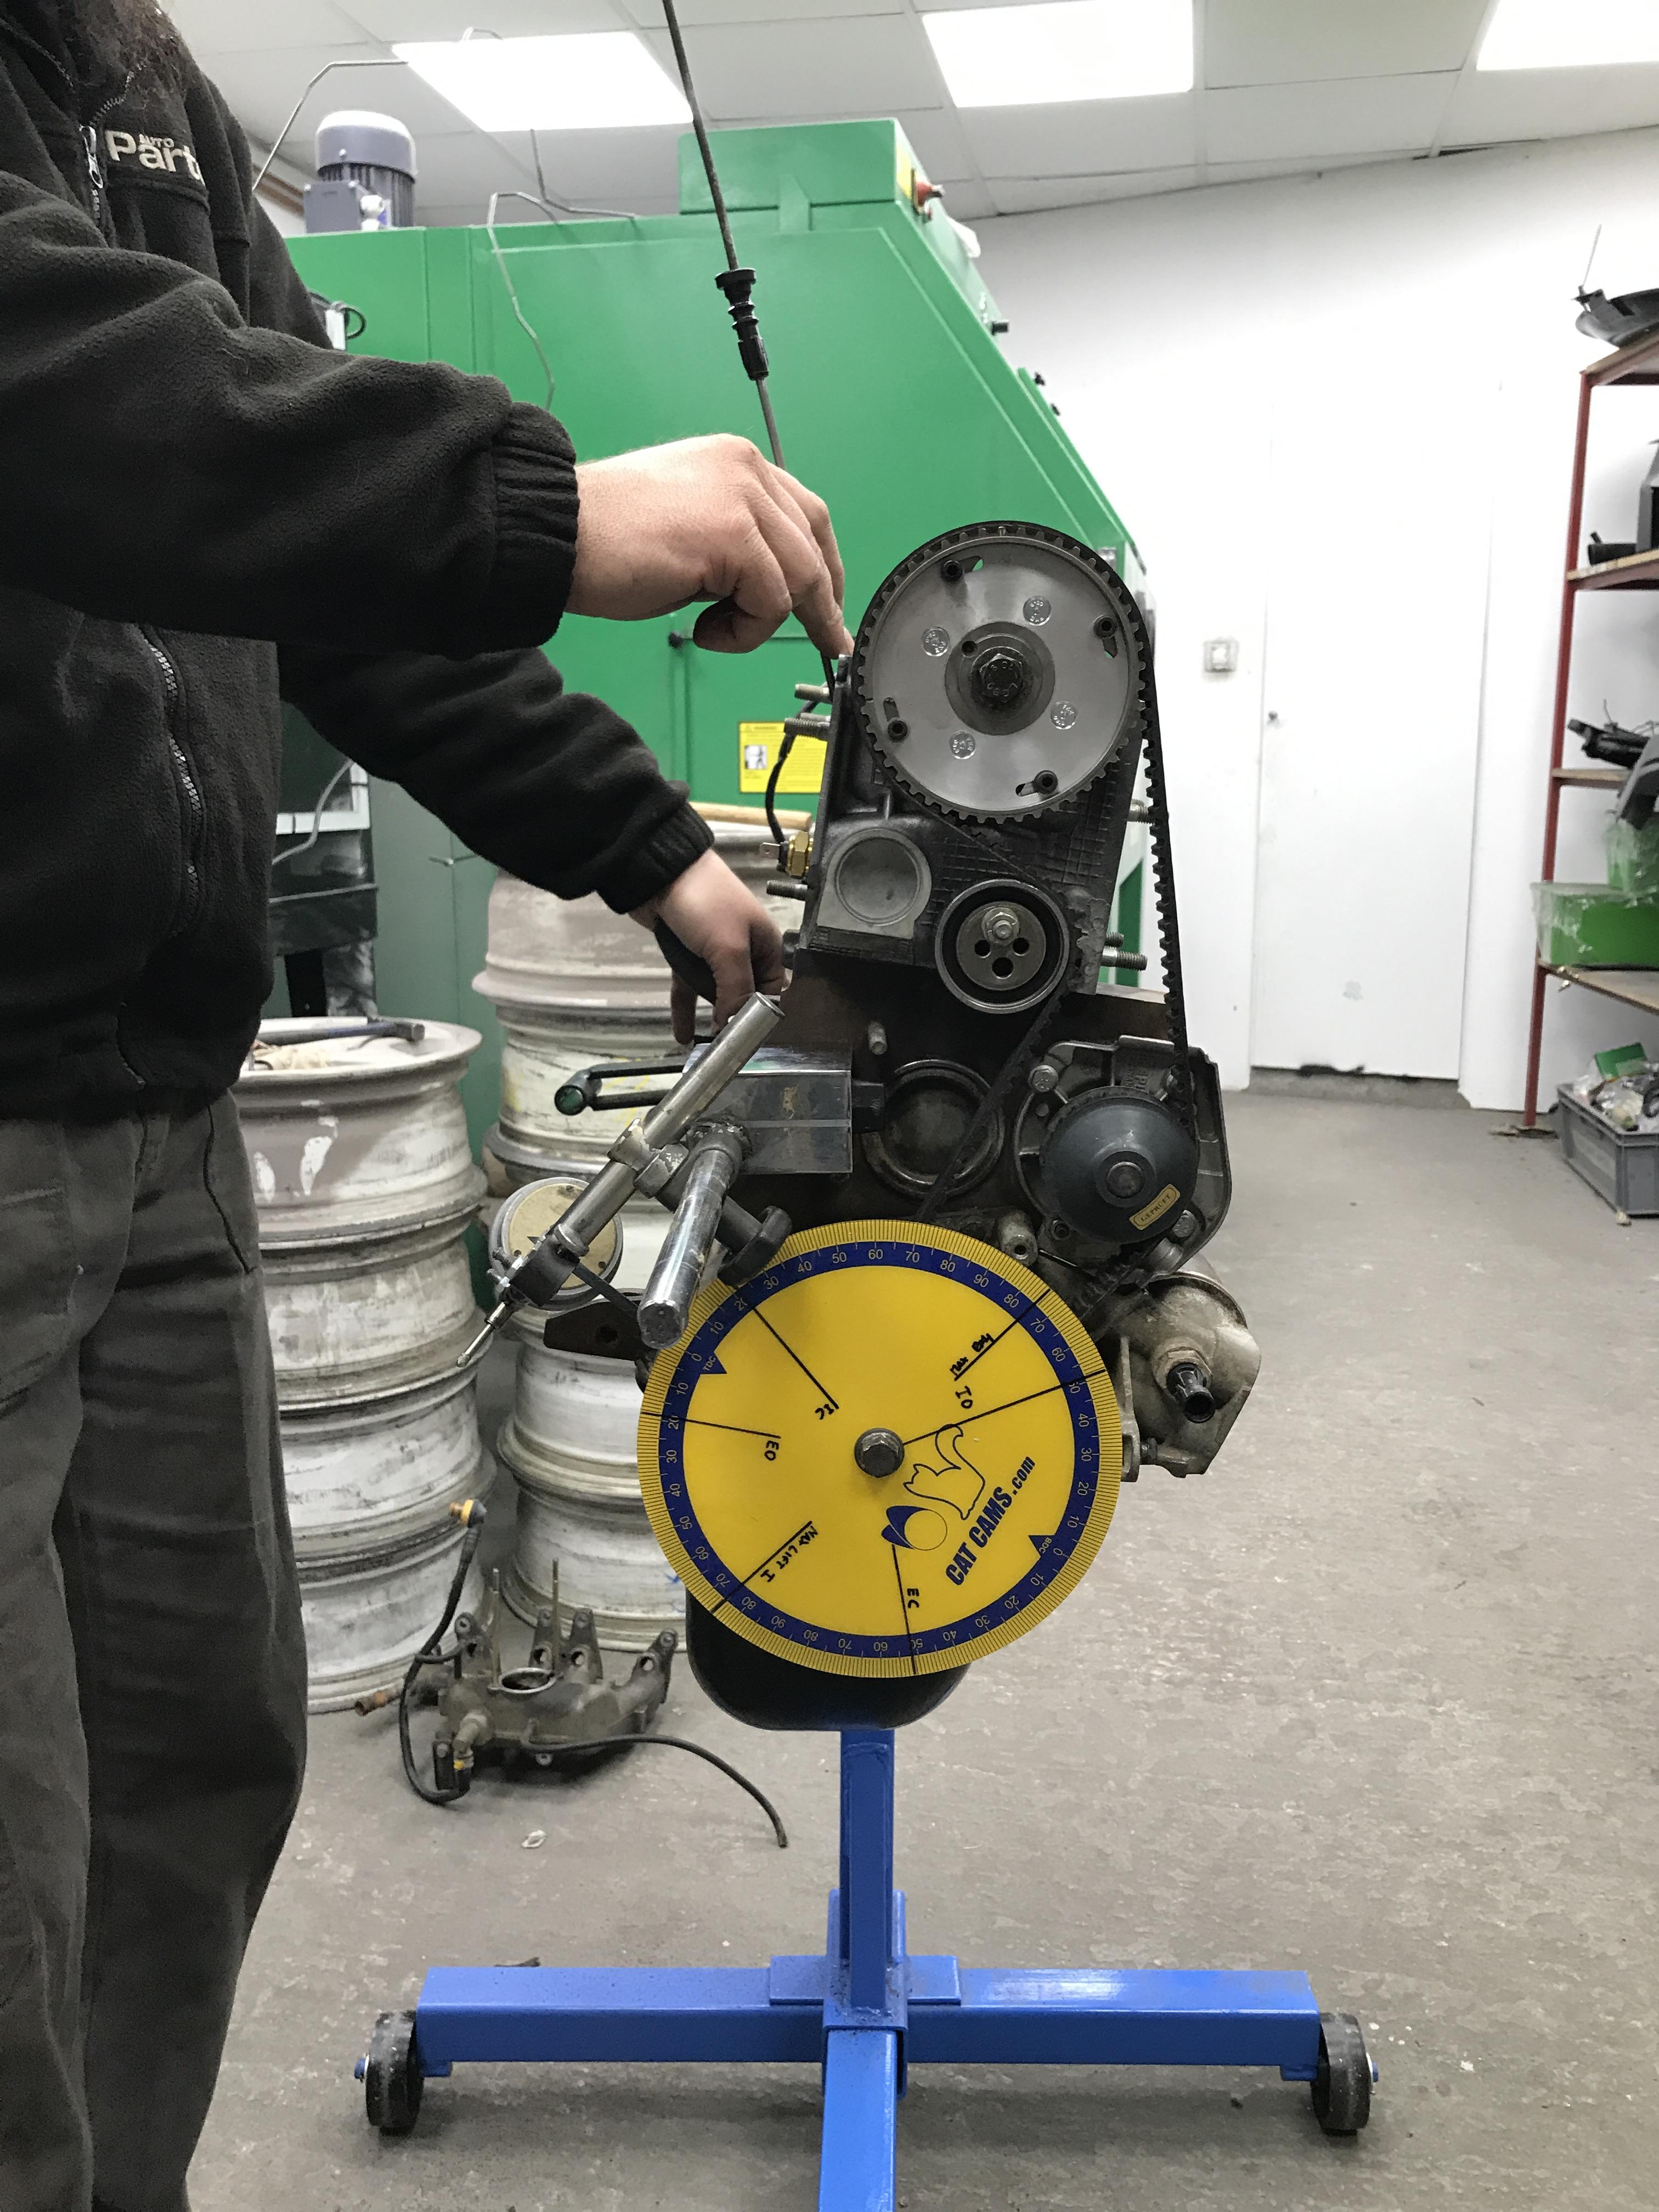
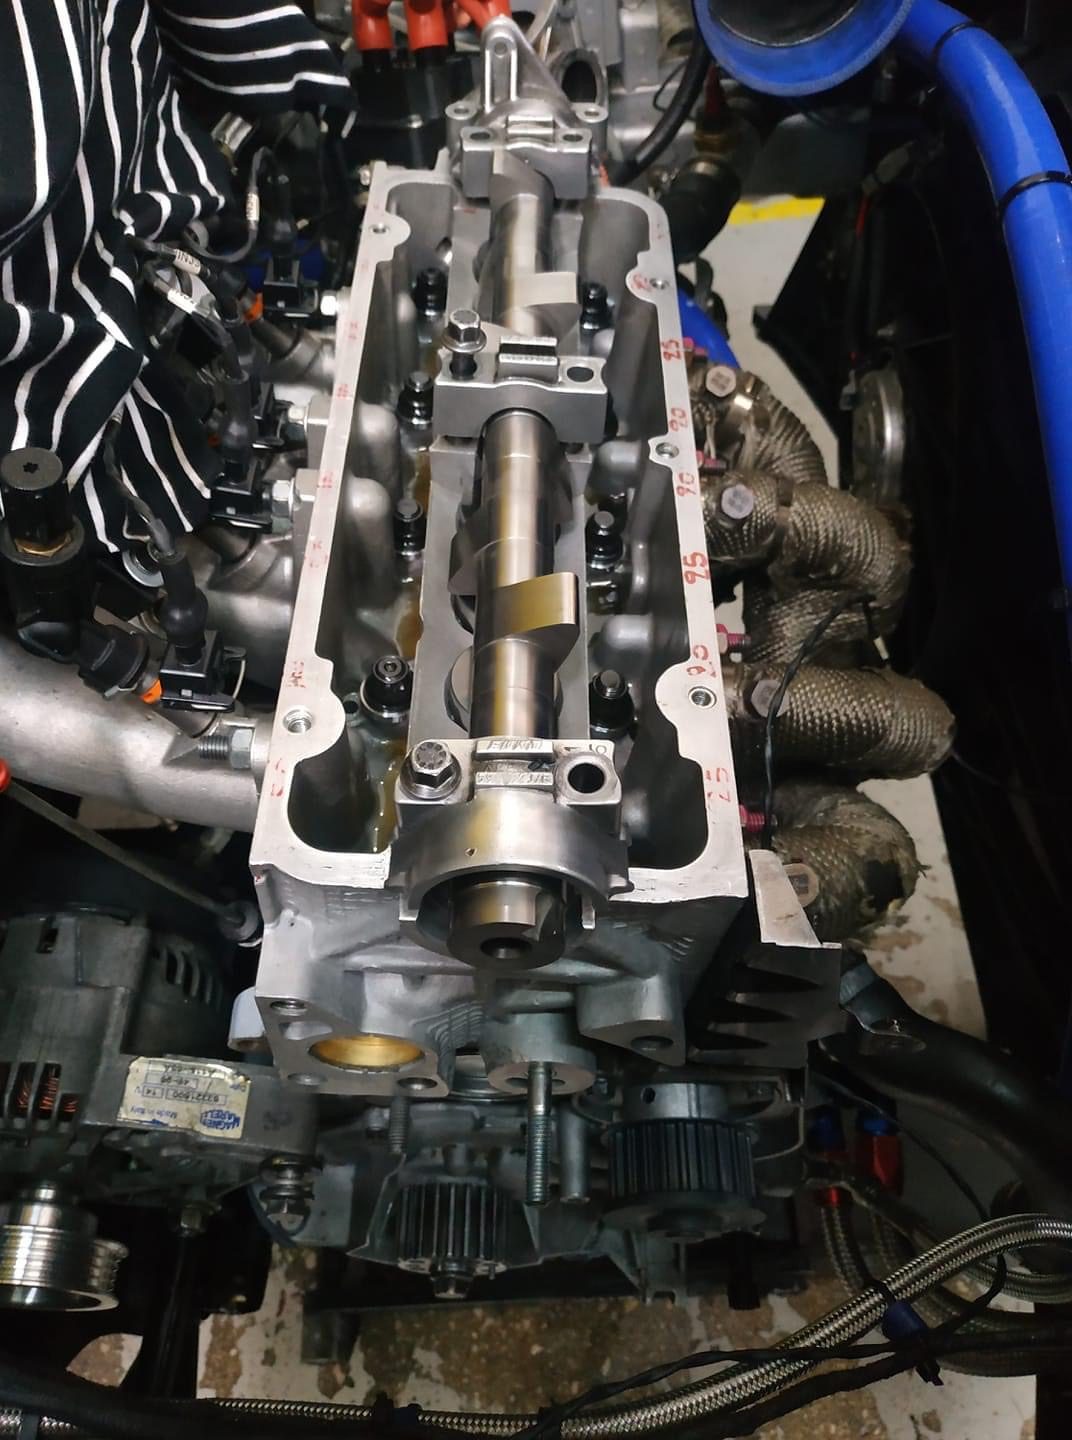
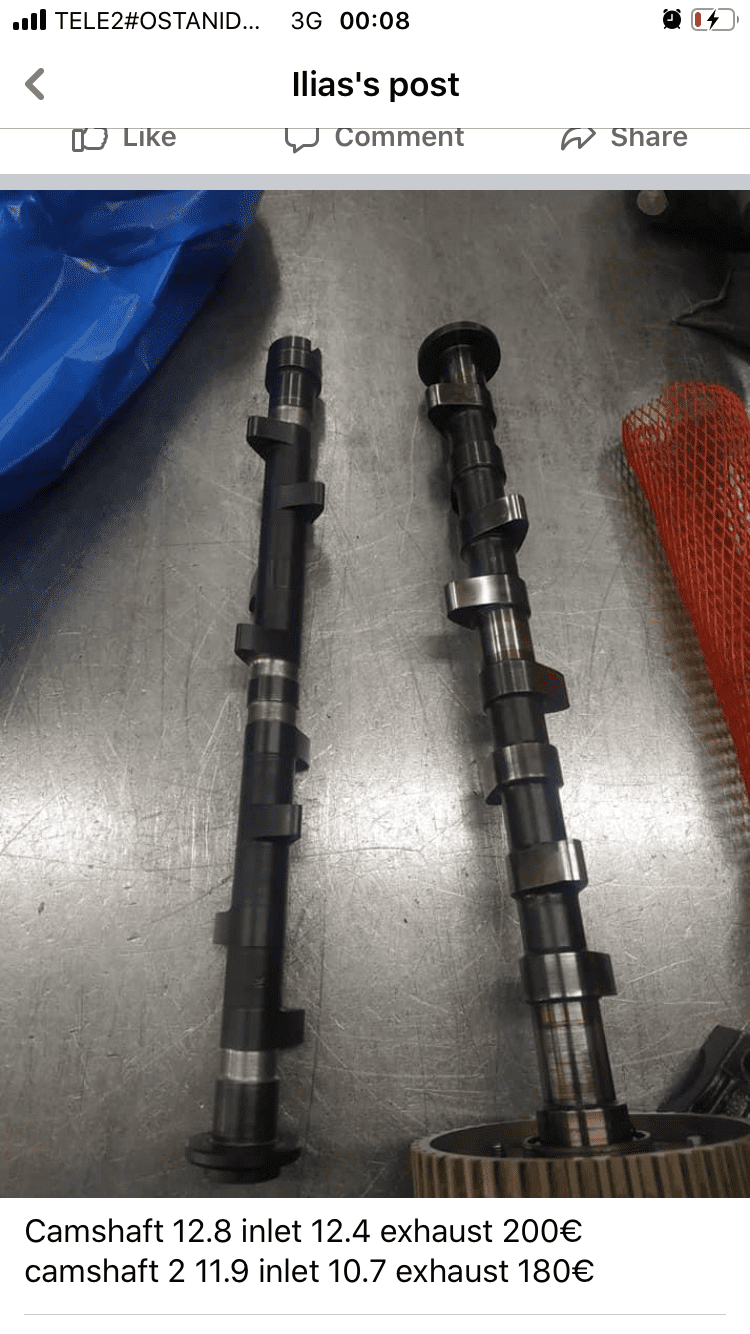
The cam selected and bought was CatCams steel billet 290° cam with 10,2mm lift and 105° LSA.
In the next stage I wanted to do a lighter valve train with shimless buckets and bought one Subaru STI lifter for testing purposes.
They can be made to work and we did everything to make them work but unfortunately I couldn't source the lifters at the time so I resorted to Grande Punto buckets that are again lighter than stock and work really well for cheap. (also far easier to set it up with shims but again heavier)
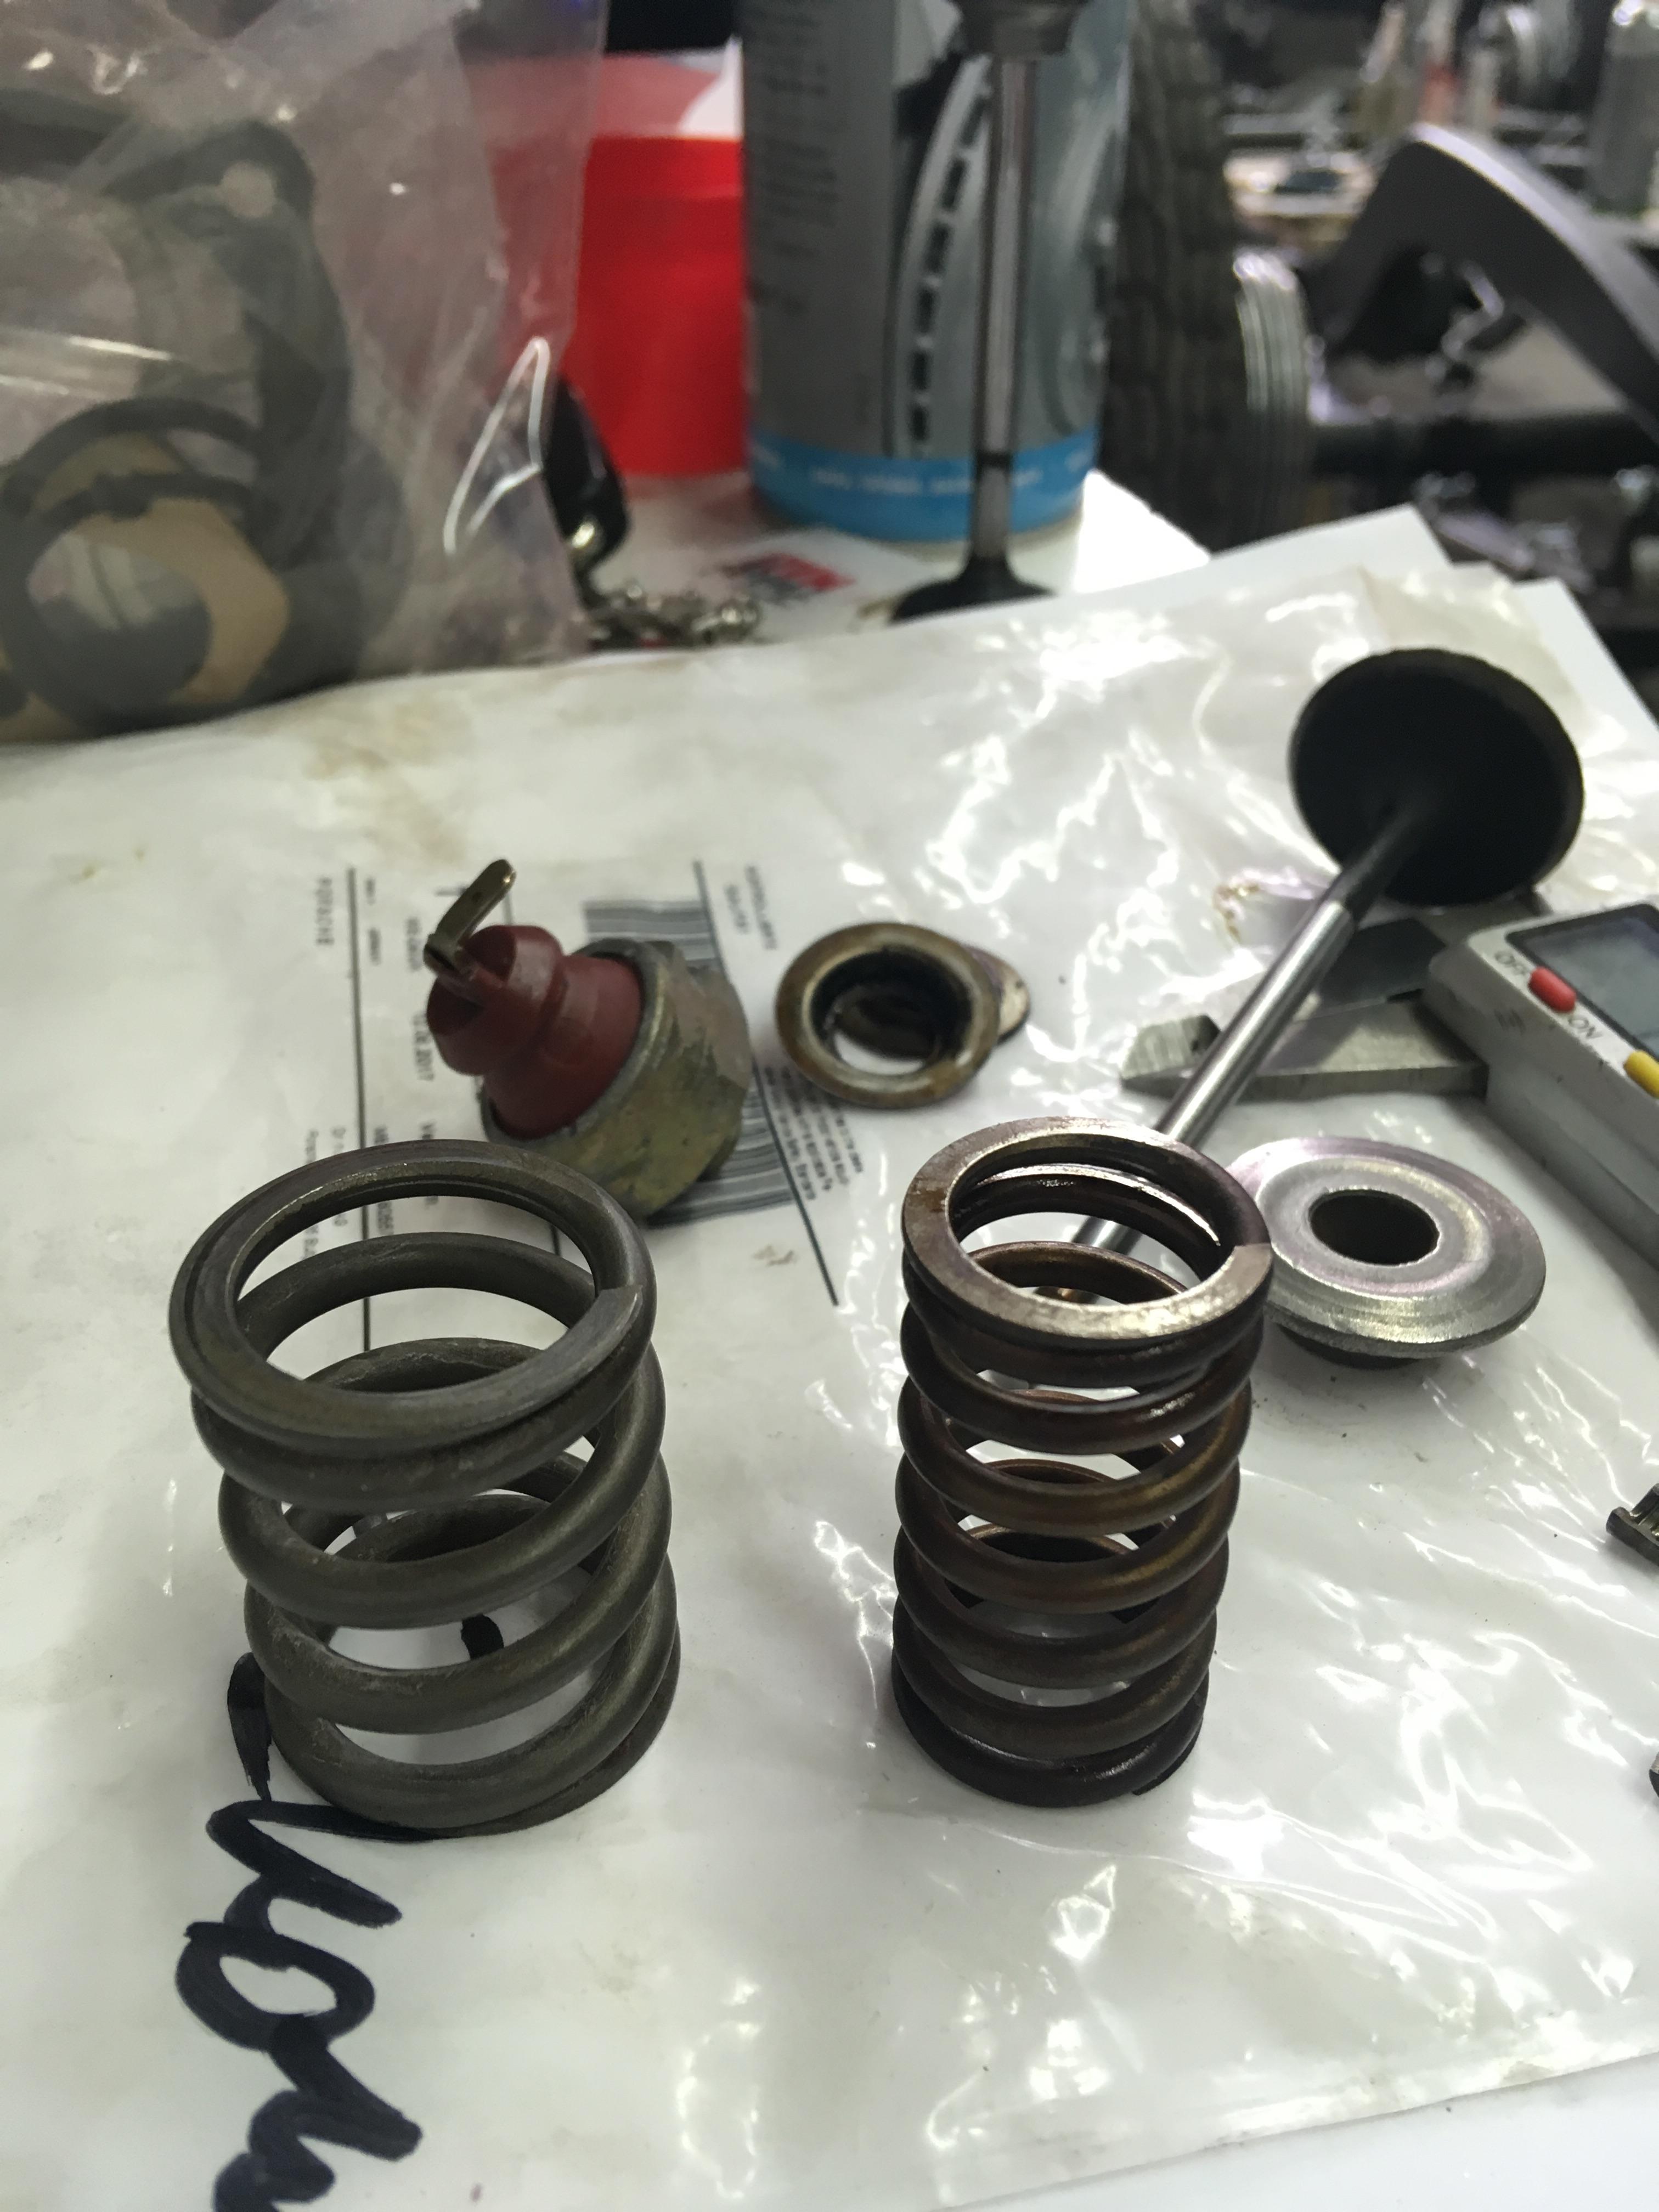
As we had custom valve guides to suit the valve/head combination the standard springs/retainers/collars didn't fit as well as the standard valve stems so with the whole parts bin we made a combination to suit with smaller/lighter but also softer valve springs that mostly aren't good for high RPM applications.
AFAIK some Nissan economy car engines used titanium retainers from factory, but I couldn't find them at the time so I didn't use that unfortunately.
Since the valve train was lighter as well I suspected the springs will sustain the RPM range of a "factory stroker" engine without any valve float. If I diagnose valve float problems at high RPM, I'll probably adapt some Honda B/K engine valve springs or something in Honda range that fits.
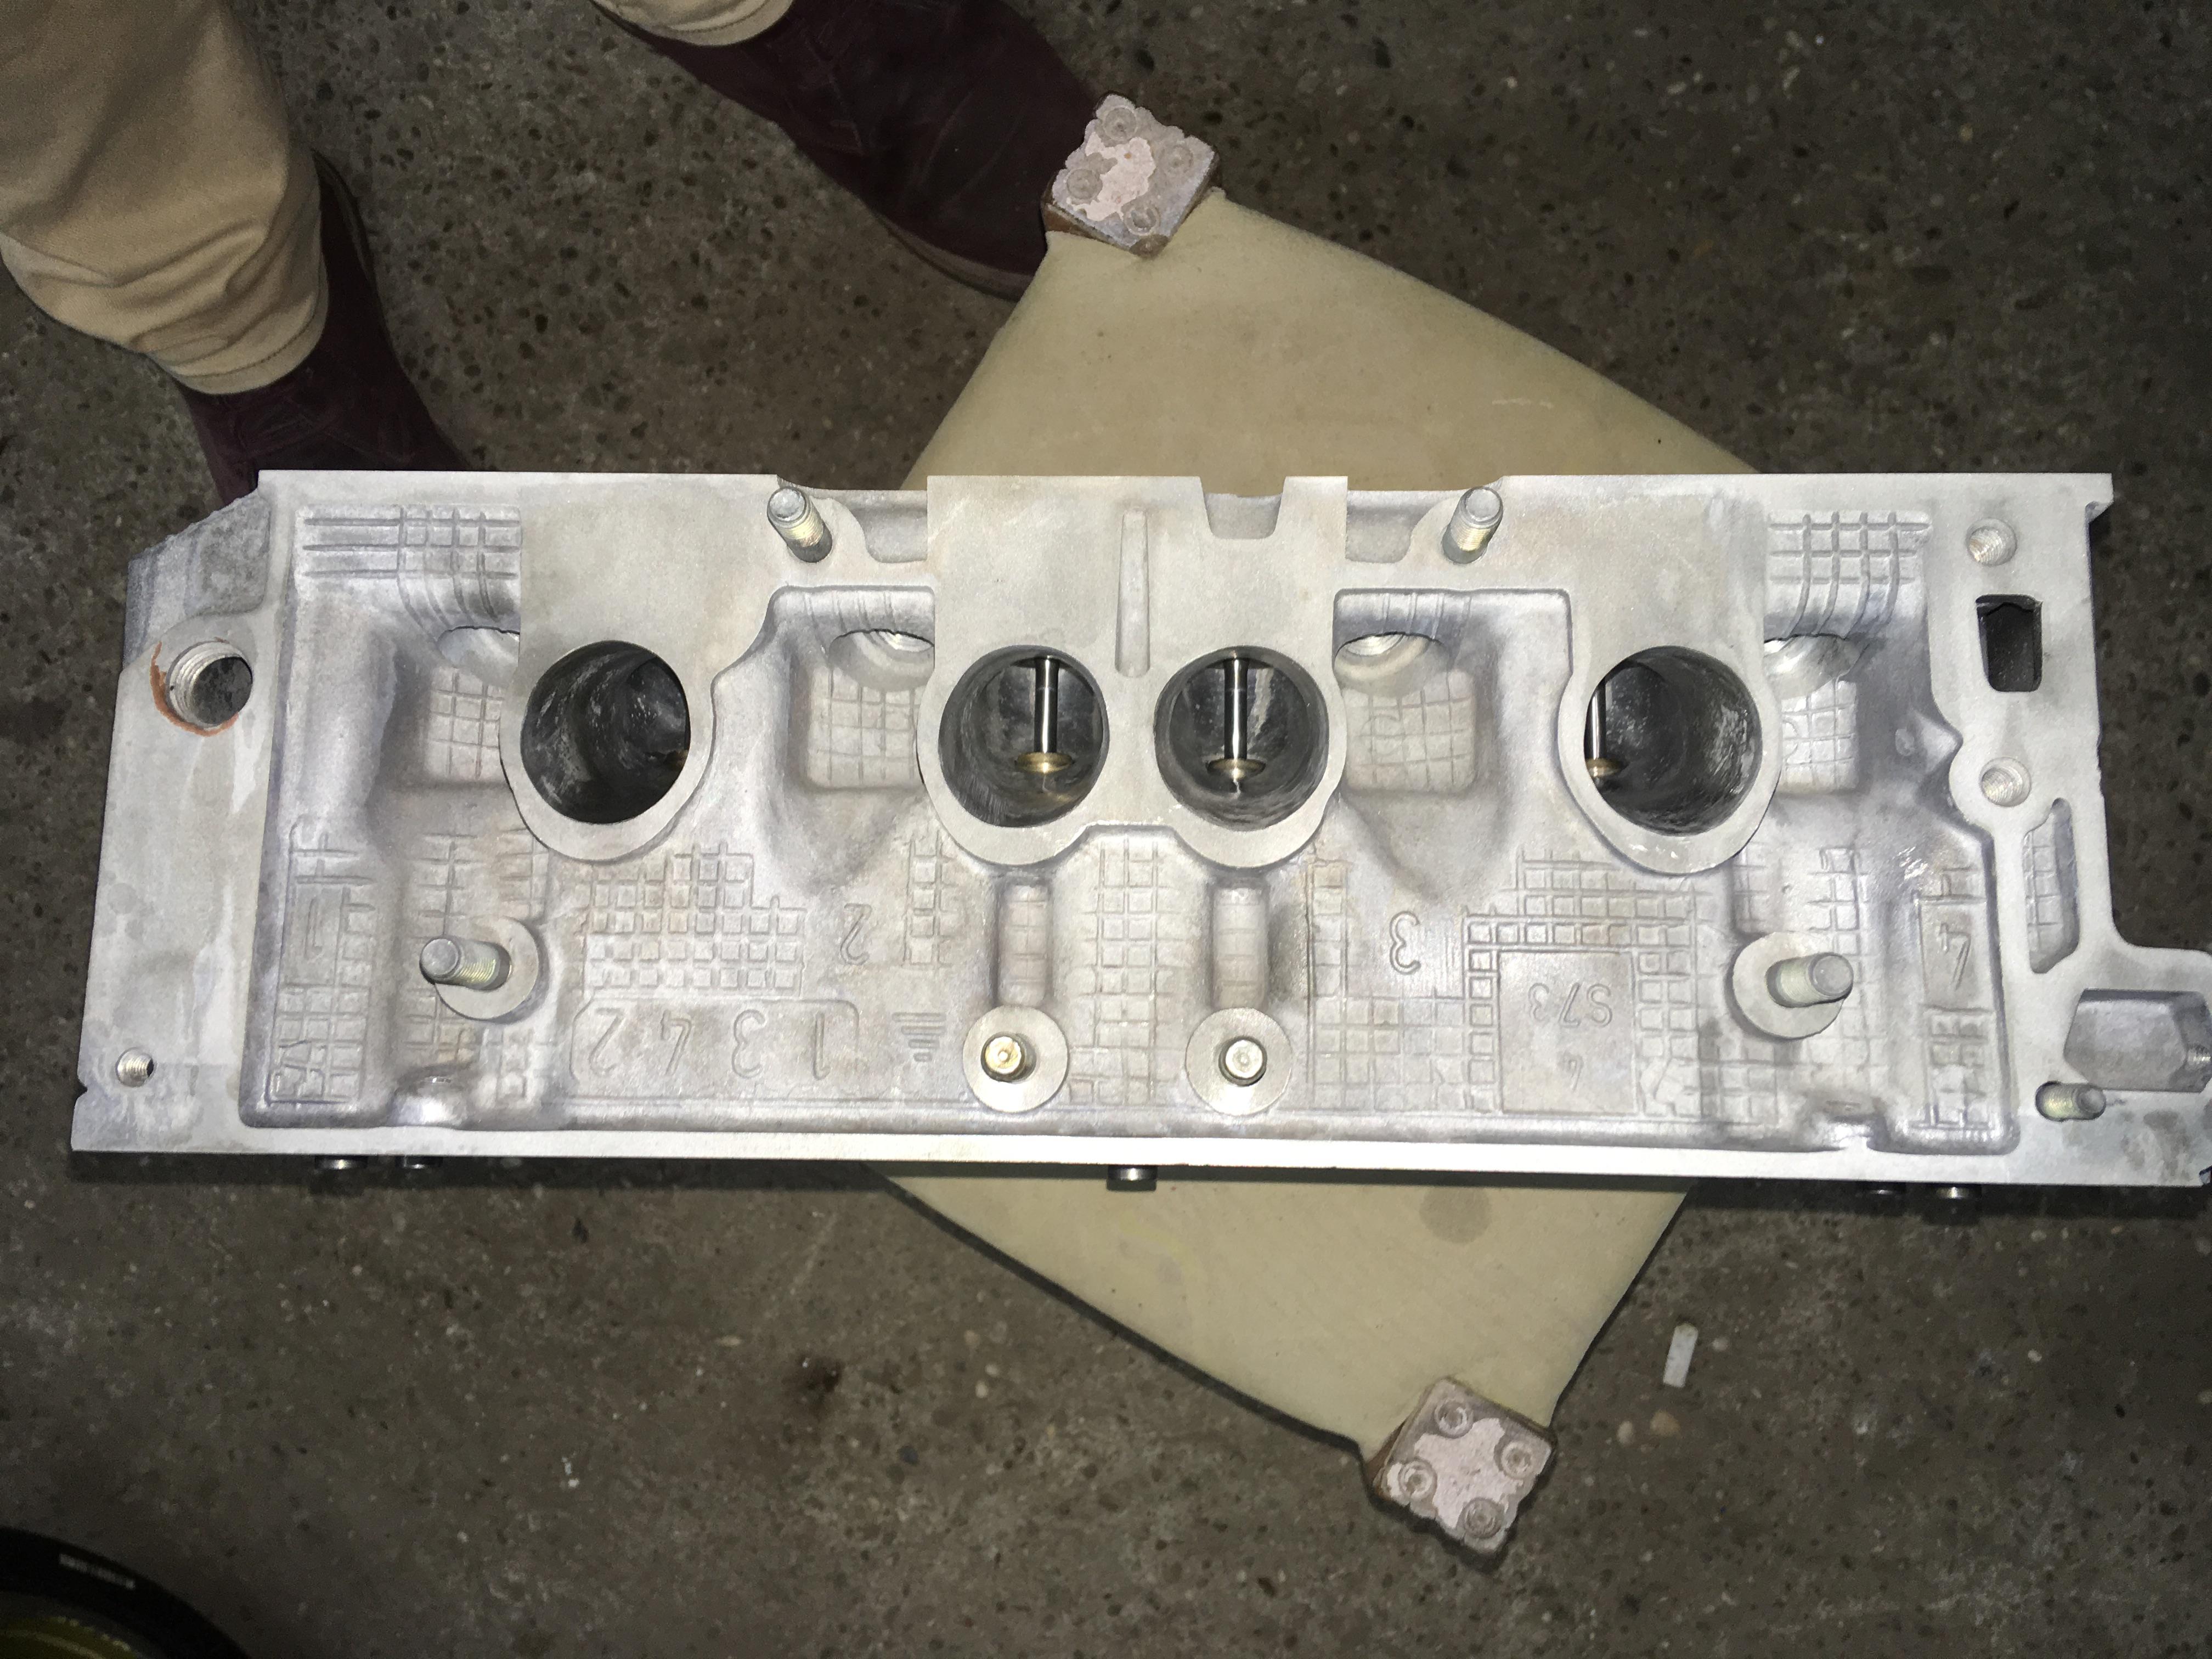
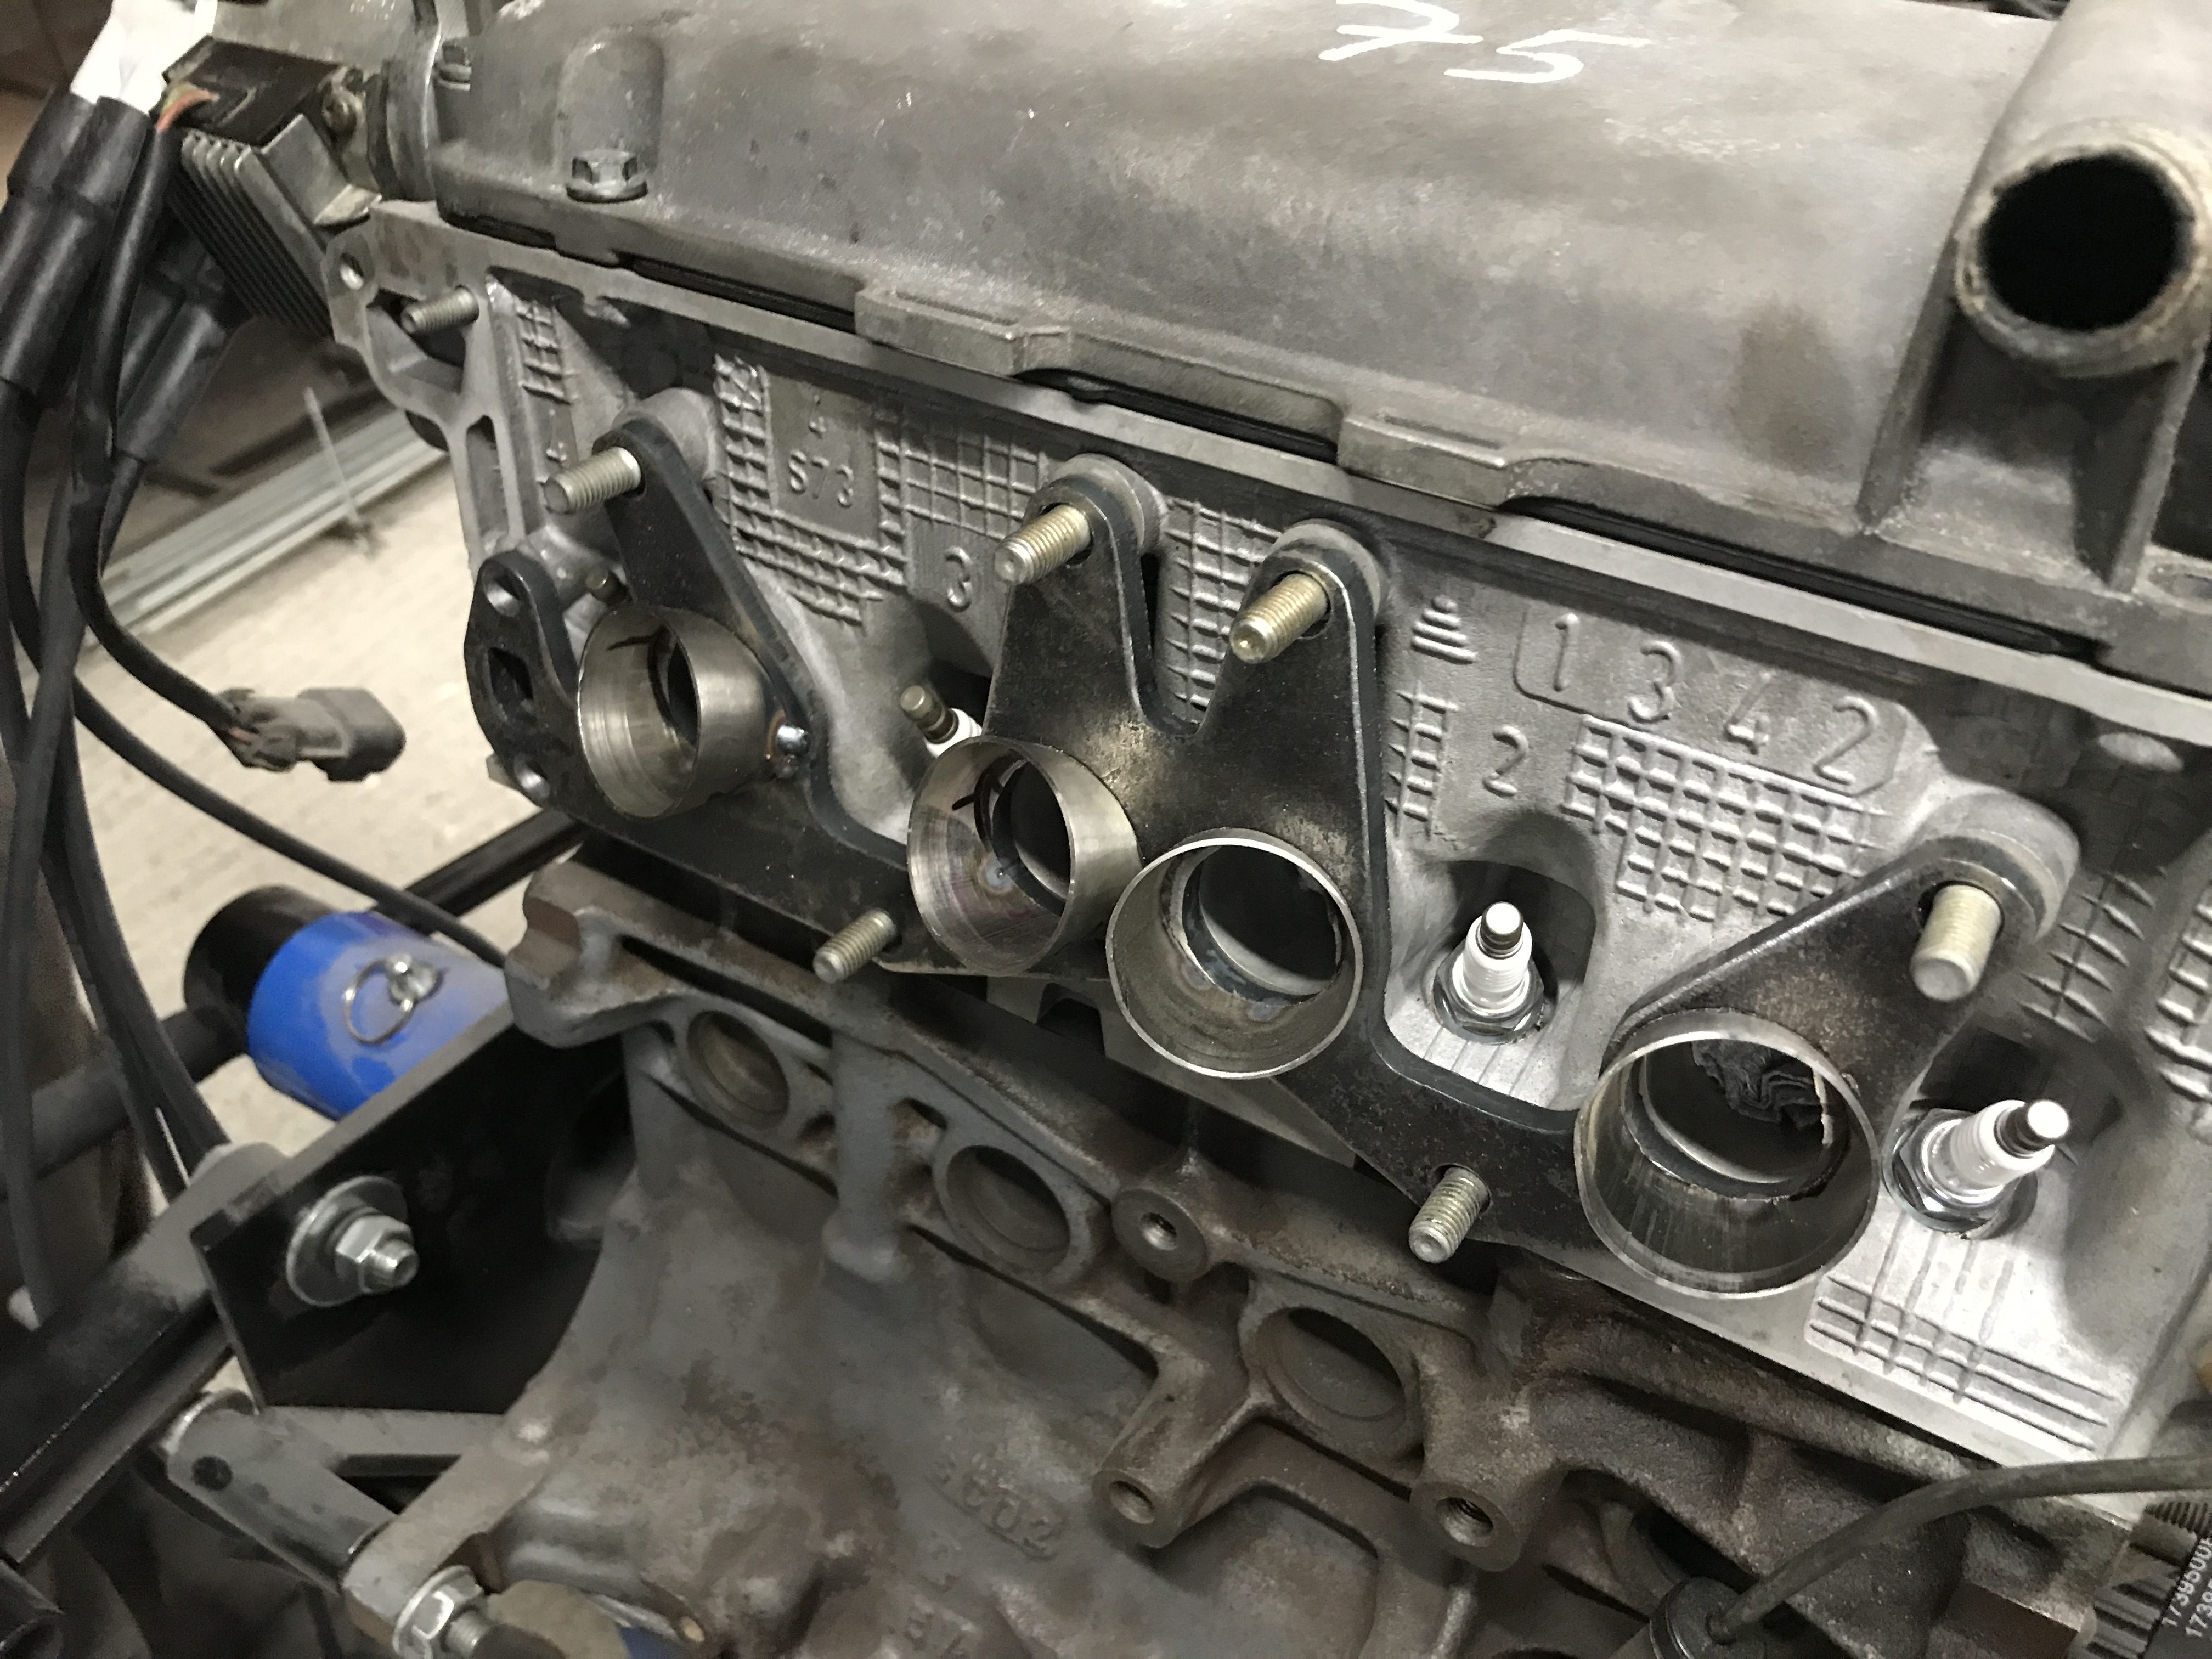
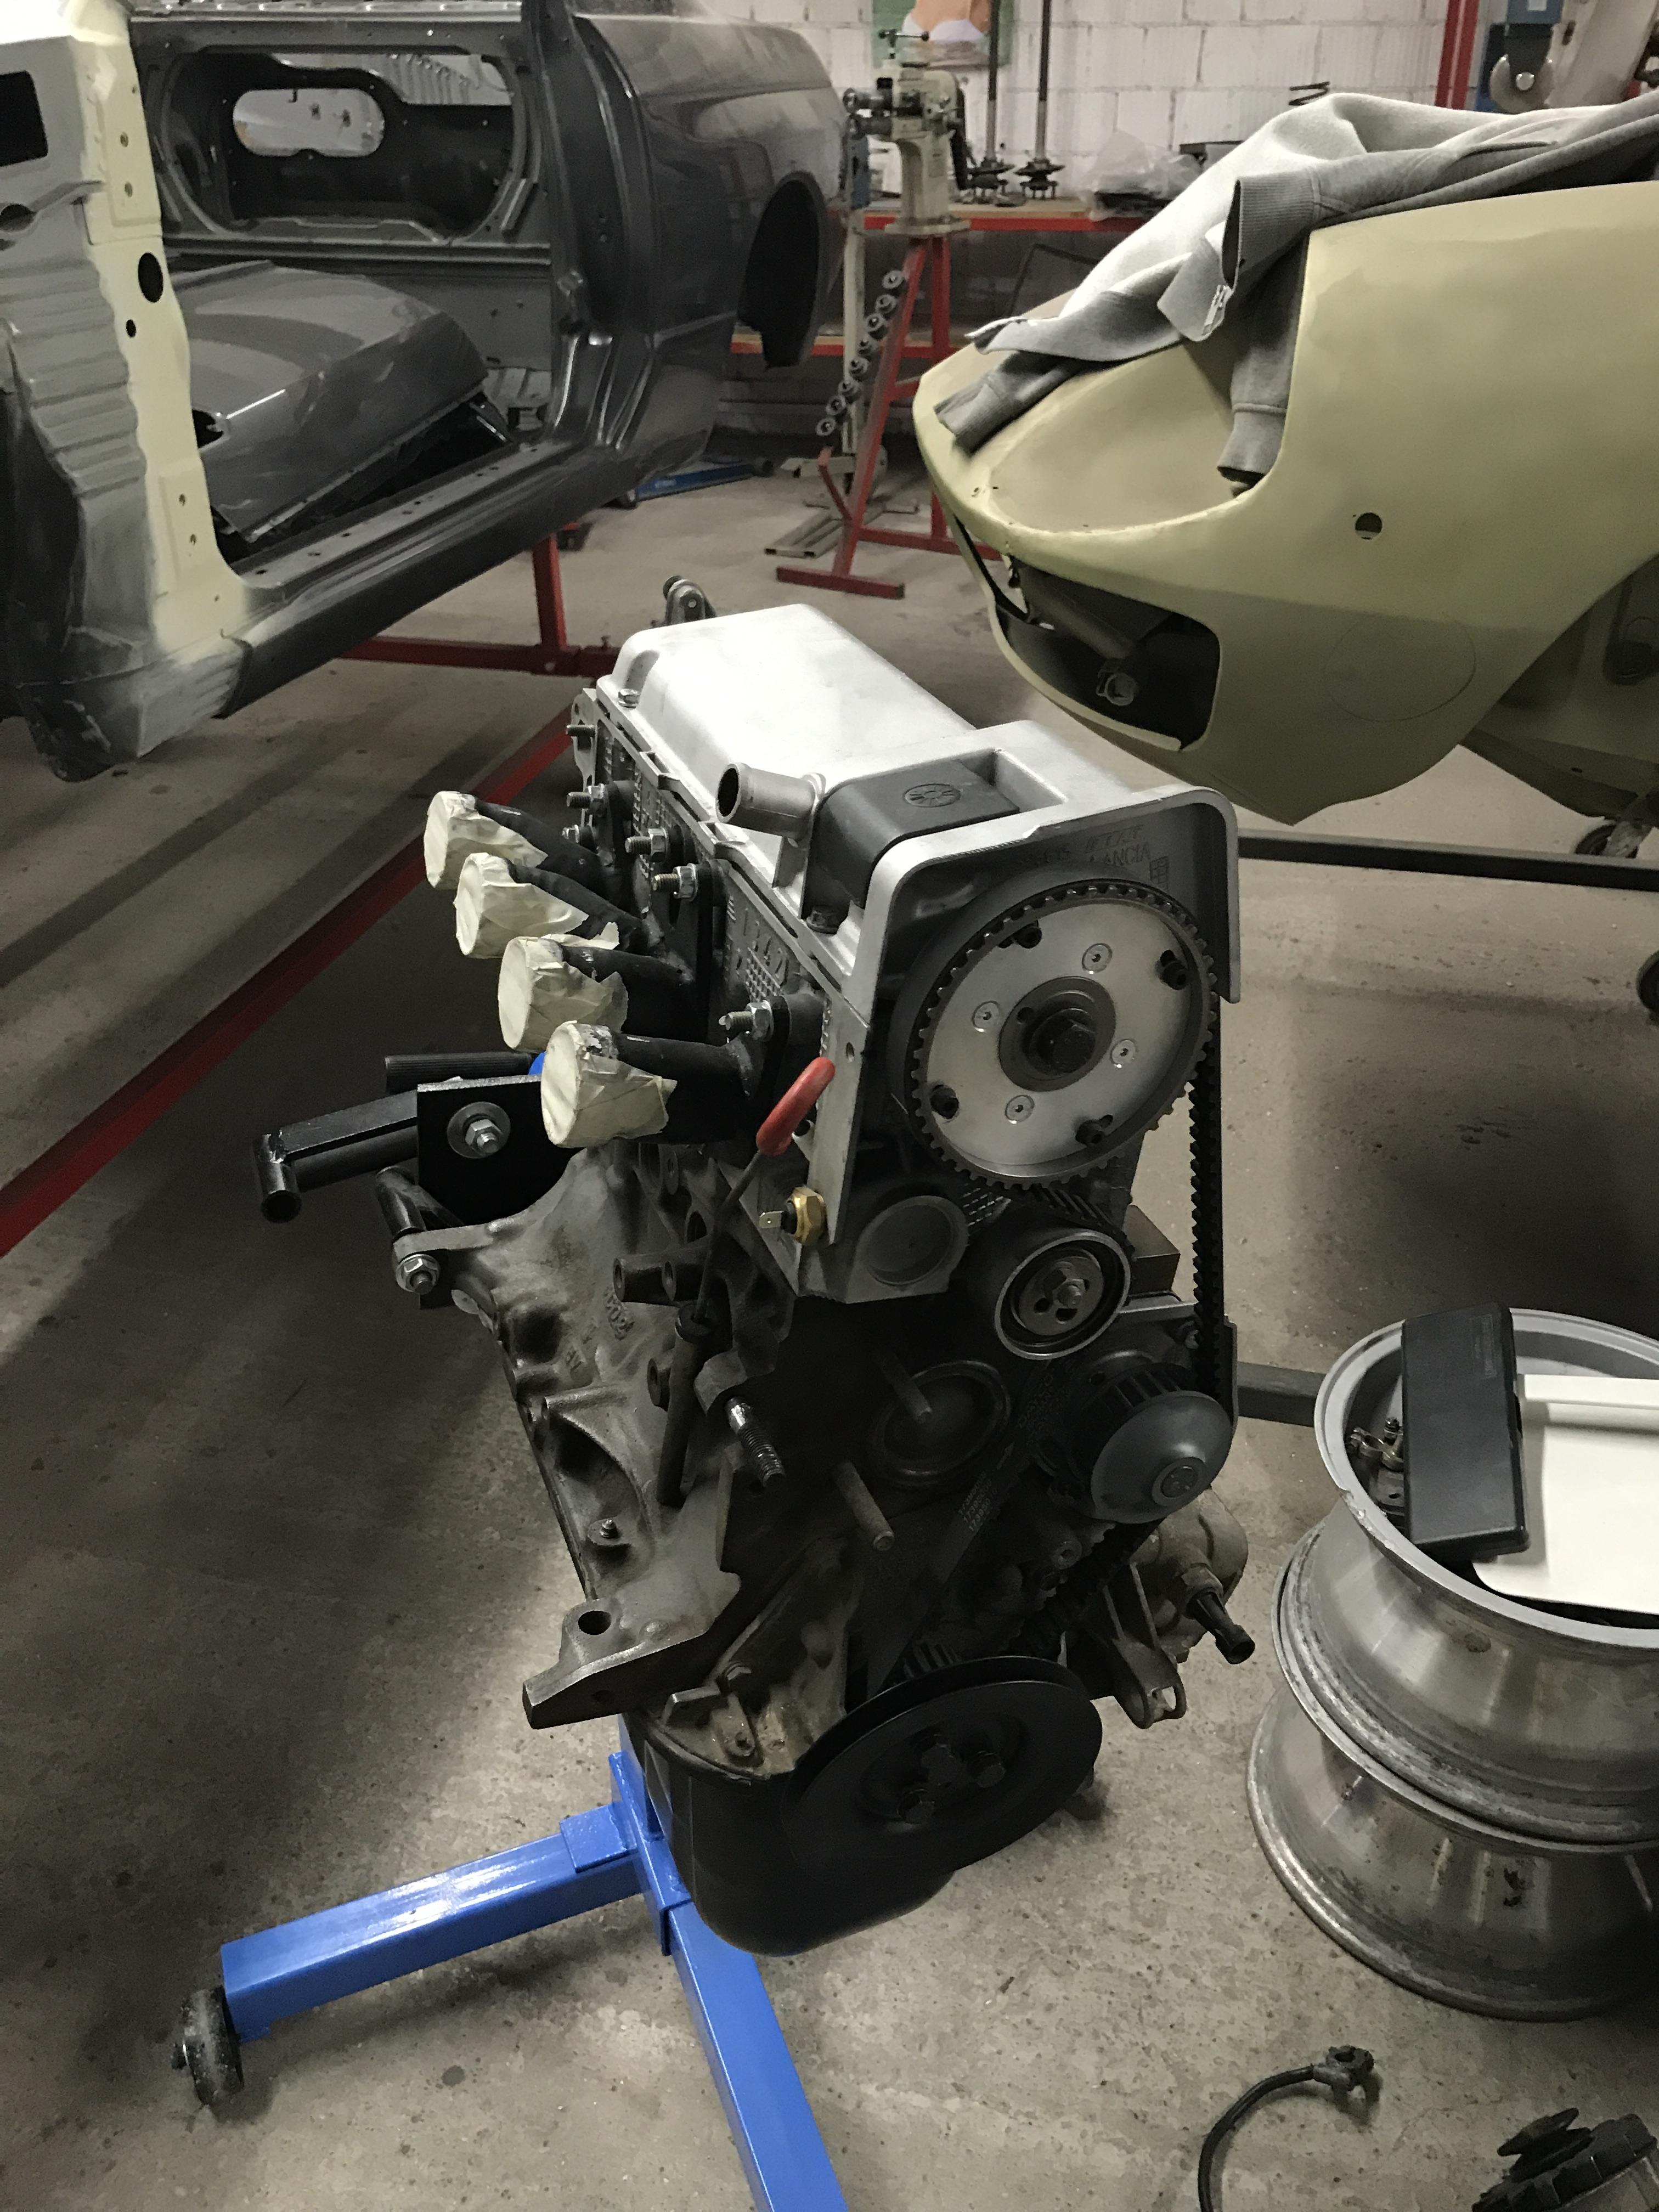
The head porting began and when I inspected the possible port work vs the ideal ports on paper, next step was finding the exhaust manifold to suit.
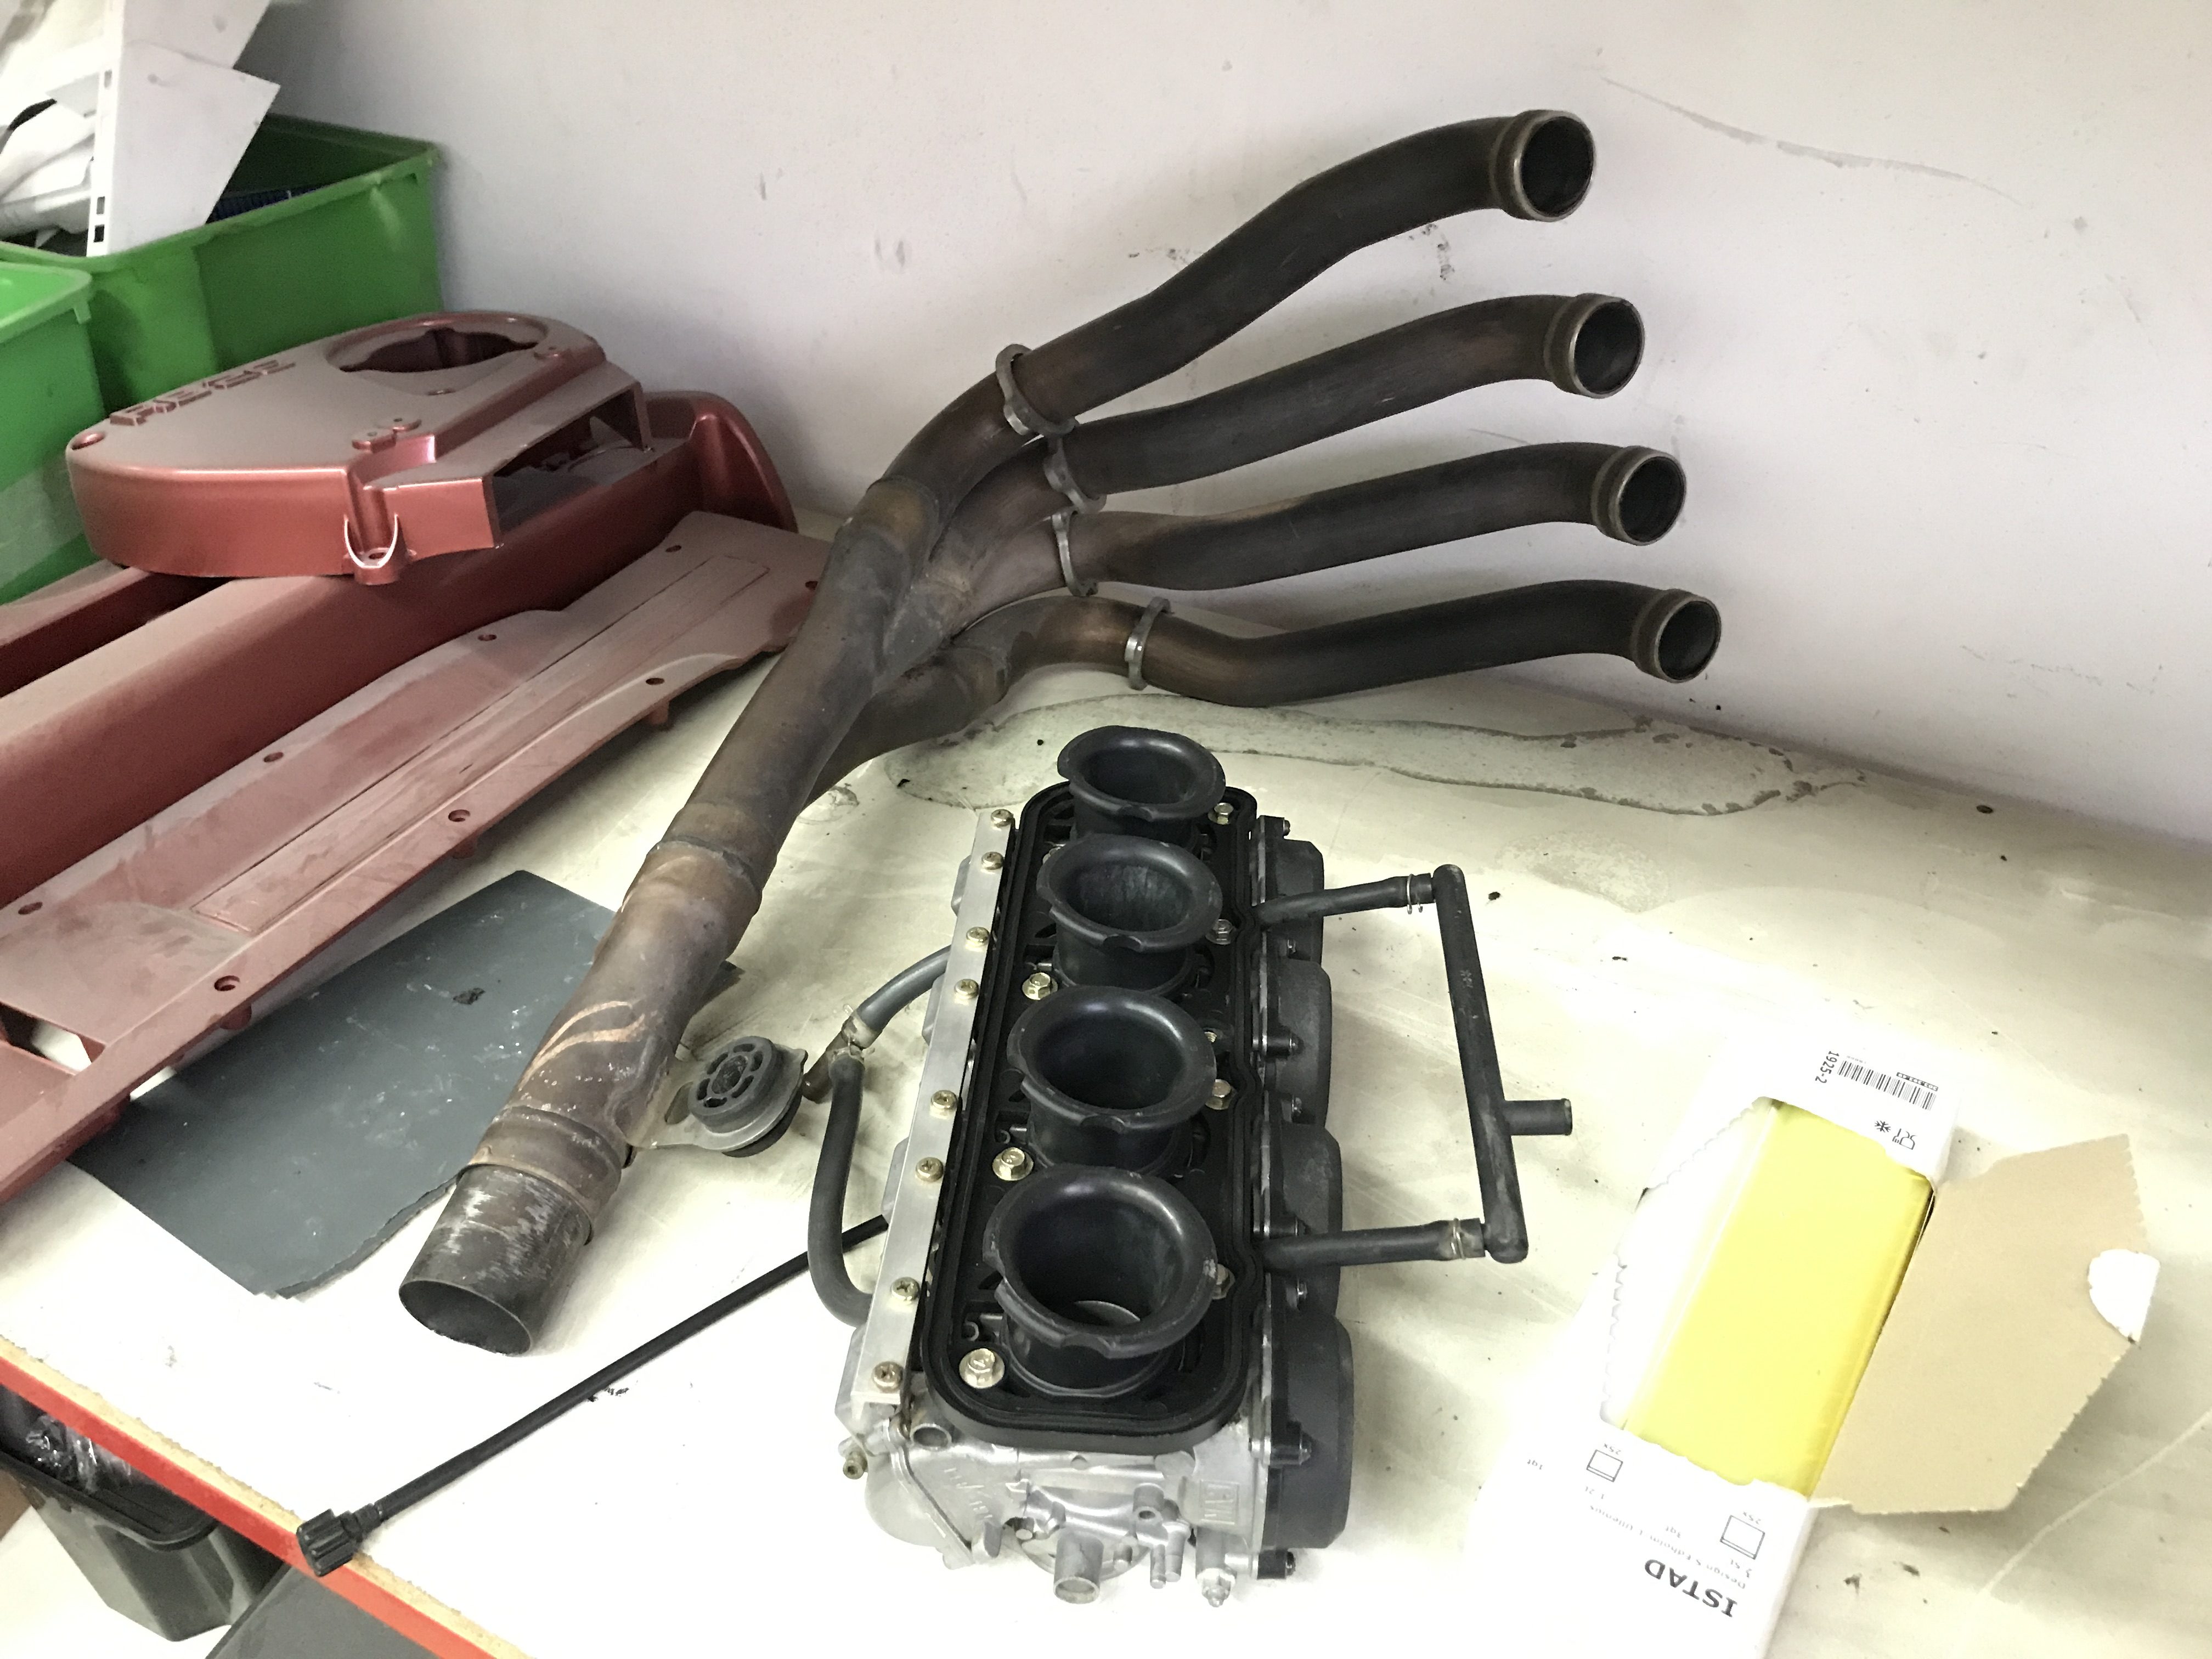
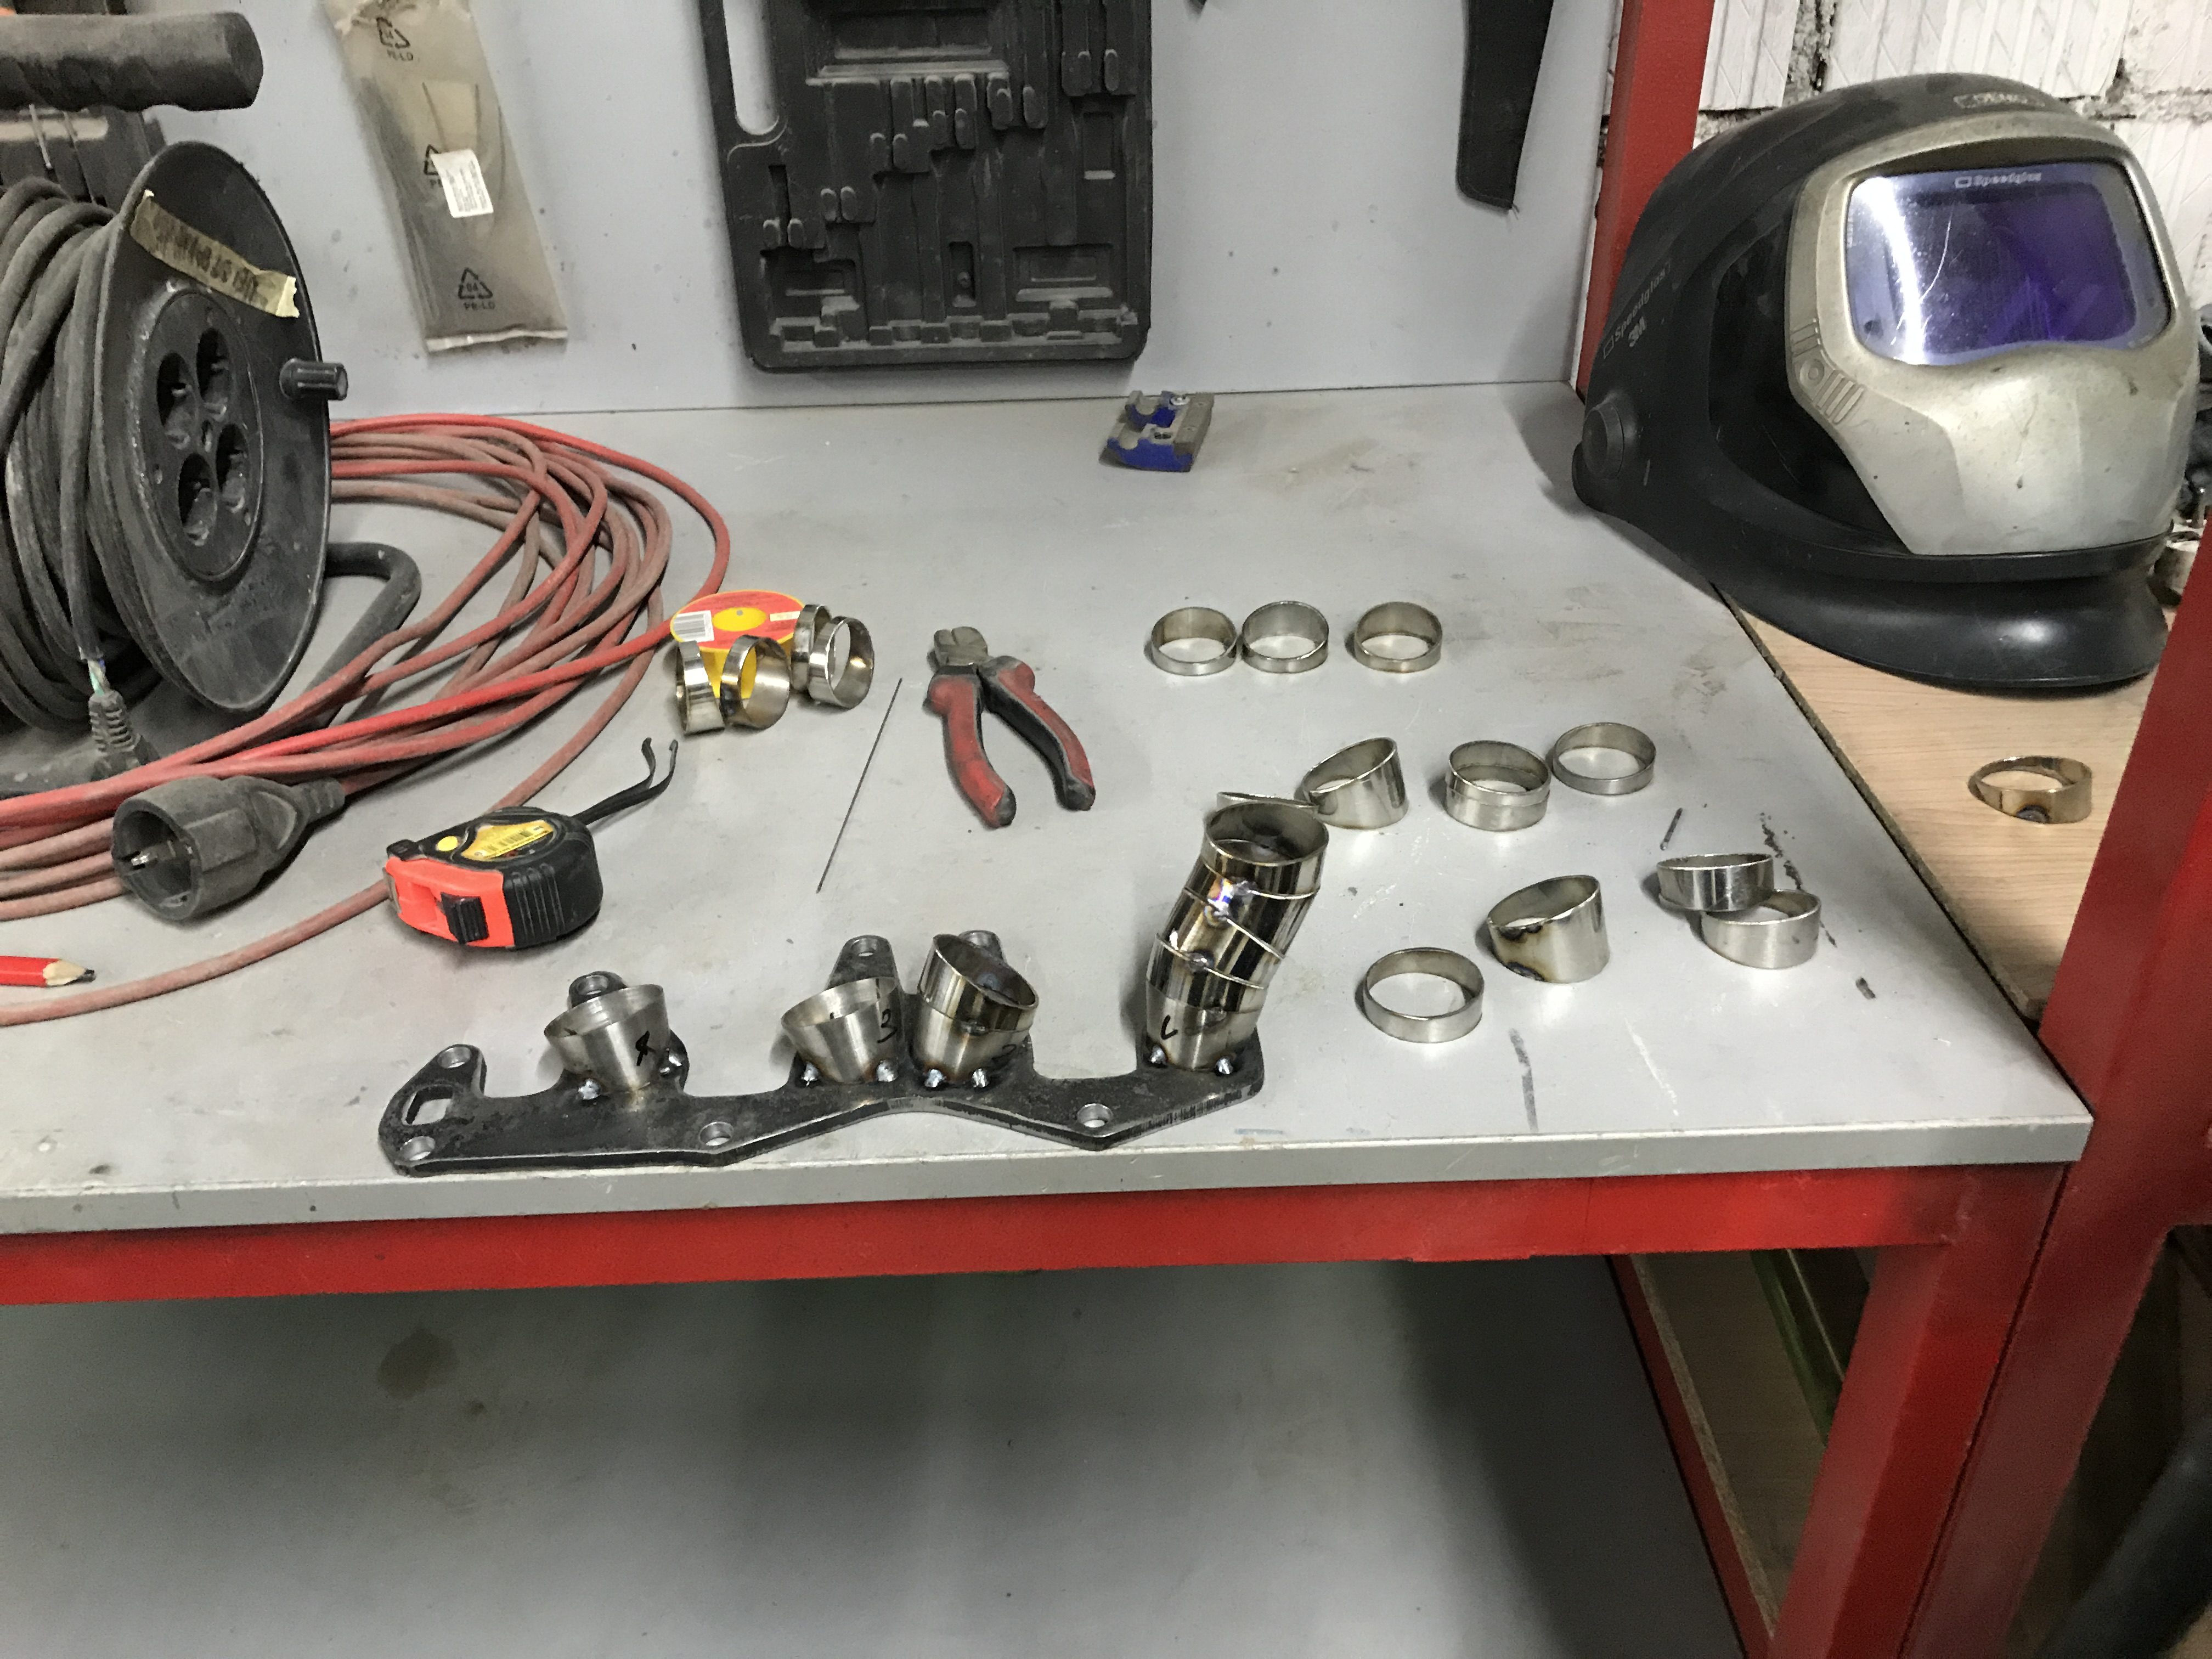
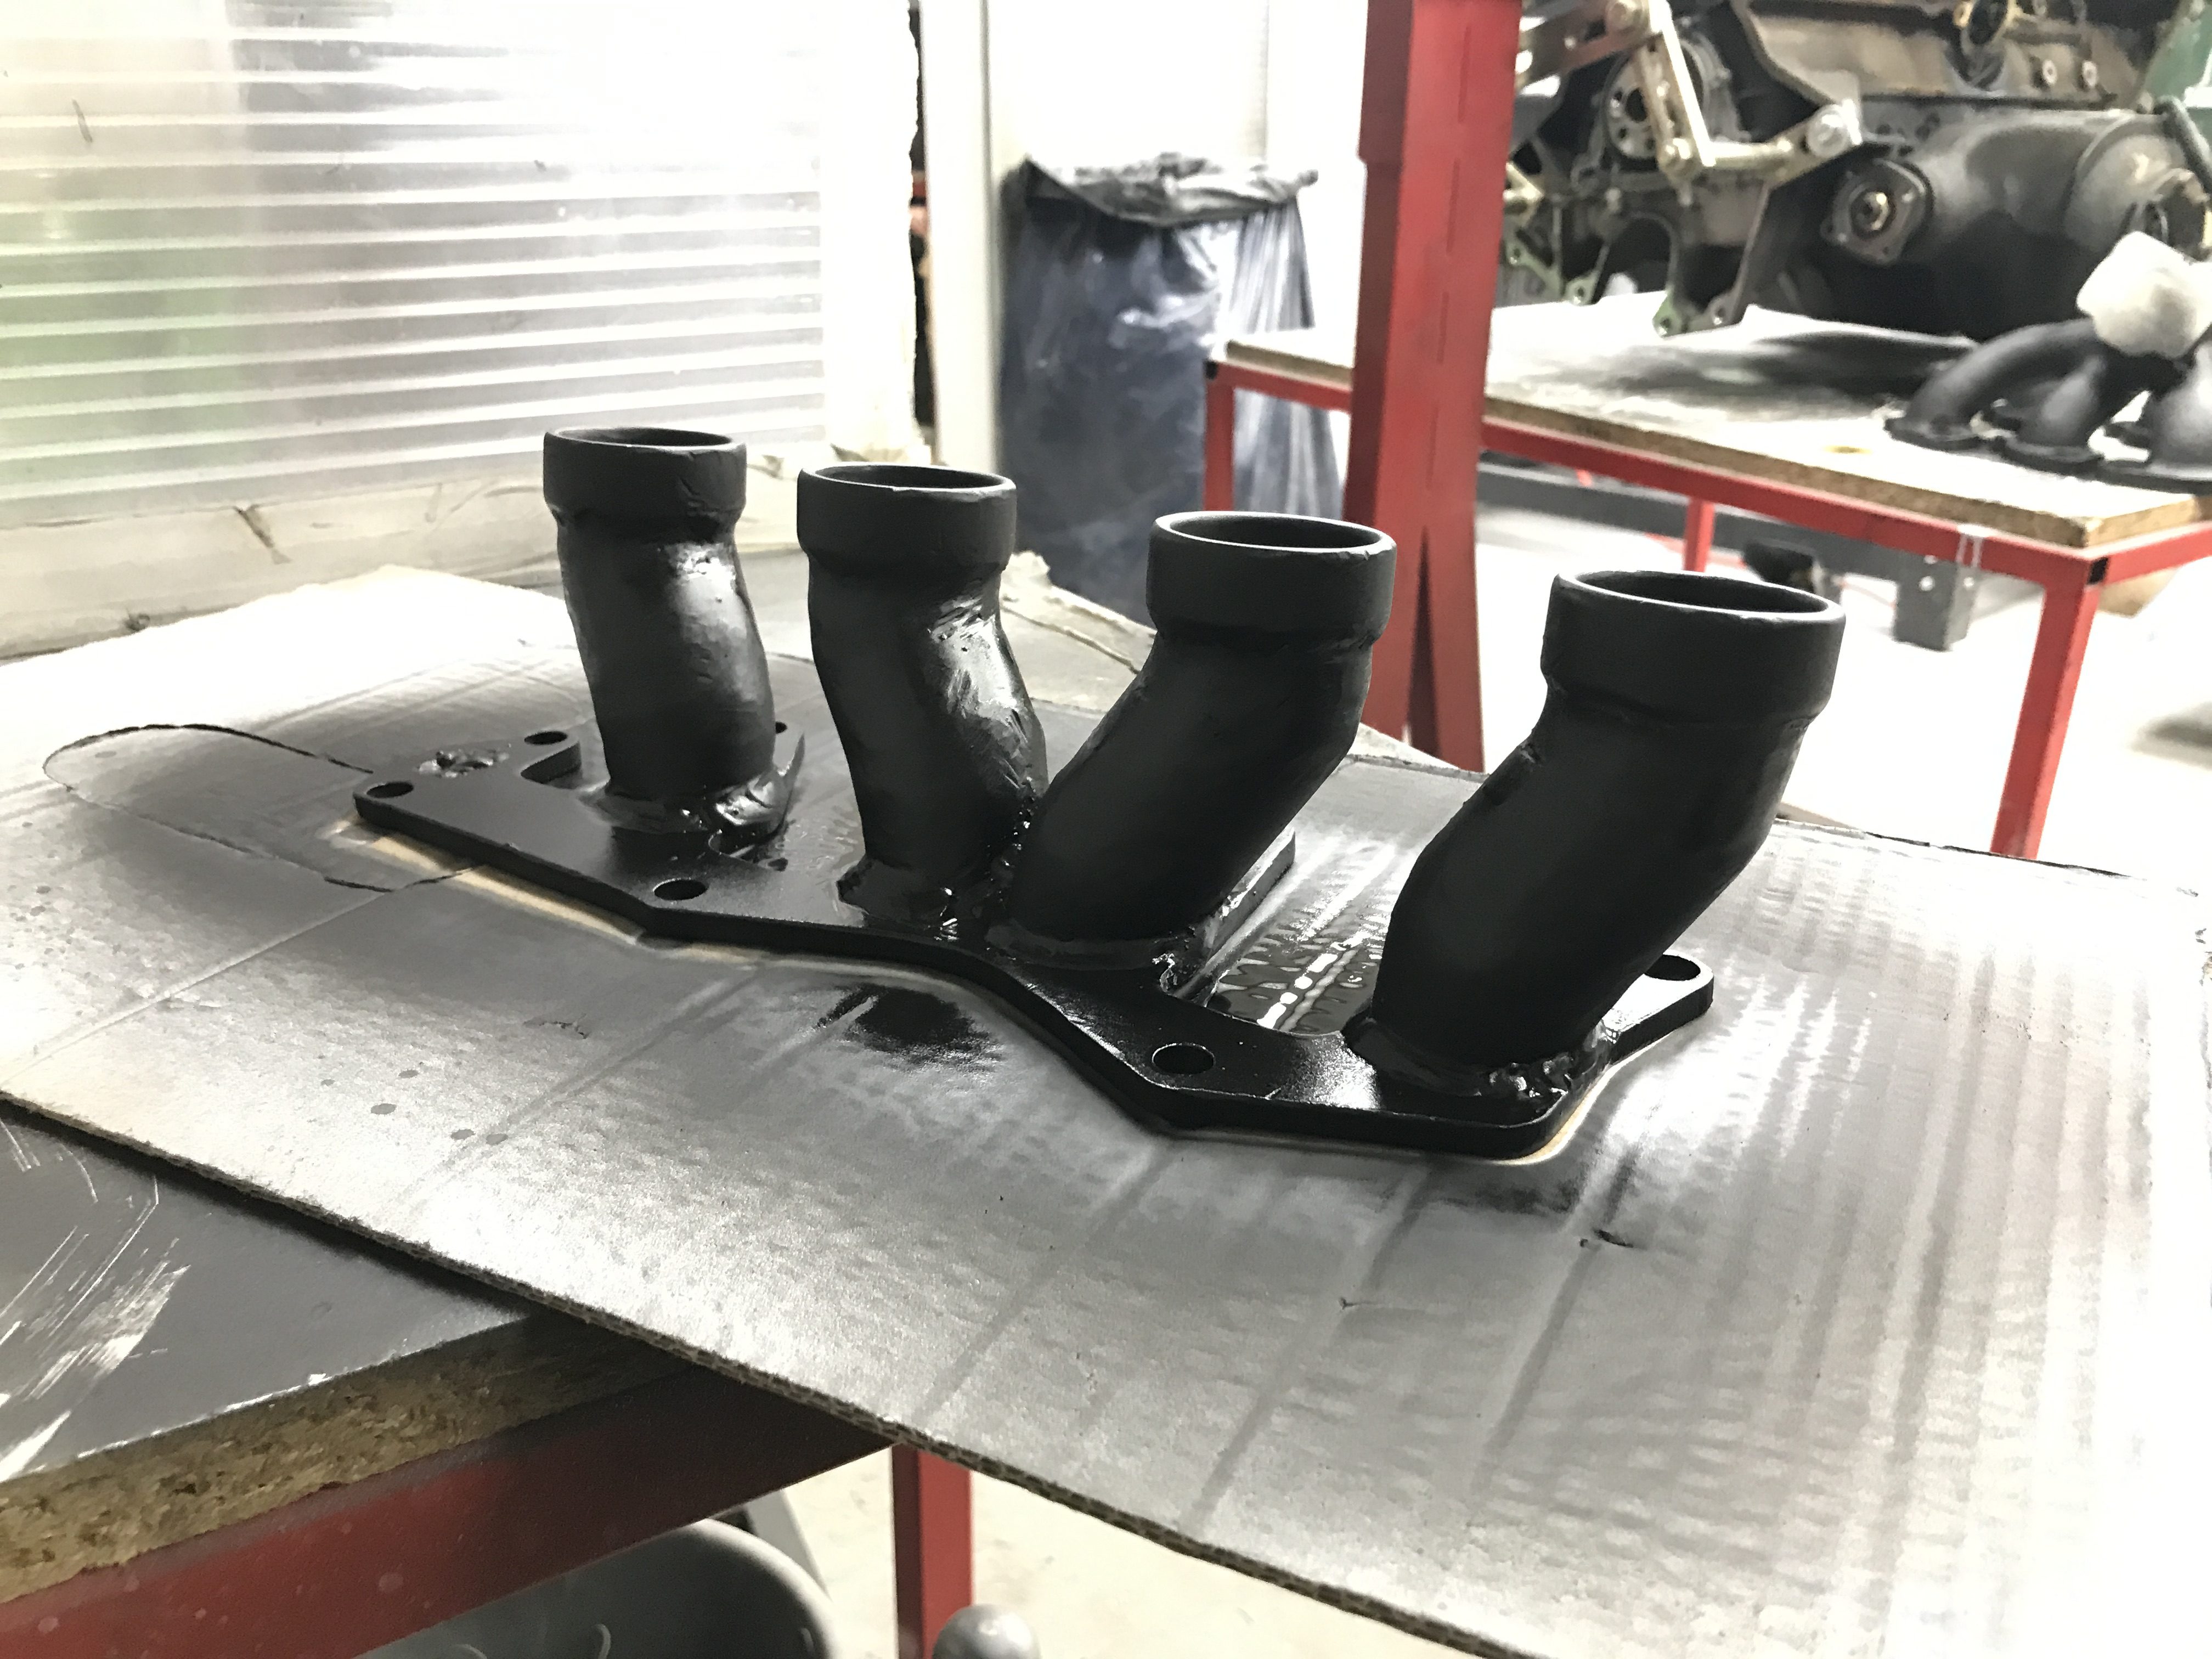
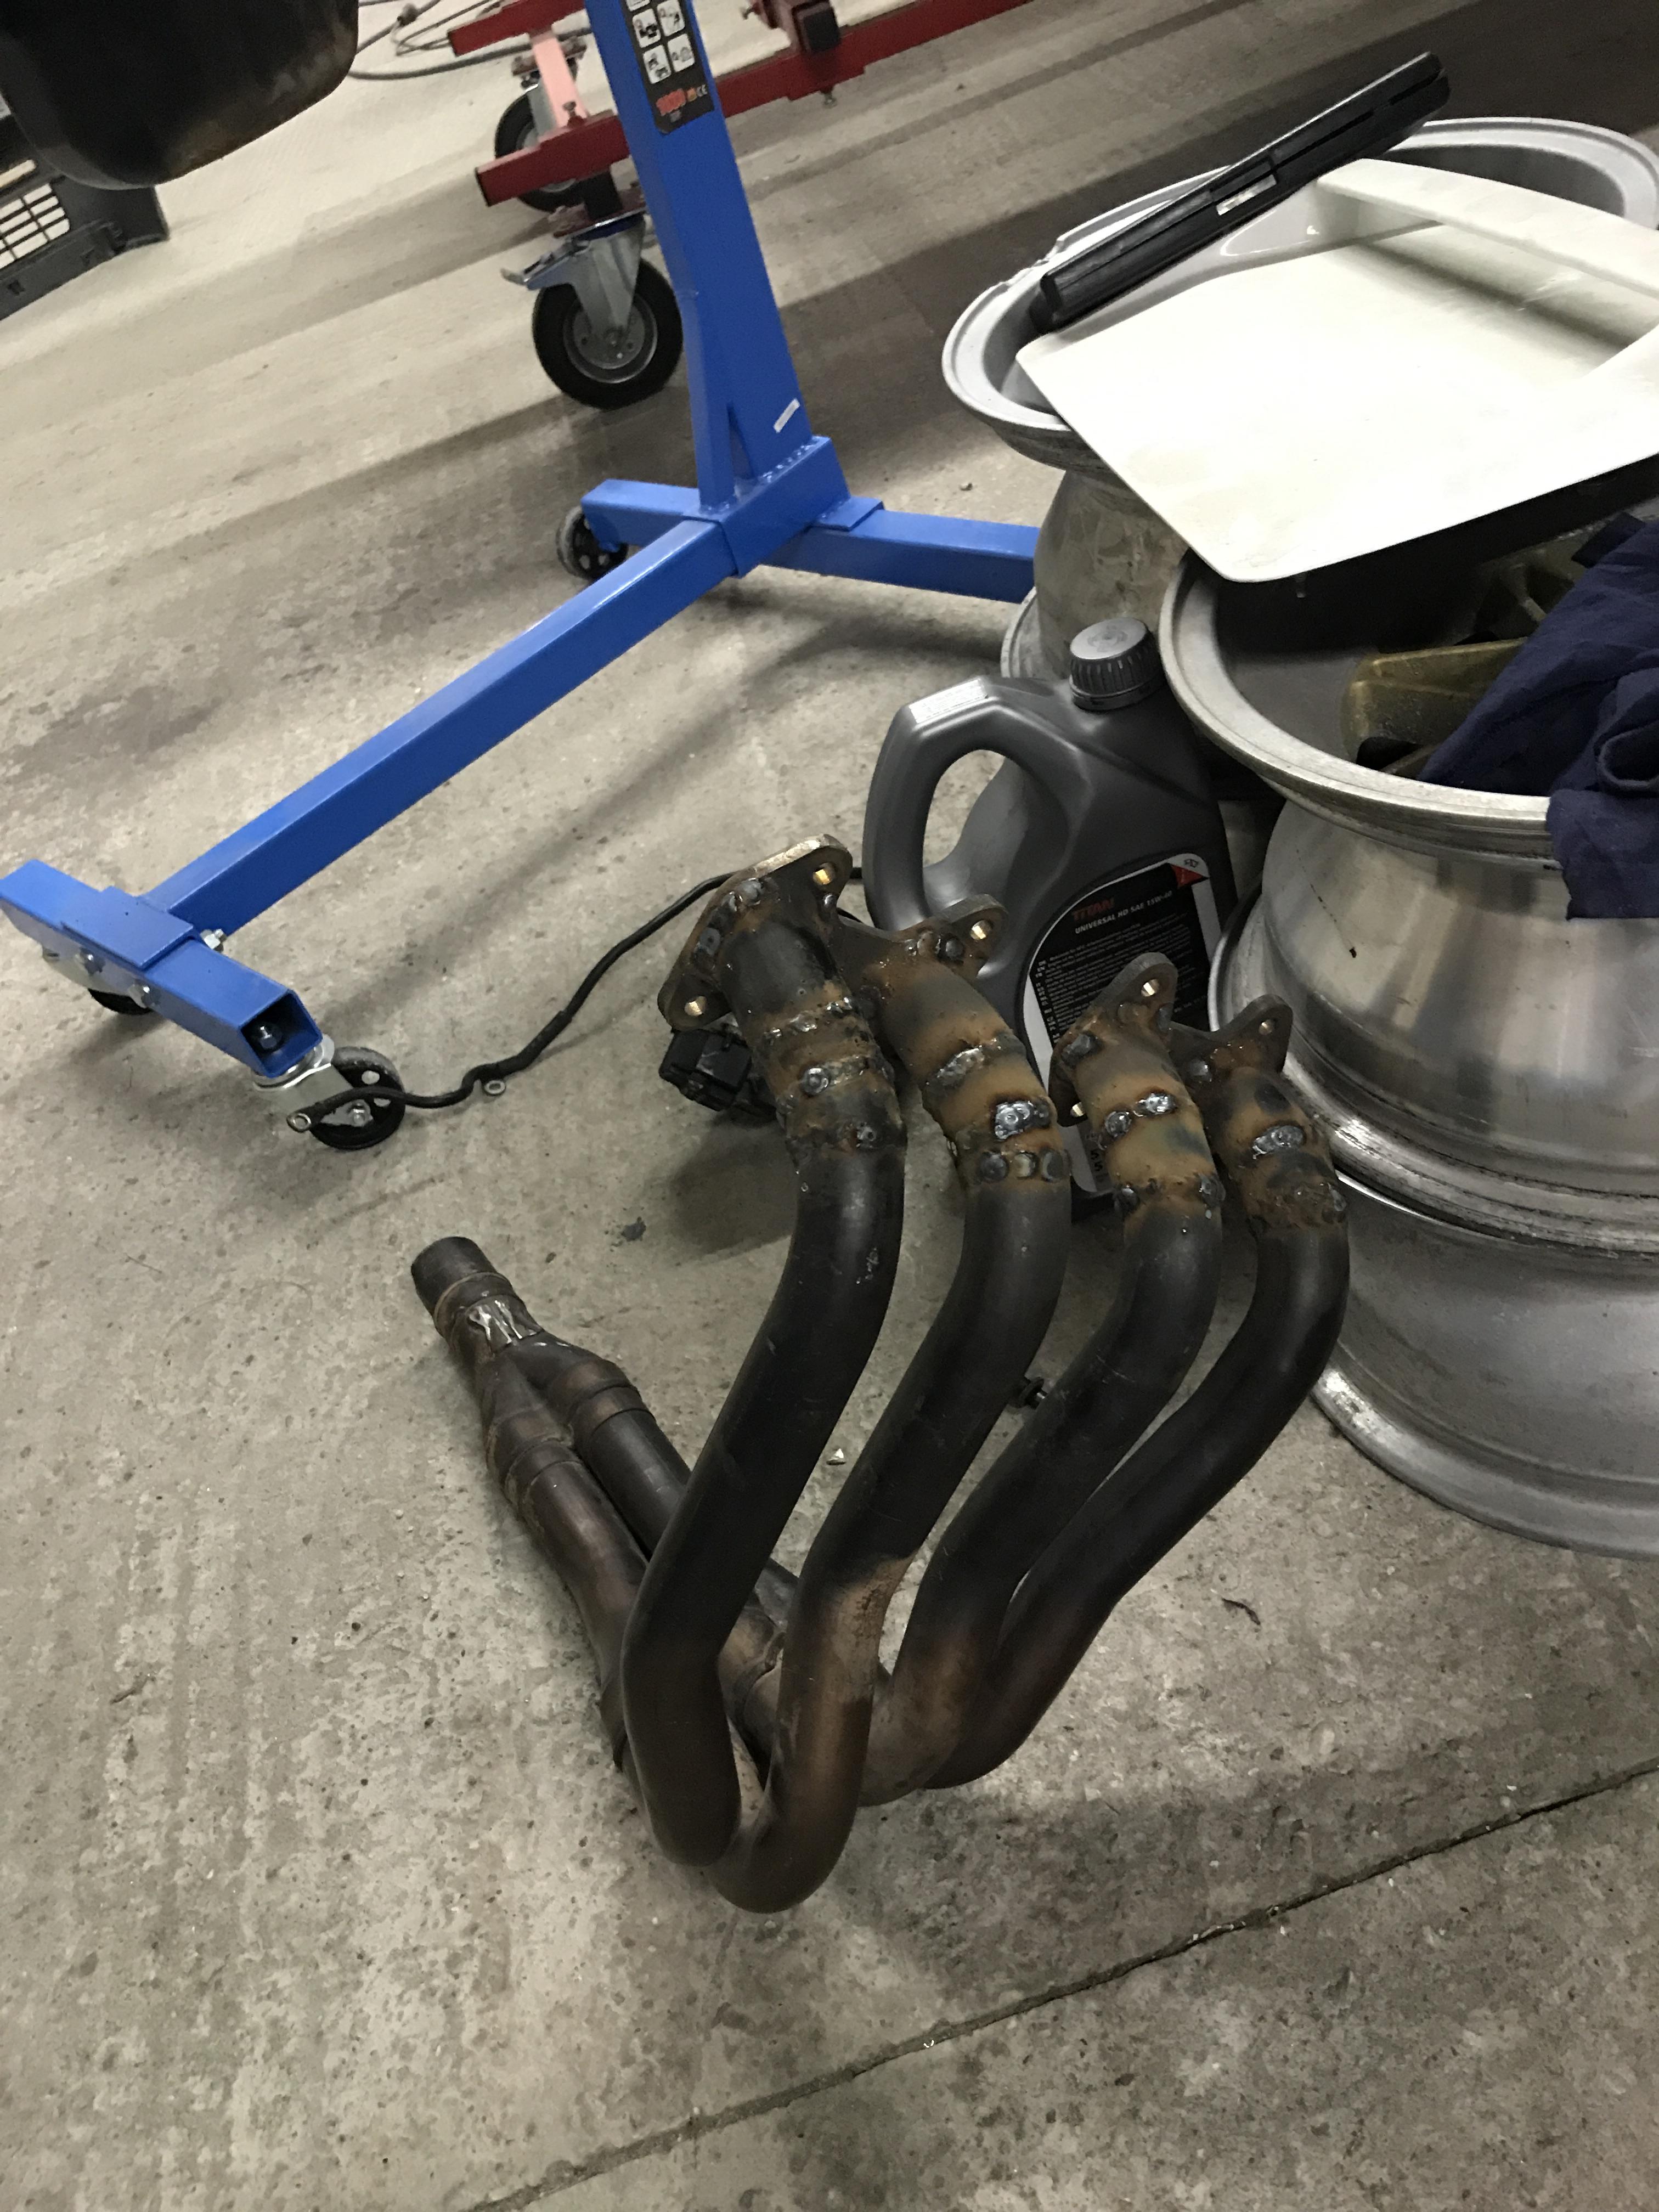
After googling some photos of motorcycle manifolds, I bought CBR1000RR standard manifold as it looked like it could be modified to fit.
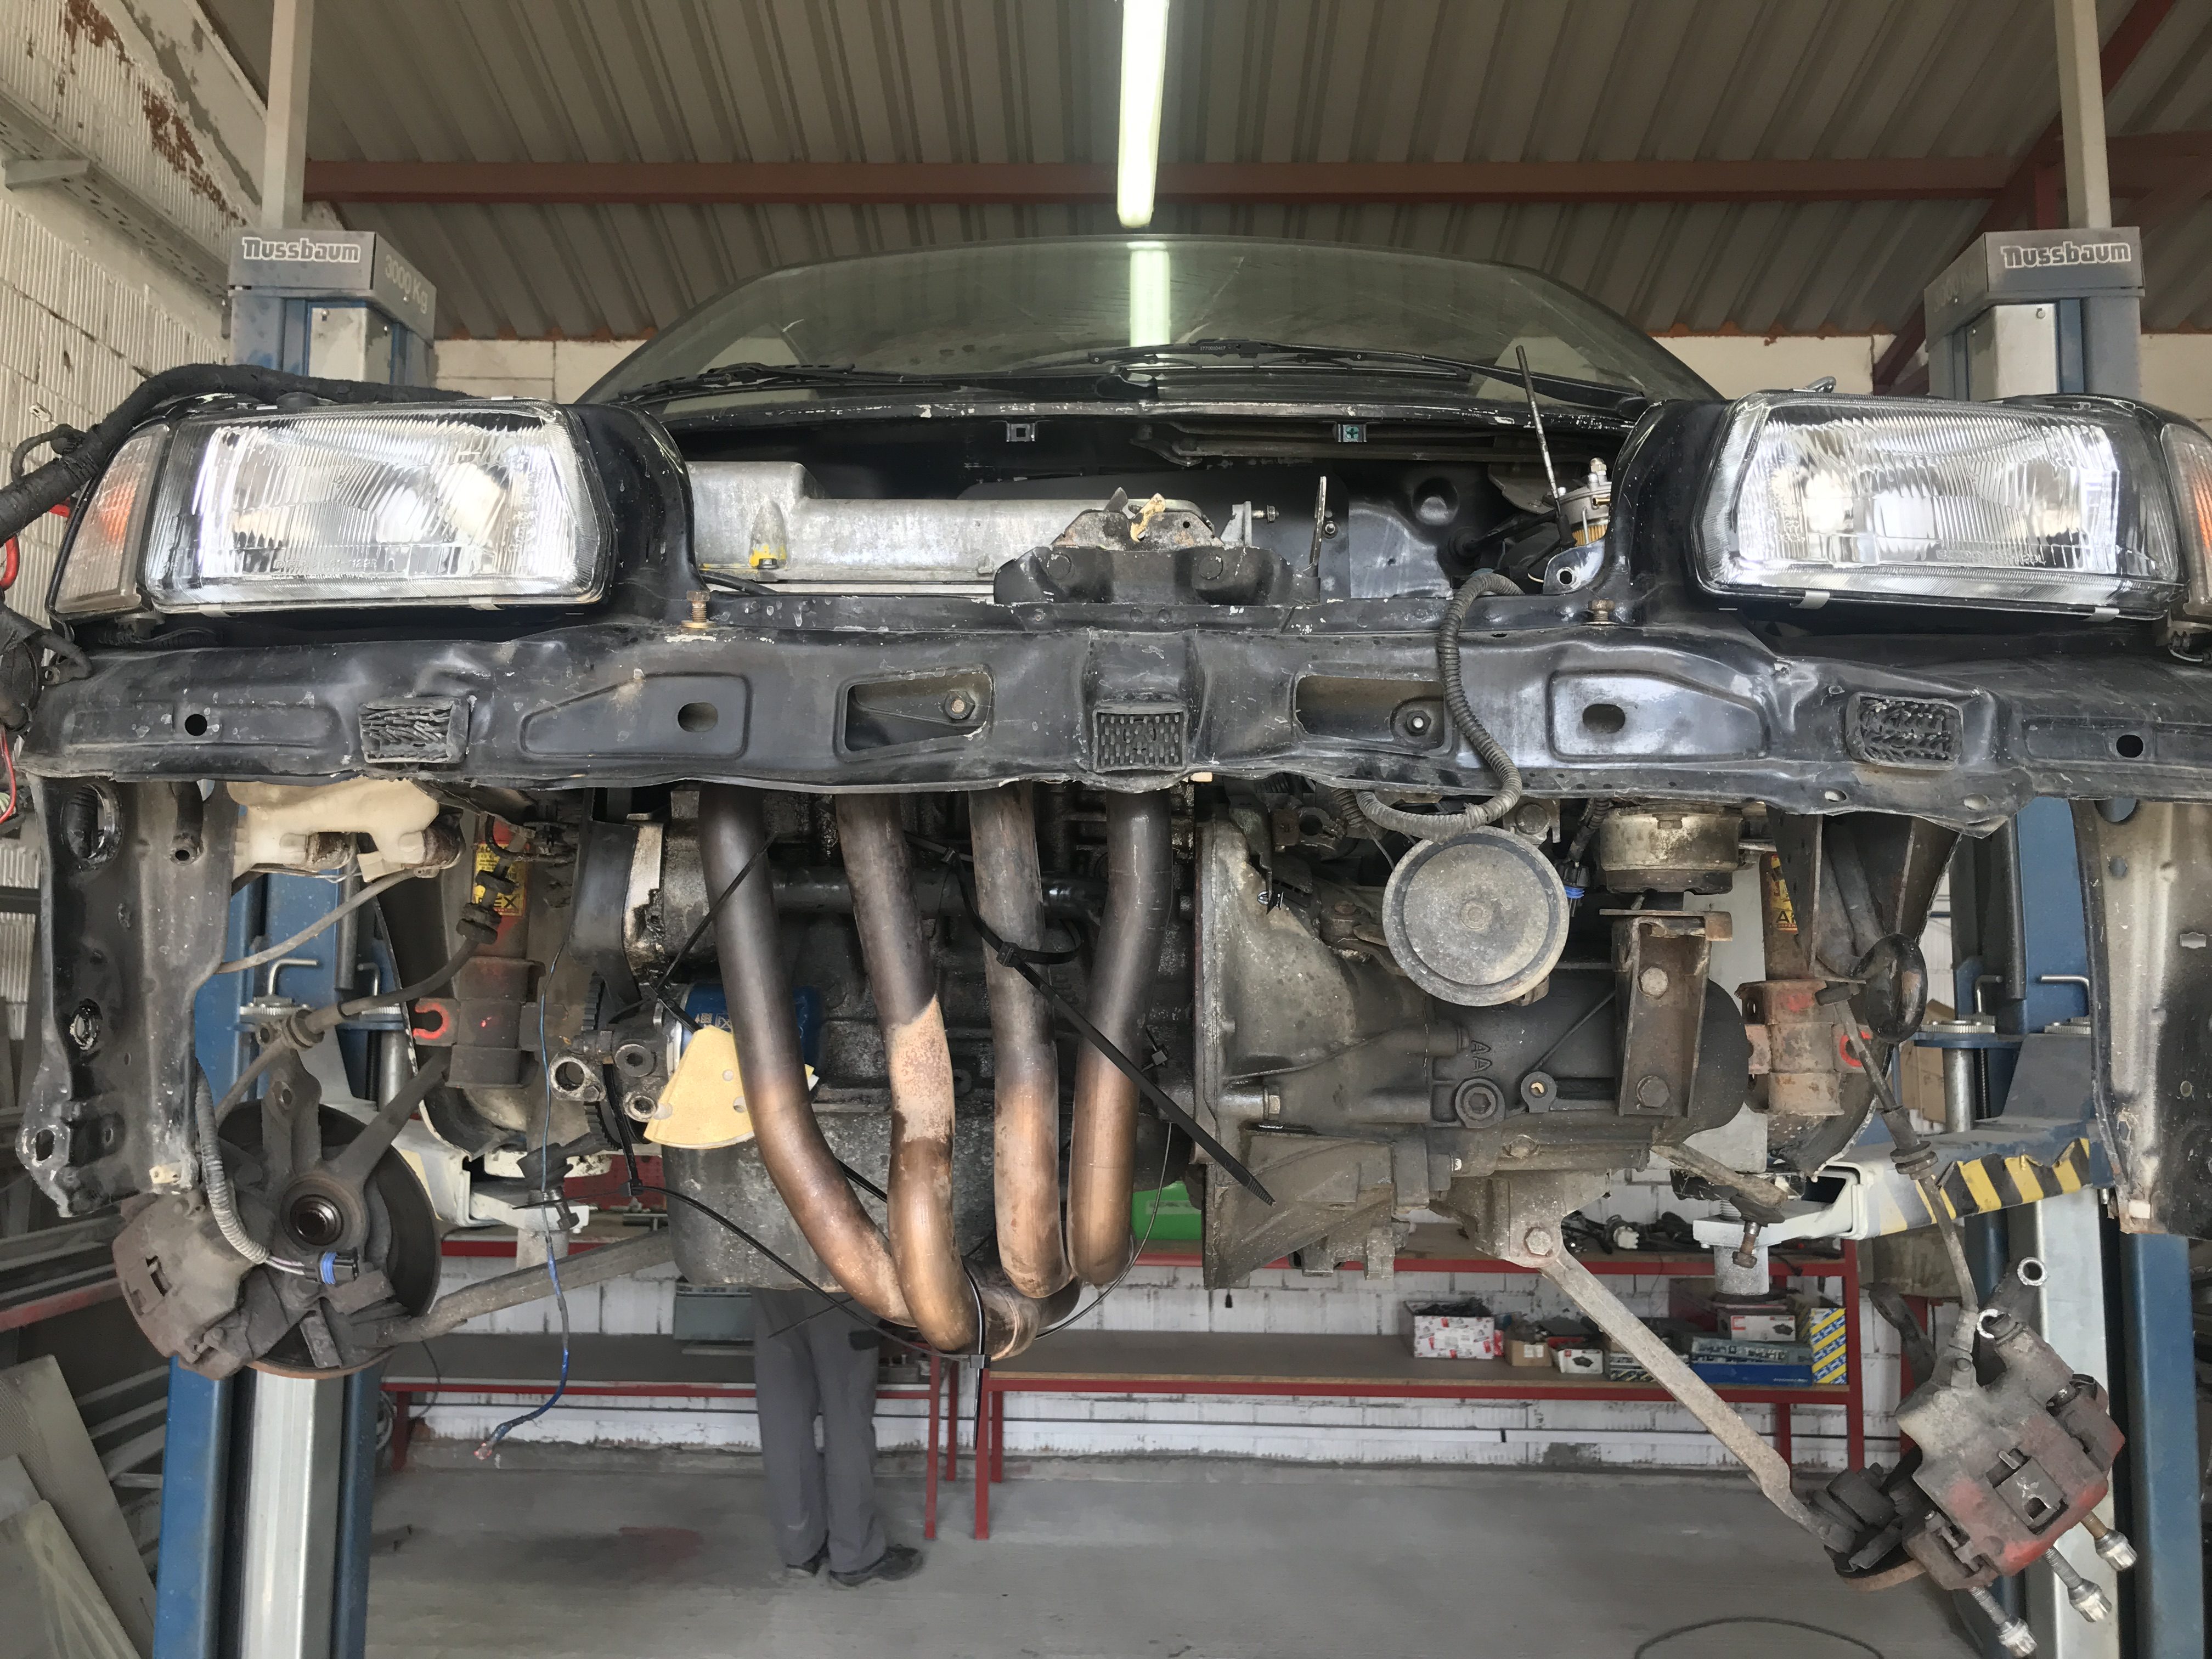
Eventually manifold arrived from Germany and it matched almost perfectly with calculations of the sizes and lengths needed to make this engine breathe and scavenge well.
In the final stages of engine installation we just modified the primaries as I intended. Cooling system needed to be modified to fit the manifold in the car as the engine is really in the nose of the car but again we have a far superior and lighter item than something available commercially that is not some expensive works/motorsport stuff.
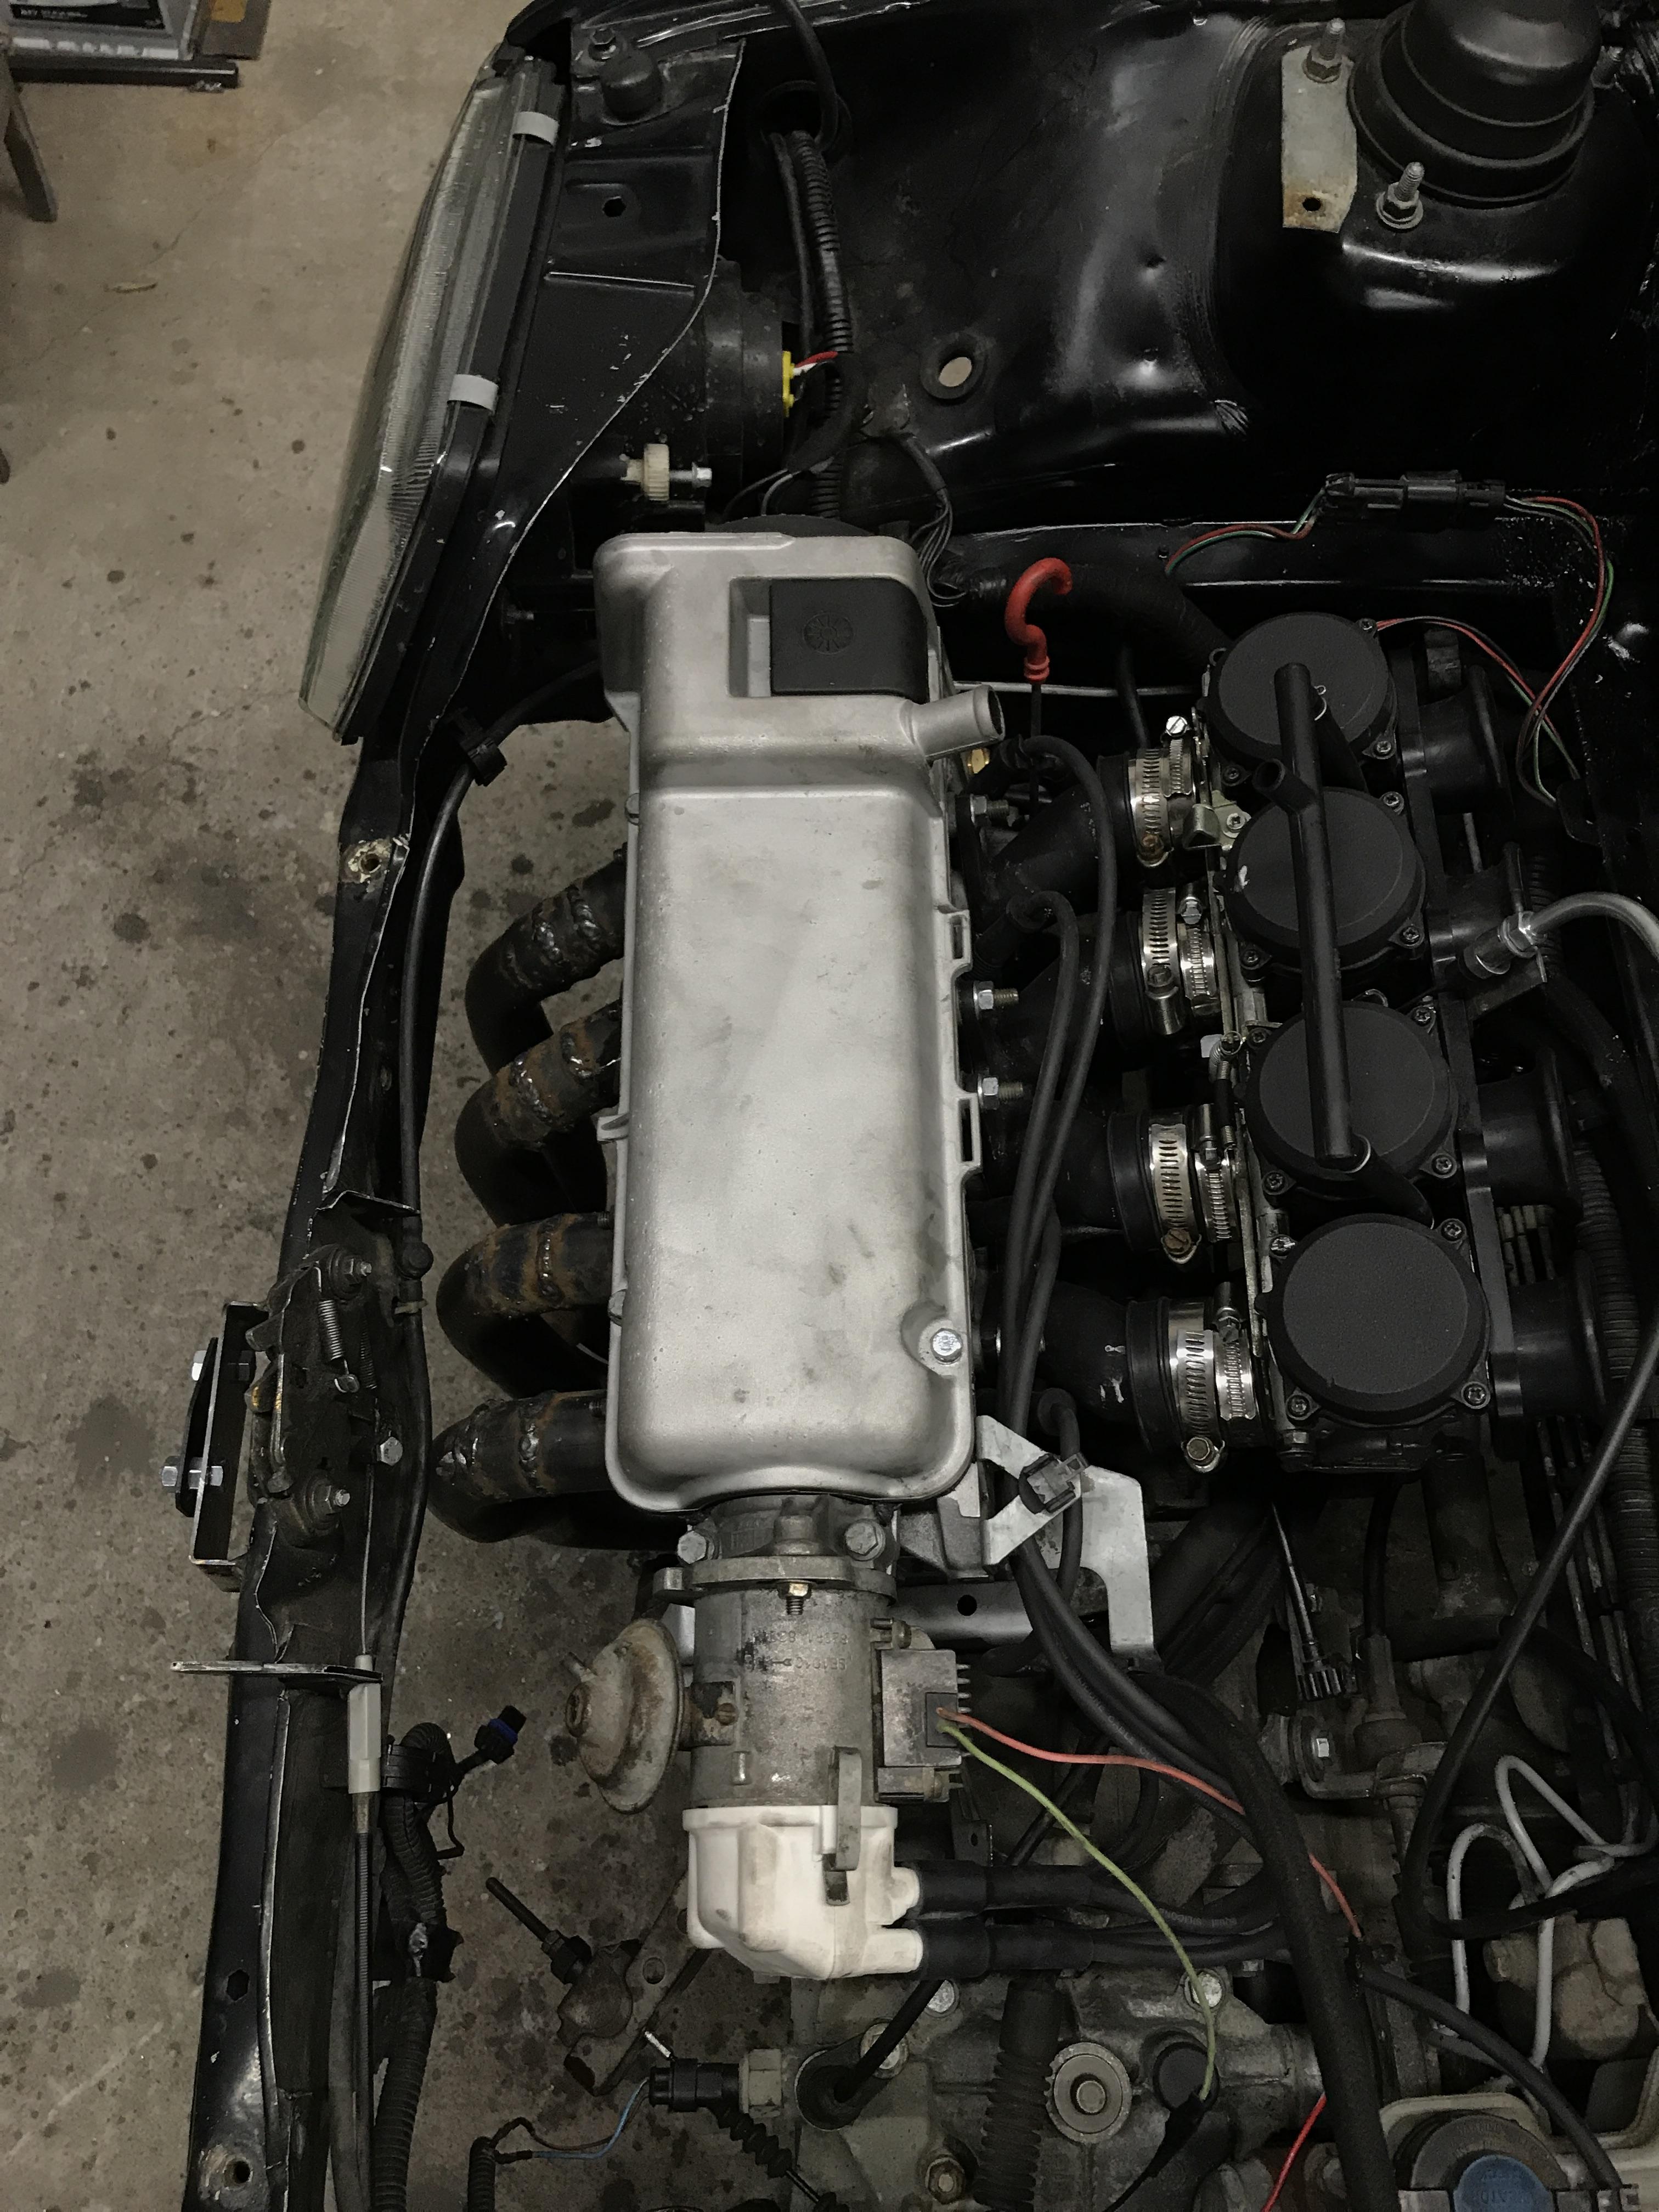
The next stage involved my internal battles. I always wanted to do an ITB engine with Standalone ECU but again I always wanted to do a bike carb conversion as well.
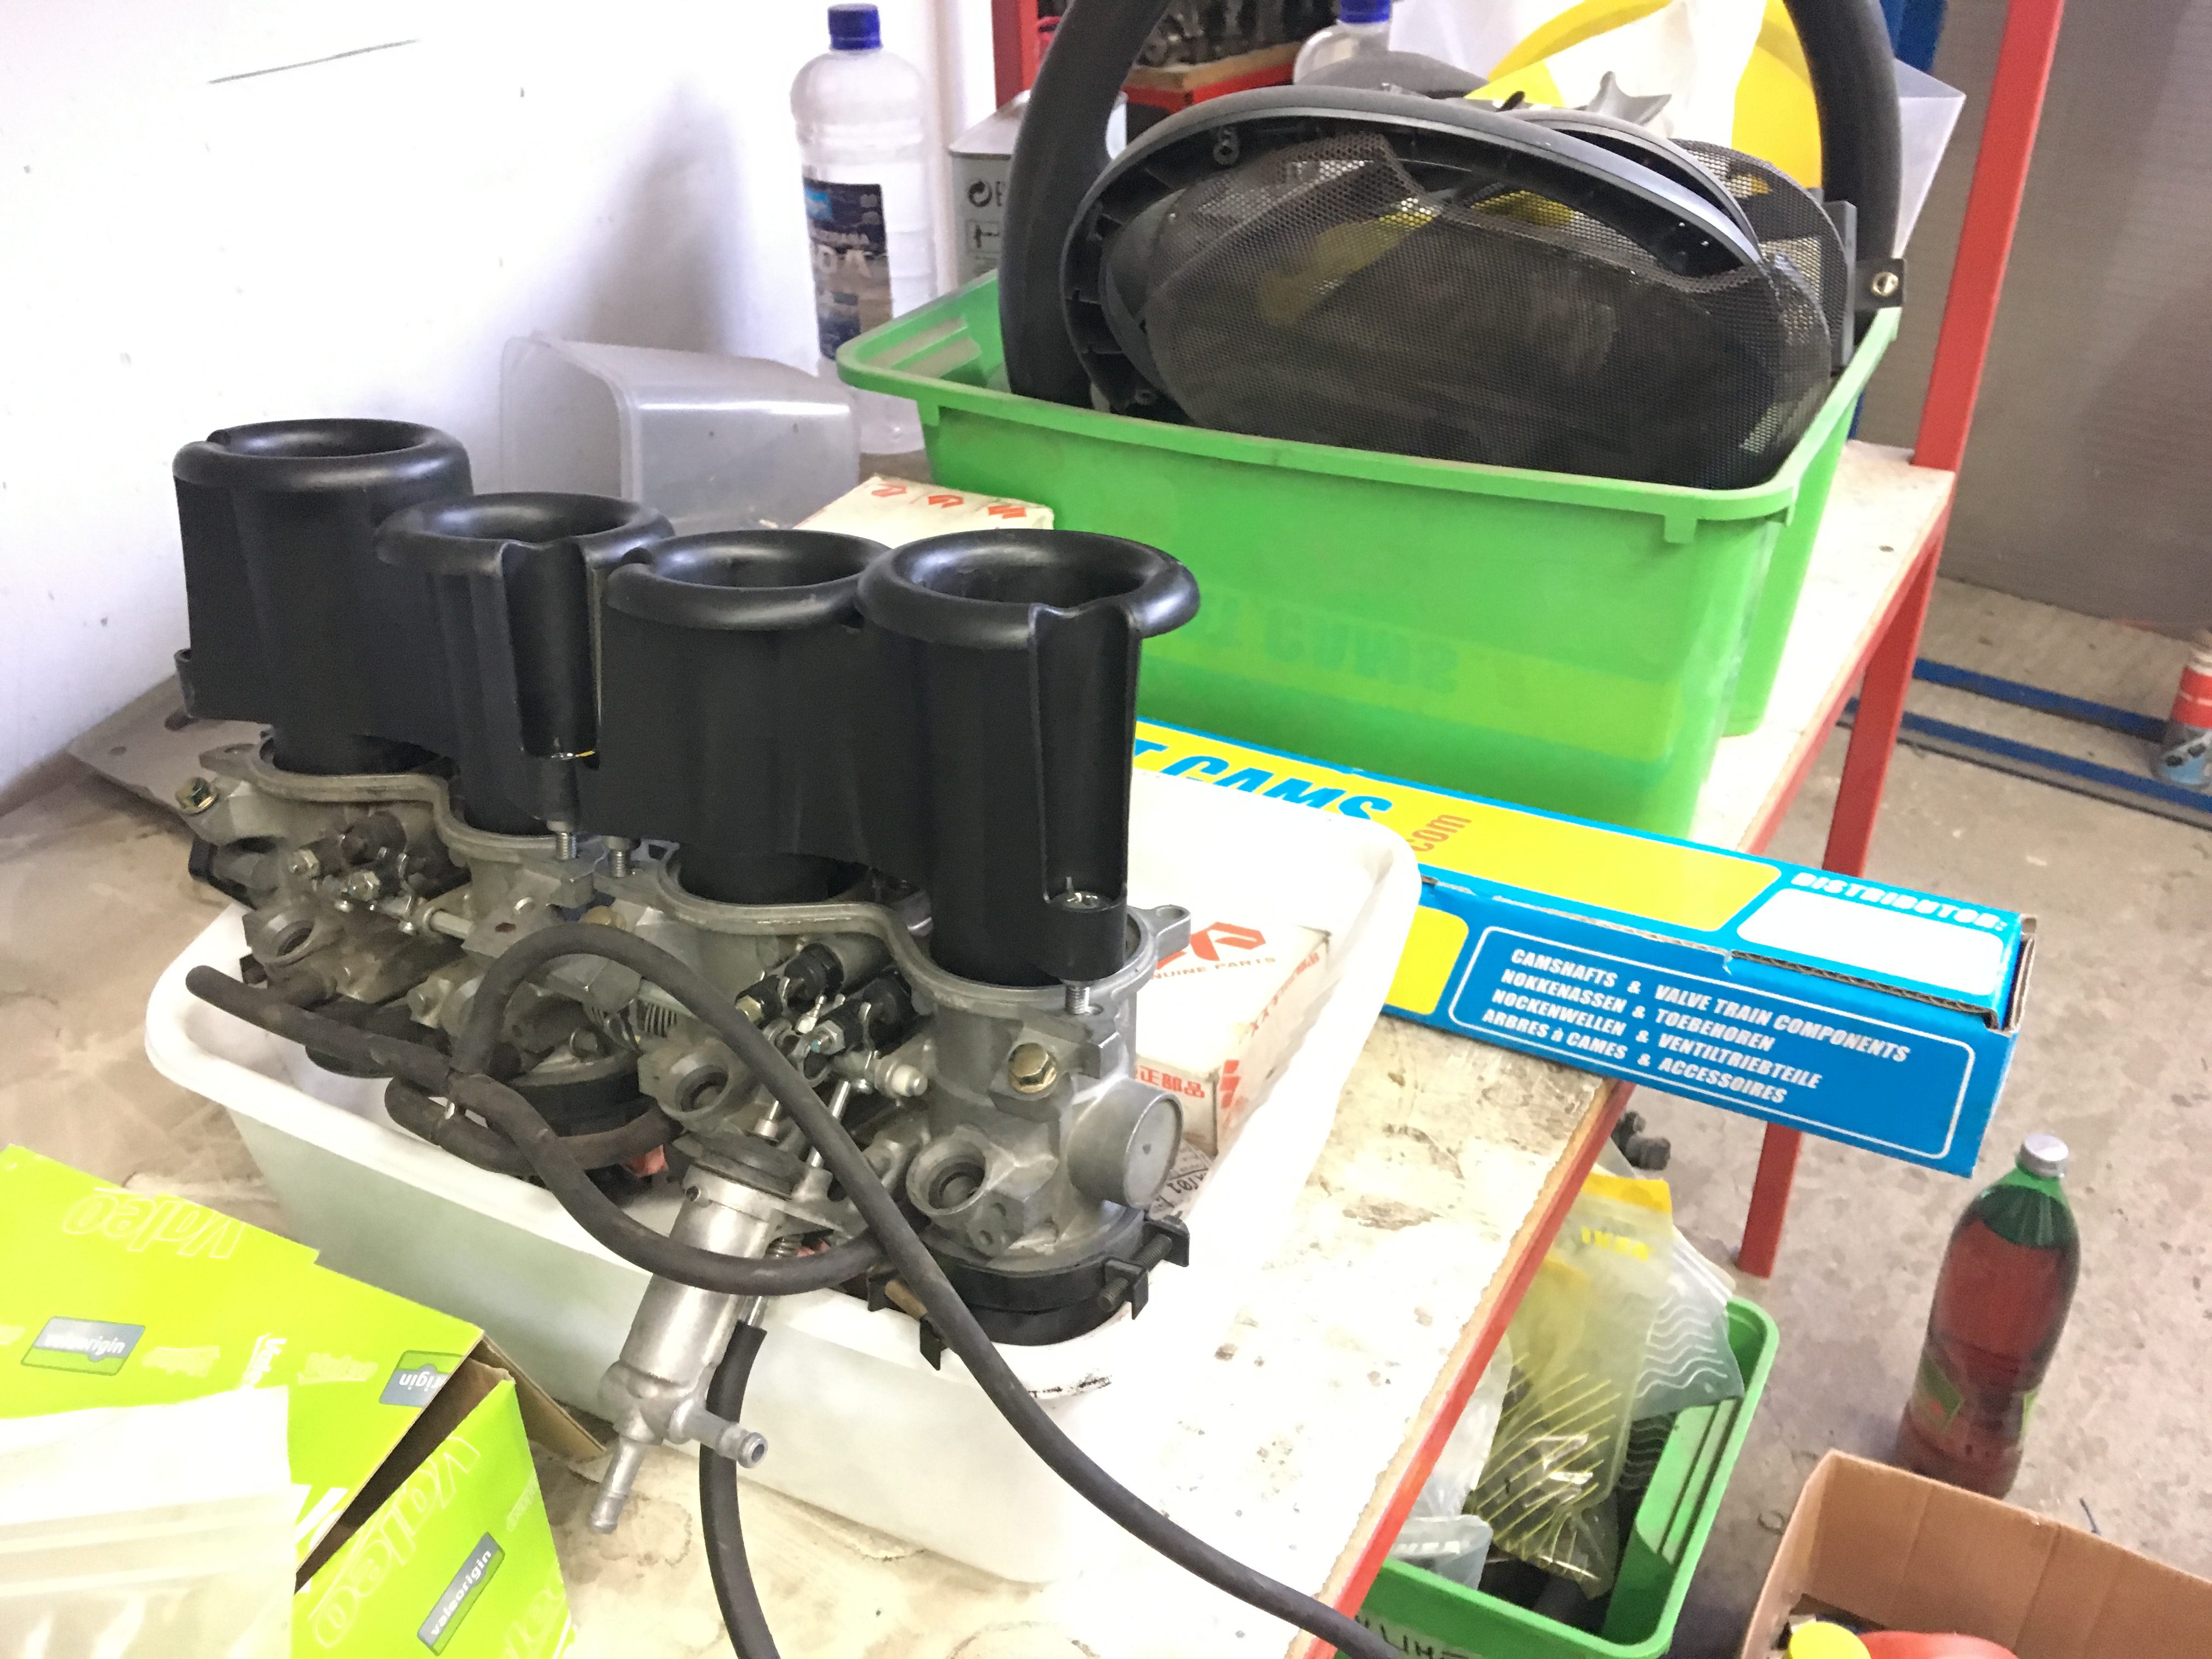
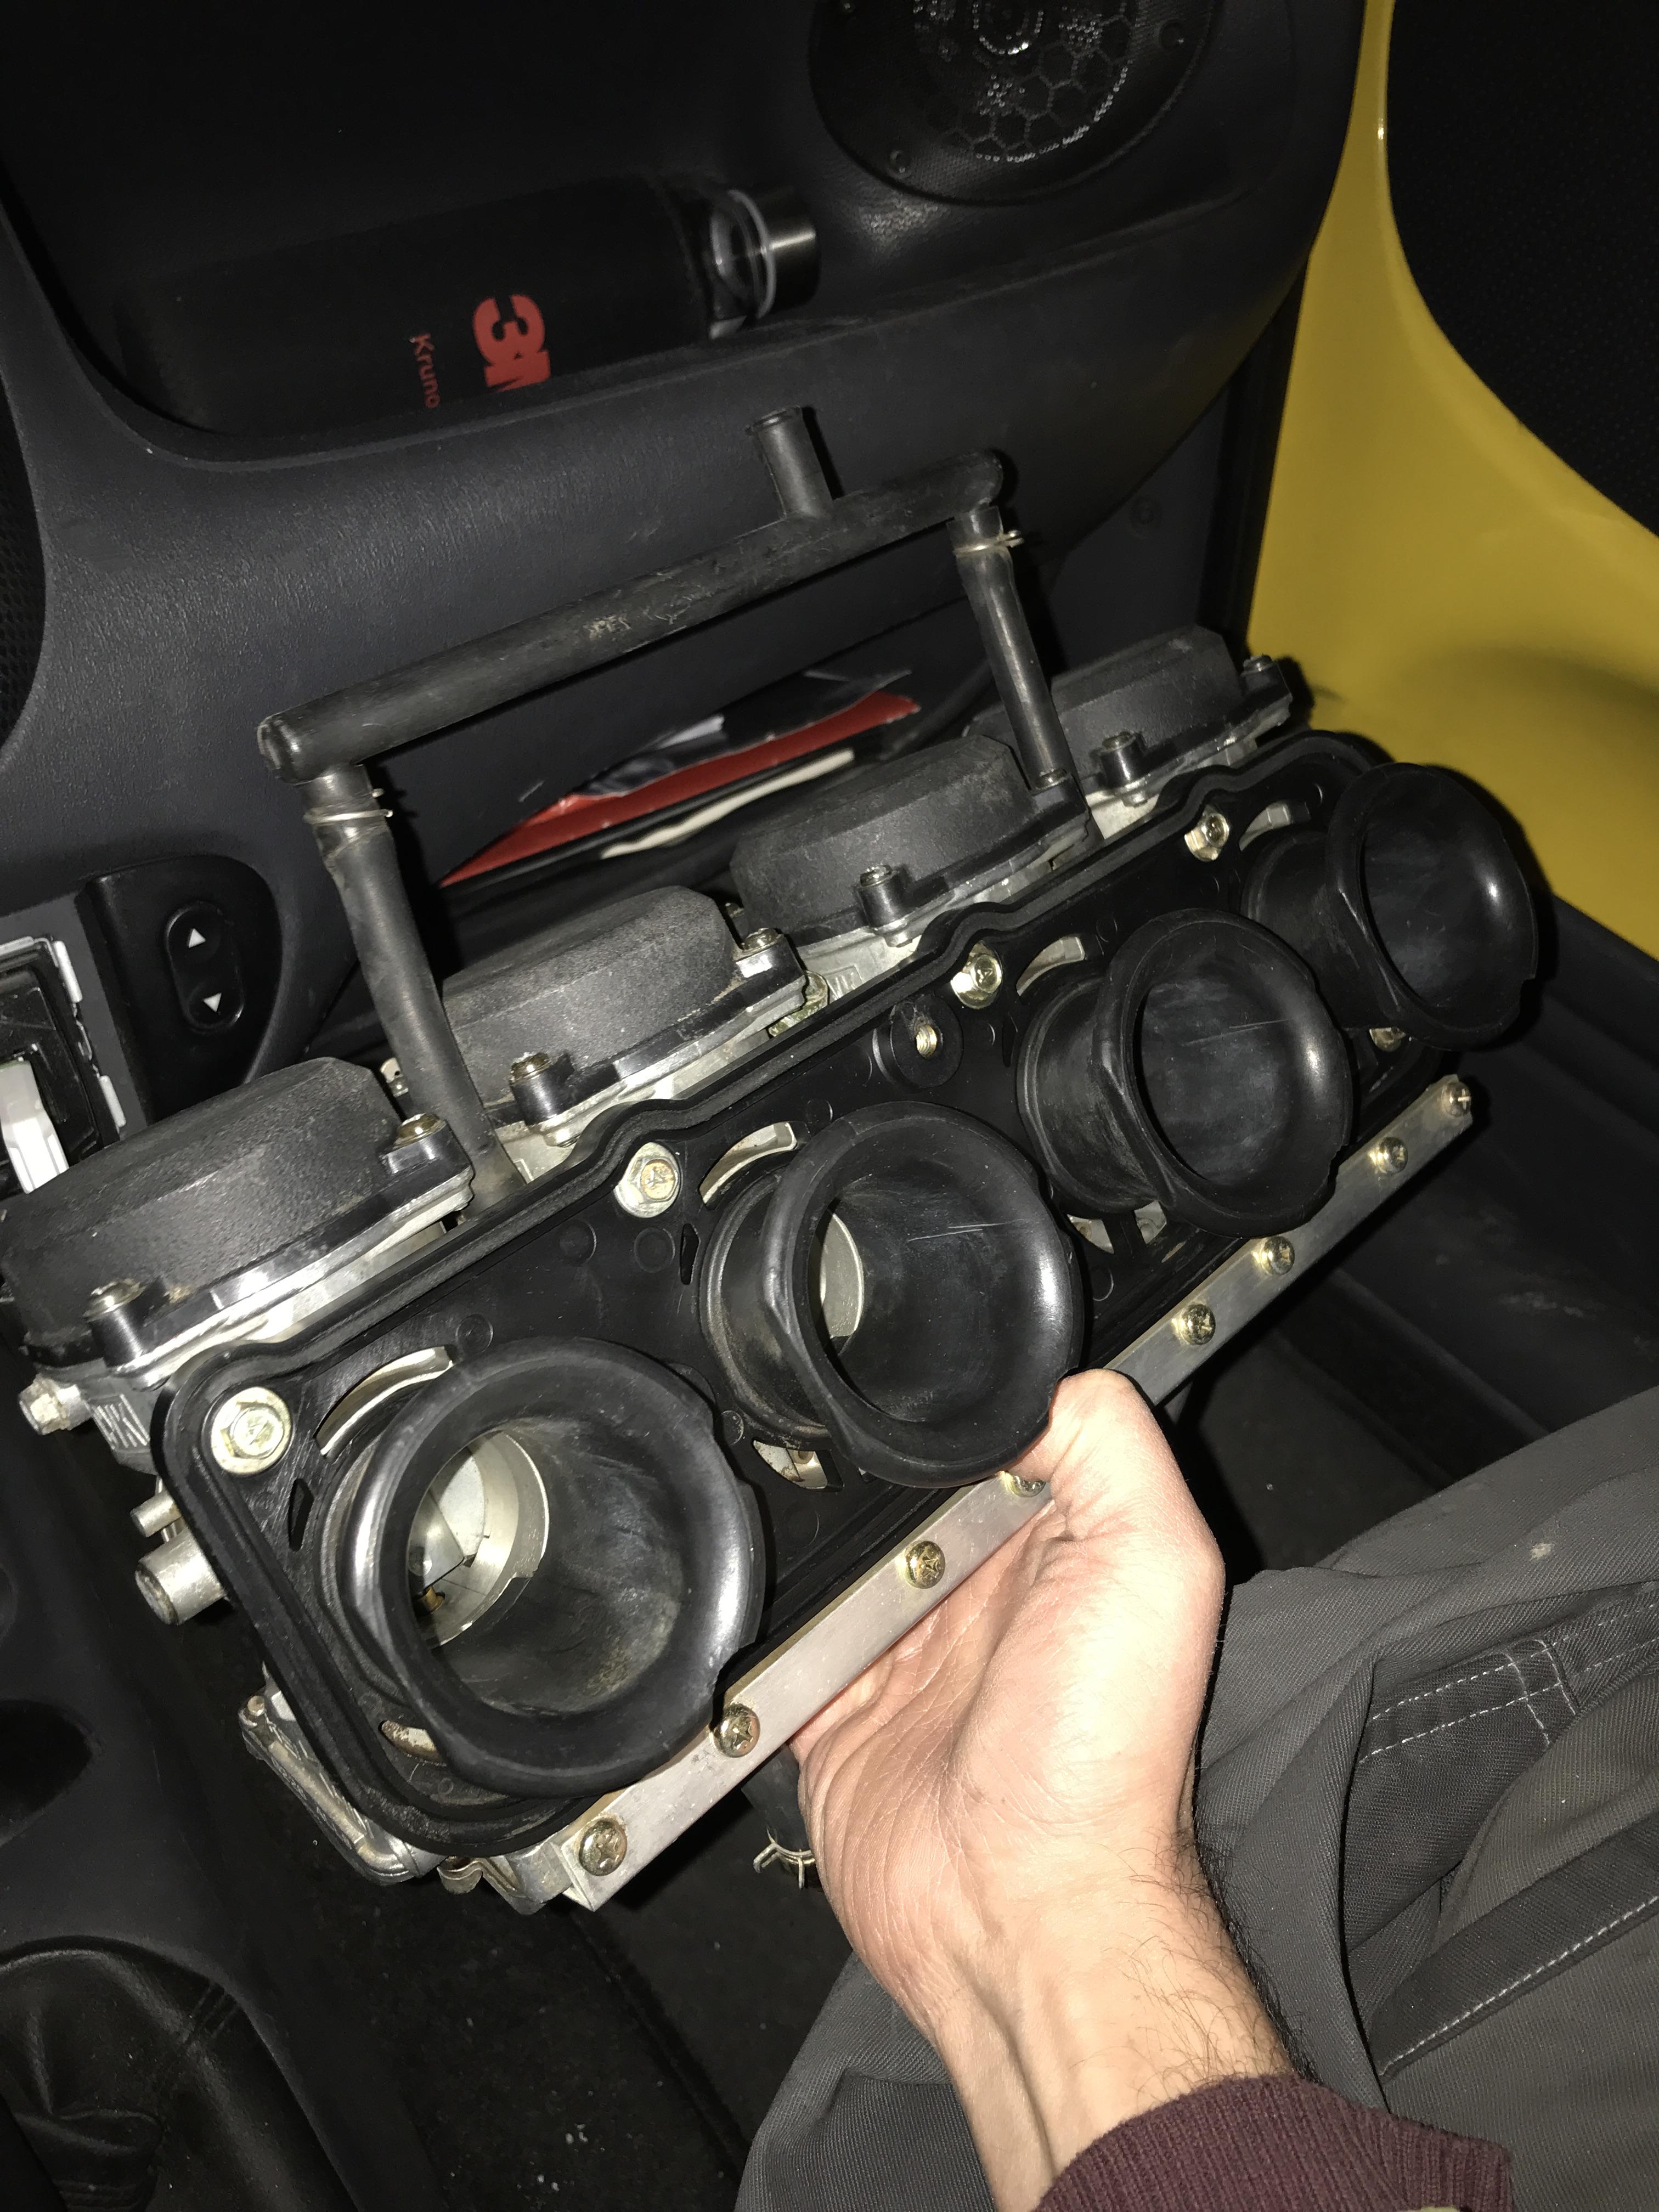
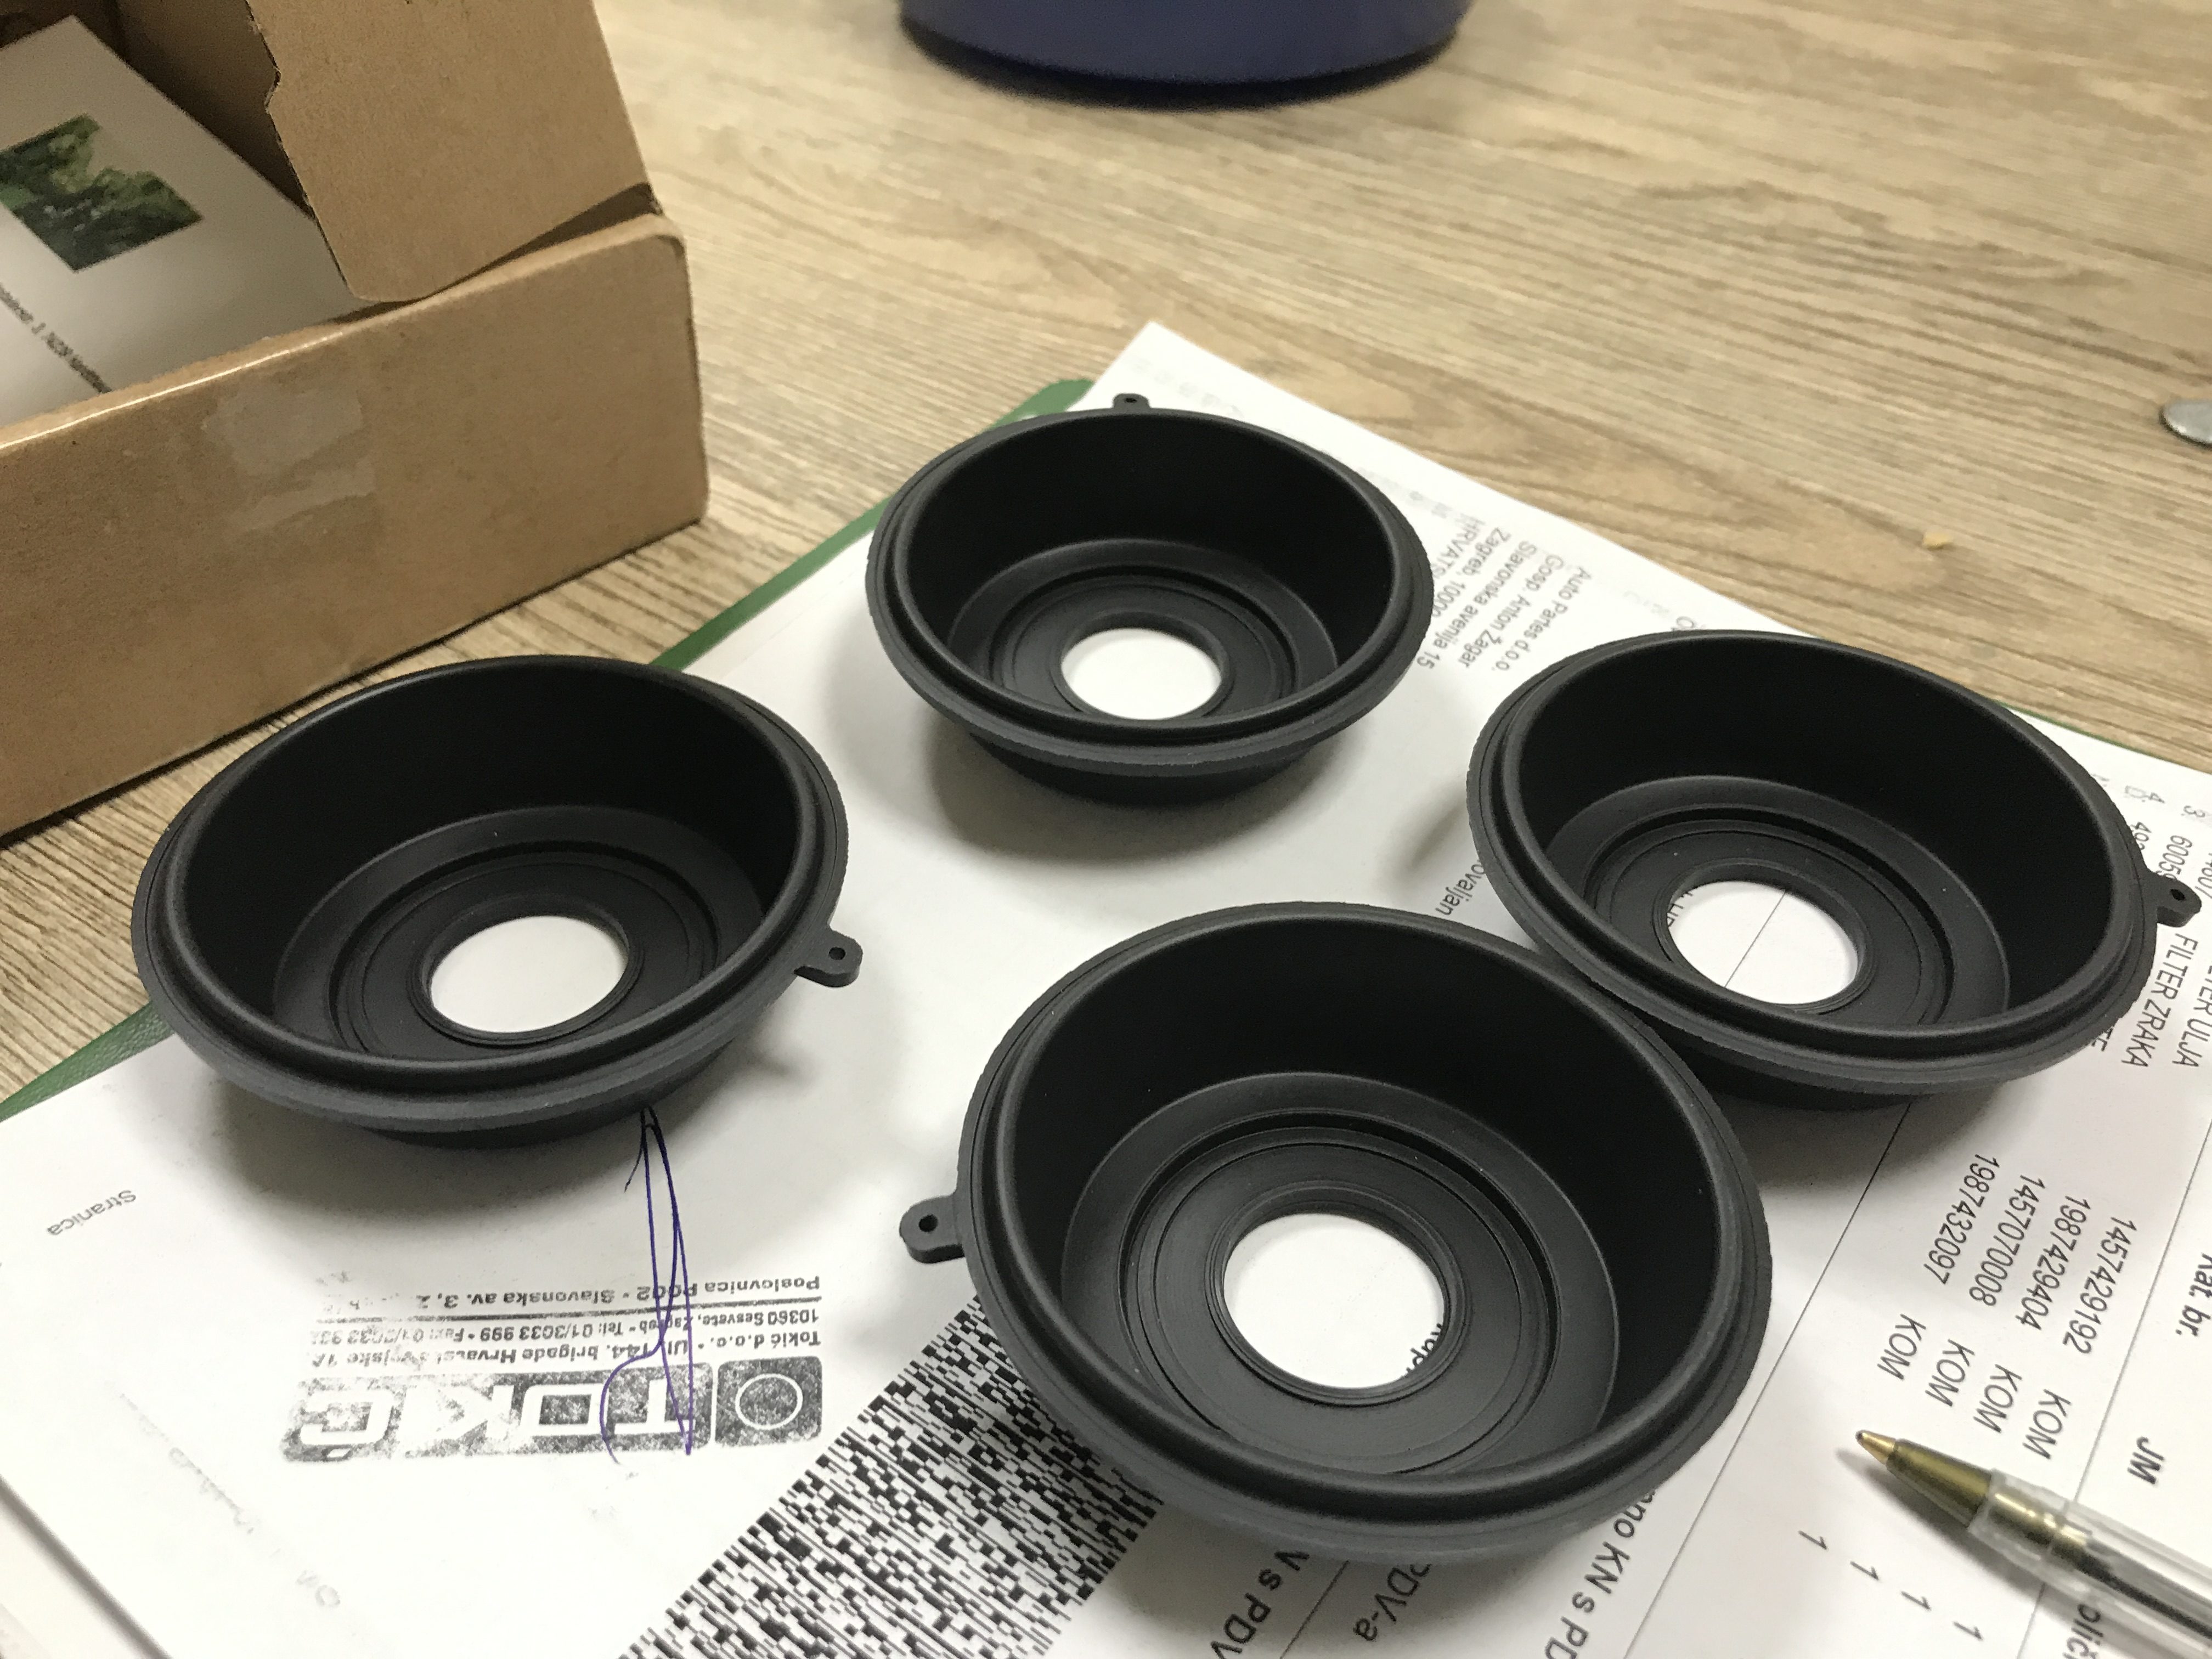
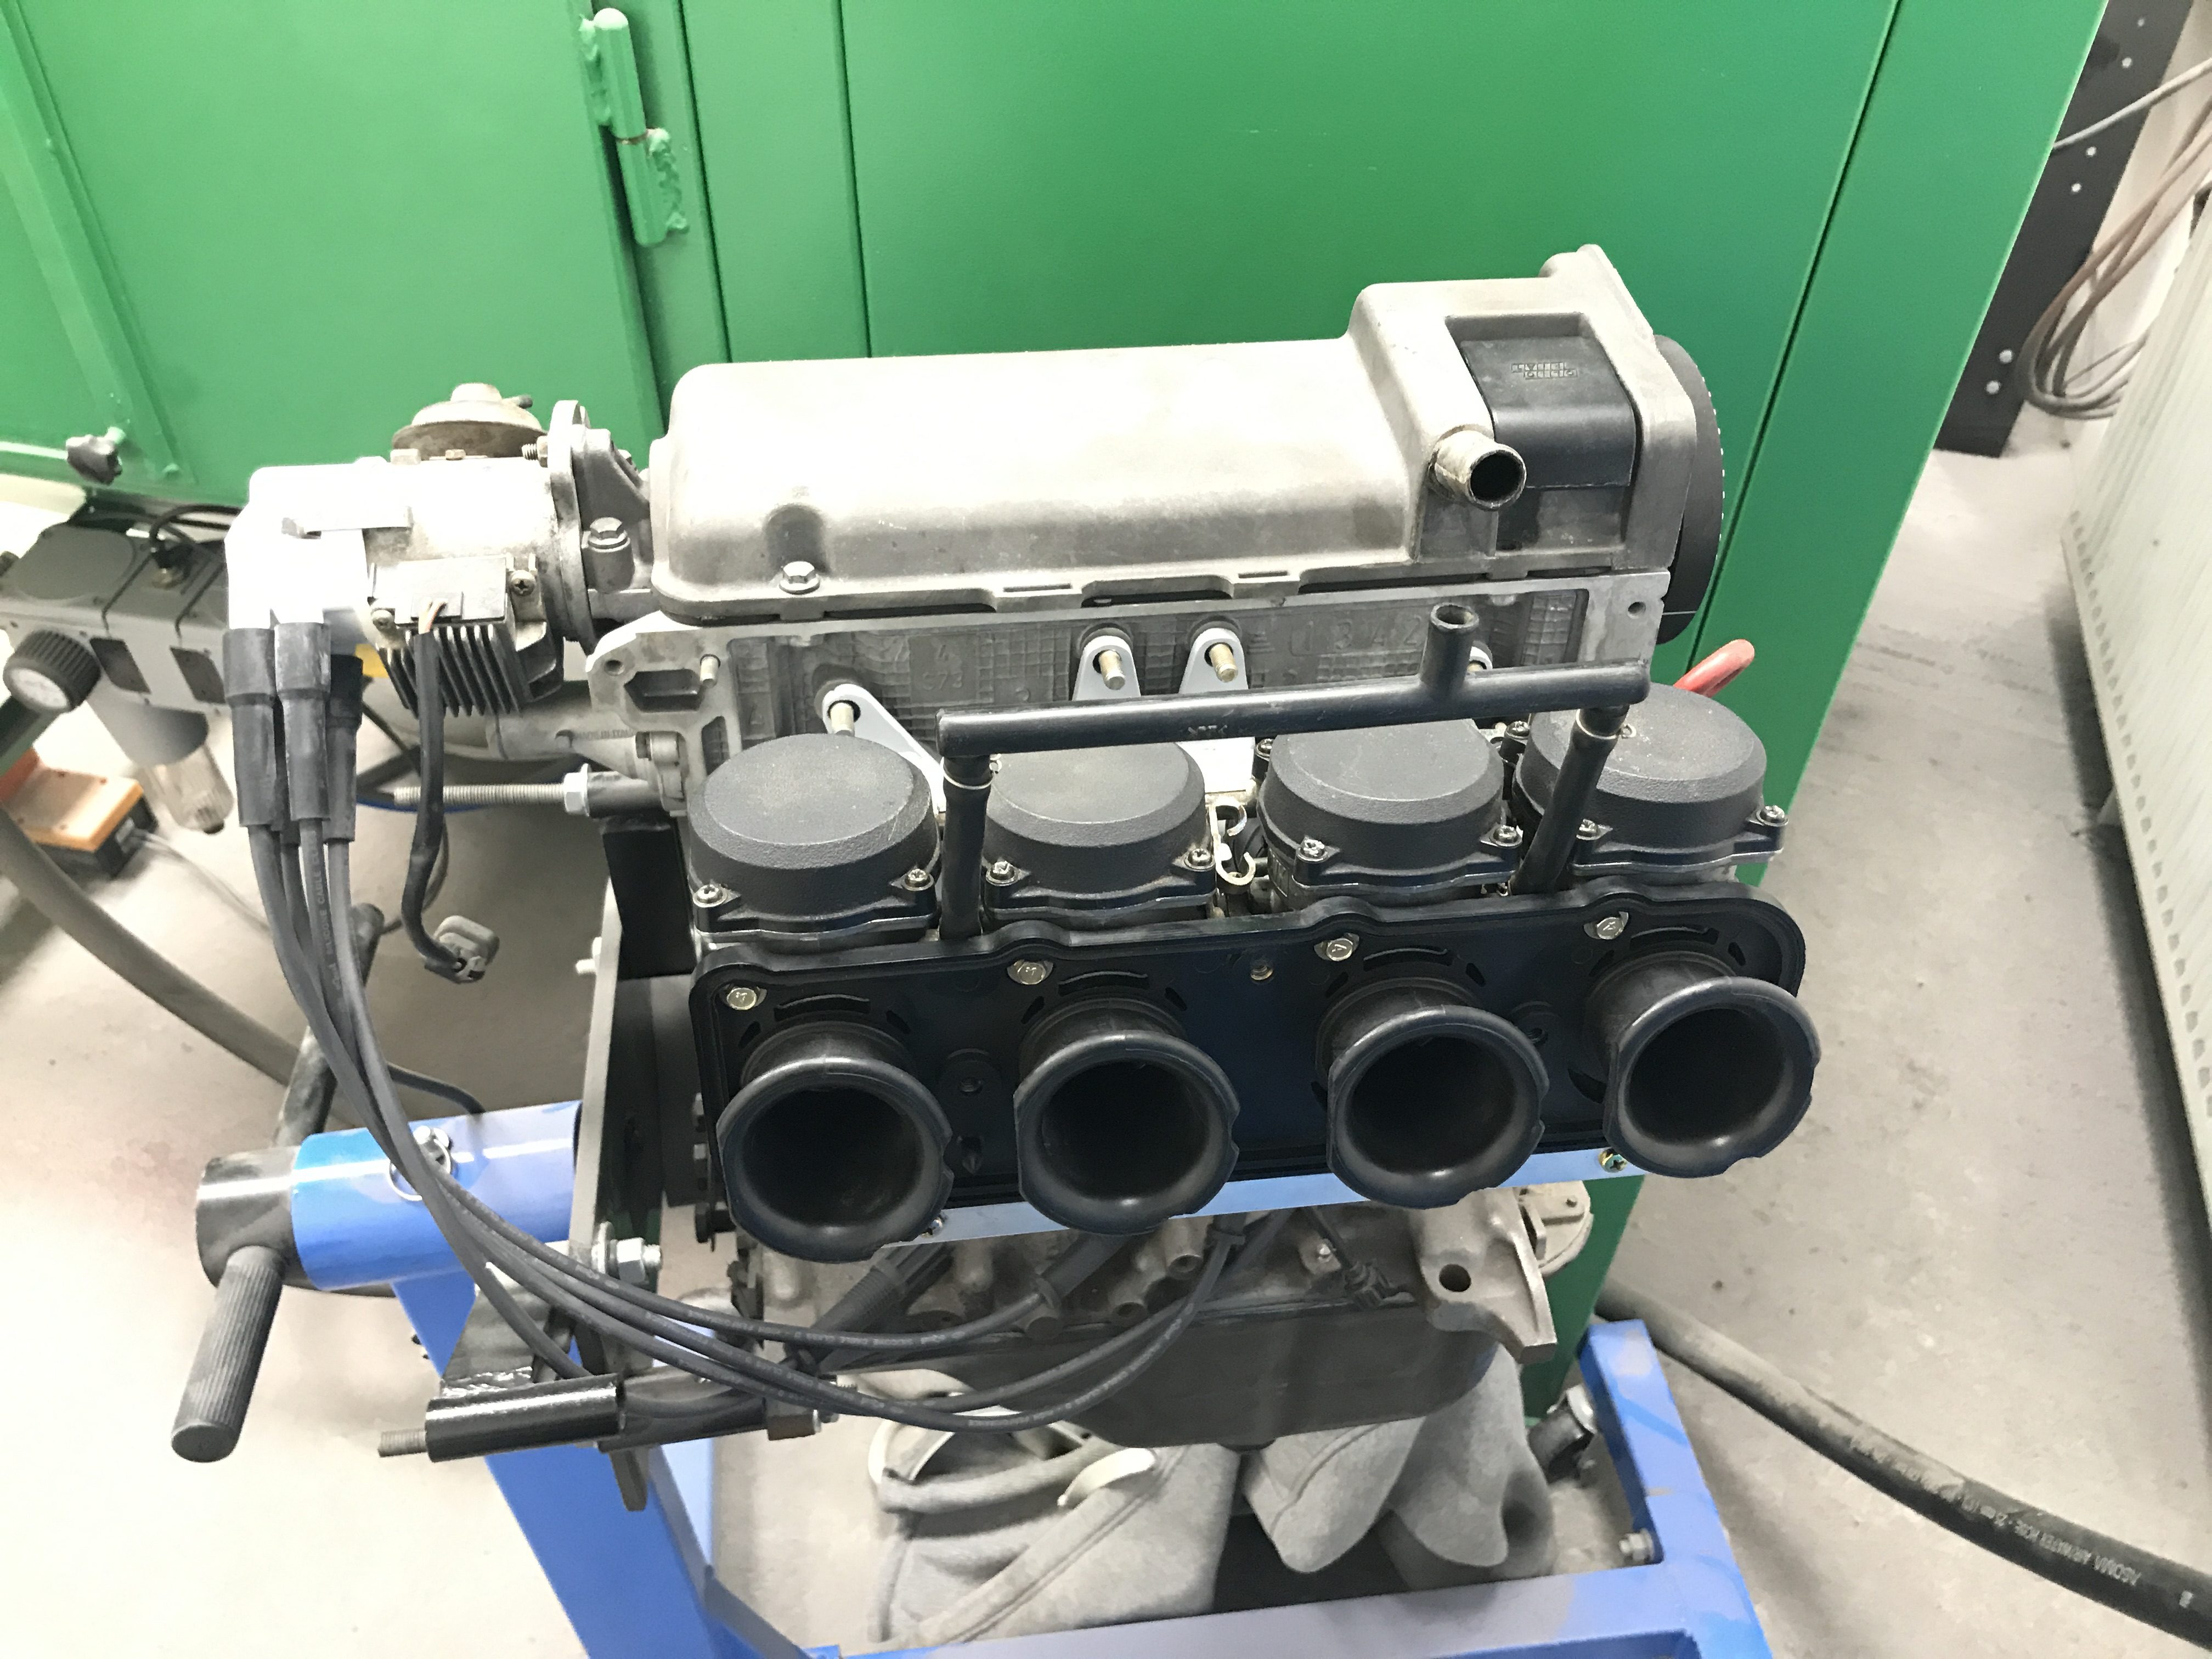
As I missed the days of simplicity with the carburetors and wanted to remove all the weight possible from the car, I opted to buy a set of Keihin CVK38 carbs from a ZX7R. I chose the size with midrange torque in mind and to keep the car streetable, CV carbs are the bomb.
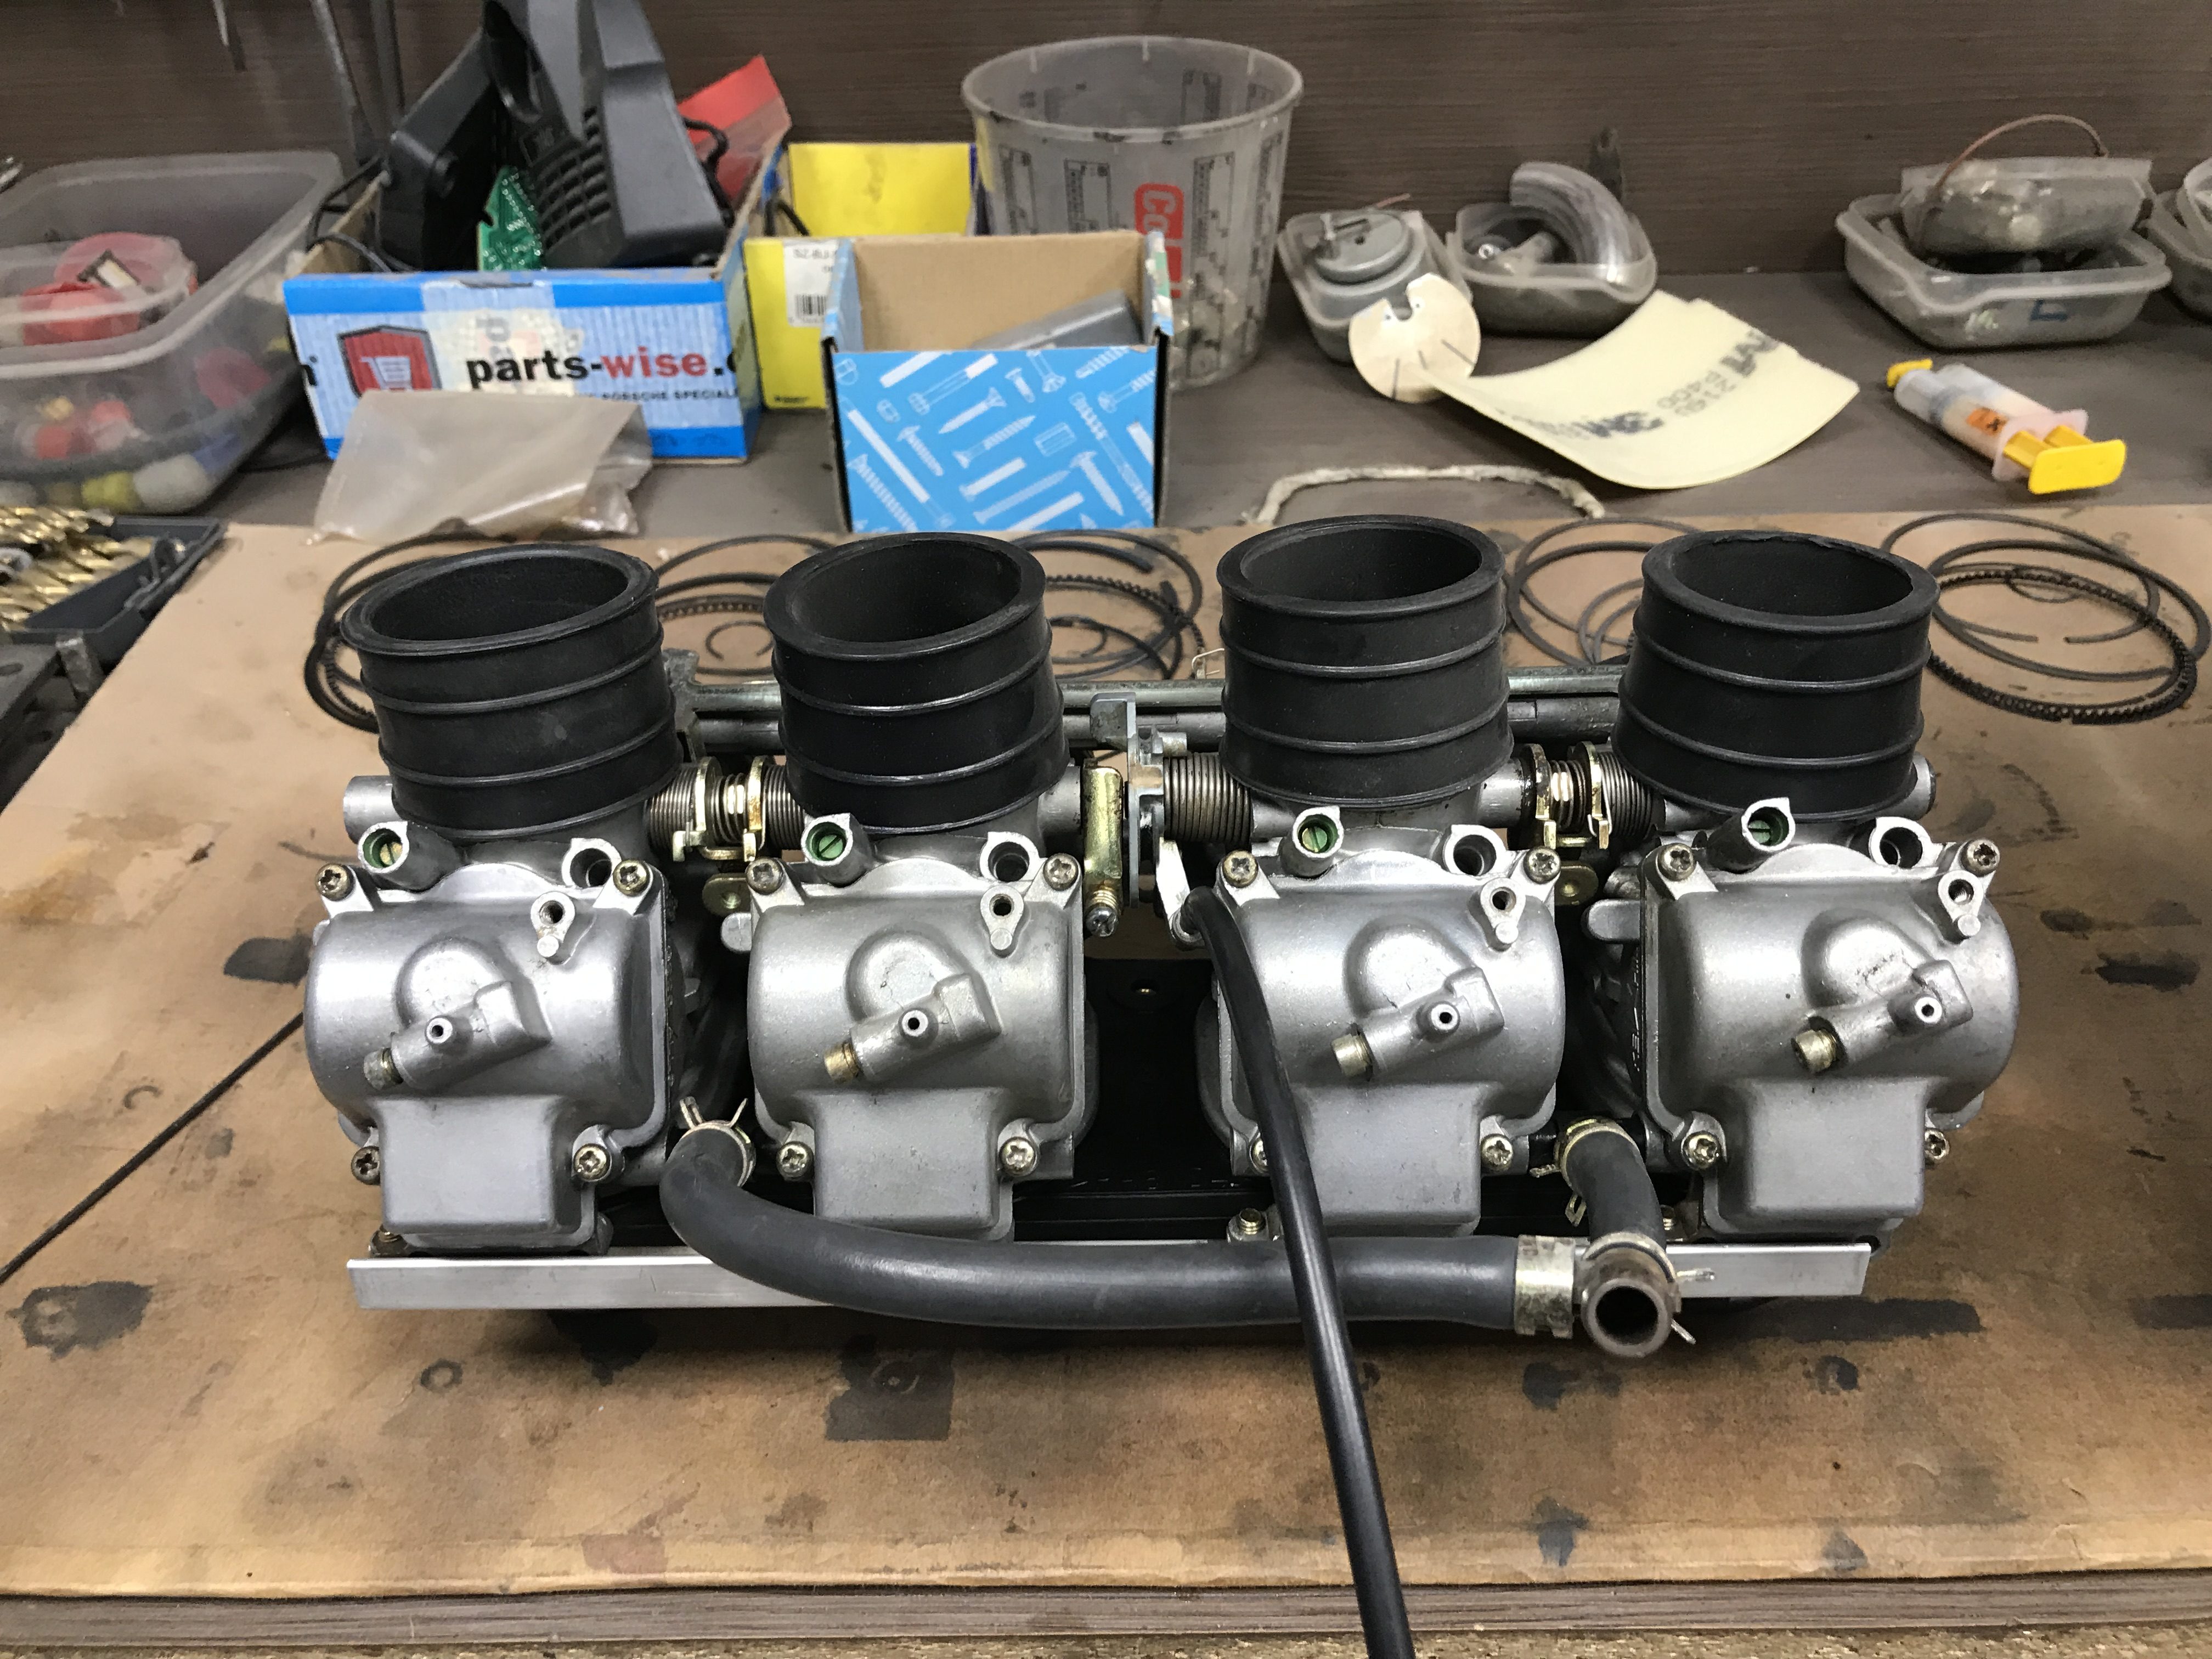
As no off the shelf manifold exists we made it from scratch with mild steel as I didn't have access to other materials at the time.
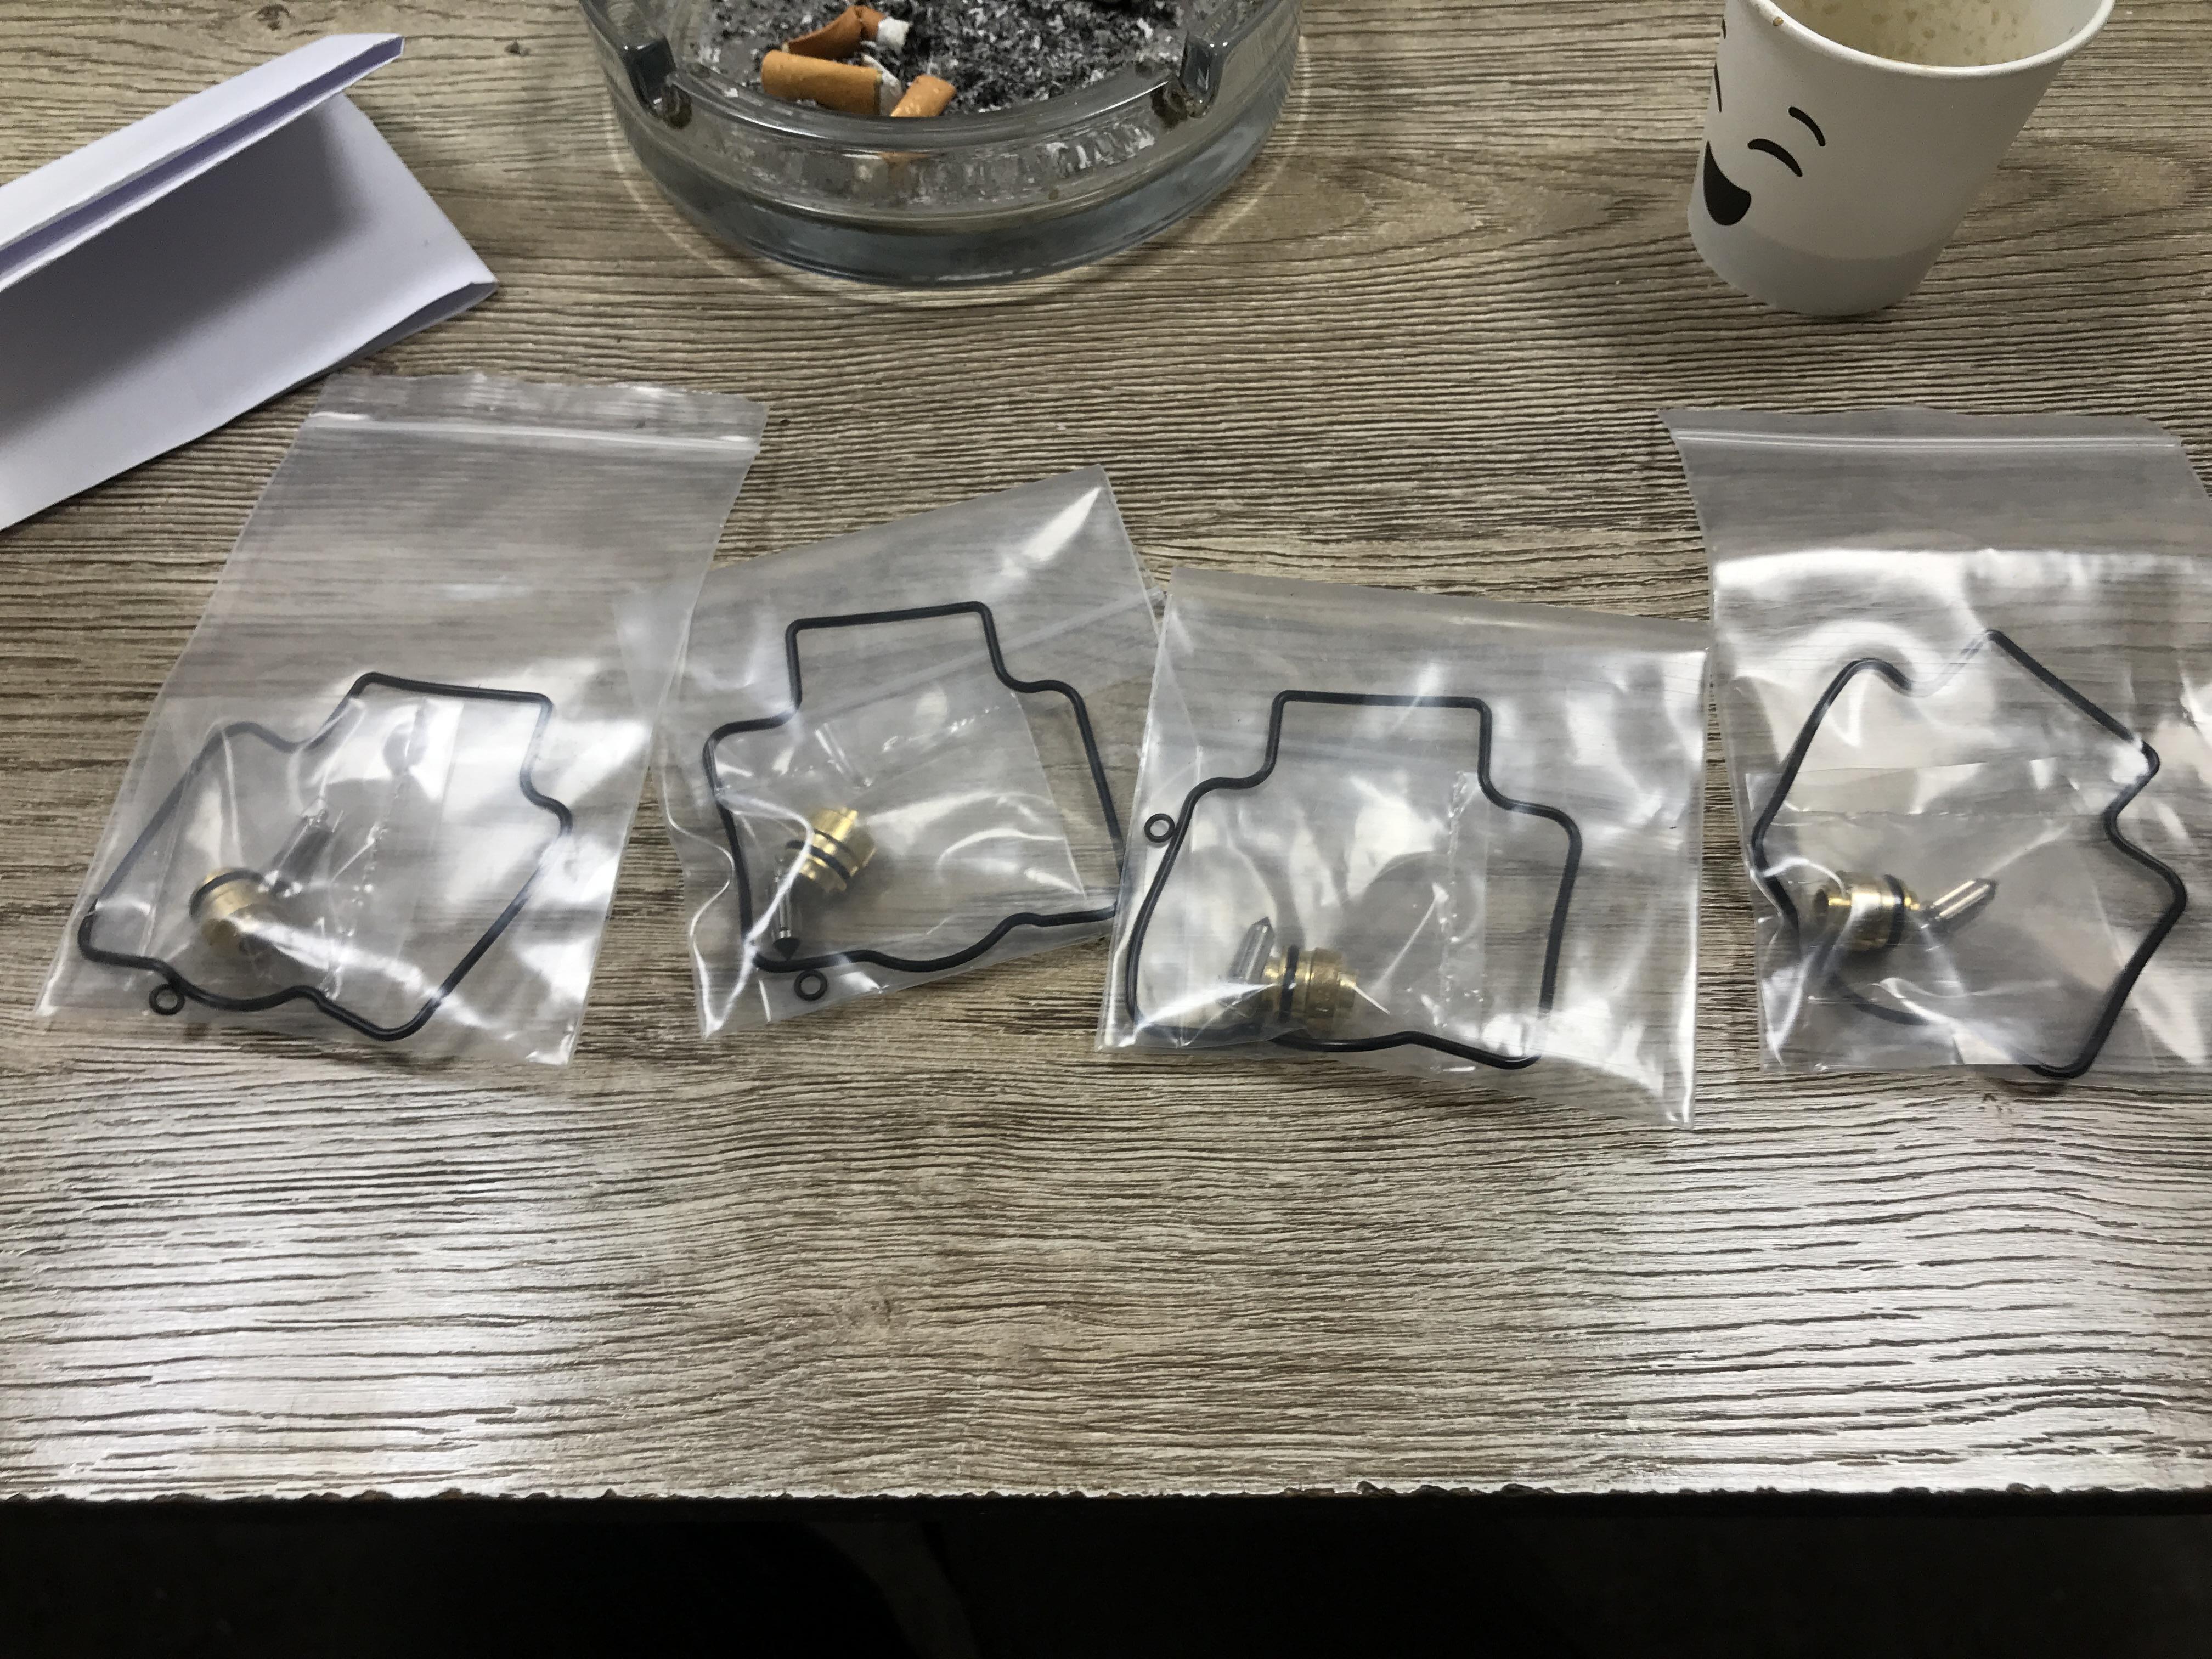
Also, when You buy something used here in Balkans, it probably doesn't work. With that in mind we first installed the intake on the engine that was already in the car so we would be sure everything works before putting it on the expensive built engine. Only one slide of four worked so I had to rebuild the carburetors with new diaphragms and seals. That actually made me happy because I actually learned something new about CV carburetors and I was also positive that I have something that shouldn't be a nuisance in the future.
The heater system needed to be removed from the car to fit the intake and we also removed power assisted brakes so I don't have to pull vacuum out of the intake that would disturb the intake pulses in the combustion process.

To jet the bike carbs properly for car application some parts are needed that I'm still waiting from UK because of the whole situation in the world.
When parts for the jetting arrive, we will plug in the Innovate Wideband sensor and jet it on the road as well as going to a dyno to get the data.
For ignition I chose the Magneti Marelli distributor derived from a Fiat Uno, it works well for a baseline and it was the simplest thing to do at the time as I didn't like the idea using a standalone ECU that I had at the time just to control the ignition without fuel.
I will eventually fiddle with ECU powered ignition box since I can't get the timing curves ideal and I'm probably loosing about 20% of potential power on the timing alone.

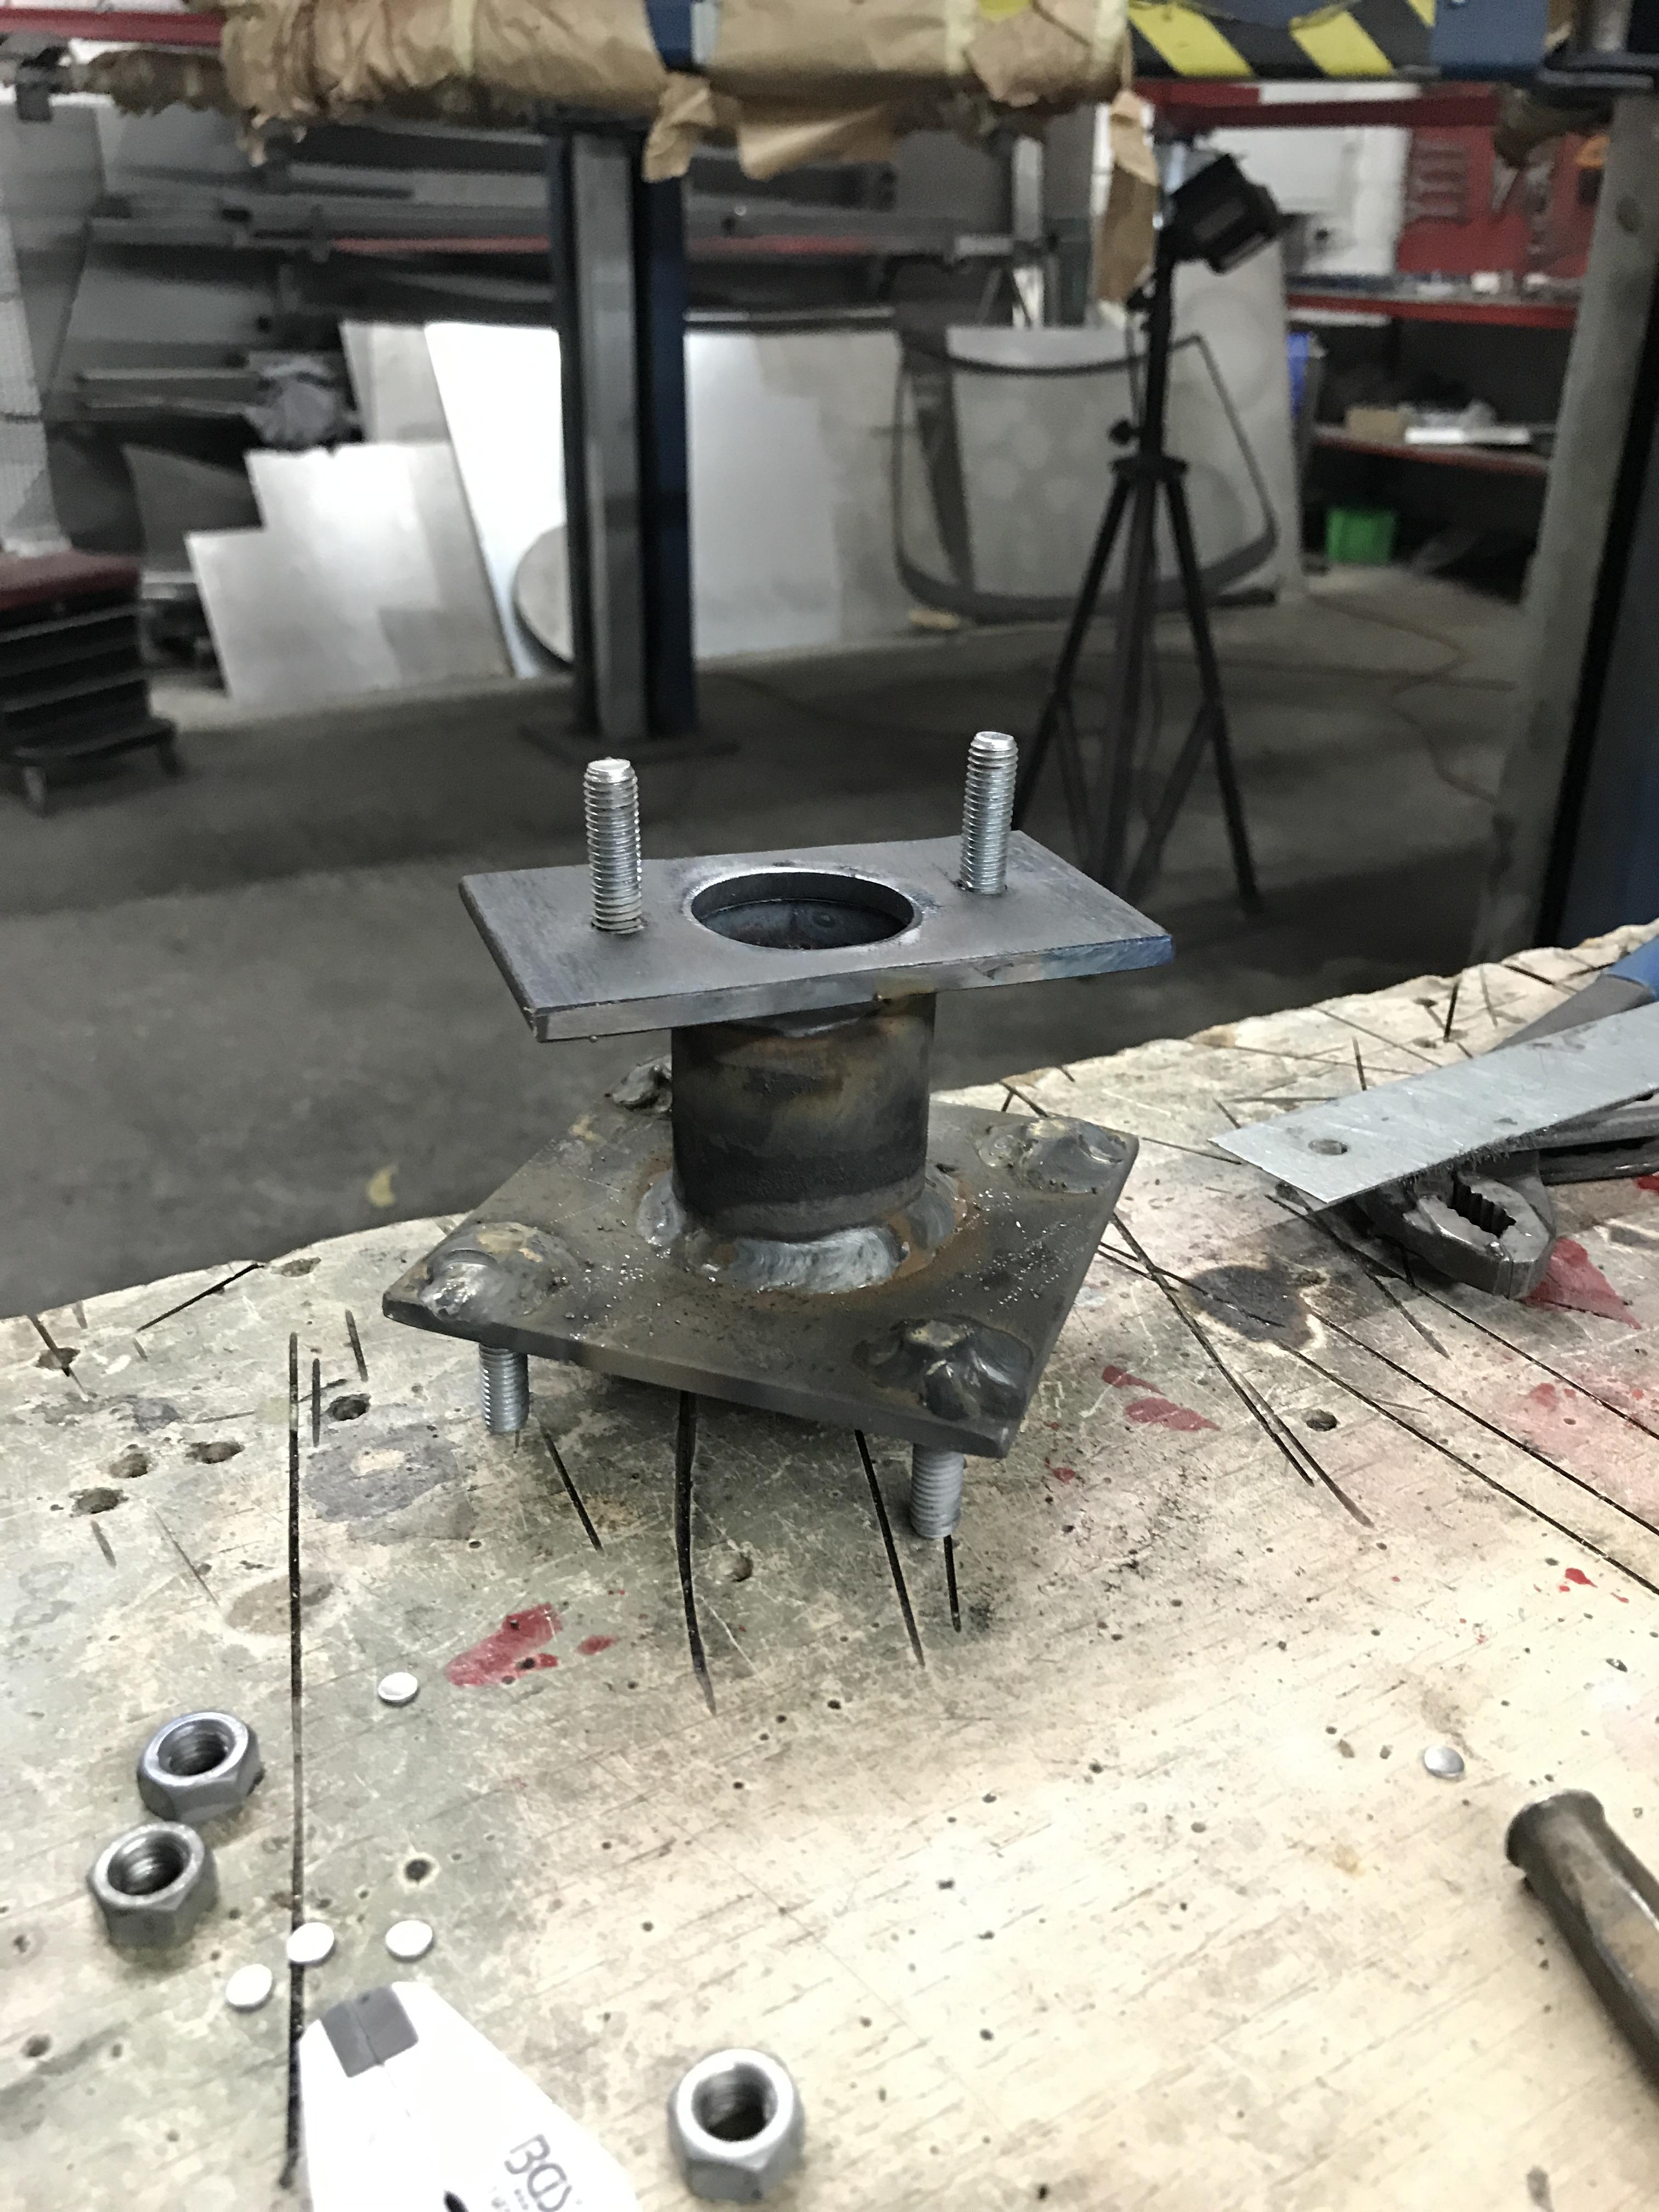
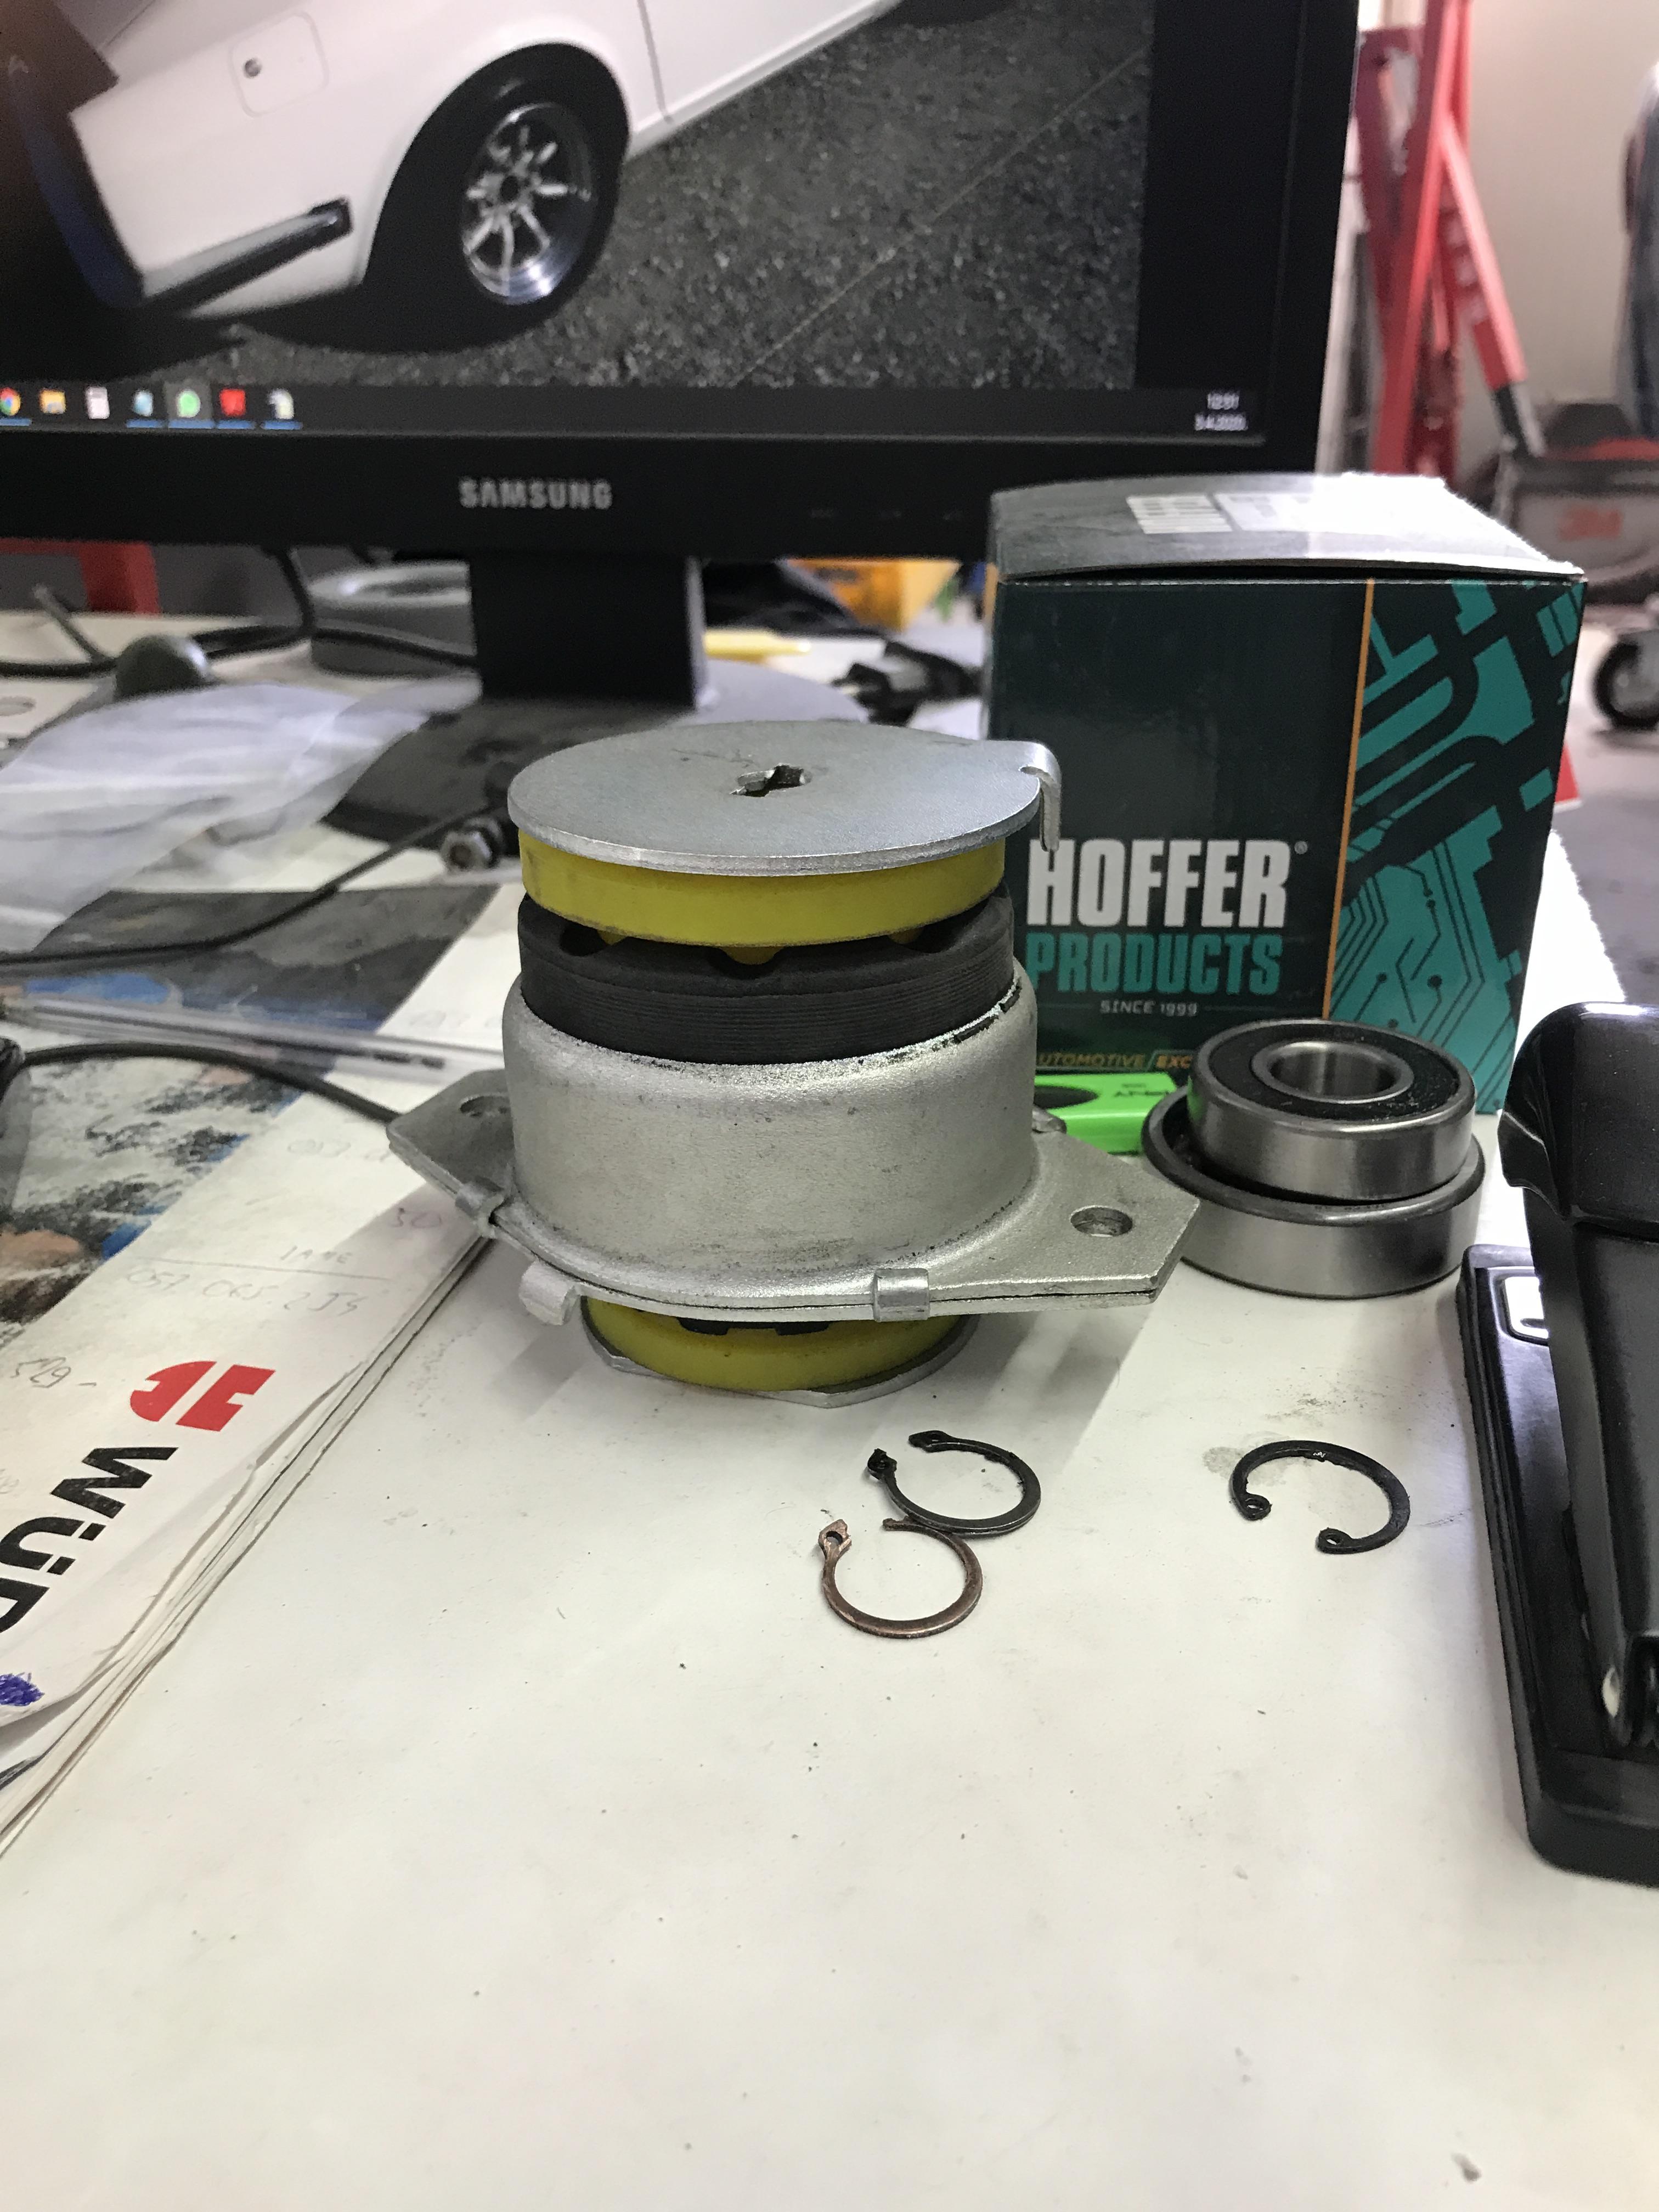
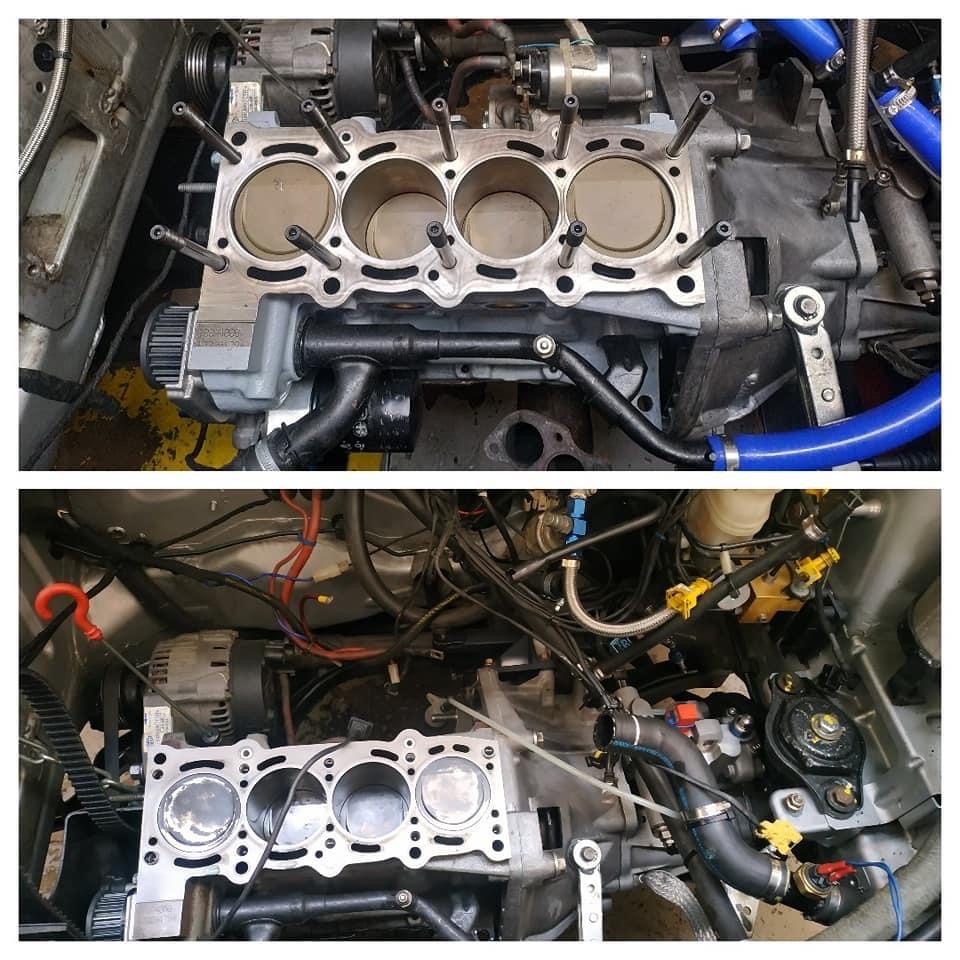
During the installation most of consumables we installed new and after a few test runs it was obvious that the stock engine mounts wouldn't handle the engine so I bought Strongflex Polyurethane engine mounts.
Also we had to make some small modifications on the engine block and auxiliary equipment to make sure it fits and works properly.
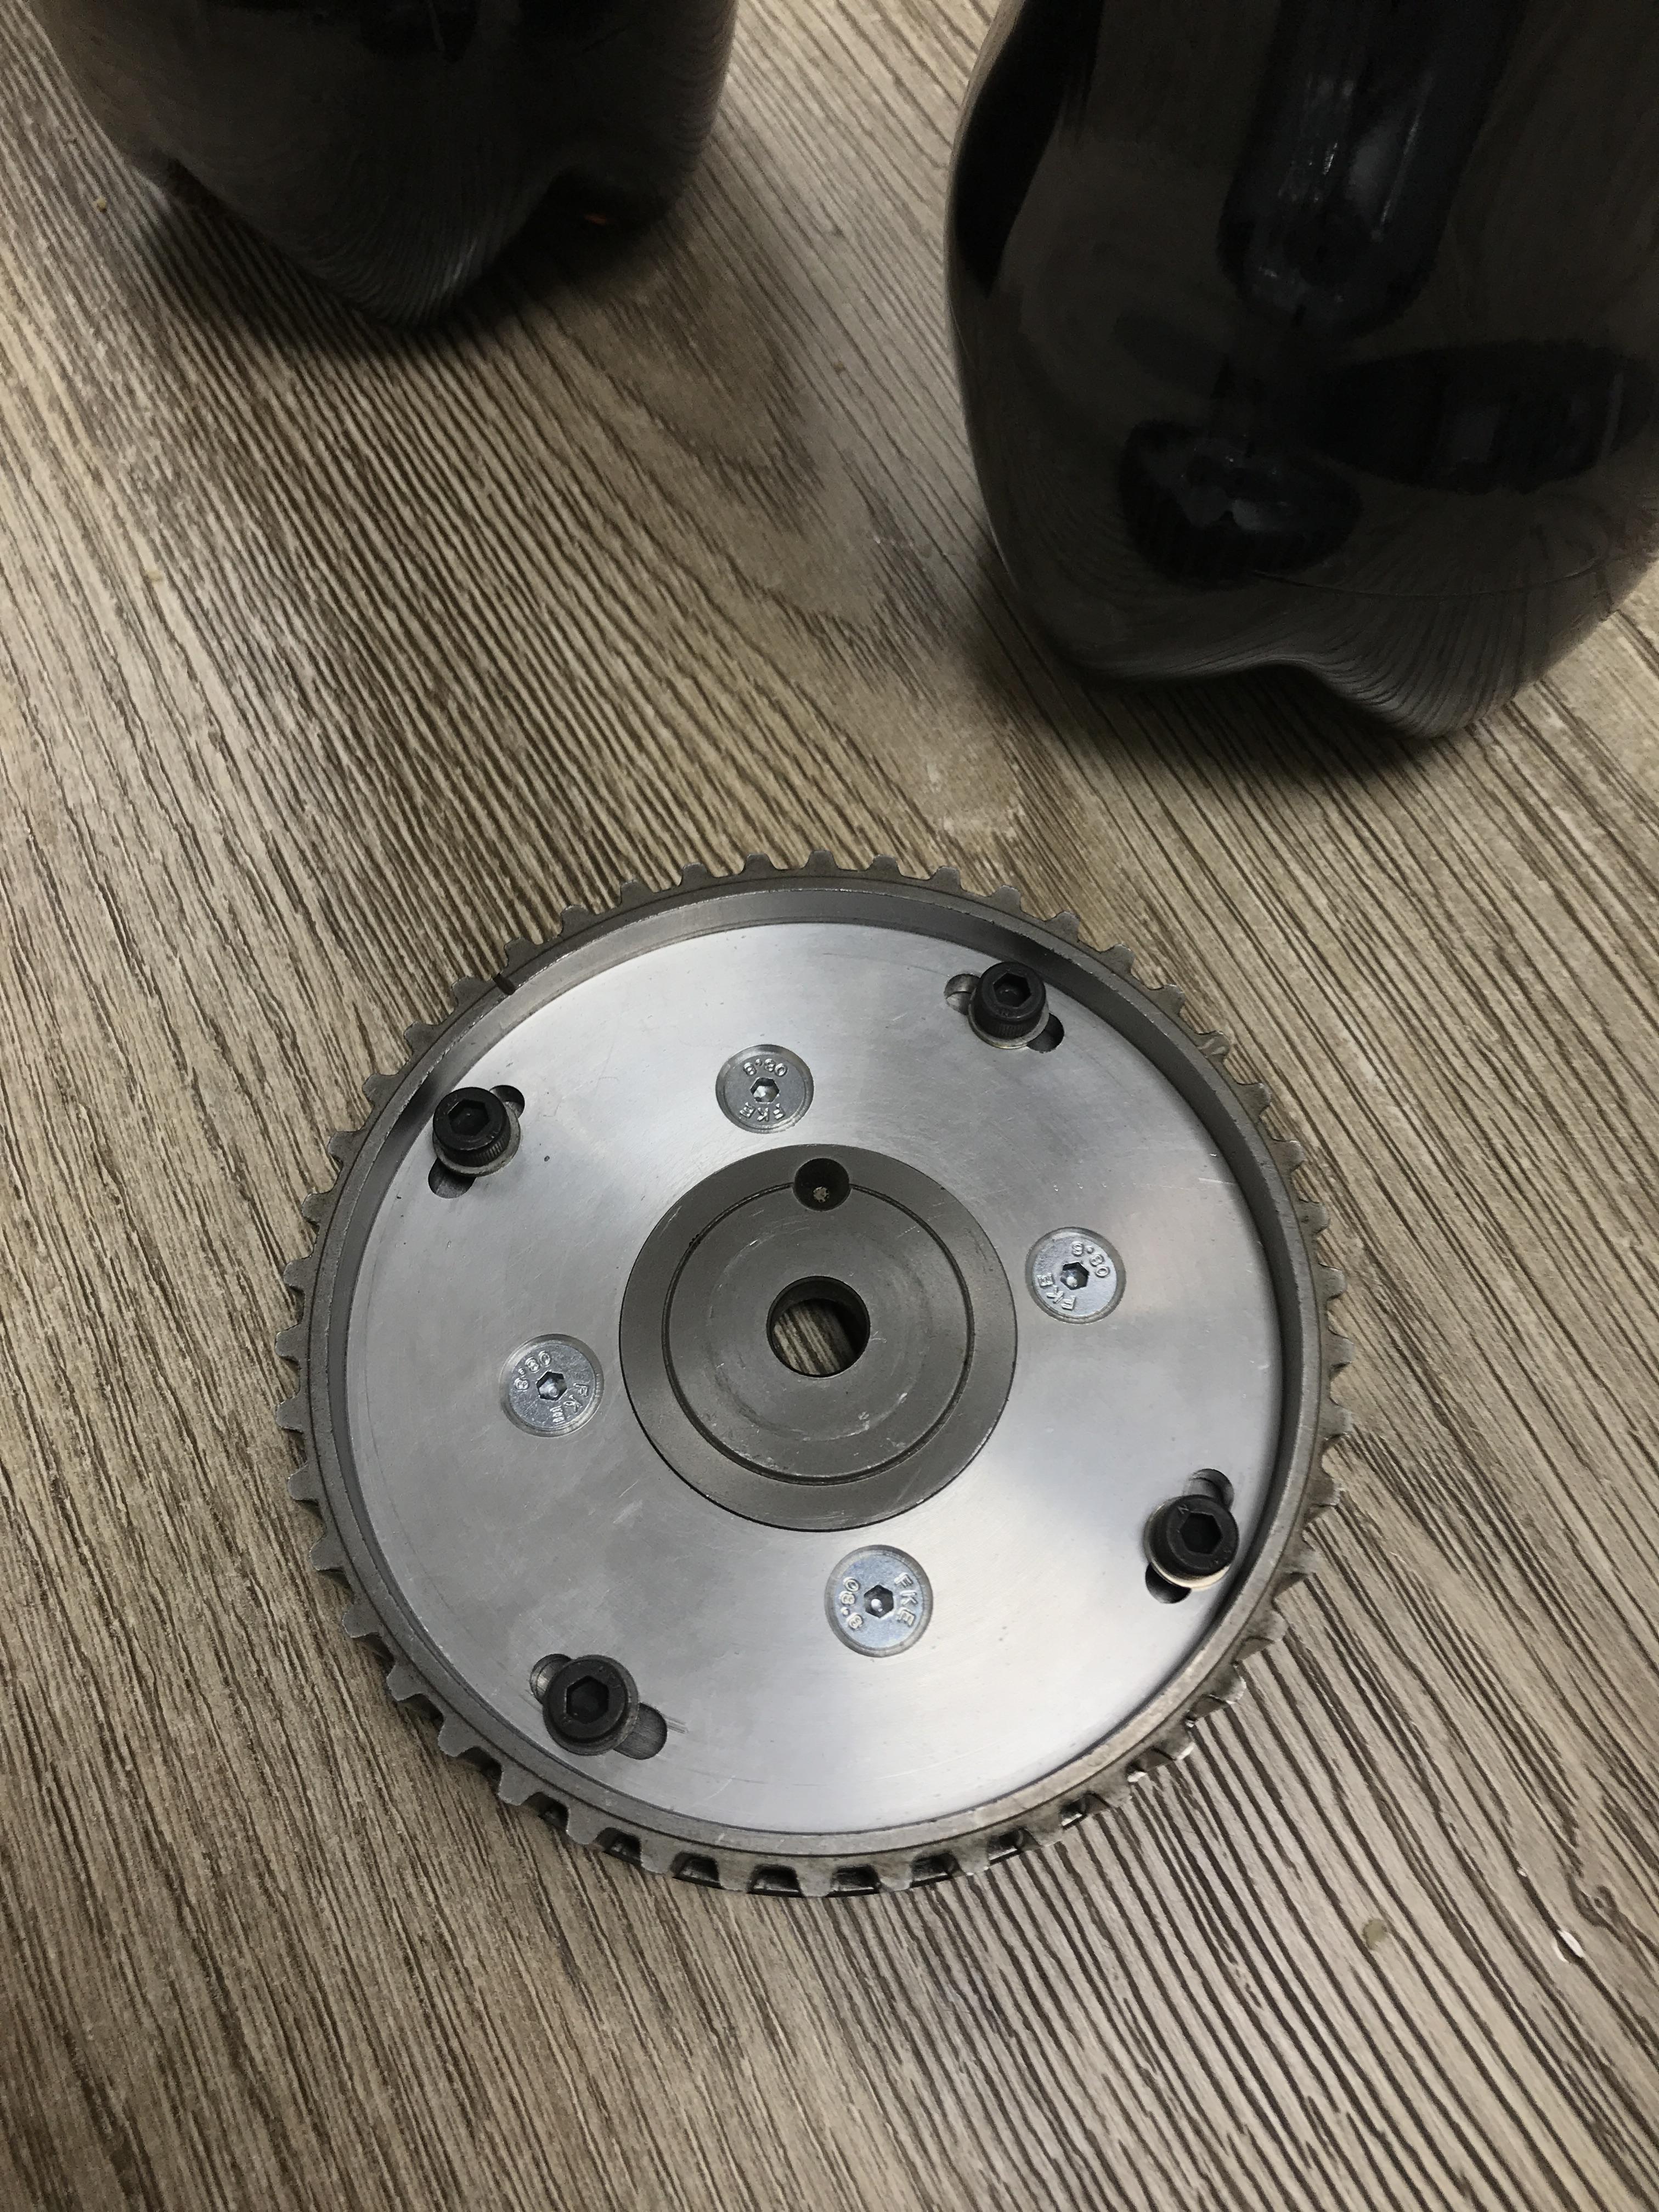
I got the Vernier pulley made so we can degree the cam properly.
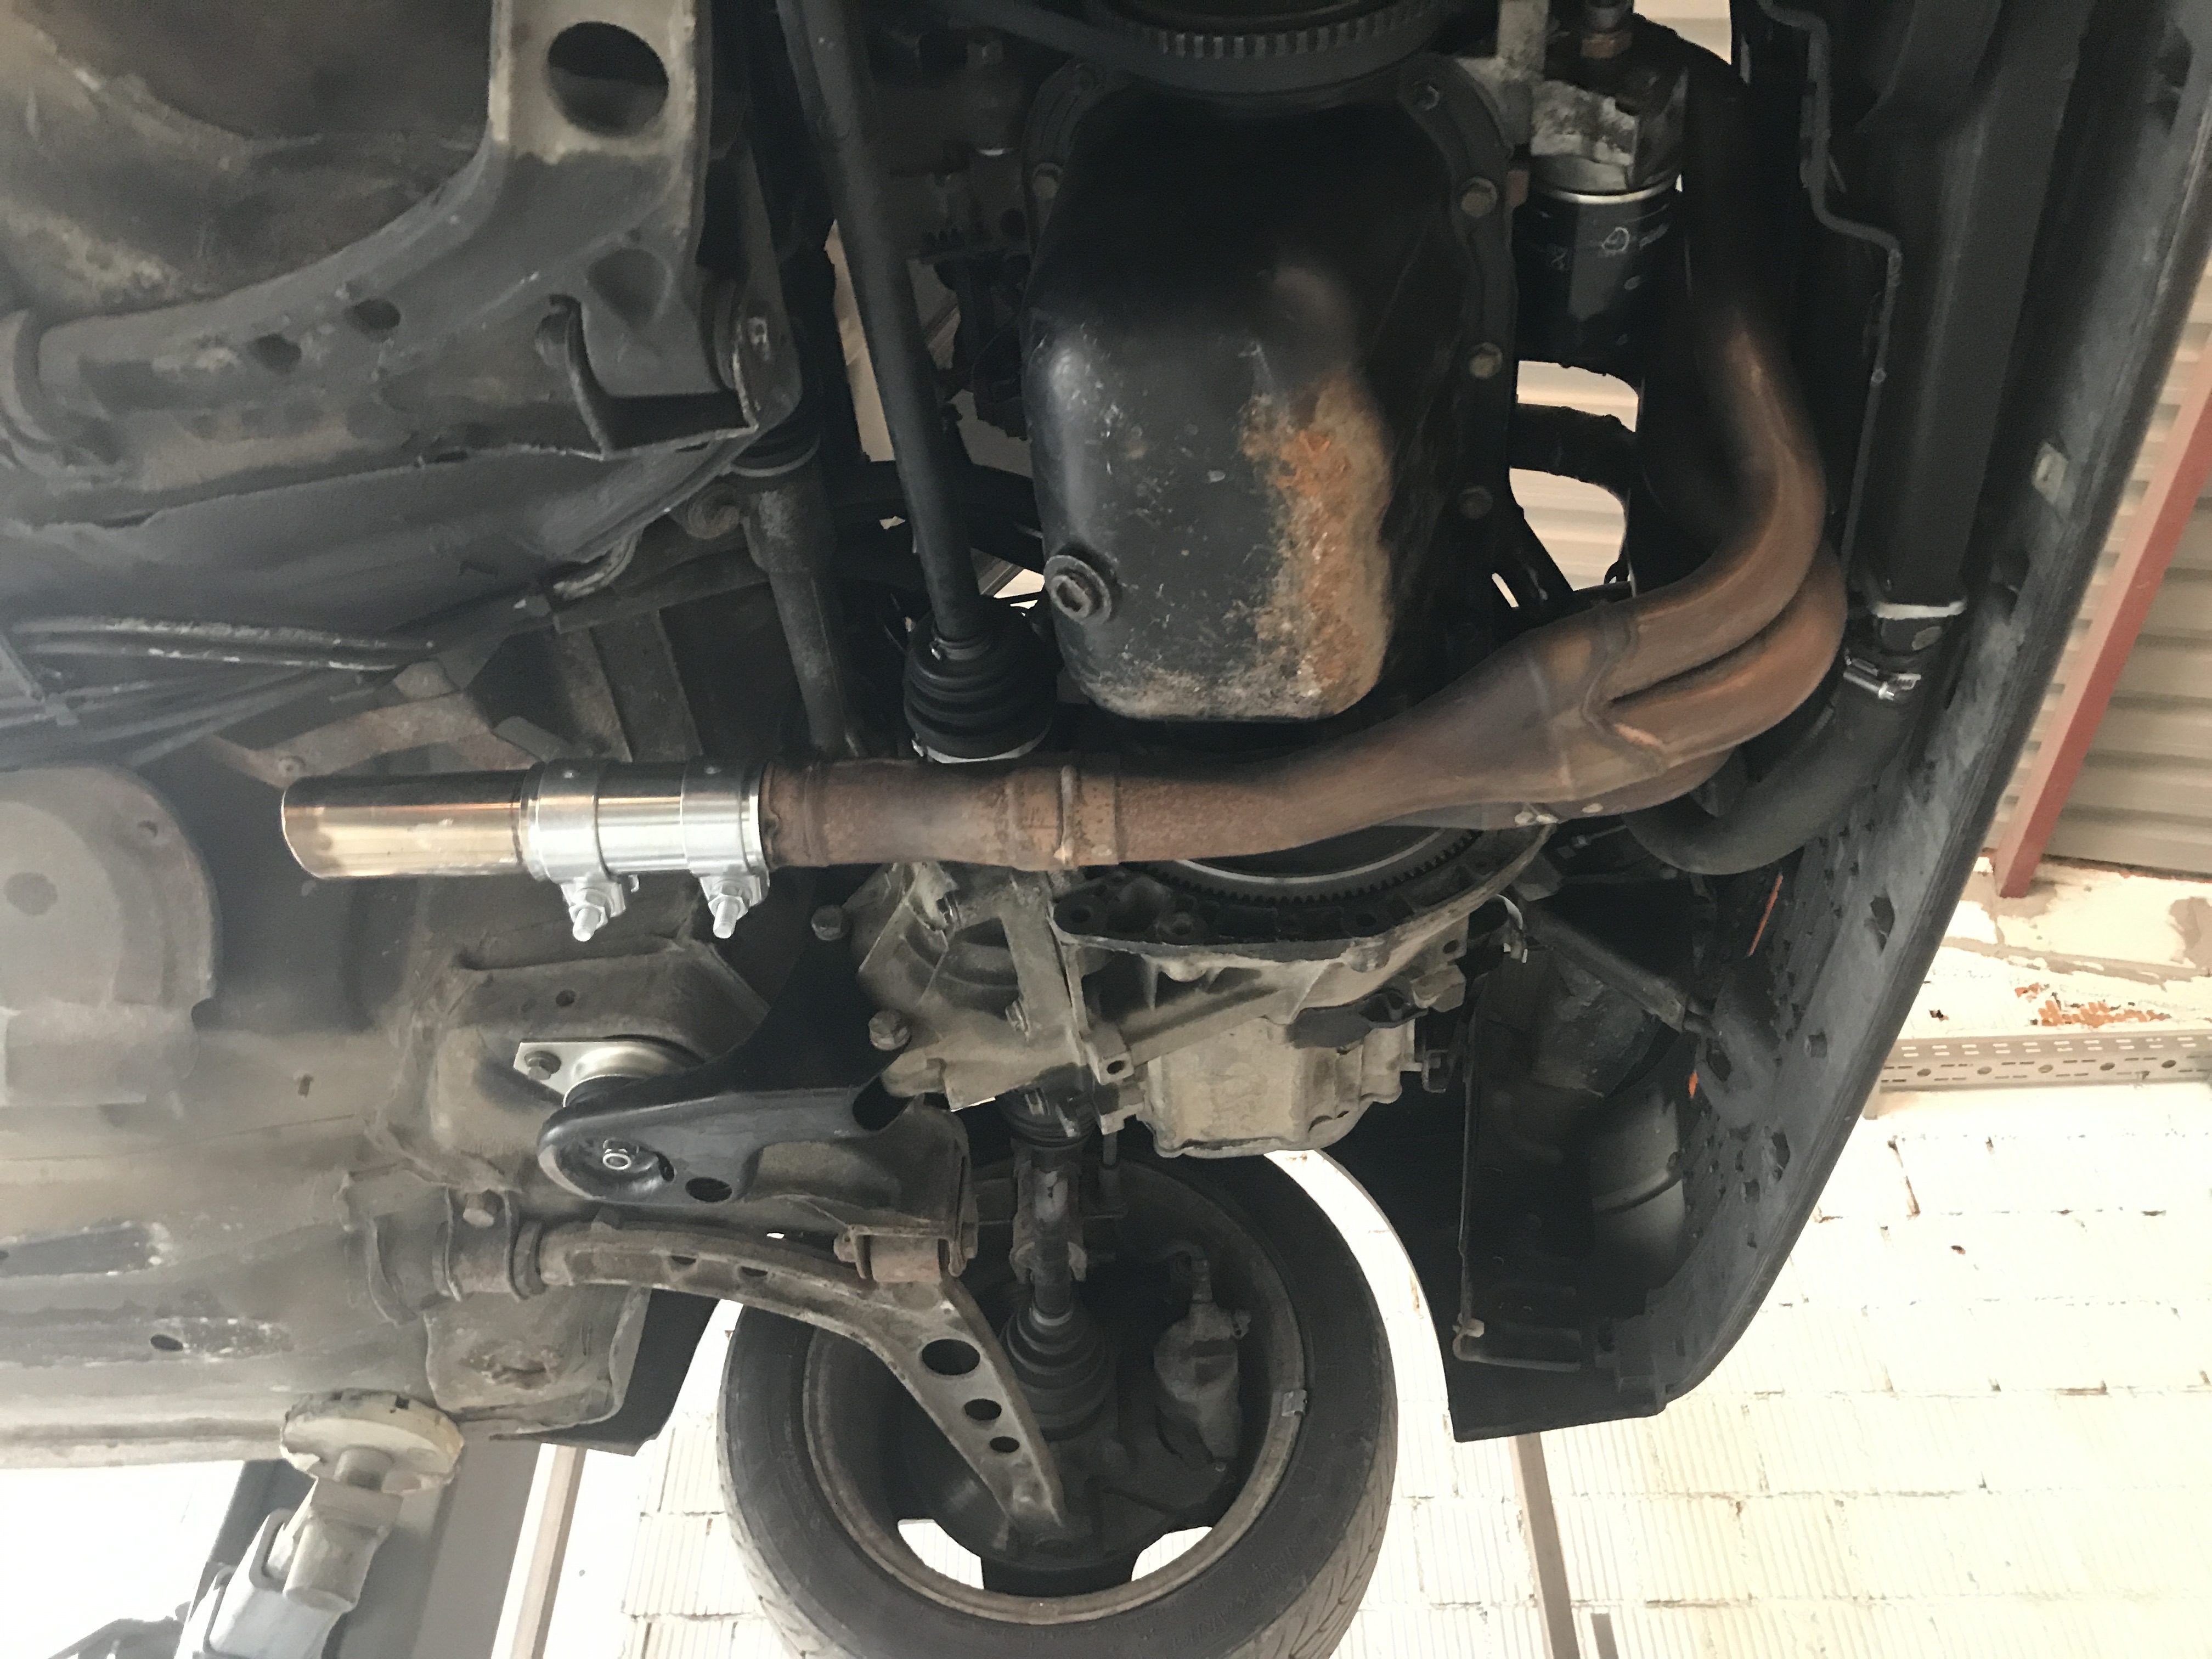
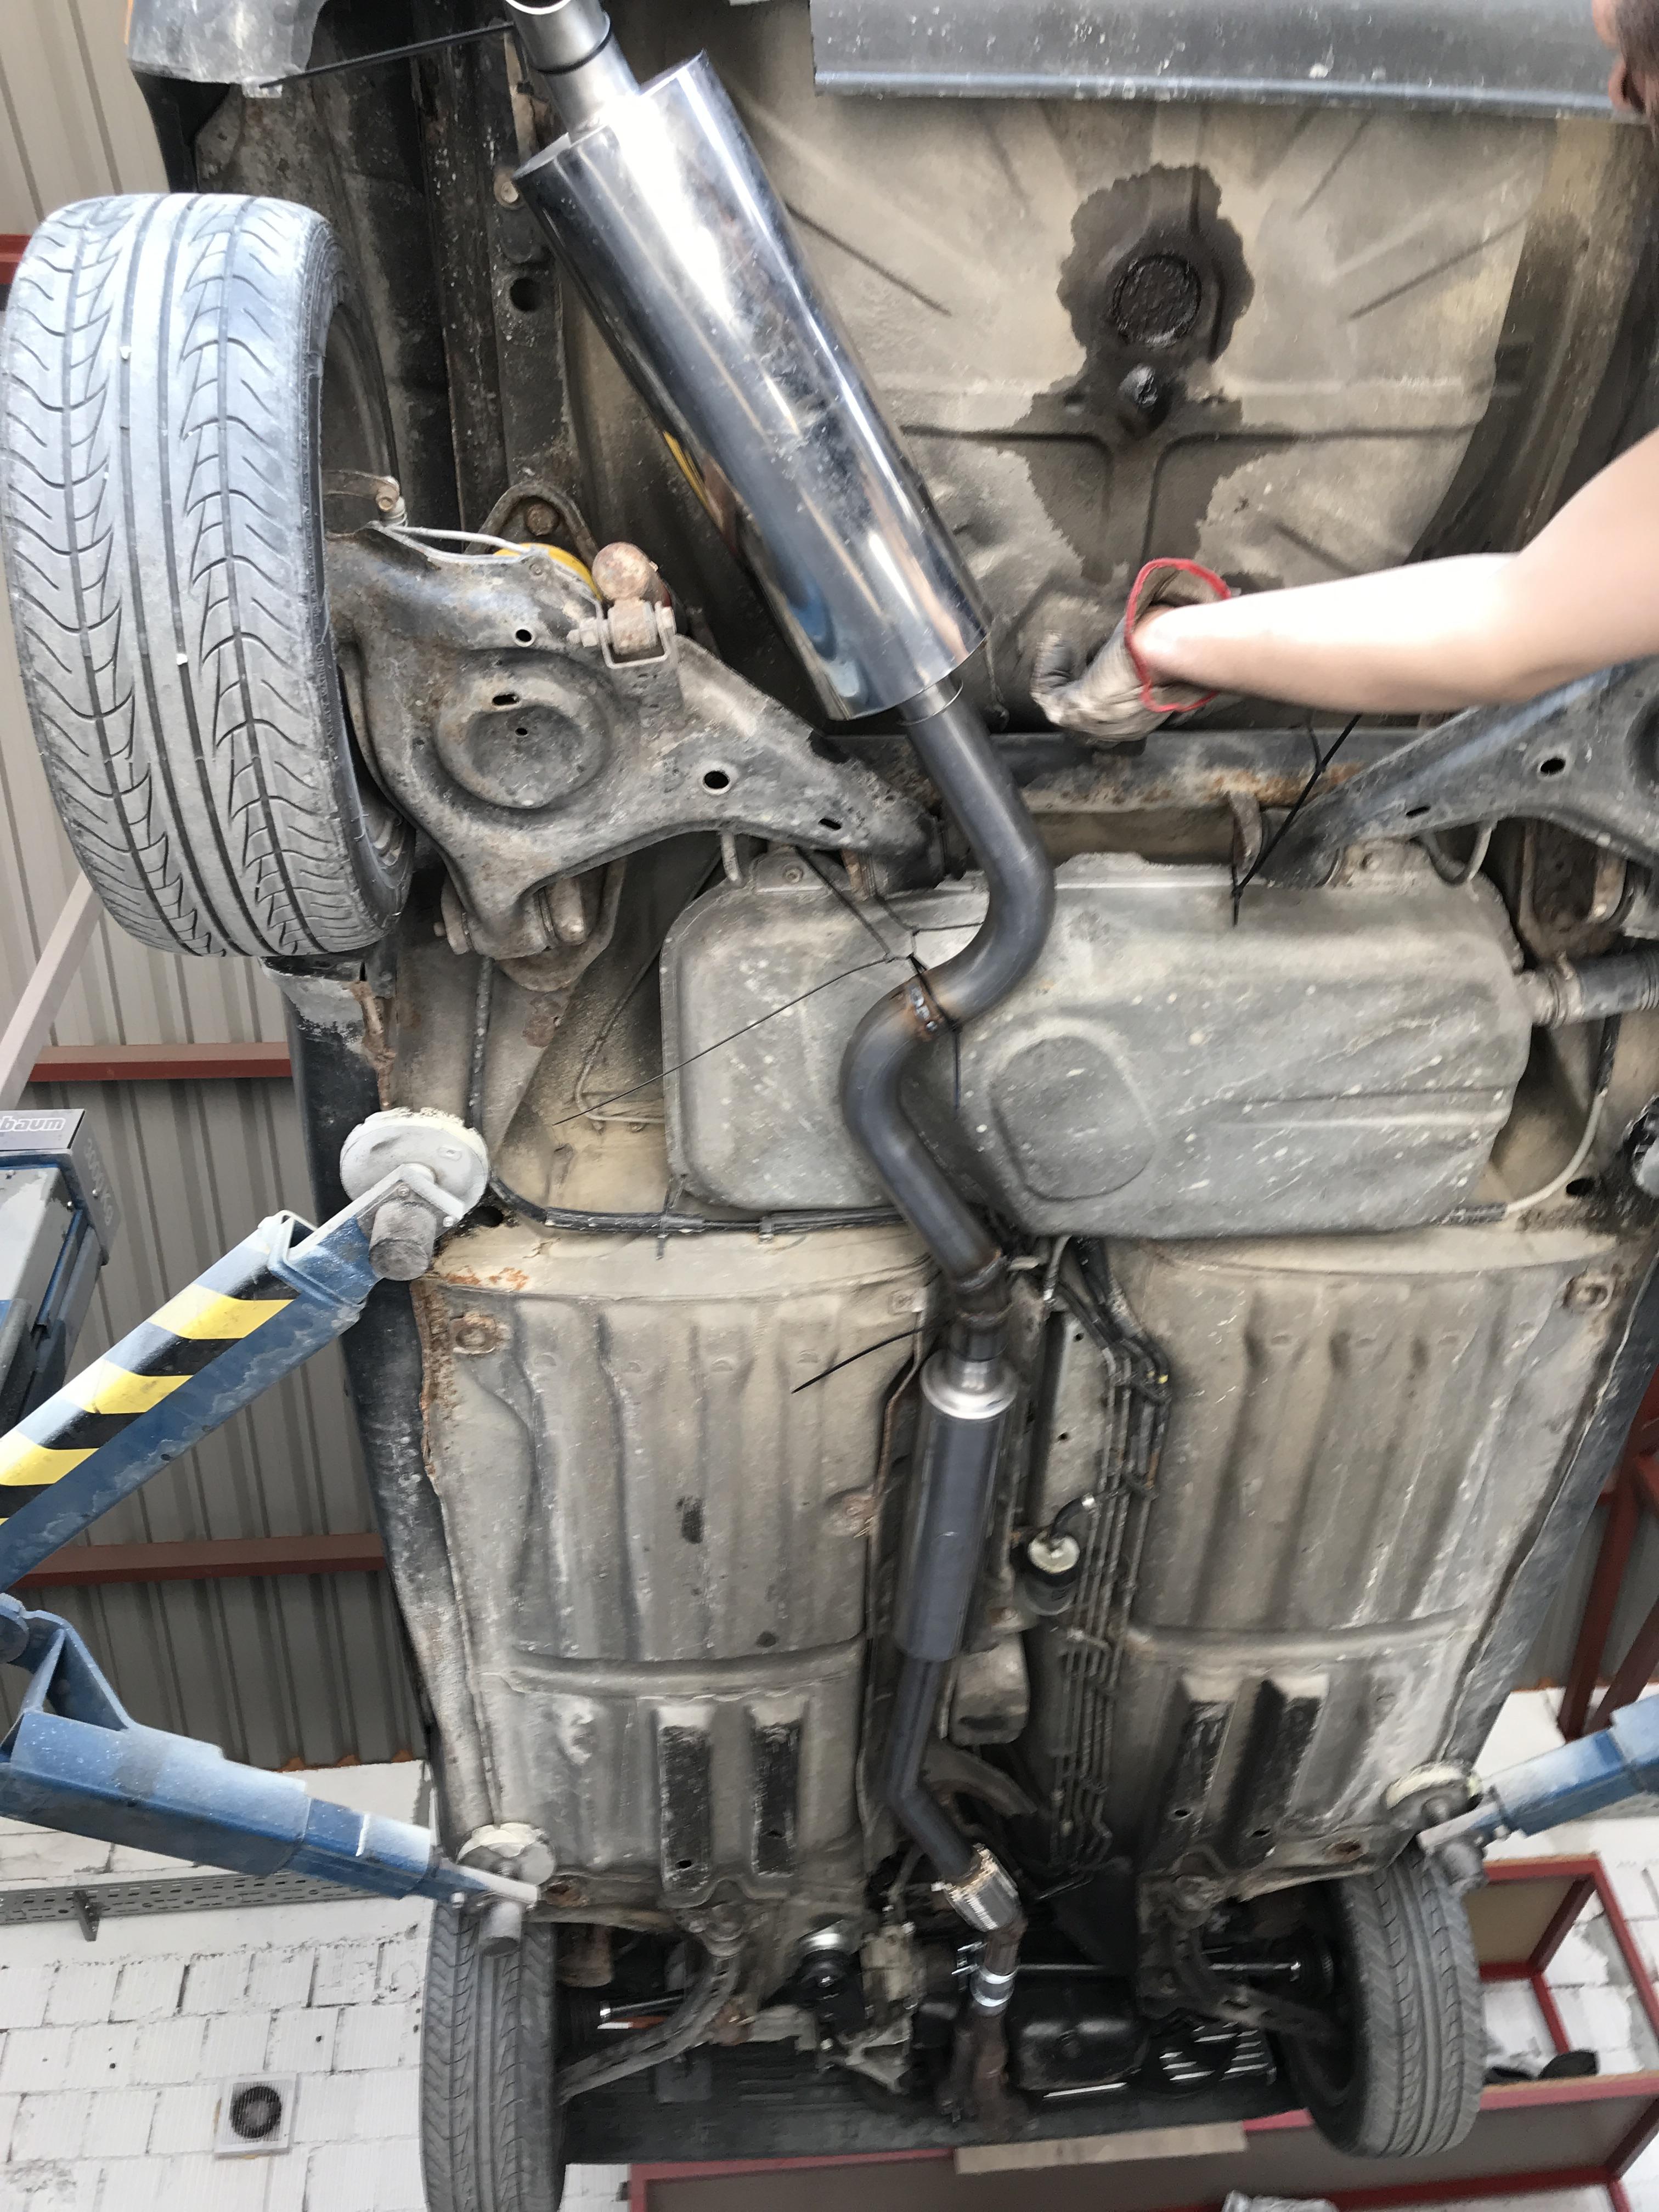
With engine installed and tested I needed to get the exhaust done for the car.
Made a few phone calls and nobody offered what I wanted so with a lot of luck and some amount of money I accidentally found 12 year old NOS lightweight muffler and resonator made by Vitomir Jankovec that is allegedly in some way associated with Akrapovič.
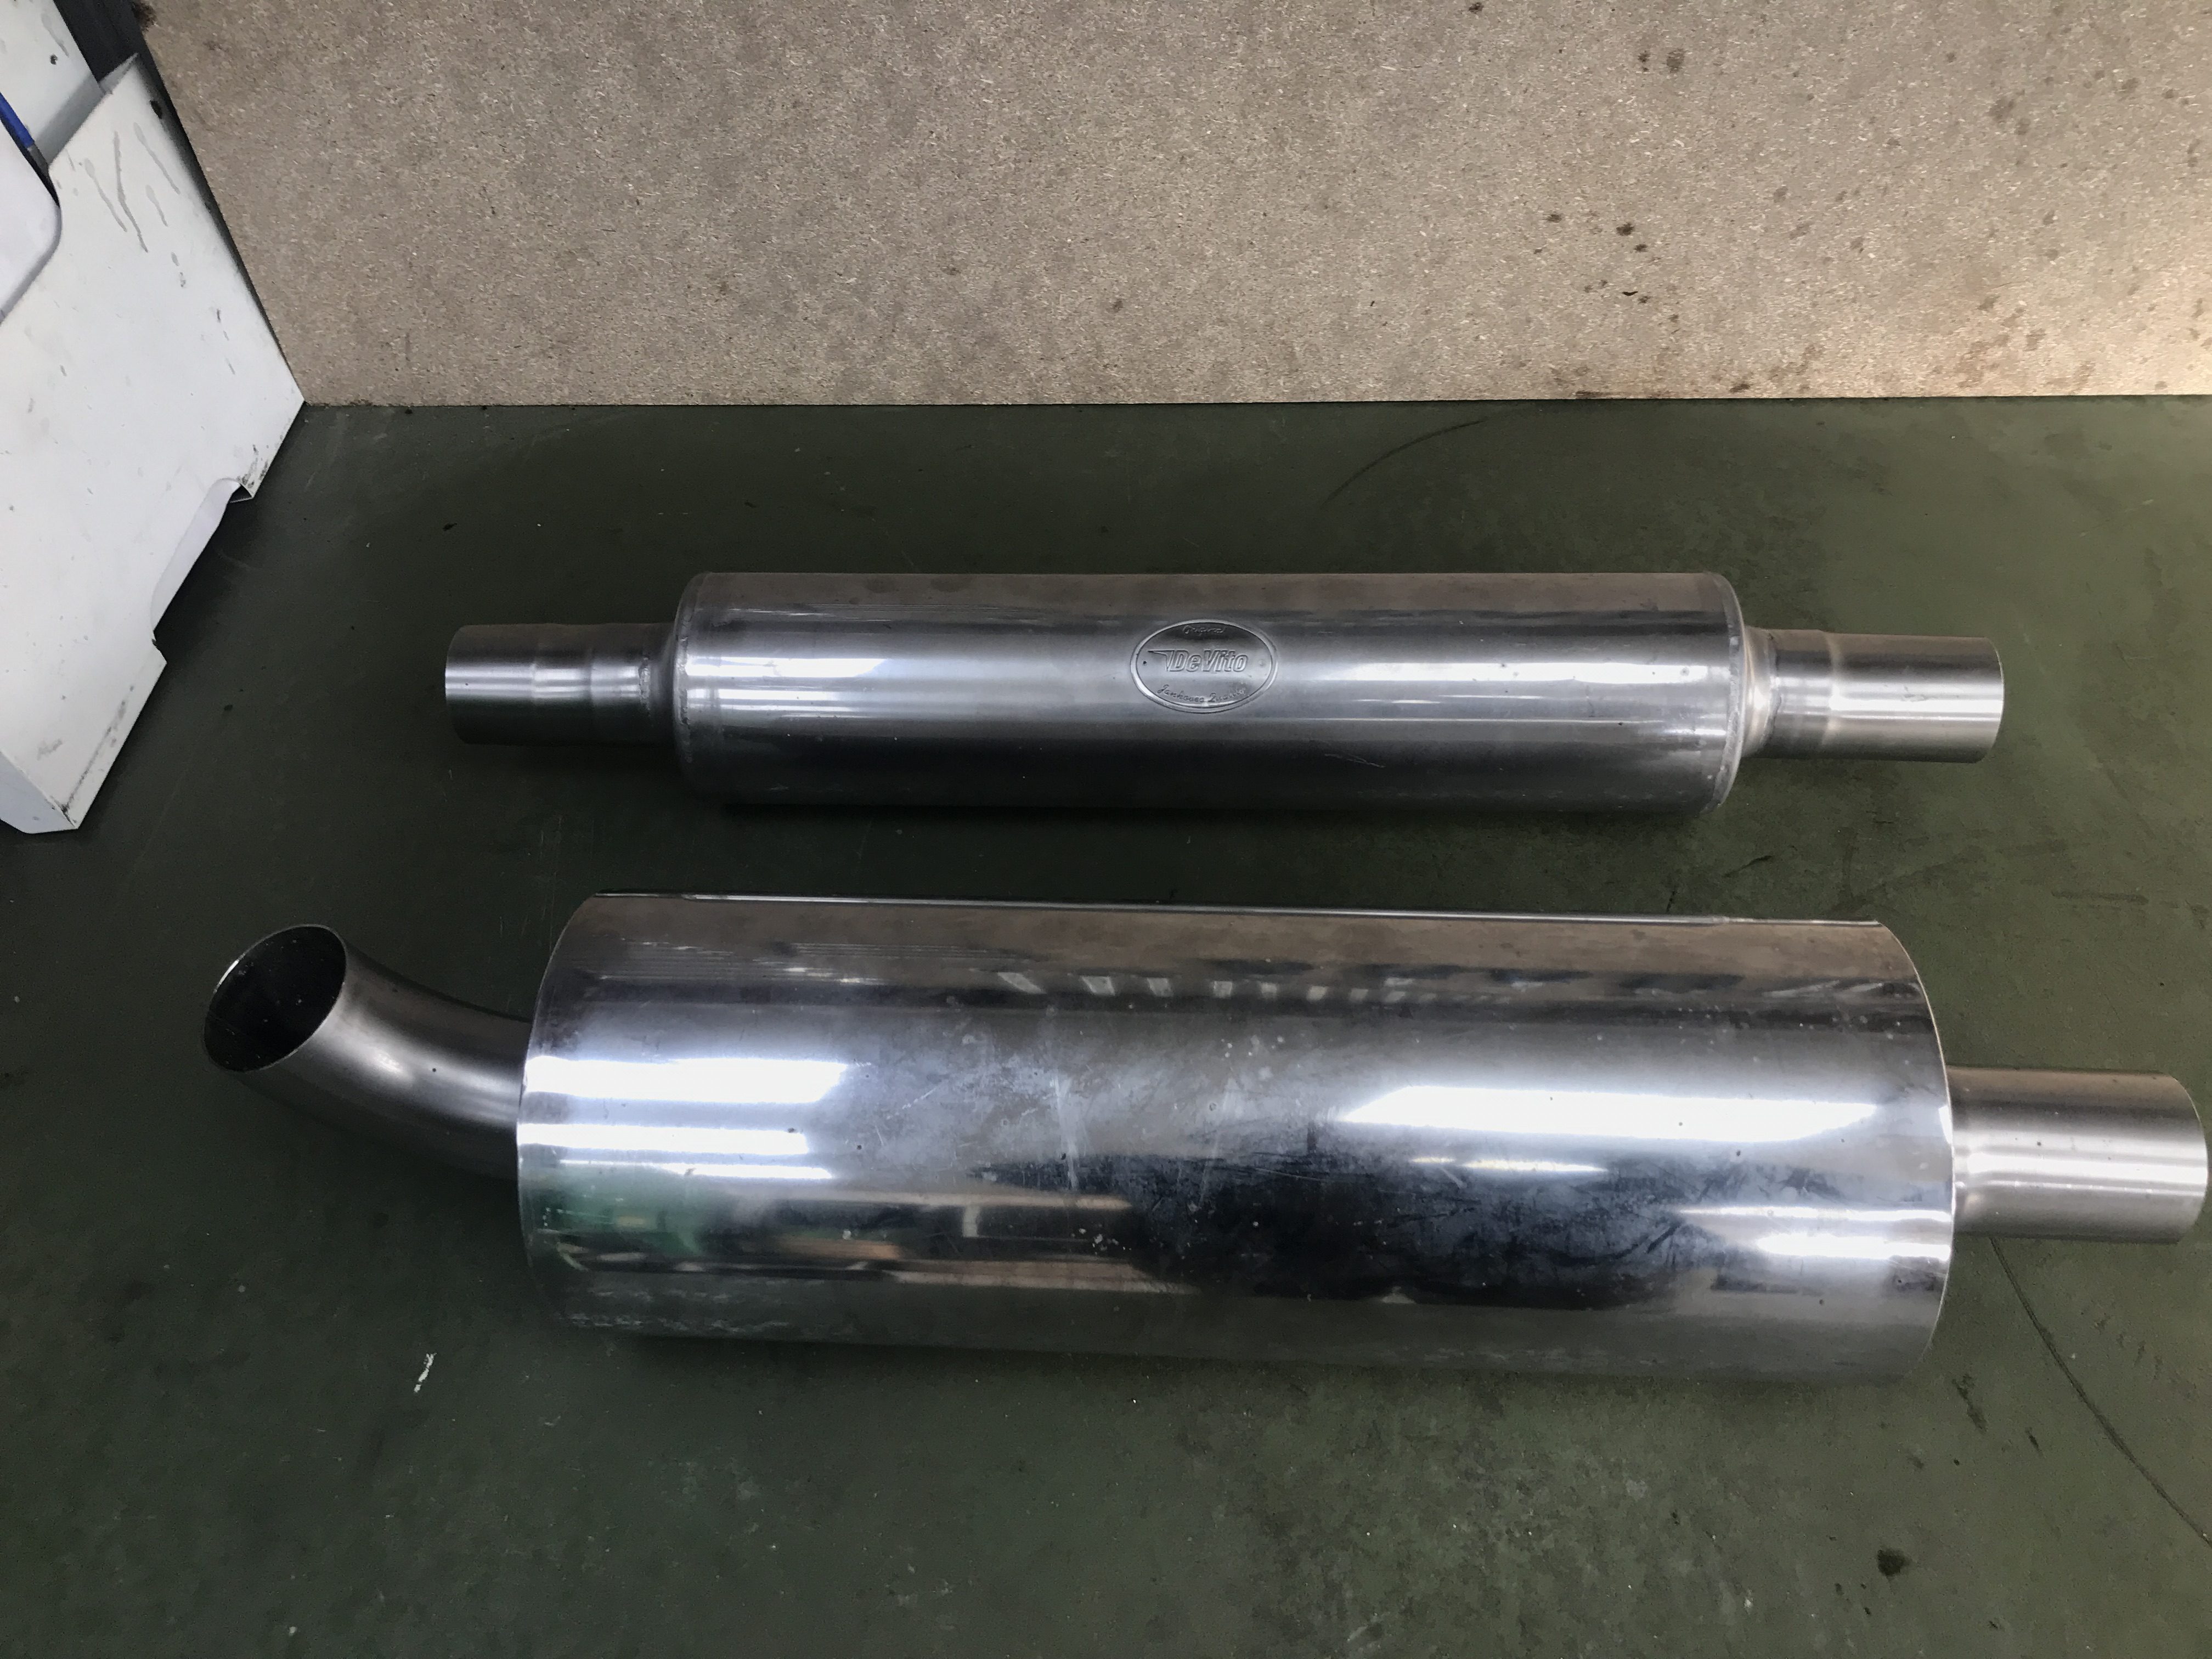
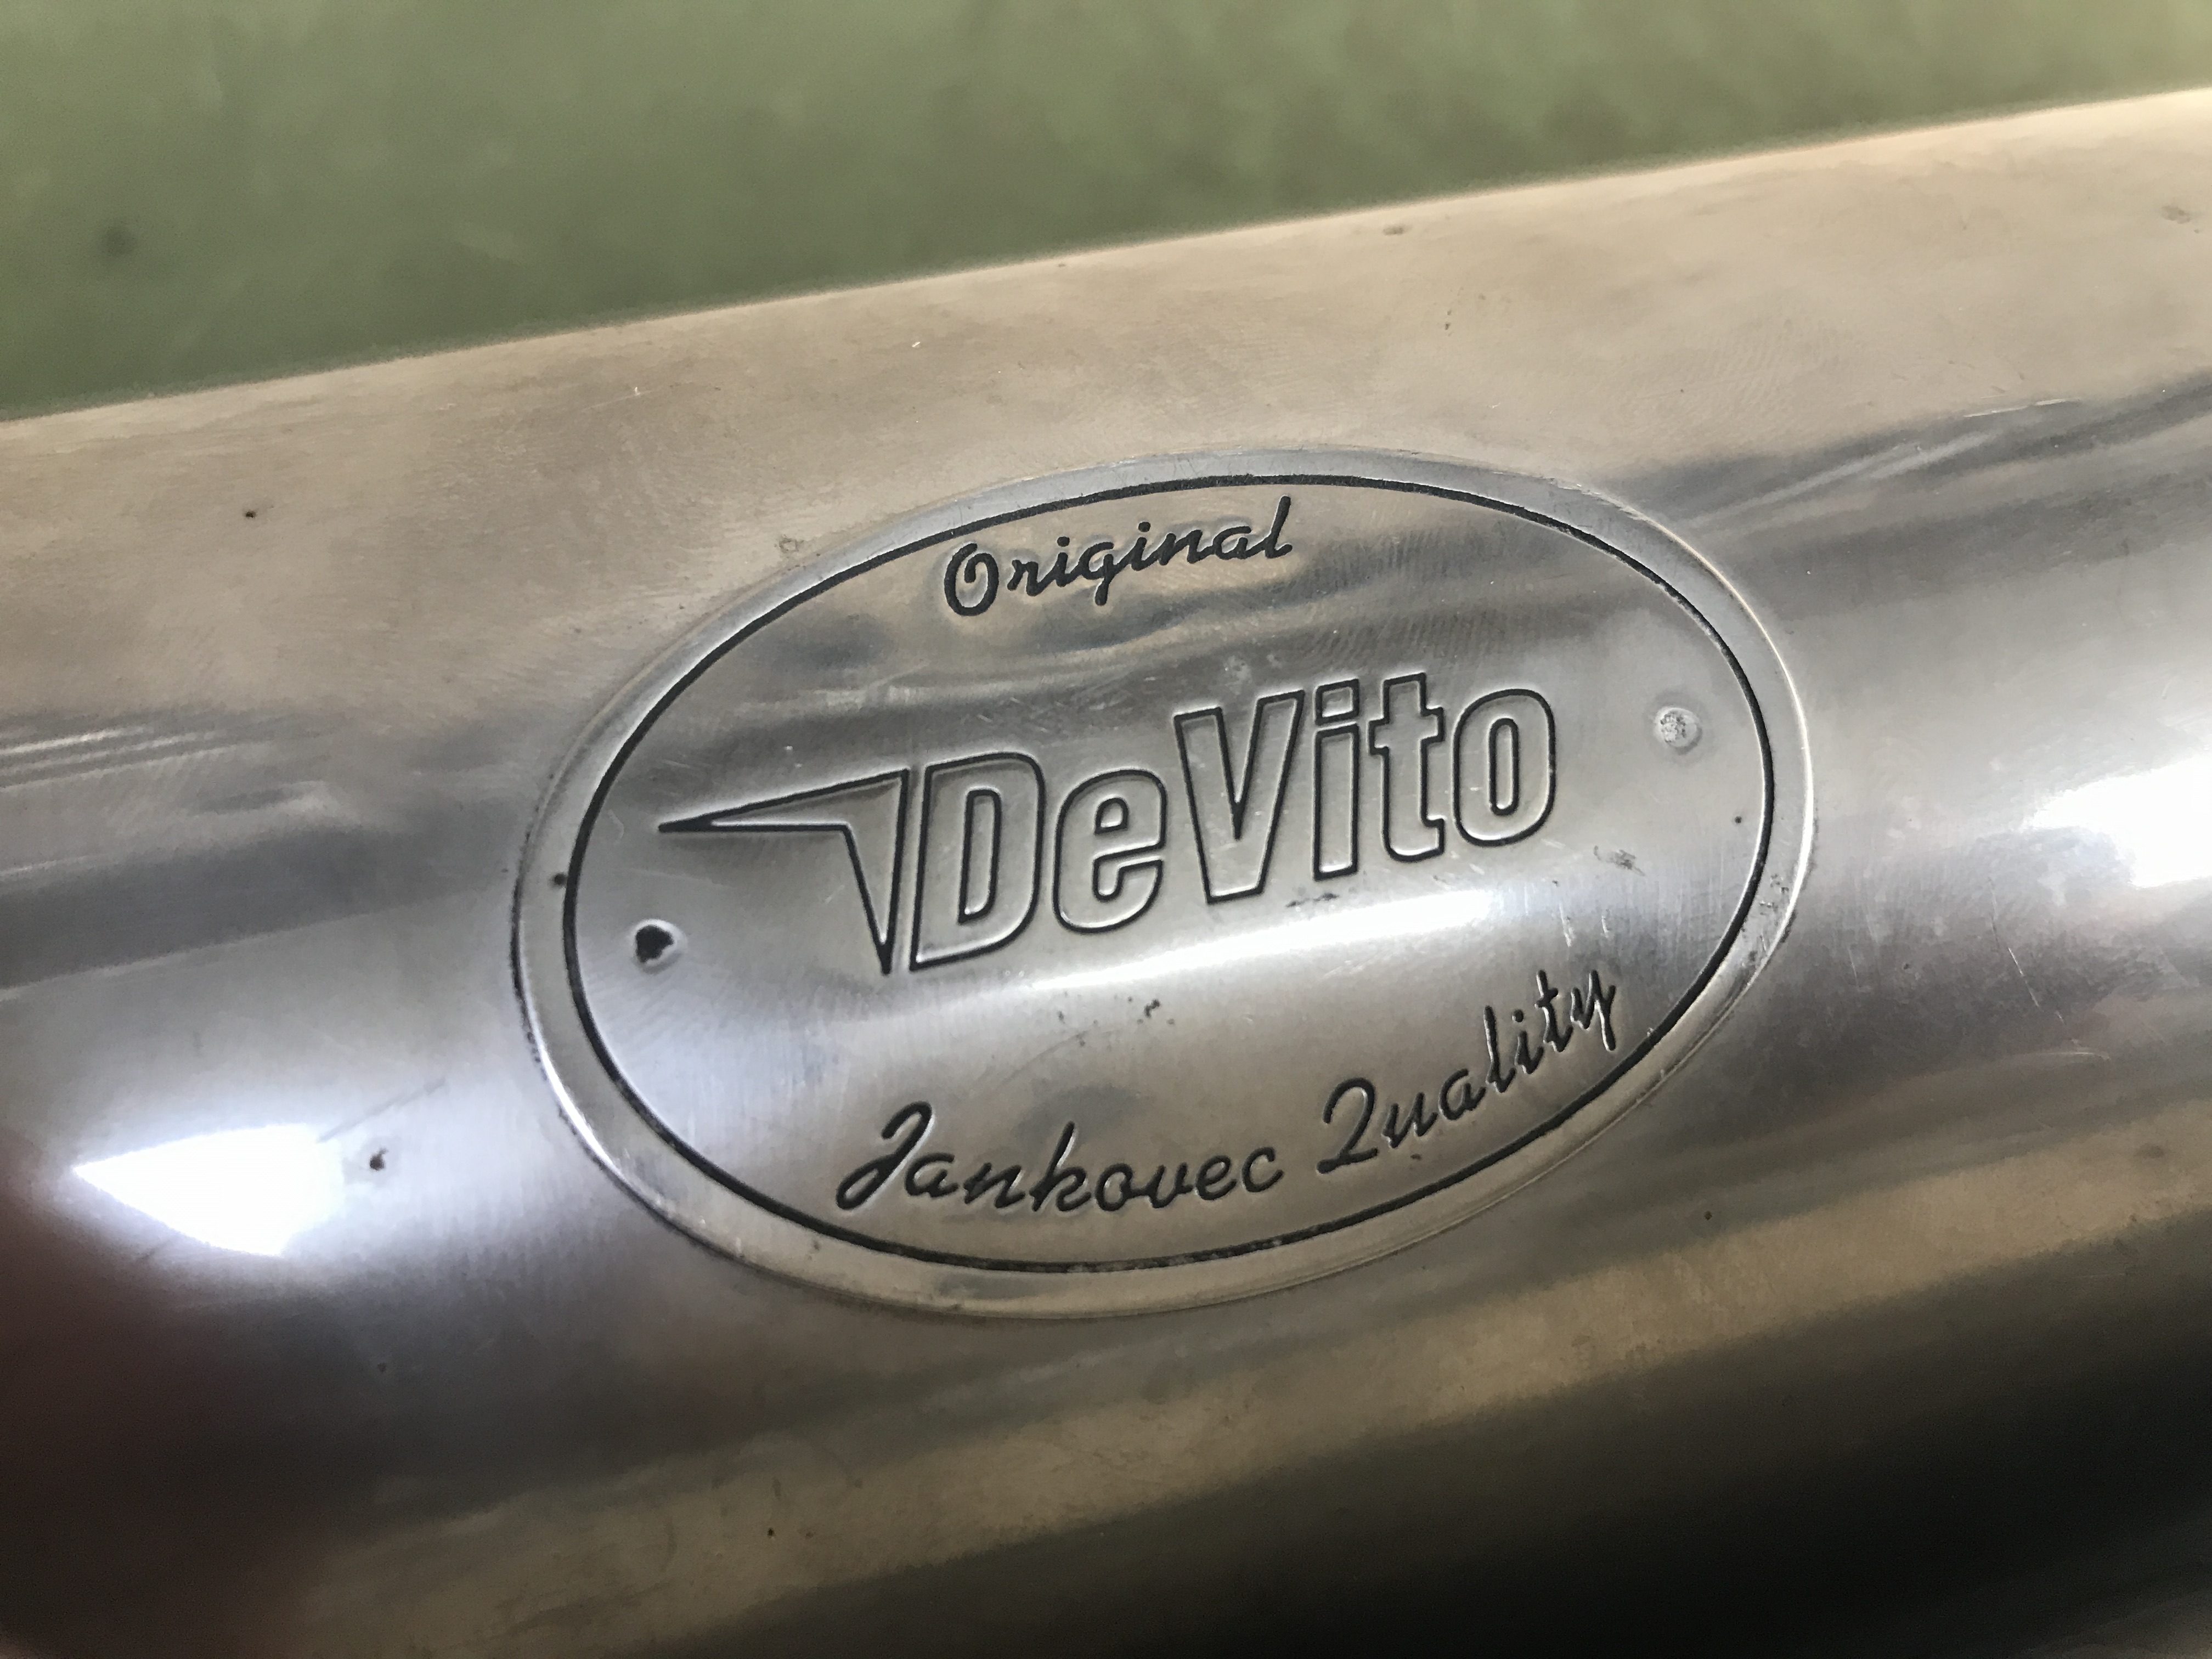
Both the muffler and resonator weigh 4.8Kg together and do a great job cancelling the noise while providing excellent flow, exactly as I wanted. I couldn't be happier with the exhaust and I'm really fortunate as the thing weighs less than some titanium stuff on the market.
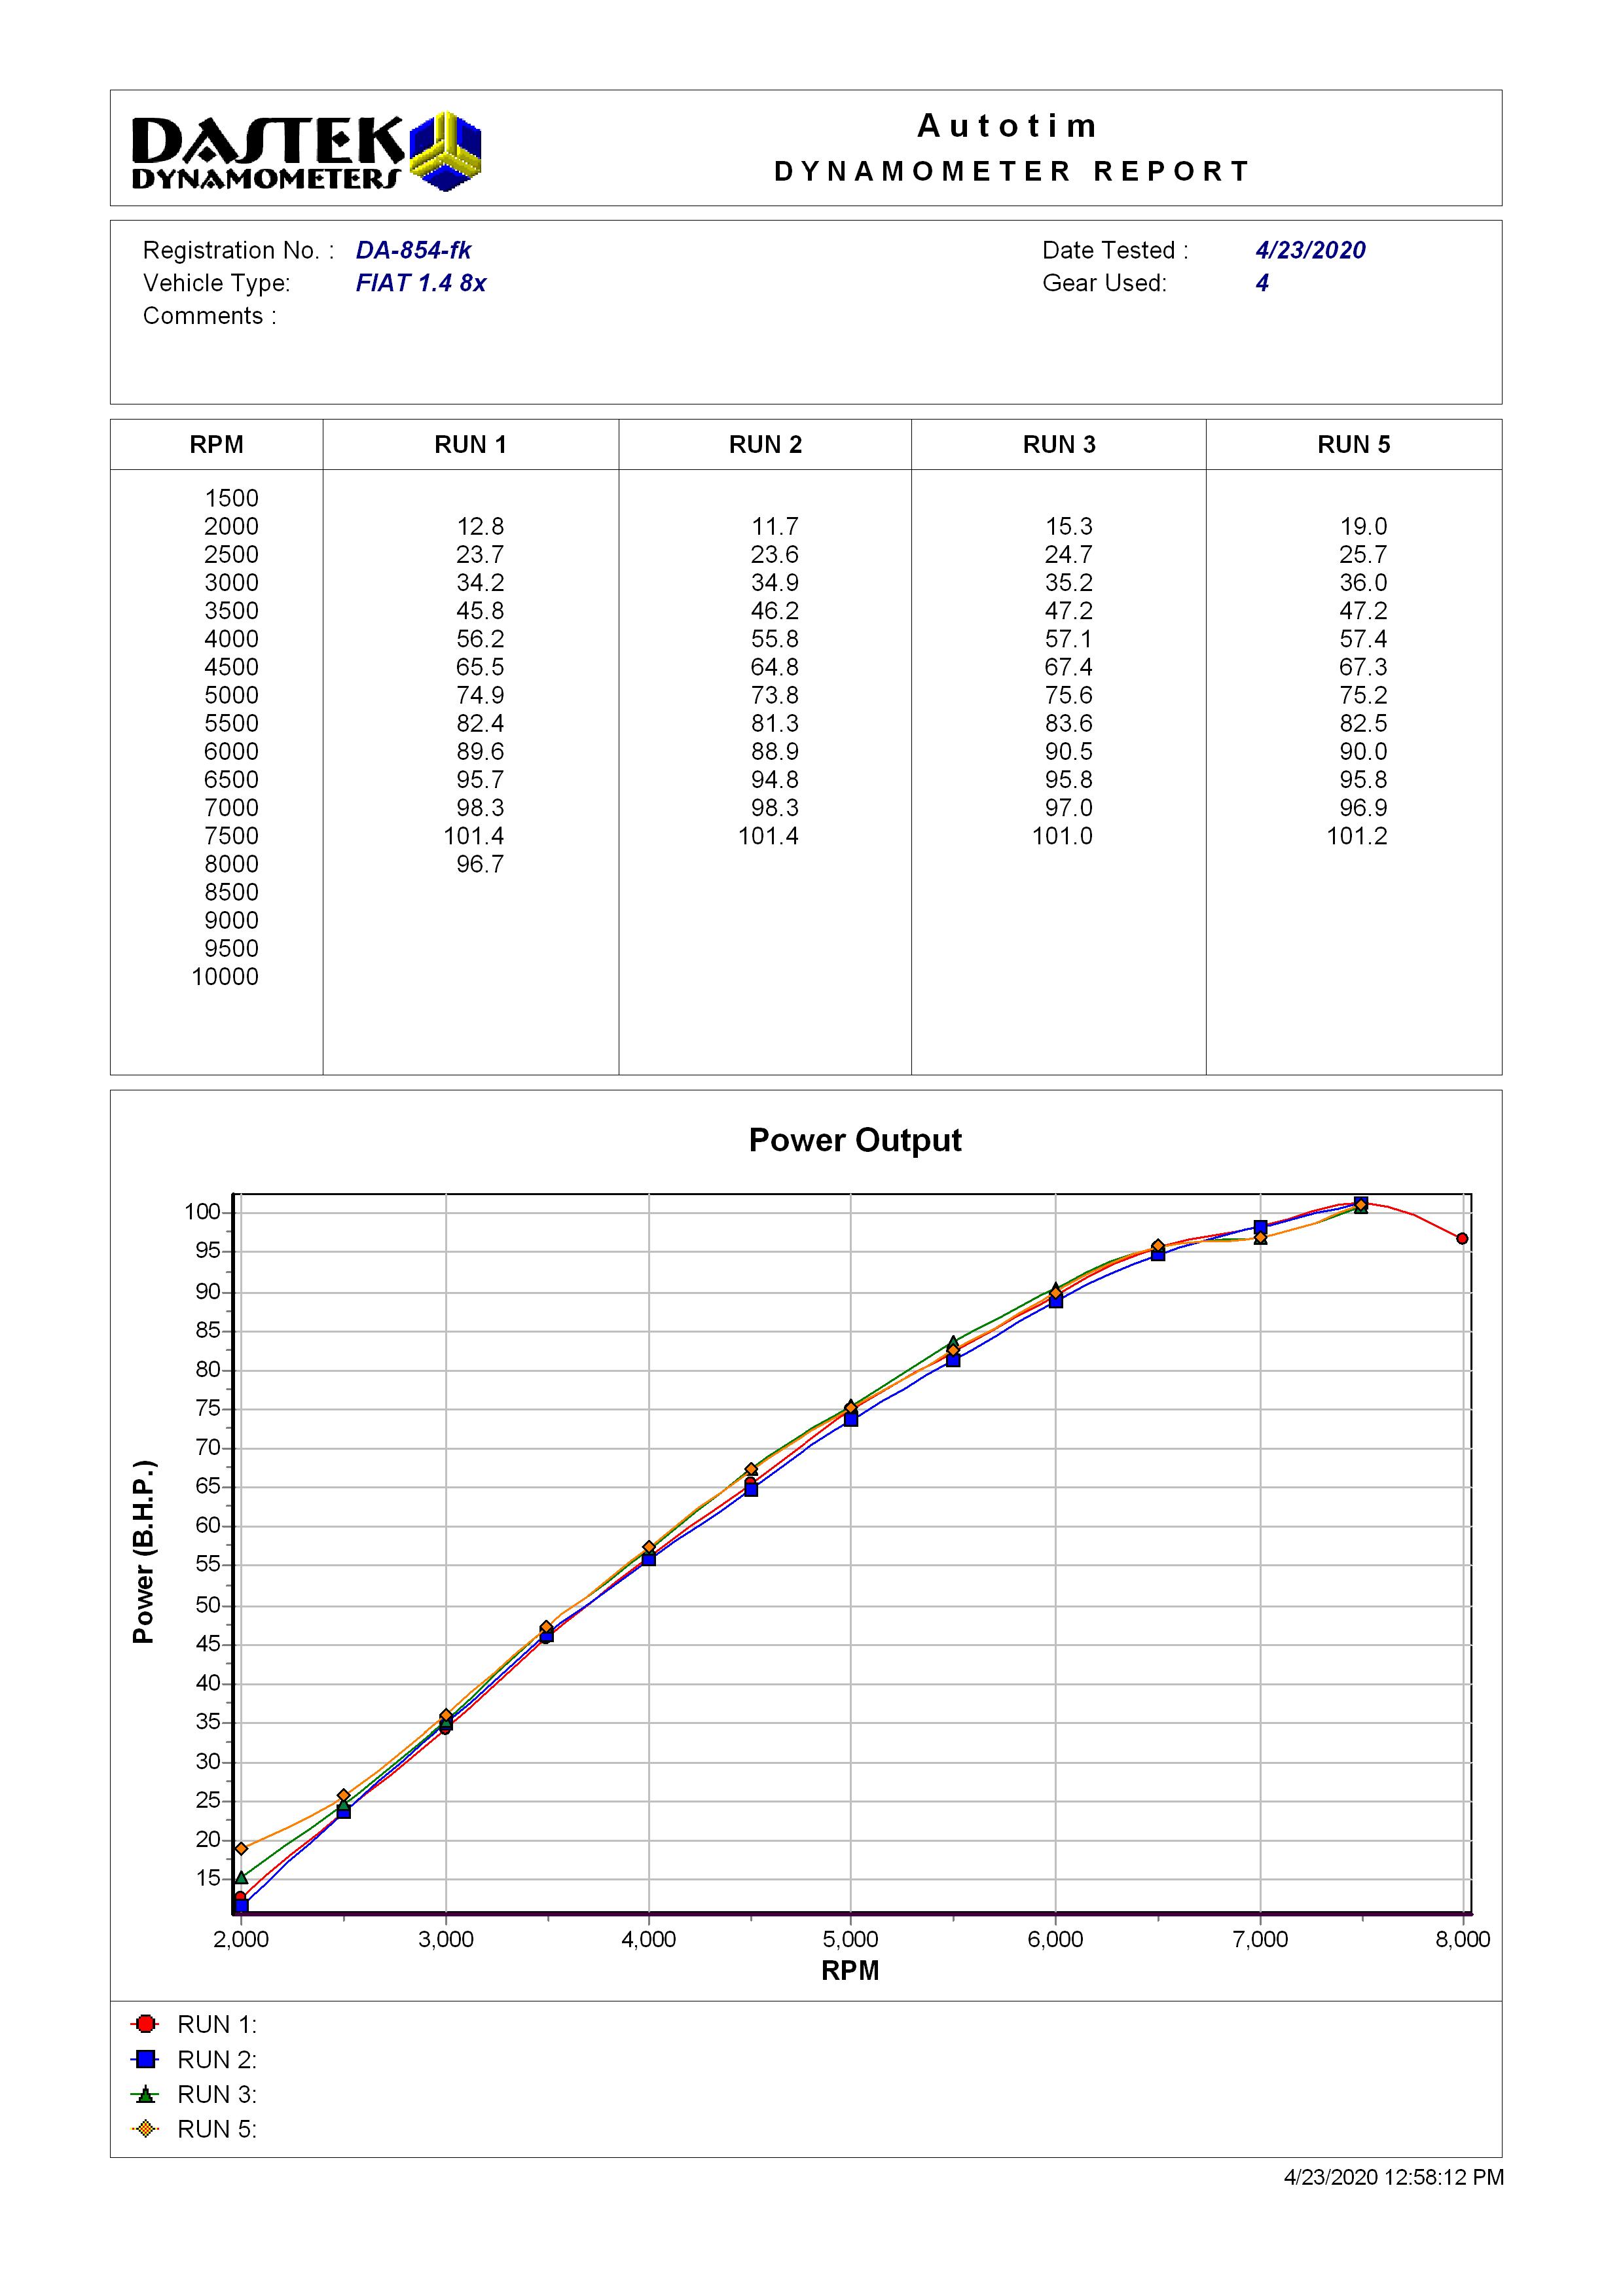
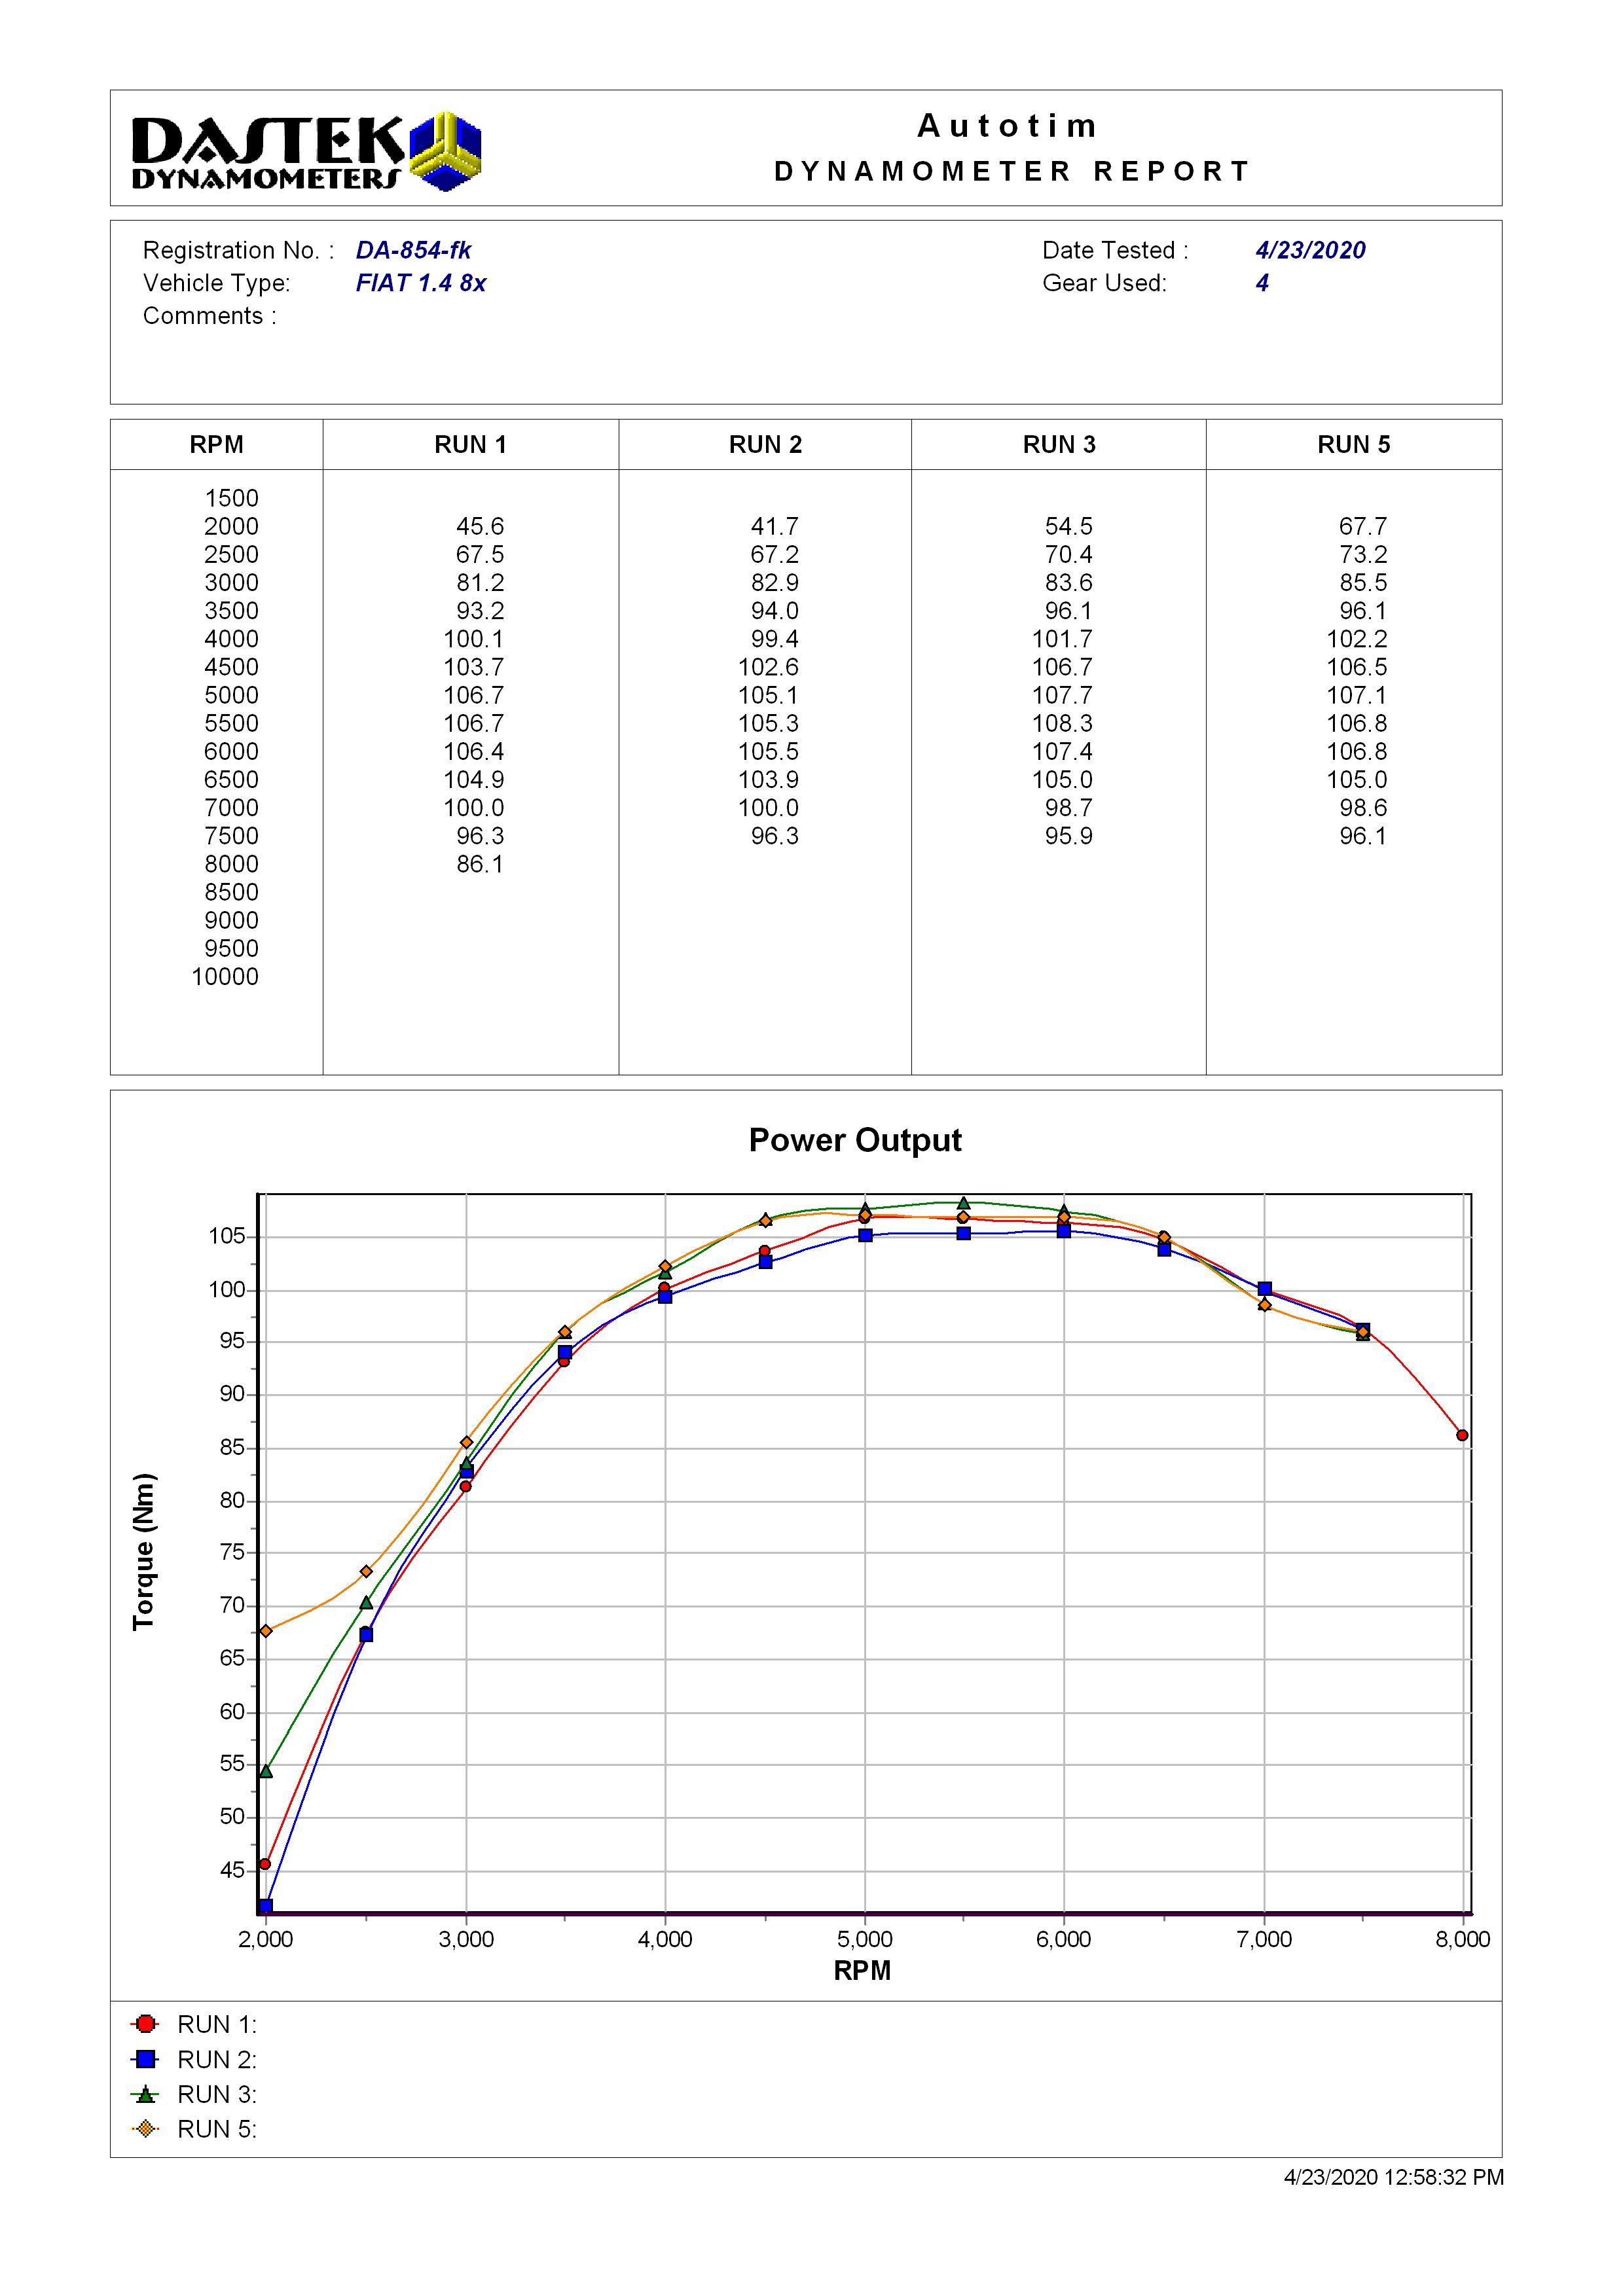
Car is currently running without a proper setup and will be set up and dynoed in near future.
I will try to log the build here and make updates when I can.
Stay strong and enjoy the photos!
Regards

As I moved to a capital of the Croatia, Zagreb I needed a smaller car for parking so I went Italian once again.
They are simple, parts anywhere for cheap etc.
First I bought the Cinquecento Sporting that previous owners used for autocrossing.
It was already uprated with a 75Hp engine from a Fiat Punto and had some poorly done mods to it, I decided to buy a Seicento for daily driving and use this for a project car.
Over the last 10 years I was mostly reading stuff and gathering information and never had a chance to do a project like this with my Japanese cars due to various reasons.
I always upgraded suspension and brakes on my cars so I wanted to go backwards with this car - everything is about engine building here.
Main purpose of the car was to make a hot street toy but it eventually progressed to a potential track day car that will probably see the track eventually.
My personal goals to be made:
1. Use almost no off the shelf parts
2. Adapt parts from other vehicles
3. Run Bike Carburetors
4. Make as much power as possible through the whole rev range and not emphasize on peak numbers
5. Use 8 valve engine to retain original look and simplicity
6. Use the biggest displacement engine from the same family
7. Cylinder head porting needed to be done by myself by hand
8. Achieve something in the range of 120-140 horsepower if possible
So first I bought 4-5 engines for parts and stock.
Grande Punto 1.4 8V engine purchased for the bottom end and few Punto 1.2 8V 75hp engines bought for the cylinder head and spares.
Those engines have bad bore/stroke relationship with 72mm bore and 84mm stroke with a lousy rod ratio and short rod in general so I didn't want to put any money whatsoever in modifying the bottom end before we test it in the car.
As the bottom end had 60000 kilometers we only put new rings in it and left the original bearing shells so I don't need to clearance it and everything ( and they were as good as new)
General idea was to use high compression pistons to achieve desired Compression Ratio, but due to block/head combo and bigger stroke we achieved something in range of 11.x :1 with standard pistons and I didn't want to go overboard with pump gas.
Decision was made to mate it to an older style cylinder head as the head design is much better and selection of cams for newer style head is virtually nonexistent.
After going through the FIA papers for the Panda Kit Rally car that used the same combination of block/head castings and following common sense, camshaft selection was determined as well as the port sizing/shape and valve sizing.
From that I resorted to valves that were commercially available - Grande Punto 1.4 8V valves that were bigger in size (I 33,5mm vs 31,5mm stock and E 28,1mm vs 27,5mm stock) and smaller in stem diameter (5mm vs 7mm stock) that made them noticeably lighter as well.
For this modification a custom set of valve guides needed to be made as well as new valve seats needed to be pressed in and machined at 3 angles for better flow.
I wanted to go larger on the intake valves but it's a far more custom job as it involves eccentric guides and custom valves so that will wait for a new cylinder head build sometimes in the future.
The cam selected and bought was CatCams steel billet 290° cam with 10,2mm lift and 105° LSA.
In the next stage I wanted to do a lighter valve train with shimless buckets and bought one Subaru STI lifter for testing purposes.
They can be made to work and we did everything to make them work but unfortunately I couldn't source the lifters at the time so I resorted to Grande Punto buckets that are again lighter than stock and work really well for cheap. (also far easier to set it up with shims but again heavier)
As we had custom valve guides to suit the valve/head combination the standard springs/retainers/collars didn't fit as well as the standard valve stems so with the whole parts bin we made a combination to suit with smaller/lighter but also softer valve springs that mostly aren't good for high RPM applications.
AFAIK some Nissan economy car engines used titanium retainers from factory, but I couldn't find them at the time so I didn't use that unfortunately.
Since the valve train was lighter as well I suspected the springs will sustain the RPM range of a "factory stroker" engine without any valve float. If I diagnose valve float problems at high RPM, I'll probably adapt some Honda B/K engine valve springs or something in Honda range that fits.
The head porting began and when I inspected the possible port work vs the ideal ports on paper, next step was finding the exhaust manifold to suit.
After googling some photos of motorcycle manifolds, I bought CBR1000RR standard manifold as it looked like it could be modified to fit.
Eventually manifold arrived from Germany and it matched almost perfectly with calculations of the sizes and lengths needed to make this engine breathe and scavenge well.
In the final stages of engine installation we just modified the primaries as I intended. Cooling system needed to be modified to fit the manifold in the car as the engine is really in the nose of the car but again we have a far superior and lighter item than something available commercially that is not some expensive works/motorsport stuff.
The next stage involved my internal battles. I always wanted to do an ITB engine with Standalone ECU but again I always wanted to do a bike carb conversion as well.
As I missed the days of simplicity with the carburetors and wanted to remove all the weight possible from the car, I opted to buy a set of Keihin CVK38 carbs from a ZX7R. I chose the size with midrange torque in mind and to keep the car streetable, CV carbs are the bomb.
As no off the shelf manifold exists we made it from scratch with mild steel as I didn't have access to other materials at the time.
Also, when You buy something used here in Balkans, it probably doesn't work. With that in mind we first installed the intake on the engine that was already in the car so we would be sure everything works before putting it on the expensive built engine. Only one slide of four worked so I had to rebuild the carburetors with new diaphragms and seals. That actually made me happy because I actually learned something new about CV carburetors and I was also positive that I have something that shouldn't be a nuisance in the future.
The heater system needed to be removed from the car to fit the intake and we also removed power assisted brakes so I don't have to pull vacuum out of the intake that would disturb the intake pulses in the combustion process.
To jet the bike carbs properly for car application some parts are needed that I'm still waiting from UK because of the whole situation in the world.
When parts for the jetting arrive, we will plug in the Innovate Wideband sensor and jet it on the road as well as going to a dyno to get the data.
For ignition I chose the Magneti Marelli distributor derived from a Fiat Uno, it works well for a baseline and it was the simplest thing to do at the time as I didn't like the idea using a standalone ECU that I had at the time just to control the ignition without fuel.
I will eventually fiddle with ECU powered ignition box since I can't get the timing curves ideal and I'm probably loosing about 20% of potential power on the timing alone.
During the installation most of consumables we installed new and after a few test runs it was obvious that the stock engine mounts wouldn't handle the engine so I bought Strongflex Polyurethane engine mounts.
Also we had to make some small modifications on the engine block and auxiliary equipment to make sure it fits and works properly.
I got the Vernier pulley made so we can degree the cam properly.
With engine installed and tested I needed to get the exhaust done for the car.
Made a few phone calls and nobody offered what I wanted so with a lot of luck and some amount of money I accidentally found 12 year old NOS lightweight muffler and resonator made by Vitomir Jankovec that is allegedly in some way associated with Akrapovič.
Both the muffler and resonator weigh 4.8Kg together and do a great job cancelling the noise while providing excellent flow, exactly as I wanted. I couldn't be happier with the exhaust and I'm really fortunate as the thing weighs less than some titanium stuff on the market.
Car is currently running without a proper setup and will be set up and dynoed in near future.
I will try to log the build here and make updates when I can.
Stay strong and enjoy the photos!
Regards
")
 very nice to see them here!