SPIKING PEDALS FIX: Clean your Logitech G25/G27 Pedal Pontentiometers

  • Thread starter iNs3CuRe
  • 106 comments
  • 198,607 views
2,951
Poland
Manchester | UK
OnoMaToPeja_
PS3>360.GOT.IT?
banner.jpg


Welcome to my tutorial showing how to clean your Logitech G25/G27 Pontentiometers!
Lets get straight to the subject!
I ADVISE YOU TO READ THE WHOLE GUIDE BEFORE YOU DO ANYTHING!
YOU ARE DOING THIS FIX AT YOUR OWN RISK


Video version:
*Now with a HD step by step tutorial!


Text version:
★ Getting your pedals out of the casing

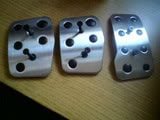
1. Using the 2.5mm Allen wrench (Hex key), unscrew the 6 screws that hold the pedal covers.

DSC01787.jpg


2. Now flip your pedals over , and remove all the 14 screws using a Philips screw driver.
Bare in mind there are 2 hidden ones under the carpet flap.


3. Now flip your pedals over once again, and remove the top cover.
After that using the Philips screwdriver, remove the 2 screws that are holding
the cable in the casing. After that put the top cover aside.


4. Now what you want to do is flip the assembly over so that its sitting on the pedals,
and remove all the 12 screws using the Philips screwdriver.


5. Now what you are left with are the pedal units. They are factory labelled A, B and C.
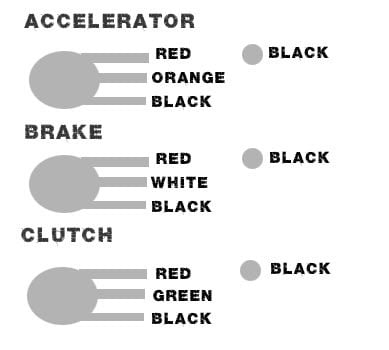
Before you unplug the cables from the pedals, label them first.
So that you know which one is which when your putting it back together.

I made a little diagram if you accidentally forgot to label the cables.
PEDALDIAGRAM.jpg


★ Cleaning the Pontentiometers

First of all let me say that you want to be very carefull when you are dealing with the pontentiometers.

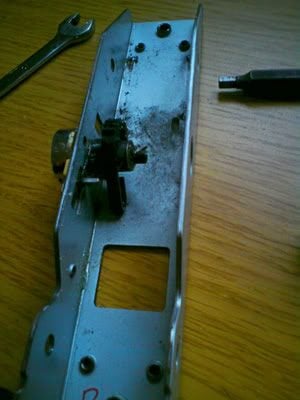
1. Take the pedal that that you want to clean the pontentiometer in, and using a 10mm Flat wrench and a Allen wrench (Hex key)
(can't remember what size sorry :( ). Undo the 2 bolts that are holding the pedal in its housing.

DSC01807.jpg


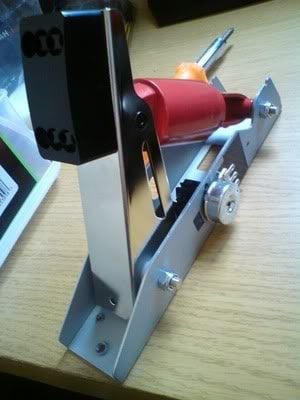
2. After that what you should be left with, is just the pedal housing.

DSC01553.jpg


3. Using a cloth, clean the housing from the dust. After that we get to the point where it gets a bit harder.
Using a flat screw driver you want to bend the silver flap that holds the pontentiometer in place.

Untitled-4.jpg


4. After you bend the silver flap, you want to carefully take everything off the bolt. Remember in what order the parts go on. When you get to the spring, you want to remember how it sits there, so that you know how to put it back on. When you get to the bolt nut, unscrew it.

DSC01560.jpg


5. When you took all of that off, you want to take the pontentiometer off the housing.

DSC01561.jpg


6. Now carefully using a flat head screwdriver, you want to bend the 4 silver flaps that are holding the pontentiometer cover in place.
Do it slowly and carefully, because the last thing that you want to do is brake them.

DSC01569.jpg


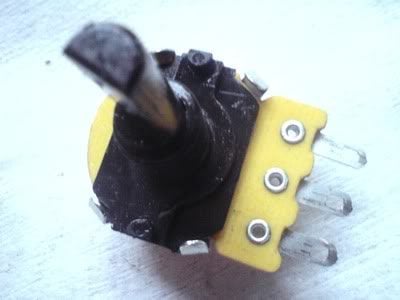
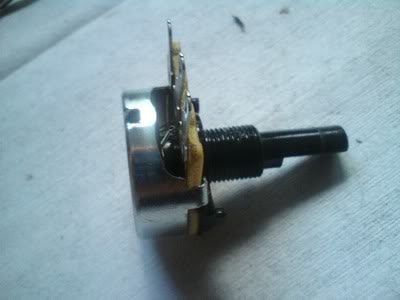
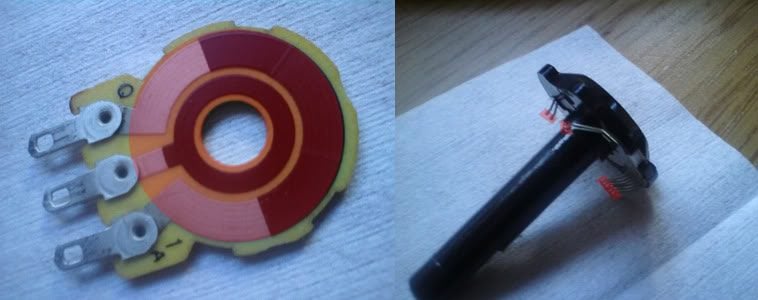
7. Now take a good luck at the assembly of the pontentiometer because you want to know how to put it back later.
After you take the pontentiometer apart you should have 4 seperate parts.
The ones below, plus the silver housing that I dont have a picture off.


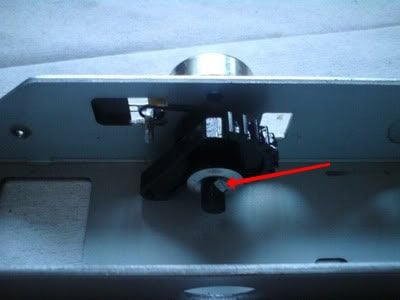
8. Now using some kind of degreaser/cleaner what you want to do is clean the parts that I have selected in red.
You should see be able to see black stain on the cleaning cloth that you are using.
(Area that needle moves on, and the tip of the needles that touch the surface)
Untitled-5.jpg


9. After you have done that, you can now put the pontentiometer back together. Remember to carefully
bend back the silver flaps that hold the pontentiometer together.

DSC01569.jpg


10. After that, put the pontentiometer back in the casing, tight the nut back to the bolt. Put the rest of the parts back and check if it's working fine by moving the part that is connected to the pedal and seeing if the needle in the pontentiometer moves at the same time. Then put the pedal back in the casing, remember to aline the teeth that move the pontentiometer. Tight everything back together by reading the guide backwards.

The end, if you have done everything correctly your pedals shouldn't spike anymore! Thank you for reading and I hope I have helped, plus can I just add that English is not my first language and something might not make sense :(

Any feedback very appreciated. 👍


Last edited:
in order to clean the potentiometers you do not have to go this far.
you just need to get access to the pots ( do not remove or open them up.
you will need a can of spray contact cleaner ( it comes with a plastic tube ).
spray a small amount inside the pot through the case opening.
then rotate the pots several times by working the pedal up and down.
problem solved.
note - the contact cleaner can be purchased at any electronics supply store or repair shop.
 
Thank you so much. This has been such an annoying problem with my G25.
Glad I could help mate ;)
Does that mean it'll fix the throttle sticking a bit on idle?
Yes.
Powell, try cleaning it, if you can't then you need a new pot.
Cleaning should fix it, if not new pots on ebay for about 4 quid each.
in order to clean the potentiometers you do not have to go this far.
you just need to get access to the pots ( do not remove or open them up.
you will need a can of spray contact cleaner ( it comes with a plastic tube ).
spray a small amount inside the pot through the case opening.
then rotate the pots several times by working the pedal up and down.
problem solved.
note - the contact cleaner can be purchased at any electronics supply store or repair shop.

^ This will only work as a temporarly fix, for some people it will work for a week for others maybe three weeks. If you want to do it properly and remove the problem for a long time then you are going to have to clean in manually.
 
Easier way to clean your potentiometers, get a can of electronic cleaner and spray all the hell out of the pot. This fixed my spiking :sly:
 
Easier way to clean your potentiometers, get a can of electronic cleaner and spray all the hell out of the pot. This fixed my spiking :sly:
^This works to but only for a certain time, you might see that after a month the problem will come back :P
Hi! Your walk-through made my day, no more spiking; yay!!

Thanks a lot :D
No problem, glad I helped 👍 :D
Just did this, the whole cotton bud turned black after cleaning em.

hehe :D
 
It looks like a complex and delicate procedure that I think not everyone can do, but it still is very thorough and helpful guide, kudos 👍.

PS: The only spelling mistake I've seen so far is the word "aline". I think you mean align ;)
 
It looks like a complex and delicate procedure that I think not everyone can do, but it still is very thorough and helpful guide, kudos 👍.

PS: The only spelling mistake I've seen so far is the word "aline". I think you mean align ;)
Thank you, English is not my first language so I guess you guys could let me off :indiff: :D
2 months and still going strong! :P
hehe nice! that's what I was saying, lifetime differs for everyone :P
 
Sorry I don't know, I never owned a DFGT. :guilty:

I tried and I was able to take the pot apart without breaking anything, I cleaned it but it wasn't that dirty. So I think the pot is toast, I'm just going to get a replacement.
 
I found mine wasn’t that dirty when I did mine (G27, couldn’t see any dirt on the rag). I guess either the 'fingers' on the center were sticking a bit on the track or the board with the tracks may have started to wriggle and caused the spiking. Either way, it works properly after I re-assembled it.
 
I'm having this problem with a DFGT. I can't seem to take the pot off of the mounting and gear thing.

I was trying to just tighten the connectors (that worked for the brake pedal), I ended up snapping the middle post (the thing the connector slides onto), so I've tried to soldier the wire directly to the circuit board. It worked for a day, then started spiking again.

The weird thing I'm noticing, is when I soldier the wire on, sometimes the pedal will work perfectly, then a couple seconds later (maybe when the soldier fully dries), it stops working. Anyone know why that's happening? How to fix this? and how to take apart the pot on the DFGT?

There is a washer and nut I can see, but it's in way too tight of a space to get any c wrench or anything in there. I saw on ebay that someone's selling DFGT pedal sets for $40 but I'd rather not do that.

I really just don't want my iracing subscription to be going to waste right now, and the only car I can drive with the X and Square buttons on the DFGT wheel is the solstice and driving cars with X in GT5 is just annoying.
 
Can this be done with DFGT too? How would I take the wires off without damaging them?

The wires aren't the problem. You can just pull the connectors off the posts (be careful though, I broke one of em). The problem is it's really tough to get the pot off of the crap it's attached to. Even if I got a new pot, I don't know how to get the old one off. These pedals are really poorly designed and built. This is a really annoying problem.
 
Use a flat head screw driver and bend the silver cap before the gears and get that off and then the rest comes off easily. Also use the flat head to bend the 4 things that attach the pot, I don't know what to call them.
 
Quick question, is there a difference in contact cleaner? I went to the store and they had automotive electrical contact cleaner but on the warning it says not for use on circuit boards or household electronics. Can I still use this or would I have to get something else?
 
Quick question, is there a difference in contact cleaner? I went to the store and they had automotive electrical contact cleaner but on the warning it says not for use on circuit boards or household electronics. Can I still use this or would I have to get something else?

If it says not to use it on circuit boards or household products I would advise against using it. Also, silicon spray/cleaner works for contact cleaner as well. That's what I used
 
Back