Lion-Face
Premium
- 1,466

- Invercargill
- Lion-Face
I apologize if this has been done before, a quick search didn't reveal anything so i went ahead.
I have noticed over my time here, the odd question comes up about why does my picture not look like this, or how did you get a picture so clear? etc. I original wrote this post for the AU/NZ PlayStation forums, and after a few weeks there to see if there were any amendments needed, I've decided it was time to copy it here.
This thread is here to give people a simple run down on setting up your High Definition TV for Blu-Ray/Games primarily, and will cover the basic aspects of setting up your TV for correct contrast and colour when in use. This isnt proffessional grade stuff, its done by eye and so therefore isn't the be all and end all, its just a start to improve your TV picture, get more out of your tv, save power and to extend your tv's life in the process of doing so.
This thread is aimed at users with High Definition LCD or Plasma displays. Although will work fine with most other displays no problem.
Disclaimer: This is a guide only to getting a better picture from your tv. I dont claim to know all, and i myself am learning all the time. I have been tweaking TV's over the past year and this is a simple run down of what i have come to learn so far. If i am wrong, please let me know so I can update this post with correct, or additional information.
Ideally when doing Picture settings, your TV must have been turned on for at least 30minutes to warm it up and let it settle. You should be in a dark room, with as little light hitting the screen as possible, its also an idea to have a lamp placed behind the TV for lighting as you will see in my TV pictures below. You should be using the highest quality connections you have, HDMI is best. The source of the test patterns should be in the highest quality possible, from a Blu-Ray disc, although if a DVD is the best you have, the end result won't be too far off, and should be an improvement on an uncalibrated TV.
NOTE:
Ideally you are to setup a tv in a dark room with those lighting conditions stated, but if you watch TV in different lighting conditions, during the day for example, go back and recalibrate the Brightness first, then Contrast settings in your 'normal' vewing conditions.
Setting up a TV picture in a Dark Room will be too dark for normal daylight viewing, while setting up a TV picture in the middle of the day will often be too bright for night time viewing. Often you can find a happy compromise with a slight backlight adjustment if you use your TV throughout the day. Also of note, a lot of TV's allow for multiple setting configurations, allowing you to have a Night setting and a Day setting, and you can switch between them as need be on the remote.
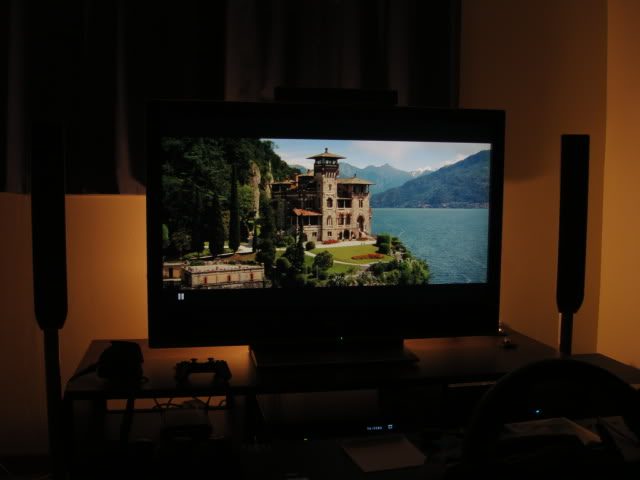
# Here you can see (barely) my TV and lighting arrangements for my room, provided by a 40watt bulb behind the TV. Ideal for setting up picture settings and viewing as it takes the strain off your eyes.
I will be using the Sony Picture Blu-Ray picture settings menu in this thread. I figure this to be a good start as many people here have a Sony Pictures BD (Casino Royale for any PS3 early adoptors for example) Any Sony Pictures Blu-Ray disc should have this menu that you can access, and they are easy enough to get ahold of if you want to go rent the disc for a night. Alternatives would be any THX DVD that has THX setup found in the settings menu of the DVD. You should be able to get the same results from other test discs as many of the test patterns are similar/standard and they all have the same things to look for when setting up your tv picture.
If you want more in depth tuning of your TV, you can't go past Digital Video Essentials Test Disc which you can pick up from online retailers (link below - thanx vtwin650 from Optimal Tv Settings thread of the AU/NZ PS Forums)
http://www.amazon.com/dp/B000V6LST0/?tag=gtplanet-20
Your PS3 settings should be the following
Video Settings Menu
BD/DVD Video Output Format (HDMI) Y Pb/Cb Pr/Cr
BD 1080p 24 Hz Output (HMDI) On (if your tv can accept this output)
Display Settings
Cross Color Reduction Filter Off (only used for Composite cables)
RGB Full Range (HDMI) Limited (Not FULL, only for Computer Monitors/Limited numbers of TV's, very rarely should you use FULL)
Y Pb/Cb Pr/Cr Super-White (HDMI) Off (this may change later on, but i'll get to that)
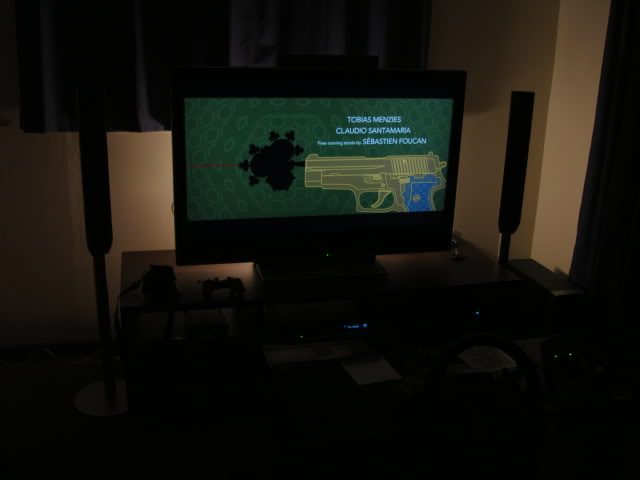
Now that thats sorted, throw in your copy of a Sony Pictures Blu-Ray (for this example i'm using Casino Royale) and load it up to the Menu screen.
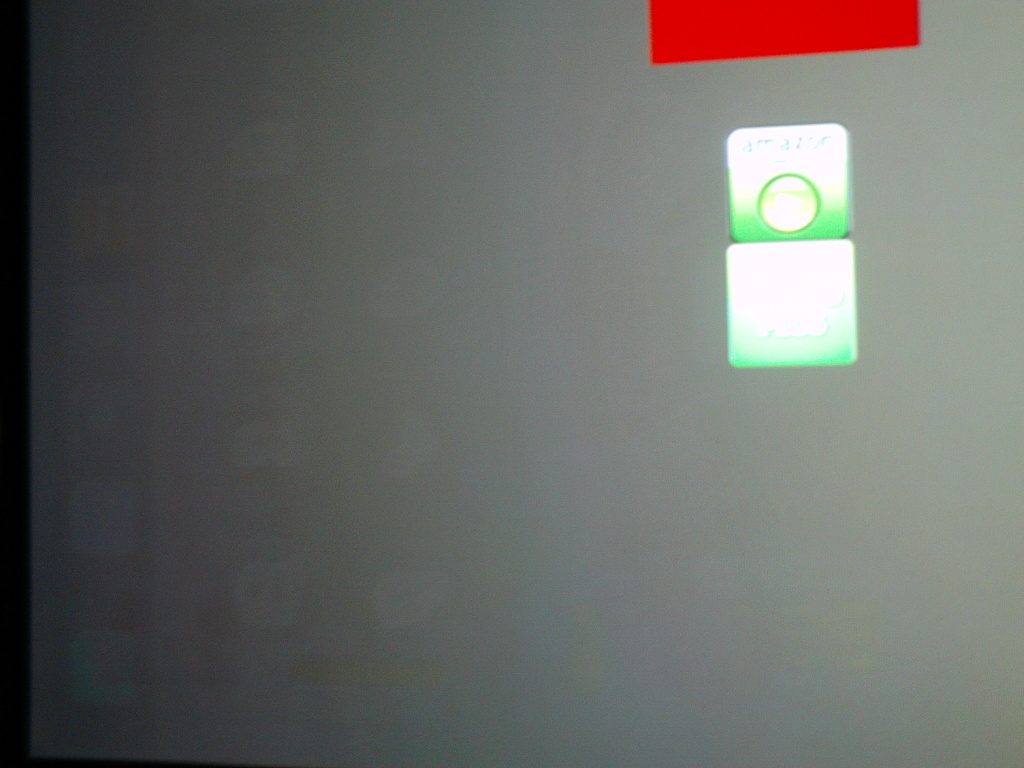
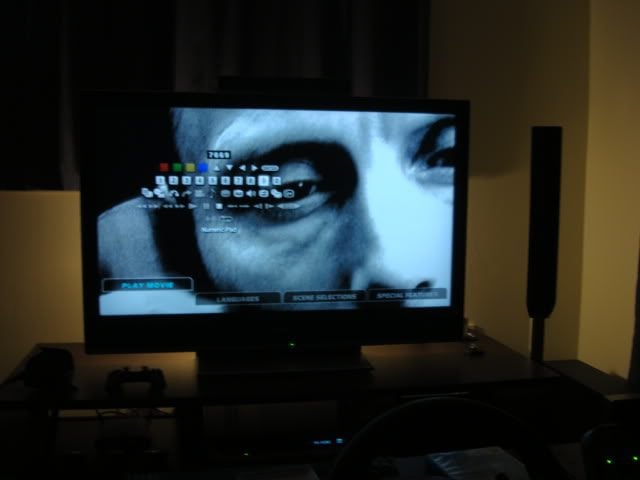
On the Main Menu screen of the disc. Press the Triangle Button on your controller, go up to the number pad and enter the numbers 7 6 6 9 using the X button, (pic below) then go up to the Enter button at the top right and press X. You should get a very colourful set of bars comeup, when it does, press the Start Button to pause.
# The secret picture setup area of Sony Pictures Blu-Ray Discs
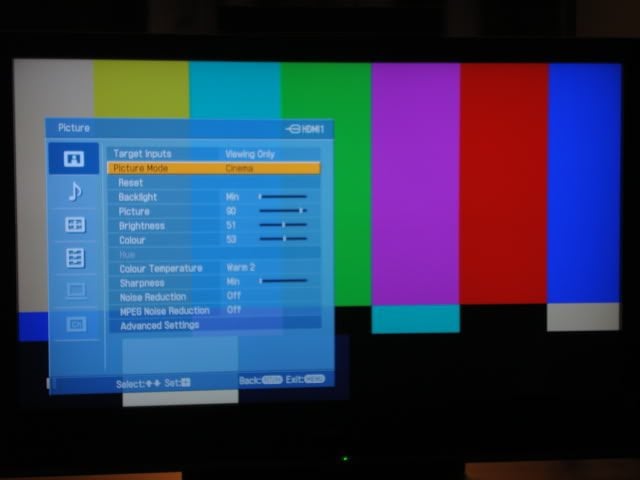
Go into the Picture settings of your TV's menu. First thing you'll want to do in here is change the picture mode from whatever it is set to, to Cinema (also known as Movie) Mode, doing this turns off any processing your TV does to the picture. If you dont have this option, at the very least pick 'Standard' picture mode and go from there, any other Presets, like Sport, Game, Vivid etc are quite frankly, terrible. Next, change the Colour Temperature to Warm 2 (some tv's only have a Warm, or a Warm3 setting, change it to the highest 'Warm' temp available)
# The Picture Settings menu, the one pictured is my Sony BRAVIA KLV46V300A LCD.
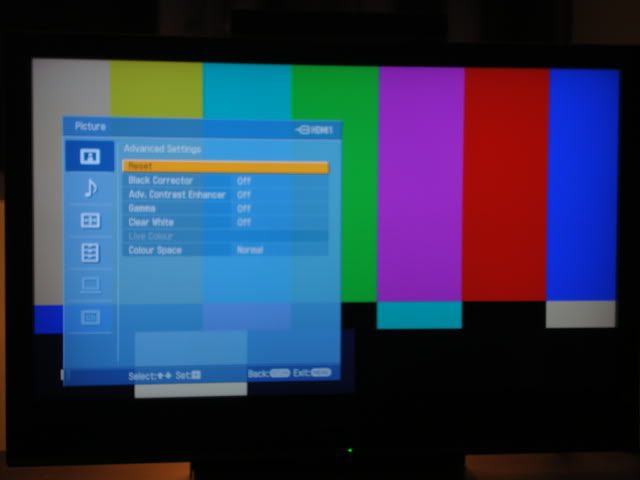
Next, go into advanced settings, usually found at the bottom of your Picture settings menu, and turn all of them OFF. These settings often give a false picture, providing something eye catching for the public and marketing for the manufacturers. More often than not, these will alter colours in a vibrant, but incorrect way.
Note: If you have a 100hz or 200hz tv, this setting is personal choice. If you are to have it on, leave it at 'Standard' or default. For Blu-Ray movies, you should be running 24hz (in the PS3 menu) and shouldnt need 100hz. Games dont get any benifit from 100hz, other than it can, at times, cause delays between pressing the button and what happens on screen. You should really only be using 100 or 200hz for normal TV viewing and DVD watching, not for games or blu-ray.
If you have an LCD, ajust the Backlight setting as you see fit. If your in a dark room, a lower setting would be best, the brighter the room, the higher the setting, but i wouldnt adjust it over 6 (out of 10) regardless. The lower the setting, the more power you will save while running the TV. I have mine set at 4/10 regardless of lighting conditions.
Finally, turn off All noise reduction, MPEG Noise reduction and Noise Reduction should be at Zero or Off. Only sometimes on Standard Def TV or poorly mastered DVD's would you want to turn either of these settings on. If your running HD through the TV, these settings will only hamper the picture.
#Advanced Picture settings menu of my TV.
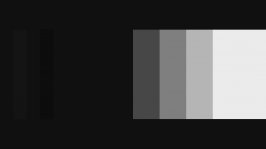
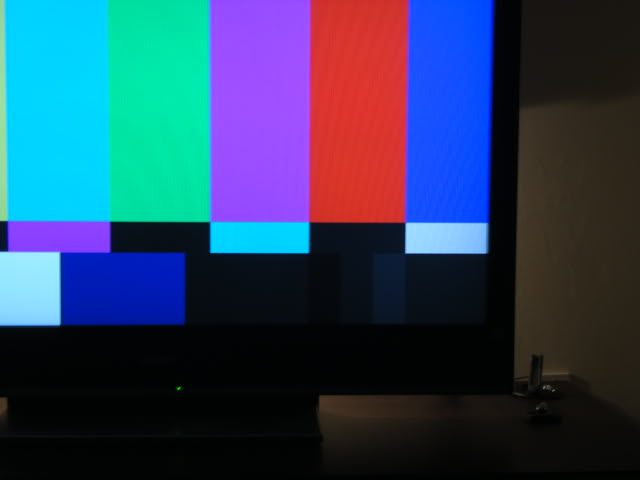
Now that we have that sorted, we can start looking at the colourful bars on the screen. We really just need to focus on a small area of the screen, the bottom right hand corner. What we want to do here is turn your Brightness control most of the way up to see the different colours of black in our picture. Under the Red bar on the right hand side, (reading right to left) you should clearly see a lighter shade of black (that looks gray in the picture below), a darker shade (that in the picture forms a "T" under the Red bar) and then a Very Deep shade of black. If you dont see the 3rd shade of black (the very dark shade) dont worry, as this isnt the most important shade, it just tells us whether your TV/equipment can send, accept and display the shade 'blacker-than-black' or 'Below Black' signal*.
*Note: If you cant see the Below Black signal, you have one last option, press the Triangle button on your controller to bring up the menu. From here, select AV Settings, and go down to the option Y Pb/Cb Pr/Cr Super-White (HDMI) and turn that On. I have found on my TV that I had to turn this setting On to get the Below Black signal to show.

#Below Black showing on screen. You may have to squint to make out the differences in the picture, your TV should be much clearer.
Now that we can see the different Black bars at the bottom of the picture, we want to turn down the brightness until we can only just see the single bar on the right. The 'Below Black' bar will dissapear and we should be left with a flat shade of black and then a single bar which is a slightly lighter shade of black. This sets the Black level of your TV correctly and will allow you to see more detail in the darker areas of Movies/Games.
# Here you can see, after Brightness is turned down you can see mostly one shade of black, with the last bar just above black still visible. The Below Black bar has dissapeared. You may have to squint to make out the differences in the picture, your TV should be much clearer.
Press R1 on your controller to move to the next screen, then press Start again to pause it.
This screen is an interesting one, but simple enough. This screen will show you that if you have a Full HD Display, whether you are getting a full 1080p picture or not. You will have to go into your Screen adjustments menu to find the option to alter this. Most 1080p TV's will have a 'Full Pixel' Option, some call it 'Overscan' (which you should set Overscan to off for this effect)while others will just have 'Full Zoom' (or otherwise) option.
This will make sure that you are seeing the full 1920x1080pixels on screen that you paid for. In my picture below, after you alter the setting, you should see the tips of the triangles at the edge of your screen, and you see where in my picture it sez '4:3' and '3:2' at the top left and right corners? after the Full Pixel option is selected, you should get a 16:9 come in at the very edge of the screen. I can't show you in my pics as i dont have a Full HD display.
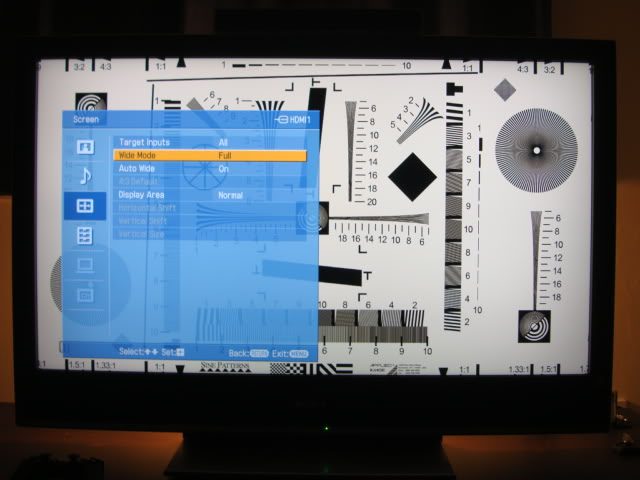
#Full Pixel - doesnt show on a 720p display
Go back to your Picture settings menu, and take this oppurtunity to turn your Sharpness option right down to Zero, or Off. Sharpness setting can create 'fake' edges to your picture, making the picture appear more detailed and possibly introducing artifacts into your picture. Turning down the sharpness removes these harsh edges and allows you to see the finer detail in the picture.
Press R1 on your controller to move to the next screen, then press Start to pause it.
Here you will see a simple greyscale picture, running from Black on the left, through the shades of grey to white at the very right. This is where we want to adjust the Contrast setting (sometimes called 'Picture' setting) What we want from this screen is a deep black at the very left hand side of the screen, and a bright white at the right hand side of the screen, and an even shift from black to white in the middle. This sets up your White colours and allows you to see detail in the brighter pictures displayed on your TV.
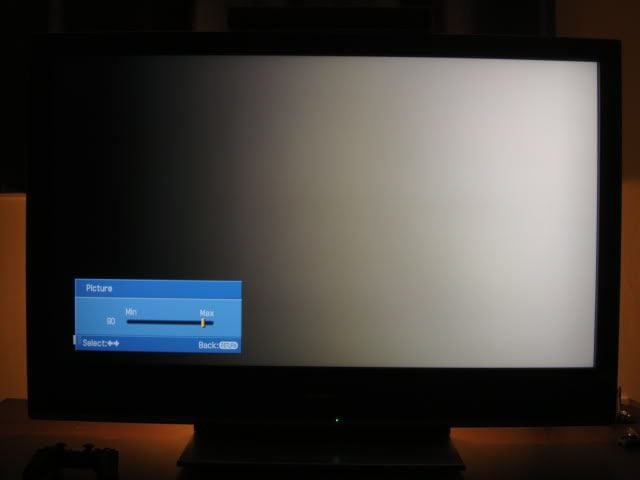
# Setting up your White levels. My camera doesnt show it, but the black to white gradiant should be a smooth transition from deep black to bright white.
And thats about it. You can press Start to unpause, and press R1 a few time to skip through to the end, where it should kick you back to the menu of your BD
I havnt adjusted the Colour settings as there is no accurate way to adjust colour settings without the proper tools. Whats best to do now is watch the blu-ray you've just used and look at the skin tones of the actors faces and adjust the colour setting based on the skin tones of the actors. The skin colour is one of the hardest things for a tv to get right, and if you can tweak it just enough, the other colours should fall into place relative to that. It often doesnt need too much of a tweaking after a setup your tv has been run through, but sometimes a bit more colour doesnt go astray.
Here is the end result. The first picture is my TV on 'default' settings, how it came out of the box.
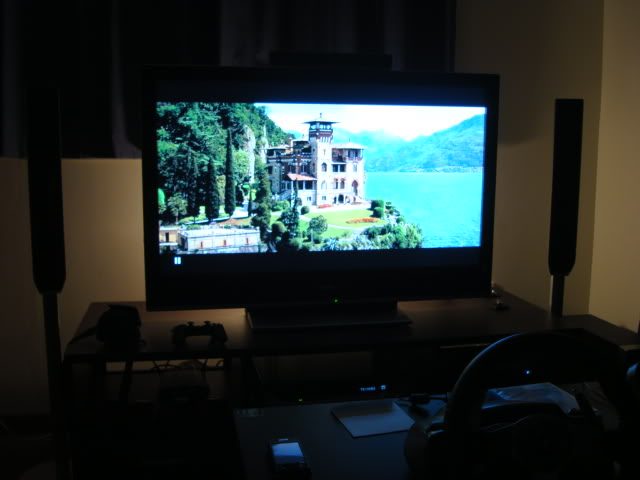
And the end result a proper picture calibration
My final settings of my TV as follows.
Display Mode - Cinema
Backlight - 4
Picture - 90
Brightness - 51
Colour - 54
Hue - N/A
Colour Temperature - Warm 2
Sharpness - 0
Noise Reduction - Off
MPEG Noise Reduction - Off
Advanced Settings - All Off, Colour space set to Standard.
For games. All movies are made to a standard colour space. Games on the other hand are not regulated in the same way. So while those picture settings will be correct for all the movies you watch, games it may or may not be. Ideally if you find a game too dark (or to bright, but more commonly they are a bit too dark) use the in game options of the game to adjust the brightness.
Any questions i will be glad to help out with. I hope this has helped some of you get a better end result from your TV and will enjoy a richer viewing experience in the future")
Thank you for reading.
*If this thread is in the wrong section, please move to correct, thanks.
I have noticed over my time here, the odd question comes up about why does my picture not look like this, or how did you get a picture so clear? etc. I original wrote this post for the AU/NZ PlayStation forums, and after a few weeks there to see if there were any amendments needed, I've decided it was time to copy it here.
This thread is here to give people a simple run down on setting up your High Definition TV for Blu-Ray/Games primarily, and will cover the basic aspects of setting up your TV for correct contrast and colour when in use. This isnt proffessional grade stuff, its done by eye and so therefore isn't the be all and end all, its just a start to improve your TV picture, get more out of your tv, save power and to extend your tv's life in the process of doing so.
This thread is aimed at users with High Definition LCD or Plasma displays. Although will work fine with most other displays no problem.
Disclaimer: This is a guide only to getting a better picture from your tv. I dont claim to know all, and i myself am learning all the time. I have been tweaking TV's over the past year and this is a simple run down of what i have come to learn so far. If i am wrong, please let me know so I can update this post with correct, or additional information.
Ideally when doing Picture settings, your TV must have been turned on for at least 30minutes to warm it up and let it settle. You should be in a dark room, with as little light hitting the screen as possible, its also an idea to have a lamp placed behind the TV for lighting as you will see in my TV pictures below. You should be using the highest quality connections you have, HDMI is best. The source of the test patterns should be in the highest quality possible, from a Blu-Ray disc, although if a DVD is the best you have, the end result won't be too far off, and should be an improvement on an uncalibrated TV.
NOTE:
Ideally you are to setup a tv in a dark room with those lighting conditions stated, but if you watch TV in different lighting conditions, during the day for example, go back and recalibrate the Brightness first, then Contrast settings in your 'normal' vewing conditions.
Setting up a TV picture in a Dark Room will be too dark for normal daylight viewing, while setting up a TV picture in the middle of the day will often be too bright for night time viewing. Often you can find a happy compromise with a slight backlight adjustment if you use your TV throughout the day. Also of note, a lot of TV's allow for multiple setting configurations, allowing you to have a Night setting and a Day setting, and you can switch between them as need be on the remote.
# Here you can see (barely) my TV and lighting arrangements for my room, provided by a 40watt bulb behind the TV. Ideal for setting up picture settings and viewing as it takes the strain off your eyes.
I will be using the Sony Picture Blu-Ray picture settings menu in this thread. I figure this to be a good start as many people here have a Sony Pictures BD (Casino Royale for any PS3 early adoptors for example) Any Sony Pictures Blu-Ray disc should have this menu that you can access, and they are easy enough to get ahold of if you want to go rent the disc for a night. Alternatives would be any THX DVD that has THX setup found in the settings menu of the DVD. You should be able to get the same results from other test discs as many of the test patterns are similar/standard and they all have the same things to look for when setting up your tv picture.
If you want more in depth tuning of your TV, you can't go past Digital Video Essentials Test Disc which you can pick up from online retailers (link below - thanx vtwin650 from Optimal Tv Settings thread of the AU/NZ PS Forums)
http://www.amazon.com/dp/B000V6LST0/?tag=gtplanet-20
Your PS3 settings should be the following
Video Settings Menu
BD/DVD Video Output Format (HDMI) Y Pb/Cb Pr/Cr
BD 1080p 24 Hz Output (HMDI) On (if your tv can accept this output)
Display Settings
Cross Color Reduction Filter Off (only used for Composite cables)
RGB Full Range (HDMI) Limited (Not FULL, only for Computer Monitors/Limited numbers of TV's, very rarely should you use FULL)
Y Pb/Cb Pr/Cr Super-White (HDMI) Off (this may change later on, but i'll get to that)
Now that thats sorted, throw in your copy of a Sony Pictures Blu-Ray (for this example i'm using Casino Royale) and load it up to the Menu screen.
On the Main Menu screen of the disc. Press the Triangle Button on your controller, go up to the number pad and enter the numbers 7 6 6 9 using the X button, (pic below) then go up to the Enter button at the top right and press X. You should get a very colourful set of bars comeup, when it does, press the Start Button to pause.
# The secret picture setup area of Sony Pictures Blu-Ray Discs
Go into the Picture settings of your TV's menu. First thing you'll want to do in here is change the picture mode from whatever it is set to, to Cinema (also known as Movie) Mode, doing this turns off any processing your TV does to the picture. If you dont have this option, at the very least pick 'Standard' picture mode and go from there, any other Presets, like Sport, Game, Vivid etc are quite frankly, terrible. Next, change the Colour Temperature to Warm 2 (some tv's only have a Warm, or a Warm3 setting, change it to the highest 'Warm' temp available)
# The Picture Settings menu, the one pictured is my Sony BRAVIA KLV46V300A LCD.
Next, go into advanced settings, usually found at the bottom of your Picture settings menu, and turn all of them OFF. These settings often give a false picture, providing something eye catching for the public and marketing for the manufacturers. More often than not, these will alter colours in a vibrant, but incorrect way.
Note: If you have a 100hz or 200hz tv, this setting is personal choice. If you are to have it on, leave it at 'Standard' or default. For Blu-Ray movies, you should be running 24hz (in the PS3 menu) and shouldnt need 100hz. Games dont get any benifit from 100hz, other than it can, at times, cause delays between pressing the button and what happens on screen. You should really only be using 100 or 200hz for normal TV viewing and DVD watching, not for games or blu-ray.
If you have an LCD, ajust the Backlight setting as you see fit. If your in a dark room, a lower setting would be best, the brighter the room, the higher the setting, but i wouldnt adjust it over 6 (out of 10) regardless. The lower the setting, the more power you will save while running the TV. I have mine set at 4/10 regardless of lighting conditions.
Finally, turn off All noise reduction, MPEG Noise reduction and Noise Reduction should be at Zero or Off. Only sometimes on Standard Def TV or poorly mastered DVD's would you want to turn either of these settings on. If your running HD through the TV, these settings will only hamper the picture.
#Advanced Picture settings menu of my TV.
Now that we have that sorted, we can start looking at the colourful bars on the screen. We really just need to focus on a small area of the screen, the bottom right hand corner. What we want to do here is turn your Brightness control most of the way up to see the different colours of black in our picture. Under the Red bar on the right hand side, (reading right to left) you should clearly see a lighter shade of black (that looks gray in the picture below), a darker shade (that in the picture forms a "T" under the Red bar) and then a Very Deep shade of black. If you dont see the 3rd shade of black (the very dark shade) dont worry, as this isnt the most important shade, it just tells us whether your TV/equipment can send, accept and display the shade 'blacker-than-black' or 'Below Black' signal*.
*Note: If you cant see the Below Black signal, you have one last option, press the Triangle button on your controller to bring up the menu. From here, select AV Settings, and go down to the option Y Pb/Cb Pr/Cr Super-White (HDMI) and turn that On. I have found on my TV that I had to turn this setting On to get the Below Black signal to show.
#Below Black showing on screen. You may have to squint to make out the differences in the picture, your TV should be much clearer.
Now that we can see the different Black bars at the bottom of the picture, we want to turn down the brightness until we can only just see the single bar on the right. The 'Below Black' bar will dissapear and we should be left with a flat shade of black and then a single bar which is a slightly lighter shade of black. This sets the Black level of your TV correctly and will allow you to see more detail in the darker areas of Movies/Games.
# Here you can see, after Brightness is turned down you can see mostly one shade of black, with the last bar just above black still visible. The Below Black bar has dissapeared. You may have to squint to make out the differences in the picture, your TV should be much clearer.
Press R1 on your controller to move to the next screen, then press Start again to pause it.
This screen is an interesting one, but simple enough. This screen will show you that if you have a Full HD Display, whether you are getting a full 1080p picture or not. You will have to go into your Screen adjustments menu to find the option to alter this. Most 1080p TV's will have a 'Full Pixel' Option, some call it 'Overscan' (which you should set Overscan to off for this effect)while others will just have 'Full Zoom' (or otherwise) option.
This will make sure that you are seeing the full 1920x1080pixels on screen that you paid for. In my picture below, after you alter the setting, you should see the tips of the triangles at the edge of your screen, and you see where in my picture it sez '4:3' and '3:2' at the top left and right corners? after the Full Pixel option is selected, you should get a 16:9 come in at the very edge of the screen. I can't show you in my pics as i dont have a Full HD display.
#Full Pixel - doesnt show on a 720p display
Go back to your Picture settings menu, and take this oppurtunity to turn your Sharpness option right down to Zero, or Off. Sharpness setting can create 'fake' edges to your picture, making the picture appear more detailed and possibly introducing artifacts into your picture. Turning down the sharpness removes these harsh edges and allows you to see the finer detail in the picture.
Press R1 on your controller to move to the next screen, then press Start to pause it.
Here you will see a simple greyscale picture, running from Black on the left, through the shades of grey to white at the very right. This is where we want to adjust the Contrast setting (sometimes called 'Picture' setting) What we want from this screen is a deep black at the very left hand side of the screen, and a bright white at the right hand side of the screen, and an even shift from black to white in the middle. This sets up your White colours and allows you to see detail in the brighter pictures displayed on your TV.
# Setting up your White levels. My camera doesnt show it, but the black to white gradiant should be a smooth transition from deep black to bright white.
And thats about it. You can press Start to unpause, and press R1 a few time to skip through to the end, where it should kick you back to the menu of your BD
I havnt adjusted the Colour settings as there is no accurate way to adjust colour settings without the proper tools. Whats best to do now is watch the blu-ray you've just used and look at the skin tones of the actors faces and adjust the colour setting based on the skin tones of the actors. The skin colour is one of the hardest things for a tv to get right, and if you can tweak it just enough, the other colours should fall into place relative to that. It often doesnt need too much of a tweaking after a setup your tv has been run through, but sometimes a bit more colour doesnt go astray.
Here is the end result. The first picture is my TV on 'default' settings, how it came out of the box.
And the end result a proper picture calibration
My final settings of my TV as follows.
Display Mode - Cinema
Backlight - 4
Picture - 90
Brightness - 51
Colour - 54
Hue - N/A
Colour Temperature - Warm 2
Sharpness - 0
Noise Reduction - Off
MPEG Noise Reduction - Off
Advanced Settings - All Off, Colour space set to Standard.
For games. All movies are made to a standard colour space. Games on the other hand are not regulated in the same way. So while those picture settings will be correct for all the movies you watch, games it may or may not be. Ideally if you find a game too dark (or to bright, but more commonly they are a bit too dark) use the in game options of the game to adjust the brightness.
Any questions i will be glad to help out with. I hope this has helped some of you get a better end result from your TV and will enjoy a richer viewing experience in the future
Thank you for reading.
*If this thread is in the wrong section, please move to correct, thanks.