wfooshee gallery - Trying black-&-white conversions

  • Thread starter wfooshee
  • 47 comments
  • 6,474 views
More birds. Birds in trees, birds in the air, birds in water.

Red-winged Blackbirds get thick as thieves in the spring and summer months in my park. I never see them in town, but out here they're just all over the place.


One thing I've learned while learning to be a birder is that the sexes in birds can be very similar, so much so that experts can't tell which is which, or they can be so different as to make you think it's a different species. The Red-winged Blackbird falls under "different." The female is neither red-winged nor black. Only the beak, legs, and eyes look the same as the male:


Cardinals are easily recognizable, male or female. The male is the familiar bright red, and the female is brown-ish tan.


I've found two kinds of woodpeckers here, the Downy Woodpecker....


... and the Red-bellied Woodpecker (whose belly is not red.)


Before starting this kind of photography I never would have believed that there could be so many different kinds of birds so similar to each other in size and build, yet still different species. Warblers are such a group. Maybe no more than 4 inches high, all of them sing, but not like each other, and all of them have their own characteristic color.

You have no idea how hard it is to shoot these sometimes. You hear them constantly but you can't ever find them in the trees, hidden in the leaves. When you do catch a glimpse of one, it is as he was flitting around from one perch to another, almost never sitting anywhere for more than a couple of seconds. My first catch was a Northern Parula:


Got one on another day with lunch on hand.


This one I found while I was sitting on a bench resting. He was in the bushes across the path from me. This is a Worm-eating Warbler. (Yes, that's what it's called.)


American Redstart (female)


Pine warbler:


I caught this Pine Warbler mid-hop as he was moving around the tree. A nice accident I found when I got the pictures onto the computer out of the camera.


Very common during Spring and Fall around here, the Yellow-rumped Warbler. Has a yellow spot right above the tail feathers, thus the name.


Another lucky shot, got the instant of takeoff:


I'll finish this post with two or three other perching birds. First, a Blue-gray Gnatcatcher.


Gray Catbird. (Don't ask me, I don't make up the names....)


Brown Thrasher.


Eastern Towhee:


Next time, some water fowl: gulls, terns, ducks, and so on.
 
DSC_2518.jpg

Really like this one. You taking all these handheld?
 
Yes, handheld. Lens is Nikon's 70-300 ED VR. Cameras were a D5000 and a D7000.

All are at maximum zoom and are cropped, sometimes all the way down to a pixel-for-pixel crop without being resized down to the 1280 that I save my JPGs in. I keep my full-frame RAW files on a separate drive.

The one you chose was 1/250 at f:5.6 ISO 200, distance was 17.8 meters according to EXIF data. If you haven't discovered it already, you can click on the images in my post and get the full-size 1280-pixel version. I like posting that way better than the forum's "click to enlarge"/"click to shrink" hinkiness.
 
I'm sure that's a nice piece of kit, but it's 5 times the price of my 70-300 ED VR!

Five!

I can't seem to remember where I laid that $2500 I'd set aside for it......:guilty:

I've considered the Sigma 150-500 but I'm concerned about its sharpness. I'm planning to see if I can rent one in a few weeks to see how I like it. There might come a day when I could drop a grand on that if I like it.
 
Ouch... Did not know it was so expensive. đź‘Ž

Renting the Sigma is a good idea.
Also, you can check for used versions of the old 80-400 VR.
 
Actually, looking at borrowlenses.com, they don't offer the 150-500, but they have the 50-500. I think the 150-500 is supposed to be a better lens.

They do have the previous Nikkor 80-400 AF VR ED used for about $730..... Not AF-S, but with my D7000 having the motor in the body that doesn't matter. Still a bunch of $$$ for a hundred mm more reach. If it was good enough I could then sell the 70-300 and get a significant part of that back.

You're trying to have me hatch some evil plan here, aren't you? :sly:
 
Haha. Just want what's best for my fellow GTPlanet photographers. ;)

Seriously, one can tell you like your birds, and your "all the way down to a pixel-for-pixel crop" left me wondering you should really do something about it.
 
Well, thinking about it, being an AF instead of an AF-S generally means much slower focus acquisition, so probably not gonna go for the used 80-400.

Reading on the new 80-400, it's expensive because five of its elements are ED glass (well, four, plus one Super-ED.) My 70-300 has two ED elements.

I guess I'm still looking to save up for the Sigma.

Yes, I like my birds, but I like living in a fixed structure, and eating, and all those other modern amenities of life.
 
Waterfowl​

(well, other than the waders from earlier)


This is a selection of water birds such as ducks, gulls, terns, etc. These birds live on or near the water, and feed pretty much exclusively on aquatic plants or on fish and shellfish.

American Coot


Pied-billed Grebe
Dives and swims underwater for food. When threatened will dive rather than fly to get away.


Black Skimmers
They use their underbite beak to scoop fish out of the water as they skim over the surface.


Belted Kingfisher


Double-crested Cormorant


Cormorants lack the oils in their feathers that other waterfowl have, so they have to dry in the sun after swimming:


Loon
I got this one in what looks like a little "happy-dance."


Sanderling
A black-legged black-beaked sandpiper-type bird, runs in and out of the waves on the shore to dig things out of the sand for food. The larger birds here are Ruddy Turnstones, another shore bird.


Royal Tern


Ring-billed Gull


Laughing Gull
Named for the sound it makes, sounding like 'Ha! Ha! Ha!" and identified by its dark beak and black legs. Sometimes has an all-black head.


Hooded Merganser
Males have the white spot (hood)on the head, females are more brown overall.


Those were a ways off. On another day I got this group of females:


Red-breasted Merganser
Male:


and female:


Brown Pelican


Pelicans will commonly fly very low on the water, taking advantage of a ground-effect air cushion. They'll give three or four flaps and drop right to the water to soar for 20 or 30 yards, then rise to give a couple more wingbeats and continue.


Muskovy Duck
Lastly, these ugly-looking things. Apparently they are feral descendants of domesticated ducks. I'm told they make good eating. My brother's comment was, "Well yeah; they're made of food!"


Last edited:
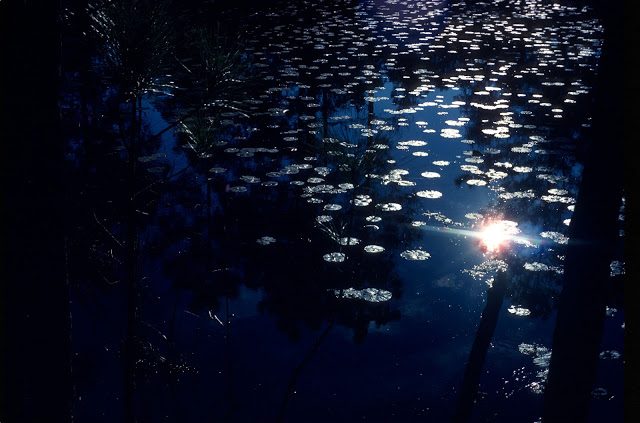
In the very first post of this thread is an image of lily pads on a pond, with the sun reflected on the water. This is one of my favorite images I ever made, and I'm insufferably proud of it.

It's on Kodachrome 64, and is the 15th frame of the very first roll of 35mm film I ever shot. The camera was my dad's Voigtlander Vitessa, a 1952 folding rangefinder that he passed down to me when I asked for a 35mm camera for Christmas. I'd been shooting snapshots with a 126 Instamatic camera up to that point, and was very aware of its limitations. I was in college at the time and had a couple of friends with "good" cameras, and of course Dad always had a nice camera.
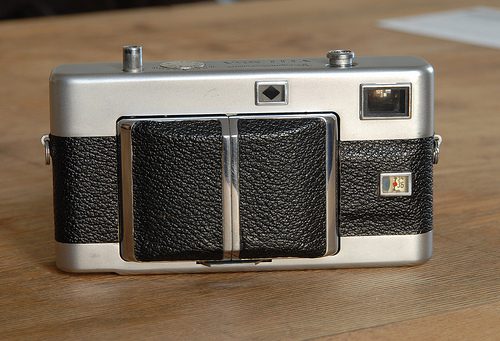
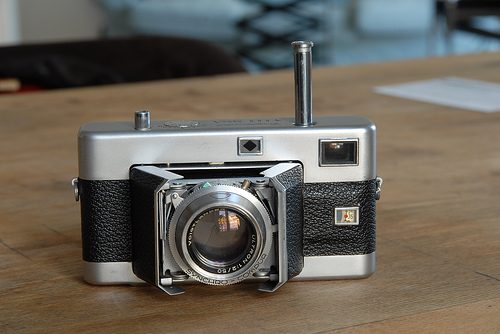
Here's the camera:
Vitessa%2520folded.jpg


vitessa%2520open.jpg


It had a 50mm f:2 lens with a leaf shutter, 2 seconds to 1/500 plus B. Minimum aperture was f:16. The tall plunger is the film advance, and the other button is the shutter. It had a switch to sync the flash with a flashbulbs or electronic strobe. The window on the front with the yellow dial in it is the frame counter. You had to zero it when you loaded the film, or your count was wrong. The larger window at the top corner was the viewfinder, and you focused by moving the image taken from the diamond-shaped window until it was superimposed exactly on the subject in the viewfinder.

The camera was completely manual, no metering. I carried a light meter around with me. I still have both the camera and the light meter, both in good working order. I haven't run any film through it in ages, but I "exercise" the shutter every few weeks by tripping it at various speeds. Slower speeds have audible clockwork gears running as the escapement counts down the time! I really don't know how accurate the shutter is, but the speeds that are slow enough to hear are a little longer than they ought to be, so I'm assuming it's a little slow all the way across. That's not necessarily the case, as different clockworks engage at different speed ranges.

So Dad showed me how to load it, where the settings were, and explained what it meant to have shutter speed and f-stop set correctly, how they related to each other to control light onto the film. He explained what film speed was (we called it ASA, not ISO at the time) and how to set the light meter for film speed. Then he turned me loose.

I did some reading, figured out the light meter, and bought some film. Dad said, "Always use Kodachrome, never use Ektachrome!" He was an early Ektachrome user, back when its color stability was measured in minutes, and when he used Ektachrome, he didn't like the color as well as Kodachrome. Good thing he switched back because the 2 or 3 rolls of Ektachrome he shot are completely magenta nowadays. (I have those slides and have been scanning and "repairing" them, maybe a subject for another thread...) So I got my Kodachrome, went out to the state park (where I still shoot today!) and saw this scene.

From my reading beforehand I knew that this certainly qualified as backlit. (Duh!) I pretty much made a guess at the exposure by pointing the light meter at several different points around the scene and summing them up in my head. I subtracted 2 stops for the severe backlighting of the sun being reflected in the image, and this is what I got.


I've had quite a bit of difficulty getting it digitized, though. Every few months I dig it out and try some of the new tricks I've learned during the time, with color or level adjustments, brightness or contrast, whatever. My first scan of it was with a slide adapter in a flatbed scanner. Quite unsatisfactory, but all I had at the time. I have a Nikon film scanner now, and it does a much better job with it. I've been through 2 pieces of software with that scanner, the Nikon software it came with (Yuk!) and now Vuescan.

The issue with the slide is that the film is not flat in the mount. Looking at the slide on the table, the film dishes up as you move in from the edge, then the center is like a dimple. What happens in the film scanner is that it focuses on a single point, and the rest might not be as sharp as one would like.

So tonight I made it my project to try to do something about that. I learned the other day that I can select the focus point in Vuescan, so I decided to run multiple scans of the slide, with various points picked as the focus, then see what Photoshop would do with a focus-stack! The result is much better than any of my previous scans, and almost satisfies me with the slide. It still has more contrast than the projected image, and could do with a mild HDR treatment to bring whites and blacks more in line with each other. It's right at the limit of blowing the lily pads to completely white, and the dark areas to the left have lost a lot of what's on the slide. (I don't even want to think about getting a set of scans exposed for the light areas, then for the dark, and in between, with the focus stacking I'd need to do on top of that! I'd need 12 to 15 scans to produce just 3 images from whcih to HDR the thing!) But this focus-stacked scan of 4 or 5 separate scans is the best I've come up with on this slide ever, so I figured I'd post the story of making it.
 
Shot some slide film a few weeks ago, using my F4. My only FX-format lenses are an ancient but wonderful 85mm f:1.8, old enough it's converted to AI, and my current-generation 70-300 ED VR. My digital kit 18-55 DX is the only "short" lens I have that is remotely useful on the F4, and it vignettes, although not too badly above 30mm or so. So I have a slow wide-angle for my film camera. :) Wider than 30 or 28 or so, and it actually blackens the corners.

Anyway, this was my first trip out that wasn't just a camera test, i.e. look for certain conditions, write everything down, compare the slide with what I saw and decide if the camera worked or not. This day I went out to shoot film, not test cameras.

I have to say, looking at a projected slide in a darkened room beats the ever-living snot out of putting digitals up on the computer screen!

I took a roll of Velvia 50 with me on this day, and although it was sunny, there were cloudy periods, and an f:5.6 lens is not what you want to be carrying around when shooting at ISO 50!

I also experimented with the scanner a bit, allowing it to save both JPG and RAW files. In every case, the JPG produced by the scanner software (VUESCAN) was better than anything I could scrape up from the RAW file. The only thing I found myself able to do better RAW was filter noise, and the scanner wasn't THAT noisy.

So here, from a couple of nearby state parks, some images shot on slow slide film. These are uncropped except to remove the rounded corners of the slide mounts. Click the images for 1280-wide versions.

On this one, I couldn't make the dark areas at the sides not black in the RAW image without blowing the center out, or washing out all contrast. The JPG is nearly unmodified here, moved the Levels center slider a tiny bit to the left.


SQUIRREL!!!!! This guy followed my along the walkway, I guess looking for a handout that never came.


This shows the underbrush recovering from a prescribed burn back in January. Before the burn, the ground would not have been visible in this shot. Runaway growth of underbrush provides fuel for real wildfires, so it's periodically burned away in controlled fires. Fire is also part of the lifecycle of the pine trees. The image is very late in the afternoon, and with the darkened corners from that DX lens, it almost looks like a flash picture.


This grass was 2 or 3 feet high before being burned out. The yellow tips are what was left after the fire, yet the grass grows right back.


Sky on water is always a good subject. I took two of these, this one and one a stop darker. This one is better. It's better still when projected rather than scanned to a PC screen!
 
Look great. Love the natural colour and depth. The only person I've seen so far to get close to this with digital is Diabolical. (Remember I'm colourblind so if the colours are not correct then this is how I see things:D)
 
An F4 with the 18-55mm DX kit lens attached to it is something I can't even imagine. :lol:

But it's nice that it works, even if in a limited way.
(I also used a 55-200 DX on my F80/N80 and on the D600. A small crop or using a 16:9 ratio would do the trick.)

Also, nice to see such clean film shots. That's ISO 50 doing its magic.

And it's true that I try to get a bit of the film tones and colours to my digital images. ;)
 
Just ran across this image while looking for something else for somebody else, and wanted to share it here.

Taken along a trail in Falling Waters State park in Florida, it struck me as a cool shot when I first pulled it up on the PC. It makes me want to ask if you see a forest or if you see trees. It also makes me want to call the jigsaw puzzle companies! :sly:


(Clickable for twice-size version)
D7000, 18-55 at 22mm, 1/125 shutter-priority and f:14, ISO 400
 
I've been trying to learn some things about black-and-white. I've never shot B&W film, and of course wherever I go I see wonderful B&W images; portraits in someone's house, landscapes on someone's wall, things like that. I don't know anything about tones, curves, etc. and have no learned ability to view a scene and imagine it as it ought to look in black-and-white.

A bi-weekly contest a while back was for black-and-white, and on another forum I'm on they have a monthly "project" thread, and one recent "assignment" was black-and-white.

So I've taken an image that I shot at Yosemite National Park, Yosemite Falls as it happens, and tried to be all Ansel Adams with it. Here's the color image:


Using Photoshop's Image, Mode, Grayscale I ended up with this:


OK, it's black-and-white, but I don't like the sky, there's no definition in the clouds, the trees are a little dark, blah blah blah. I'd seen something once where you can split the channels in Photoshop and end up with images that are one just from the red channel, one just from the green channel, and one just from the blue channel, and usually the green channel makes a better black-and-white than a simple gray conversion. Here's the monochrome from the green channel of the original RGB file.


OK, that's better in the trees, but I still don't like the sky. So more reading..... I found Image, Adjust, Black-and-White and got a dialog with a whole bunch of adjustments to play with. Basically, it converts the image to gray, but "remembers" where the colors were. The sliders let you boost or reduce the levels of what had been the reds, yellows, greens, cyans, blues, and magentas independently, and finally you can tint the image if you want, as in sepia, by adjusting saturation and hue of the tint.

In my image, the sky was a real issue, so I strongly reduced the cyan and a little reduction of blue. Enhancing yellow brightened up the foliage. The others had very little effect in this image, mostly in the rock face, and I also cloned out the dark cloud right above the rock. Here is what I ended up with.


Still a bit dark at the bottom left, but to my eye and limited taste it's a vastly superior image to any of the simpler conversions.

One other image I played with is this one, along the road out of the park.


I did a bit more work on this one before converting to black-and-white. I cloned out the road markers and did a perspective correction to remove some "lean-in" at the top, then did the black-and-white conversion to produce this image:


Something I'd really like to be able to do is b&w portraiture. I have very little experience with portraits in the first place, though, much less b&w, and almost no experience with lights. I love looking at good b&w people shots, though, and I want to make some!!!
 
Back