The inuke software has 5 main screens I will go over them with basic factors
.
See the tabs at the top for each screen.
The
MANUAL will give more detailed information and help.
(1) Configuration
Here we set the usage of the amplifer.
In your case with one very big unit to power it may be best to set the amp to BRIDGE mode. By this you are using both channels on the amp together. The L/R audio source input is being combined, so you have two inputs (A) & (B) but only one output (A). The indicator will show their activity.
Note various screens will have Hz at bottom dB at the side. You will mostly be using upto or around 100Hz. I always recommend people to use "test tone generators" to get familiar with different Hz in how they can feel and respond on their own installation/configurations.
Delay is not needed but can be messed around with if you wish later.
Peak Limiter is used to digitally restrict the amplifers output wattage
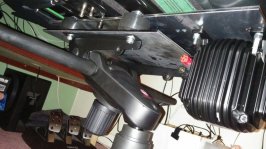
Load set the amount of ohms the unit uses, your BK is 4ohms
Phase can be set to 180 as your unit will be upside down.
Hold / Release usually does not need to be altered
 (2) Filter / Crossover
The display makes this simple to grasp with a little practice you see changes your making.
Yellow is Channel A and Blue Channel B. HZ at bottom and dB to the side.
Gain will increase the signal level pre-amplification.
High Pass sets the Hz to start at
Low Pass sets the Hz to finish at
Type is for different filters (Butterworth is fine)
Slope adjust the angle/drop of the filter from slight to steep
 (3) Parametric EQ
The display shows changes made, this is simple to grasp also after a few minutes
Bypass lets you easily compare these changes with activating them or bypassing altogether
Reset sets all to default
Filters 1-8 allow you to set 8 frequency Hz positions to your choosing.
Gain adjusts the strength of this Hz either +/-
Frequency is the exact Hz you want to alter
Quality adjusts how specific to that Hz selected is altered or also the adjacent Hz
Type is for different filters (PEQ is fine)
 (4) Dynamic EQ
You may not need to use this if using the PEQ but it can be useful to use the gain feature to help boost or cut certain frequency areas. Like previous screens, the display shows the changes being made to make it easier to grasp. Its harder to do so with these static images.
Some features here may not bring major benefits over using the PEQ and with using tactile. Also with tactile it may be harder to detect any effects they may have when using tactile and not speakers/subs.
DEQ 1 & 2 click to enable or disable.
Gain alters +/- the signal strength but maintains the frequency curve
Threshold alters the signal strength and also alters the curve over the dB range
Frequency sets the Hz point to alter
Quality determines how exact to that frequency is altered
Type is for selecting different filters (BP is fine)
Attack (leave at default)
Release (leave at default)
Ratio (leave at default 1:5.0)
 (5) Setup
Amp Connection click on the amp to use (only one can be configured at a time)
Connect to activate the amp over USB
PC Presets save settings to PC if you wish for safe backup
Amp Presets load/save settings to amps internal memory with name etc. Useful for comparing different settings with EQ etc.
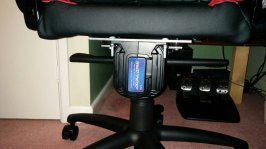
Amp will power up with last used setting, you do not need USB connected to operate. See MANUAL linked at top as front display and dials on amp can be used to control and load presets etc.

I recommend having a keyboard with audio controls or some form of easy control for "Windows" volume level, you may want to adjust intensity with different games or cars and this way it's easy to do when you have your speakers/volume and tactile/volume levels balanced to your preference.


")


