Having trouble in Inkscape

  • Thread starter Maverick52
  • 12 comments
  • 1,663 views
73
United States
United States
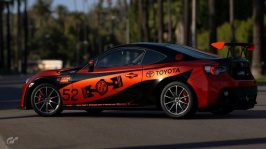
So first off, I've only started using Inkscape recently so there is probably quite a bit I don't understand about it yet, so I'm sorry if this is really simple and obvious but I've been racking my brain and trying to google answers and I haven't figured it out. Anyways, I'm trying to make some custom decals for a livery and I've run into an issue with something not working the way I want it to.

I've imported a scapes picture from GTS to "draw" on top of to make sure things will go where I want them once imported into the game. I've drawn a black stripe along the side of the car and for the livery to be correct a logo needs to be placed on top of this stripe. Instead of simply putting the logo on top of the stripe and choosing a color for it, I'd like to "cut" the logo out of the stripe so that the paint shows through. So far I've been doing this by placing whatever logo/words I want on top of a stripe and then using the "Exclusion" command under "Paths". In all of those instances the exact dimensions of the top logo was "cut" out of the stripe. In this instance that I'm having trouble with, the "cut out" is not the exact dimensions of the logo placed on top of the stripe.

Here are some pics that should show what I mean. (The stripe is at 50% opacity just so I can see the logo on top)

Before the using the "exclusion" command:
Before.jpg


After using the "exclusion" command:
After.jpg


This is the logo I am trying to replicate:
download.png

As you can see, the "86" and "Racing Series" worked perfectly. It might be worth mentioning that the Toyota and Toyota logo were vector images I downloaded, while the rest I traced by hand. However, the lines above the "86" and below "Racing Series" are also doing the same thing and I made all of those in Inkscape with the rectangle tool.

If anybody has a clue what's going on here, I'd appreciate any help you can offer!
 
@Maverick52 ,

I see different issues that could explain your troubles and you need to know them when you’re drawing for GT Sport.

- First, the game doesn’t recognize « Objects ». Whether it be rectangles, ellipses, text, you always have to use the « Convert to path » function so they work in the game.

- Second, don’t forget that in vector drawing, a line has no thickness, even if you add a stroke to it. So if you « cut » with a simple line (i.e. NOT a path), the cut has no thickness either. For example if you have drawn your stripes as lines instead of rectangles, you couldn’t see the cut. In order to cut with « lines » which have a stroke you have to select « Stroke to path ».

- Finally, the « Exclusion » function works with only one path at a time. Select all the paths you want to cut (Stripes, Toyota logo, 86, etc) then use the « Union » or « Combine » function, which create an unique path. Then you can cut this unique path in your base shape.

I hope that it’s clear enough!
 
Thank you for the reply!

I've done a couple other decals for the game and ran into those issues.

In this one, the "lines" started as objects (rectangle tool) but after manipulating them how I wanted I used the "Object to Path" function on them. This is also something I verified with the Toyota "text" and logo. They are all paths.

My first thought was that the stroke may be making the majority of what I see, but after messing with it both the Toyota logo and the "lines" are only using a fill and no stroke.

I used the "Exclusion" function with each part of the logo separately to help illustrate what is happening, but even if I combine or union all the pieces of the logo it does the exact same thing.

What's even worse is that I placed additional logos around the image earlier and was able to use the "Exclusion" function with them without issue. I used the "undo" function as I wasnt sure I wanted them there, but now that I am sure they are behaving the same way as the Toyota text & logo when I try to use the "Exclusion" function. If I make a new square or circle object and use the "Exclusion" function with that, it works just fine.

I probably should have put that all in my original post, but I figured it might be something simple & I could save all that typing! Sorry!
 
I just came back to do that! Can't believe I forgot to in the original post.

It's a little unorganized, sorry!
 

Attachments

  • 86 Side.zip
    526.8 KB · Views: 18
So I just tested something...

If I open up Inkscape, import the scape of the car, draw a stripe on it again, import the logo I'm having issues with, select all it's parts and use the "Combine" function, then select the logo and the stripe and use the "Exclusion" function, then it works perfectly fine.

This is essentially the exact same process I was doing with the image I zipped up for you, just over a longer period of time and with additional imports, saves, etc. I wonder if it just got messed up somehow along the way.
 
I just came back to do that! Can't believe I forgot to in the original post.

It's a little unorganized, sorry!
Actually, it’s very basic! It’s your base shape that has a stroke. So the Toyota logo is cut properly, but then it is « filled » with the shape’s stroke. Just delete the outline of the shape and it will be fine.

Also, I used the « difference » instead of « exclusion » function and it worked fine with the stripes too.

Don’t forget to suppress the base image and to save as « plain svg » or « optimized svg » before uploading in the game.
 

Attachments

  • 86 Side bis.zip
    527.8 KB · Views: 18
Ah hah! That makes sense! Thank you so much for looking at it!

That is also why the new one I started was working fine, I didn't have any stroke selected on that one. I did a test upload to the game with that one and I'm running into another issue. Maybe you can help me solve this one as well?

When I apply the decal to the car in the livery editor, it's very small. Slightly larger in size than the door handle, for example. I can scale it to cover the length of the car, as it's intended to be that size, but that seems to pixelate the decal. I'm assuming GTS is taking the vector we upload and actually applying/converting it into a raster image for the livery editor, and then once I scale that I see the pixelation.

Here is an example, this is a scapes photo, the pixelation is worse in the editor.

I tried scaling up the decal and adjusting the page size, assuming that if GTS is converting the vector to a raster it may want to see a larger vector to make a higher resolution raster, but that didn't seem to help at all.
 
Yes this is a known issue (which shouldn’t occur since its a SVG but hey, it’s Polyphony...).

My suggestion : make your decal for the « cut » part (around 50cm in the real car) and do the rest with in-game shapes.
 
Yes this is a known issue (which shouldn’t occur since its a SVG but hey, it’s Polyphony...).

My suggestion : make your decal for the « cut » part (around 50cm in the real car) and do the rest with in-game shapes.

Ah, bummer.

I see now that if I open my decals or any of the decals I've acquired through "Discover" there is a max size they appear as on the car. So if I wanted max resolution I would basically have to figure out what size this is and section off the livery into those sizes, correct?

The livery I'm attempting to make in inkscape with custom decals is actually based on one I've already made from in game shapes. The issue I ran into was that I wanted to use a two tone scheme using the special metallic flake paints and black decals. With the in game shapes, if I put the "Toyota Racing Series" logo on top of a black shape, then I needed to color the logo a solid color. Once you preview this and the lighting is reflecting off of the metallic paint, it makes the logo look really flat and off color no matter how good of a job I did trying to "match" the coloring. This is why I'm trying to "cut" the logo into the stripe.
 
The square of the maximum size is around 50x50cm.

You can put your decal, then a shape next to it, but not under. It demands some patience, but you can have great results!

Gold base


Fluo orange base


Green flakes base

Or you can section your decals in parts of around 1m to 1,5m, the pixels won’t be noticeable.
 
Ah, bummer.

I see now that if I open my decals or any of the decals I've acquired through "Discover" there is a max size they appear as on the car. So if I wanted max resolution I would basically have to figure out what size this is and section off the livery into those sizes, correct?

Just to try and answer this for myself I did a quick test. I made a square in Inkscape, scaled it until the page size said it was 100px by 100px in the document properties, then saved it. Then I did the same for a 200x200 px square and 300x300 px square and uploaded all three to GTS.

When I pull them up in the livery editor they all appeared on the car at the same size, and I couldn't notice any quality differences between them at their edges.

I'm thinking I might be able to use the square as a reference measurement inside Inkscape and use the guides to make a "grid". Then I could upload each section of the grid independently and that might help keep the pixelization down...

Am I on the right path here or am I headed off into the deep end?
 
@Cytoria , I just wanted thank you again for your help!

I used the guidelines in Inkscape to "measure" the size of a square decal that I uploaded, and then used that as a reference to "cut" the livery I was working on up into "full size" pieces I could just move to their correct location, almost like a puzzle.

Puzzle.jpg

It took a bit of work but I think the result was worth it. There are a couple imperfections still that I need to work out, and likely changes/improvements I'll decide to make, but this is pretty much the result I was looking for!

86-1.jpg
86-2.jpg
 
Back