- 27

- United States
- Counter_Steer__
Settings! Let's talk!
* Finally did a tuning video on YouTube as of Patch 1.41. You can find it on my YouTube channel. *
Patch V1.31 Updates
- Braking feels better, but the cars now want to brake in a straight line. With that said. A slight tap of the brakes on a corner helps the front drop and give a bit more angle.
- Hand Brake is really improved and you can hold onto it much longer now as long if you have shifted the body weight before hand.
- Tire grip is not as good as it use to be.
- Need more throttle control to get the cars to hook up coming out of corners. You will spin the hell out of your tires now.
- Rear downforce now increases understeer even more. Downforce in general is not as affective as it once was and some cars even had their numbers lowered for applicable downforce.
- Toe is more sensitive to changes now, lower numbers is probably best.
- Natural Frequency is softer in general now and I notice a lot of cars are now bottoming out against the fenders and killing any turn radius you had before.
- Anti-Roll Bar is more sensitive to changes now and has a more dramatic affect on how the car's body rolls.
- LSD settings have been altered and will GREATLY affect your initial turn in on corners. You don't need as high numbers, especially on Acceleration and Braking.
*Food for thought:
All the cars are driving different and they wont be driving like they use to. Don't try to tune it to extremes to get back to how it use to be, you will only be spinning out. I recommend trying a car you haven't driven and tuning it. It will help with learning how the game is now.
I think possibly not running the roll cage and body Rigidity may help recover some turning ability without hindering the car and giving a crazy amount of 'rebound' ( when the car snaps away from you ). Lowering all dampening should give more pivot to the car.
Softer natural frequency helps. Transmission gearing need to be made longer in the first 2-3 gears to compensate for the lack of traction this update.
---------------------------------
Patch v1.30:
---------------------------------
Patch v1.27:
- Cars now have even more steering angle which increases oversteer.
- Steering wheel adapter functions better.
- Camber now has increased, more realistic, effect!
- Roll Cage updated again; higher level roll cages add even more stiffness to car instead of all of them having the same value.
- Weight balance between acceleration and braking more pronounced. Believe they are trying to force more straight line braking.
---------------------------------
Patch v1.25:
- Roll Cage now makes the car stiffer/flatter around corners which eliminates some body roll thus inducing understeer.
- Chassis Rigidity also does the same and is more pronounced this patch.
---------------------------------
Reason for this guide!
Since a lot of people are all over the place about this and we are all learning it together. That, and not everyone's setting is good for another. Everyone drives differently, so no two people will have the same settings. It's just the nature of the beast, but there is something unique and beautiful about that in, in itself.
This will be a mild beginner guide that is simplified as much as possible. Hopefully we all can add and take away from it.
Side-note: I ignore the stats on the left, PP, Rotational G's, etc. These are flawed and not to be trusted. You have to go with your gut on these as you test drive your cars. There is no way around it outside of testing. Every car is unique. ( Ironically, after patch 1.23, these don't matter as much anymore. )
Suspension! Where to start? Some people go top down, some don't touch certain items.
Where would I go?
Start with . . .
--- 1) Natural Frequency.
It's a little hard to explain with the math, but let's say this is the BASE of your suspension. This is what keeps the car from bottoming out and so on. It's the 'strength' of your springs.
Rough draft, I would say start out with 3.00 Front and same with Rear. Then test drive. See how it feels. After settings it to 3.00 Front/Rear, just leave it. We will come back to this.
--- 2) Height.
This is where you should go next. With Natural Frequency on 3.00, you are pretty safe to lower height ( otherwise you get the frame bottoming out on the tires effect which makes you go straight into a wall. )
Rough draft, I would say bottom Front and Rear out and go up 10 on each. Start there, if it feels like it's not turning, go higher. An easy way to see this is after you lowered it, go into cockpit view and turn your car left and right at a stand still, the steering wheel should move left and right at a good rate, but if it's barely moving, you need more height. Add 10 more to front and back.
If it does turn, next step is corner testing, hit a few corners while in cockpit view to make sure the wheel isn't stuck in a position when you brake and roll into a corner, if it does. Add 10 more height.
What you are looking for here is the steering wheel to move freely, when you have that you can adjust up or down 5 and find what works and what doesn't, all the way down to increments of 1 when you really nail it down.
Random rule I follow, I do jack the rear up 10-30mm extra for down force reasons and acceleration out of corners to help throw rear on the back for traction. This will help the car tract straighter coming out of corners.
Some like it, some don't. Try it out after you get your steering sorted.
--- 3) Damping Ration: Compression/Expansion!
These settings help iron out the Natural Frequency more.
Now you have your good spring, Compression is how SLOW or FAST you want it to CRUNCH together ( slamming the brakes and the front collapsing forward, acceleration throwing weight on the rear, chicane corners side-to-side, etc )!
Expansion is the opposite, it's how SLOW or FAST the suspension 'widens/stretches' out and/or 'returns' to normal. You're turning left on a corner, the left side will expanding. When you come out of that corner, the right side expands to return to normal ride height.
Both these values are not bad stock, but play with them.
Do the usual 10, 5, 1 method. By this I mean, lower or heighten by ten, until you find something that you like, then adjust it up or down by 5 to iron it out even more, and if you want, increments of 1 when you feel you like. Incredments of 5 usually satisfy people.
This will start to HELP your car with RE-BOUND. Find settings that make transitions feel good. Accelerating/Decelerating and back to back turns. A full lap and ghosts may be required if you don't notice a difference.
Don't underestimate this setting. It can make your car undrivable to being able to hook corners!
--- 4) Anti-Roll Bar! So, you've made it this far! Great!
Since you have your suspension pretty ironed out IN ORDER. It's a good time to get into Anti-Roll Bar. When you turn a corner and the weight transfers onto that one side to collapse the suspension, a bar is connected to the opposing side of the suspension and starts to lower it as well to help keep the car FLATTER around corners. This is why I suggest setting up Damping first, they help each other.
After driving your car several times now, you will know if it under-steers, if it over-steers and so on. Lower settings is weak transition for to level out car versus high settings ( 10 ) which does the most transitioning to try and level out the car.
Rules of thumb, going lower than the rear on the front will increase over-steer but too much and it'll give it a kind of up and down motion in the middle of turn and while it makes the turn, it doesn't feel all that good.
Going higher number on the front than the rear will create under-steer.
I usually start at five and keep going up, even front and back until I find something I like. Then I lower whichever one BY 1. If I need oversteer and I'm 8 Front / 8 Rear, I will go 7 Front / 8 Rear. Test and repeat. Usually 2 points seems to be a sweet spot like 8 Front / 10 Rear or so on.
If you need Under-steer, do the same but knock one or two off the rear. Each car is unique in this aspect, so it will take some tries. Just try it at 1 Front / 1 Rear. Then 5 Front / 5 Rear, then 10 Front / 10 Rear. Makes it simple and you will immediately know if you like soft, medium, or hard. After that just move it by increments of 1 etc.
--- 5) Negative Camber Angle!
You should have a good idea how your car feels now. These settings can be all over the place. I will just simplify it for you. If you understeer, you want more on the front, if your rear kicks out ( not talking about you flooring it. I mean during braking or coasting and it just cuts loose on you ) then you need more on the rear.
This is best tested through corners to get to the maximum point of your steering where you're coming close to sliding.
Rules of thumb; do it in increments of 1.0, 2.0, 3.0. You will hit a point where the car is feeling worse, sliding more or the exit of corners feel more skittish then usual. After that, back them off 0.5 until you find what you like.
Example of a common setting is 2.0/2.5 Front and 0.5-1.5 Rear, but some can go all the way up to 4.0 or more if need by!
--- 6) Toe Angle! You're almost there!
You have Toe-in and Toe-out. Every car takes these VERY differently, I've never seen such a vast range. So, to cut this short toe in on the front SHOULD makes the front of the front tires turn in toward each other so when you hit a corner, and weight gets thrown onto that tire, it will be turning MORE of an angle and pull you through. But, sometimes toe-out works better on some cars.
My suggestion. Start with the front, toe-in 0.10 followed by toe-out. One way is going to feel good, which one feels good is the one you will follow. Increase to 0.20. Test. Does it get better or worse? If better, try 0.30. If not, minus -0.05 to 0.15. Sometimes 0.10 is good enough.
Once front is set up, then try rear. Toe-out in the rear general makes the rear swing out to create over-steer, so expect it but it's not always a bad thing when you have a car that under steers. Toe-in on the rear is more stable but do like you did with the front, try 0.10 one way then the other way. One way will be distinctly better and you go from there.
Toe-out the front allows me to recover when the car begins to kick out. Toe-out gives better control. I like toe-out a little but wheel users may like toe-in.
Toe-in on the rear helps keep the rear from kicking our too much, but toe-out in the rear helps it swing if you have a car that understeers.
--- 7) Differential!
- Initial Torque: How quick your LSD locks both tires to spin at the same time under acceleration. Lower takes long, higher becomes instant. Higher is good for drifting or if you having problems hooking up coming into a straight. Lower is better for cornering.
- Acceleration: This is a give/take relationship. This is not how 'fast' it locks, but how much power is given to each wheel. Lowest is better for turning, higher is better for putting power down coming out of a corner. Try it increments of 10 and find your happy medium. At 60 setting, when the differential locks, 100% power is going to both wheels where as at setting 30, it's more of a 40% / 60% power is going to the wheels as the outside wheel needs to spin faster.
- Braking: This keeps the differential locked when braking, so both tires are stopping pretty equally, thus you stop straighter.
Lowest setting allows you to have some turn ability when you brake. Higher settings help brake straighter. Cars that fishtail when braking, raise this.
--- 8) Brake Balance:
Since we are talking brakes. Balance is pretty interesting and every car handles it differently. Putting the balance to the front will sometimes help you stop faster, but it really helps the car keep straight when braking. Putting it to the rear allows more brake fade, so you can still turn into a corner while braking. Try balanced, then 2 clicks to the front, then 2 clicks to the back to feel where you should be going.
--- 9) Spoiler
I would do these in even sets. 100 / 150 / 200. Then play with it. A car that oversteers, higher rear is better and lower on the front.
A car that under steers, higher on the front and/or even rear.
Front: Higher = Oversteer / Lower Understeer. Higher is not always better. Try this in increments of 50, then 25, then 10 to 5.
Rear: Keeps the rear in line going around corners. Higher settings will cause understeer and sometimes cause the front to lift. Some Front-Wheel-Drives don't need as much unless they are drifty. Again, follow the same rule, try 50, then 25, then 10 then 5.
------------------------------------
Finally! Now go back and adjust your :l frequency. Play with it using increments of .50, then .20. Higher numbers have better grip but will bounce you on bumps and curbs, probably spinning you out. Lower setting is better for turning but too little will have you oversteering and spinning out.
Always experiment.
--- 10) Ballast:
I like ballast, a lot. Most of my vehicles have it. When you see your weight balance, ballast can help that be closer or actually be 50/50. I believe 50/50 feels the best as far as drivability goes. It may not be the fastest, but it feels damn good to drive.
If your car is 46 front / 54 rear. It may be okay, but if you want to add some balance, put the slider all the way to the front and start taking on 20 kg's until you get to 50/50. Same goes for the rear. Put the slider all the way to the right for the rear and do the same.
If you lightened your car so much, keep it centered and add weight. The weight distribution will change, so you may need to move the slider to the left or weight for where it's going to keep a 50/50 weight distribution.
Ballast helps a ton with oversteer/understeer and traction, sometimes even braking.
--- 11) ECU vs Power Restrictor:
Both lower your power, but in different ways. When you use these, you will see two lines. Blue line is horsepower, gray line is torque. These lines are more important then people give credit for. At the bottom of the picture is your RPM range with max RPM at the bottom right. You can see the curves, this is your power/torque curve. Where it is at, greatly affects a car. This curve isn't actually all that bad and is usually what I like to go with. I like mid-range power, some like the curves further to the right which will cause a bog down when accelerating, but you wont be spinning your tires as much.

As far as what to use to limit power. ECU will generally keep these 'curves' to as close to what you have currently where as Power Restrictor will move these curves closer to the middle and sometimes even lower. It you have to limit power, I'd recommend using ECU to keep the car feeling the same, but . . . if you are keeping your gear ratio's from a higher HorsePower Build, I would use Power Restrictor because that will bring your torque down into the middle and give you the power to still pull hard through the gears without having to change them.
Mid range torque curves feel better to me if you have good throttle control, it's more predictable where as when power is all the way to the right in a steep curve, it becomes unpredictable because you will accelerate out of a corner and have control, then suddenly hit your power band and your tires break traction and you spin. With mid-range power, you are generally always in the power band so you can feel what is happening every second.
Try it out and test it.
Conclusion: Everyone drives differently and doing the tunes yourself builds the car for your style of driving and can make that car a monster in your hands.
----------------------------------------------
--- Gear Ratio's! Let's Talk!
I have a video on YouTube explaining my way of doing gears.
Doing Gear Ratio's is not hard at all if you know what to look for. Ignore the numbers, they mean nothing to me and they don't have to mean anything to you.

First, I would go to Top Speed and set it around 280 and forget ever touching this automatically adjusted setting ever again.

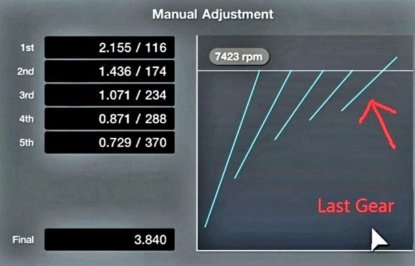
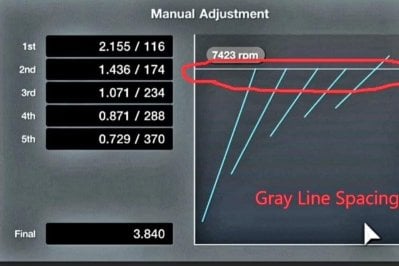
What's important on gear ratios is the gray line ( your MAX RPM / RED LINE ) and the blue lines are your gears. The spacing between the blue lines where they touch the gray line is what matters here. The spacing is the RPM drop between shifts, thus more even spacing the better you can stay in power band for even shifts. This is not for every car, will explain that later.
Test drive the car and see where it tops out. If you are not even close to your top end and want to shorter it / or you are topping out and need to make it longer. Go to "Manual Adjustment" and to your last gear. ONLY DO THIS ONE FOR NOW!

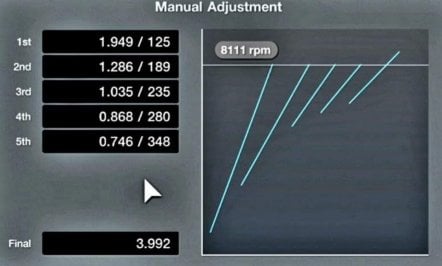
Ignore the numbers, Click your last gear ( this is a 5 speed so 5th gear ) and if you need more speed, adjust it so that blue bar goes further to the right. If you need less top end, adjust it so that last blue bar moves to the left. If you do need a reference, do it in increments of 30 by the right number ( 370 ). Lower or higher, test drive and ya. When you get your Top End sorted, you move onto the next step.

Take all the gears that are between your 1st and last gear and just shove them to the right. Get them away from first gear, get them as close to your last gear as you can. You just need them out of the way. After you've done this, it's now time to adjust 1st gear!

This should be done without traction control. ( I'm not against traction control, but you are setting gears so turn it off for now. )
1st gear will set the stage for the rest of the gears. ( The number that is 116 for mine, I would start at 100. That is a good starting spot. ) Now go out and test. Come to a dead stop and just floor it. You should spin the tires fairly easy. If you do, start moving 1st gear to the right by increments of 20 ( by the number you just set to 100! Ignore the others! ). Test again.
If it's bogging down too much, back it off by 10. You want to look for a spot where it's bogging first gear down and giving you traction and not total asphalt tearing pandemonium!
Once you find a happy medium between bog and spin that's comfortable for your throttle control, you go back to the rest of the mid row gears and space the tops of them at the gray line so they look similar to this.

You now have a good set of gears. I do not always set my first like this, I bog the hell out of first because I like to take off at full throttle if I can or at least 80% throttle, but it hurts you if you ever crash and have to crawl out of where ever, but I do recommend trying a few pulls at full throttle and seeing if you can bog it down enough that you hook right up at full throttle.
So find a happy medium. Even spacing works for most vehicles but sometimes you have high torque vehicles which are a bit more BRUTAL in the lower gears. Once you have your last and THEN 1st gear situation, make the spacing between 1st and 2nd & 2nd and third a bit wider then even out everything else so it may look like this.

The space is wider between 1st and second so when I shift into second it bogs it down, but notice the rest of the gears have even spacing? Just make up the difference between them with whatever you do. Sometimes you need more spacing here and there, but this is the best way to go about it.
Custom gears go along way with handling and peak acceleration. You will usually know when someone has them when they are blasting out of a corner or down a stretch when you are next to them.
Anywho - That's the easiest way to do gearing, I think! Meow.
Anyway, Good luck and enjoy! Hope it helps!
* Finally did a tuning video on YouTube as of Patch 1.41. You can find it on my YouTube channel. *
Patch V1.31 Updates
- Braking feels better, but the cars now want to brake in a straight line. With that said. A slight tap of the brakes on a corner helps the front drop and give a bit more angle.
- Hand Brake is really improved and you can hold onto it much longer now as long if you have shifted the body weight before hand.
- Tire grip is not as good as it use to be.
- Need more throttle control to get the cars to hook up coming out of corners. You will spin the hell out of your tires now.
- Rear downforce now increases understeer even more. Downforce in general is not as affective as it once was and some cars even had their numbers lowered for applicable downforce.
- Toe is more sensitive to changes now, lower numbers is probably best.
- Natural Frequency is softer in general now and I notice a lot of cars are now bottoming out against the fenders and killing any turn radius you had before.
- Anti-Roll Bar is more sensitive to changes now and has a more dramatic affect on how the car's body rolls.
- LSD settings have been altered and will GREATLY affect your initial turn in on corners. You don't need as high numbers, especially on Acceleration and Braking.
*Food for thought:
All the cars are driving different and they wont be driving like they use to. Don't try to tune it to extremes to get back to how it use to be, you will only be spinning out. I recommend trying a car you haven't driven and tuning it. It will help with learning how the game is now.
I think possibly not running the roll cage and body Rigidity may help recover some turning ability without hindering the car and giving a crazy amount of 'rebound' ( when the car snaps away from you ). Lowering all dampening should give more pivot to the car.
Softer natural frequency helps. Transmission gearing need to be made longer in the first 2-3 gears to compensate for the lack of traction this update.
---------------------------------
Patch v1.30:
- Camber is starting to have negative affects. Can run it 0.00 and be better off.
- Another physics change with weight shifting now makes the cars more dramatic.
- Braking balance has changed and become more touchy.
---------------------------------
Patch v1.27:
- Cars now have even more steering angle which increases oversteer.
- Steering wheel adapter functions better.
- Camber now has increased, more realistic, effect!
- Roll Cage updated again; higher level roll cages add even more stiffness to car instead of all of them having the same value.
- Weight balance between acceleration and braking more pronounced. Believe they are trying to force more straight line braking.
---------------------------------
Patch v1.25:
- Roll Cage now makes the car stiffer/flatter around corners which eliminates some body roll thus inducing understeer.
- Chassis Rigidity also does the same and is more pronounced this patch.
---------------------------------
Reason for this guide!
Since a lot of people are all over the place about this and we are all learning it together. That, and not everyone's setting is good for another. Everyone drives differently, so no two people will have the same settings. It's just the nature of the beast, but there is something unique and beautiful about that in, in itself.
This will be a mild beginner guide that is simplified as much as possible. Hopefully we all can add and take away from it.
Side-note: I ignore the stats on the left, PP, Rotational G's, etc. These are flawed and not to be trusted. You have to go with your gut on these as you test drive your cars. There is no way around it outside of testing. Every car is unique. ( Ironically, after patch 1.23, these don't matter as much anymore. )
Suspension! Where to start? Some people go top down, some don't touch certain items.
Where would I go?
Start with . . .
--- 1) Natural Frequency.
It's a little hard to explain with the math, but let's say this is the BASE of your suspension. This is what keeps the car from bottoming out and so on. It's the 'strength' of your springs.
Rough draft, I would say start out with 3.00 Front and same with Rear. Then test drive. See how it feels. After settings it to 3.00 Front/Rear, just leave it. We will come back to this.
--- 2) Height.
This is where you should go next. With Natural Frequency on 3.00, you are pretty safe to lower height ( otherwise you get the frame bottoming out on the tires effect which makes you go straight into a wall. )
Rough draft, I would say bottom Front and Rear out and go up 10 on each. Start there, if it feels like it's not turning, go higher. An easy way to see this is after you lowered it, go into cockpit view and turn your car left and right at a stand still, the steering wheel should move left and right at a good rate, but if it's barely moving, you need more height. Add 10 more to front and back.
If it does turn, next step is corner testing, hit a few corners while in cockpit view to make sure the wheel isn't stuck in a position when you brake and roll into a corner, if it does. Add 10 more height.
What you are looking for here is the steering wheel to move freely, when you have that you can adjust up or down 5 and find what works and what doesn't, all the way down to increments of 1 when you really nail it down.
Random rule I follow, I do jack the rear up 10-30mm extra for down force reasons and acceleration out of corners to help throw rear on the back for traction. This will help the car tract straighter coming out of corners.
Some like it, some don't. Try it out after you get your steering sorted.
--- 3) Damping Ration: Compression/Expansion!
These settings help iron out the Natural Frequency more.
Now you have your good spring, Compression is how SLOW or FAST you want it to CRUNCH together ( slamming the brakes and the front collapsing forward, acceleration throwing weight on the rear, chicane corners side-to-side, etc )!
Expansion is the opposite, it's how SLOW or FAST the suspension 'widens/stretches' out and/or 'returns' to normal. You're turning left on a corner, the left side will expanding. When you come out of that corner, the right side expands to return to normal ride height.
Both these values are not bad stock, but play with them.
Do the usual 10, 5, 1 method. By this I mean, lower or heighten by ten, until you find something that you like, then adjust it up or down by 5 to iron it out even more, and if you want, increments of 1 when you feel you like. Incredments of 5 usually satisfy people.
This will start to HELP your car with RE-BOUND. Find settings that make transitions feel good. Accelerating/Decelerating and back to back turns. A full lap and ghosts may be required if you don't notice a difference.
Don't underestimate this setting. It can make your car undrivable to being able to hook corners!
--- 4) Anti-Roll Bar! So, you've made it this far! Great!
Since you have your suspension pretty ironed out IN ORDER. It's a good time to get into Anti-Roll Bar. When you turn a corner and the weight transfers onto that one side to collapse the suspension, a bar is connected to the opposing side of the suspension and starts to lower it as well to help keep the car FLATTER around corners. This is why I suggest setting up Damping first, they help each other.
After driving your car several times now, you will know if it under-steers, if it over-steers and so on. Lower settings is weak transition for to level out car versus high settings ( 10 ) which does the most transitioning to try and level out the car.
Rules of thumb, going lower than the rear on the front will increase over-steer but too much and it'll give it a kind of up and down motion in the middle of turn and while it makes the turn, it doesn't feel all that good.
Going higher number on the front than the rear will create under-steer.
I usually start at five and keep going up, even front and back until I find something I like. Then I lower whichever one BY 1. If I need oversteer and I'm 8 Front / 8 Rear, I will go 7 Front / 8 Rear. Test and repeat. Usually 2 points seems to be a sweet spot like 8 Front / 10 Rear or so on.
If you need Under-steer, do the same but knock one or two off the rear. Each car is unique in this aspect, so it will take some tries. Just try it at 1 Front / 1 Rear. Then 5 Front / 5 Rear, then 10 Front / 10 Rear. Makes it simple and you will immediately know if you like soft, medium, or hard. After that just move it by increments of 1 etc.
--- 5) Negative Camber Angle!
You should have a good idea how your car feels now. These settings can be all over the place. I will just simplify it for you. If you understeer, you want more on the front, if your rear kicks out ( not talking about you flooring it. I mean during braking or coasting and it just cuts loose on you ) then you need more on the rear.
This is best tested through corners to get to the maximum point of your steering where you're coming close to sliding.
Rules of thumb; do it in increments of 1.0, 2.0, 3.0. You will hit a point where the car is feeling worse, sliding more or the exit of corners feel more skittish then usual. After that, back them off 0.5 until you find what you like.
Example of a common setting is 2.0/2.5 Front and 0.5-1.5 Rear, but some can go all the way up to 4.0 or more if need by!
--- 6) Toe Angle! You're almost there!
You have Toe-in and Toe-out. Every car takes these VERY differently, I've never seen such a vast range. So, to cut this short toe in on the front SHOULD makes the front of the front tires turn in toward each other so when you hit a corner, and weight gets thrown onto that tire, it will be turning MORE of an angle and pull you through. But, sometimes toe-out works better on some cars.
My suggestion. Start with the front, toe-in 0.10 followed by toe-out. One way is going to feel good, which one feels good is the one you will follow. Increase to 0.20. Test. Does it get better or worse? If better, try 0.30. If not, minus -0.05 to 0.15. Sometimes 0.10 is good enough.
Once front is set up, then try rear. Toe-out in the rear general makes the rear swing out to create over-steer, so expect it but it's not always a bad thing when you have a car that under steers. Toe-in on the rear is more stable but do like you did with the front, try 0.10 one way then the other way. One way will be distinctly better and you go from there.
Toe-out the front allows me to recover when the car begins to kick out. Toe-out gives better control. I like toe-out a little but wheel users may like toe-in.
Toe-in on the rear helps keep the rear from kicking our too much, but toe-out in the rear helps it swing if you have a car that understeers.
--- 7) Differential!
- Initial Torque: How quick your LSD locks both tires to spin at the same time under acceleration. Lower takes long, higher becomes instant. Higher is good for drifting or if you having problems hooking up coming into a straight. Lower is better for cornering.
- Acceleration: This is a give/take relationship. This is not how 'fast' it locks, but how much power is given to each wheel. Lowest is better for turning, higher is better for putting power down coming out of a corner. Try it increments of 10 and find your happy medium. At 60 setting, when the differential locks, 100% power is going to both wheels where as at setting 30, it's more of a 40% / 60% power is going to the wheels as the outside wheel needs to spin faster.
- Braking: This keeps the differential locked when braking, so both tires are stopping pretty equally, thus you stop straighter.
Lowest setting allows you to have some turn ability when you brake. Higher settings help brake straighter. Cars that fishtail when braking, raise this.
--- 8) Brake Balance:
Since we are talking brakes. Balance is pretty interesting and every car handles it differently. Putting the balance to the front will sometimes help you stop faster, but it really helps the car keep straight when braking. Putting it to the rear allows more brake fade, so you can still turn into a corner while braking. Try balanced, then 2 clicks to the front, then 2 clicks to the back to feel where you should be going.
--- 9) Spoiler
I would do these in even sets. 100 / 150 / 200. Then play with it. A car that oversteers, higher rear is better and lower on the front.
A car that under steers, higher on the front and/or even rear.
Front: Higher = Oversteer / Lower Understeer. Higher is not always better. Try this in increments of 50, then 25, then 10 to 5.
Rear: Keeps the rear in line going around corners. Higher settings will cause understeer and sometimes cause the front to lift. Some Front-Wheel-Drives don't need as much unless they are drifty. Again, follow the same rule, try 50, then 25, then 10 then 5.
------------------------------------
Finally! Now go back and adjust your :l frequency. Play with it using increments of .50, then .20. Higher numbers have better grip but will bounce you on bumps and curbs, probably spinning you out. Lower setting is better for turning but too little will have you oversteering and spinning out.
Always experiment.
--- 10) Ballast:
I like ballast, a lot. Most of my vehicles have it. When you see your weight balance, ballast can help that be closer or actually be 50/50. I believe 50/50 feels the best as far as drivability goes. It may not be the fastest, but it feels damn good to drive.
If your car is 46 front / 54 rear. It may be okay, but if you want to add some balance, put the slider all the way to the front and start taking on 20 kg's until you get to 50/50. Same goes for the rear. Put the slider all the way to the right for the rear and do the same.
If you lightened your car so much, keep it centered and add weight. The weight distribution will change, so you may need to move the slider to the left or weight for where it's going to keep a 50/50 weight distribution.
Ballast helps a ton with oversteer/understeer and traction, sometimes even braking.
--- 11) ECU vs Power Restrictor:
Both lower your power, but in different ways. When you use these, you will see two lines. Blue line is horsepower, gray line is torque. These lines are more important then people give credit for. At the bottom of the picture is your RPM range with max RPM at the bottom right. You can see the curves, this is your power/torque curve. Where it is at, greatly affects a car. This curve isn't actually all that bad and is usually what I like to go with. I like mid-range power, some like the curves further to the right which will cause a bog down when accelerating, but you wont be spinning your tires as much.
As far as what to use to limit power. ECU will generally keep these 'curves' to as close to what you have currently where as Power Restrictor will move these curves closer to the middle and sometimes even lower. It you have to limit power, I'd recommend using ECU to keep the car feeling the same, but . . . if you are keeping your gear ratio's from a higher HorsePower Build, I would use Power Restrictor because that will bring your torque down into the middle and give you the power to still pull hard through the gears without having to change them.
Mid range torque curves feel better to me if you have good throttle control, it's more predictable where as when power is all the way to the right in a steep curve, it becomes unpredictable because you will accelerate out of a corner and have control, then suddenly hit your power band and your tires break traction and you spin. With mid-range power, you are generally always in the power band so you can feel what is happening every second.
Try it out and test it.
Conclusion: Everyone drives differently and doing the tunes yourself builds the car for your style of driving and can make that car a monster in your hands.
----------------------------------------------
--- Gear Ratio's! Let's Talk!
I have a video on YouTube explaining my way of doing gears.
Doing Gear Ratio's is not hard at all if you know what to look for. Ignore the numbers, they mean nothing to me and they don't have to mean anything to you.
First, I would go to Top Speed and set it around 280 and forget ever touching this automatically adjusted setting ever again.
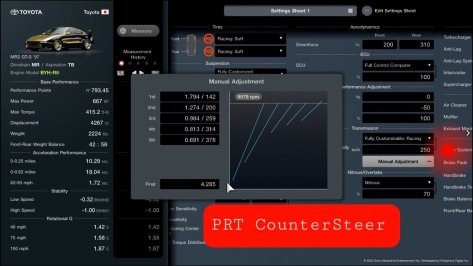
What's important on gear ratios is the gray line ( your MAX RPM / RED LINE ) and the blue lines are your gears. The spacing between the blue lines where they touch the gray line is what matters here. The spacing is the RPM drop between shifts, thus more even spacing the better you can stay in power band for even shifts. This is not for every car, will explain that later.
Test drive the car and see where it tops out. If you are not even close to your top end and want to shorter it / or you are topping out and need to make it longer. Go to "Manual Adjustment" and to your last gear. ONLY DO THIS ONE FOR NOW!
Ignore the numbers, Click your last gear ( this is a 5 speed so 5th gear ) and if you need more speed, adjust it so that blue bar goes further to the right. If you need less top end, adjust it so that last blue bar moves to the left. If you do need a reference, do it in increments of 30 by the right number ( 370 ). Lower or higher, test drive and ya. When you get your Top End sorted, you move onto the next step.
Take all the gears that are between your 1st and last gear and just shove them to the right. Get them away from first gear, get them as close to your last gear as you can. You just need them out of the way. After you've done this, it's now time to adjust 1st gear!
This should be done without traction control. ( I'm not against traction control, but you are setting gears so turn it off for now. )
1st gear will set the stage for the rest of the gears. ( The number that is 116 for mine, I would start at 100. That is a good starting spot. ) Now go out and test. Come to a dead stop and just floor it. You should spin the tires fairly easy. If you do, start moving 1st gear to the right by increments of 20 ( by the number you just set to 100! Ignore the others! ). Test again.
If it's bogging down too much, back it off by 10. You want to look for a spot where it's bogging first gear down and giving you traction and not total asphalt tearing pandemonium!
Once you find a happy medium between bog and spin that's comfortable for your throttle control, you go back to the rest of the mid row gears and space the tops of them at the gray line so they look similar to this.
You now have a good set of gears. I do not always set my first like this, I bog the hell out of first because I like to take off at full throttle if I can or at least 80% throttle, but it hurts you if you ever crash and have to crawl out of where ever, but I do recommend trying a few pulls at full throttle and seeing if you can bog it down enough that you hook right up at full throttle.
So find a happy medium. Even spacing works for most vehicles but sometimes you have high torque vehicles which are a bit more BRUTAL in the lower gears. Once you have your last and THEN 1st gear situation, make the spacing between 1st and 2nd & 2nd and third a bit wider then even out everything else so it may look like this.
The space is wider between 1st and second so when I shift into second it bogs it down, but notice the rest of the gears have even spacing? Just make up the difference between them with whatever you do. Sometimes you need more spacing here and there, but this is the best way to go about it.
Custom gears go along way with handling and peak acceleration. You will usually know when someone has them when they are blasting out of a corner or down a stretch when you are next to them.
Anywho - That's the easiest way to do gearing, I think! Meow.
Anyway, Good luck and enjoy! Hope it helps!
Attachments
-
 FB_IMG_1664564234685.jpg185.5 KB · Views: 26
 -
 FB_IMG_1664564237839 (2.jpg65.7 KB · Views: 26
 -
 FB_IMG_1664564245285.jpg75.4 KB · Views: 24
 -
 FB_IMG_1664564247439.jpg61.3 KB · Views: 22
 -
 1828ebe046031-7c75A19DF442AFA889F.5A6593C3990593B6_message_425024543097689_1660252121475.jpg111.6 KB · Views: 20
 -
 FB_IMG_1664564247439.jpg61.3 KB · Views: 24
Last edited: