The DIY-ers corner

  • Thread starter Jet Badger
  • 342 comments
  • 34,030 views
AMD Ryzen 5 1600X, MSI X370 Krait, KFA² (Galax) GTX1060 EXOC 6GB, Alphacool Eisenbaer 140mm AIO cooler, 32GB Corsair Vengence LED 2666MHz, Corsair CX650M, some Cablemod white cables and a strip of white LED.

I'm going for more cores and more RAM because it will run some engineering programs. And the AIO cooler because air flow is not good so having an "independent" way to cool the CPU is a plus.
 
Sorry for the double post, but I want to bump the thread.

I've finished the case, as shown, but I think it's too flat just being matte black, so I want to give it more flare. I want to add something car related. I thought abou black and gold like JPS era of Lotus or a white camo livery like Red Bull did a couple years ago.

I want some suggestions of what themes I can follow.
 
renown theme? could maybe find a messed up rotor for cheap, cut it down to give just the outer profile and maybe inner ring gear and epoxy it to the side too. always been a fan of the John Players Special scheme as well.
 
After debating for a while, I decided to go with a dazzle camouflage pattern like the rolling prototypes and the Red Bull testing livery 2 years ago. Really simple black and white paint. After 2 hours of masking tape this is the result. Not perfect, but a good effort. Only the paint left :)

IMG_20170908_161904.jpg

IMG_20170908_161911.jpg
 
I have no doubt there are better places to solicit this sort of information, and I'm sure I'll seek those out, but I thought I'd give it a wag here.

I'm seeking a method of affixing a hefty chunk of wood to a fine aggregate concrete base with no fewer than three bolts in a triangular arrangement. I'd really like to cast the bolts head-down in the concrete, but because of the thickness of the wood and the number of bolts I feel are necessary, I need to ensure the bolts are parallel to one another and perpendicular to the top of the casting--for ease of sliding the wood down the bolt shafts.


Short of welding metal rods to the bolt heads and welding the rod ends to metal plate that rests at the bottom of the form, obviously employing a jig (I'm not strictly ruling this option out if a better alternative doesn't exist), does anyone have any thoughts as to how I might make this connection? Appearance is a concern, otherwise I'd use a clunky metal bracket, and I need to be able to break the connection and make it again for transportation purposes.

Thanks in advance for any insights.
 
Use j bolts and some metal rod. Seems you have access to a welder. Instead of using a metal plate, use some metal rods. tack on a few extra rods in a criss cross to add some extra strength to the concrete.
Edit: read your post better. so, use the metal rod, weld it onto the j bolts at a level that would be half way into the concrete. Use some extra rods to reinforce the concrete.
So, to be sure you have these square, get some thick, stiff cardboard and make a temple till match the bolt hole dimensions. Use some nuts to attach it to the top of the j bolts. Pour the concrete into the form, press the j bolt rig to the depth you want it at and let it dry. That will hold them square until the concrete sets up.
 
Last edited:
I didn't go into as much detail as I, in hindsight, probably should have because I was really expecting something along the lines of what I had in mind, but hopefully not quite so involved. So let me elaborate some.

I've got some substantial (5" by 3/8" with 2" thread depth) t-slots, with a black oxide finish because the ends will not only be moderately exposed to elements but they will also be easily seen and they're attractive in addition to substantial.

It's not a huge deal getting different hardware (I liked the idea of using anchor bolts because I could easily tack the short ends to the elbows in a triangle formation), but the coating process for something like that is rather spendy.

If it were simple, I wouldn't be asking. :P

Thanks though!
 
25542401_10156883138409097_431503590819895215_o.jpg


The high-chair on the right is not mean to be an office chair. The seat's too short to accommodate the length of my thighs (or any adult's thighs), the leg rest is not meant for long-term resting, and there's no support for the upper back. I've been doing this for a year and a half, and it's high time I start sitting on something that least lets me rest my feet and legs wholly.

So I'm whipping something up instead of purchasing another chair. A DIY lets me tailor this to my body dimensions, so I can nail the important points of a chair: feet placed flat, elbows rested, can lean on something, and arms are level with the standing desk.

Damn legs aren't straight. Biggest headache to deal with at the moment when you don't have a sizable workbench. Once I'm comfortable with the legs standing vertically, I'm adding in braces underneath the top board to help the legs wobble less. Once I'm comfortable the the legs don't twist and wobble when I'm adjusting my butt on the
seat, then I'll add in the back board. The foot rest may be about 2 inches longer than I think it has to be. It's ridiculous!
 
I didn't go into as much detail as I, in hindsight, probably should have because I was really expecting something along the lines of what I had in mind, but hopefully not quite so involved. So let me elaborate some.

I've got some substantial (5" by 3/8" with 2" thread depth) t-slots, with a black oxide finish because the ends will not only be moderately exposed to elements but they will also be easily seen and they're attractive in addition to substantial.

It's not a huge deal getting different hardware (I liked the idea of using anchor bolts because I could easily tack the short ends to the elbows in a triangle formation), but the coating process for something like that is rather spendy.

If it were simple, I wouldn't be asking. :P

Thanks though!
Doesnt seem that elaborate. You said you were bolting a hefty chunck of wood to a triangular base and wanted to know the best way to get bolts to be level and square.
You have 5in t slot bolts, that can work. I definitely suggest using or welding up mesh and welding the bolts to it. Just sand off the coating where you are going to run the bead. The wire grid you are making or buying and using should not be so big that any of it is closer that a quarter inch to the edge of concrete form. The only point of the card board is to keep the the bolts square while the concrete sets. Once thats done then the cardboard can be removed.
Honestly though, if you use j bolts, you could just use some wire to hold it to the wire reinforcing mesh, and use the cardboard up top to hold it in place.
How big do you plan on making this base?
 
How big do you plan on making this base?
I presume to determine space around the bolt circle? The final shape will be determined by the wood, which is still clamped while the glue cures and won't be cut until after that, but there will easily be three inches around the bolt circle. Each base (two total) will be 15 inches tall with a cavity in the underside (not deep enough to simply bolt through) to reduce weight.
 
Nah, most just curious about the size. Im guessing you are going to make it something like 5-6 inches in diameter? For that, i definitely suggest a mesh over a plate. If one is accidentally dropped or something, that plate could act as a weak spot in the concrete, and what might have been a chip could become a base broke in half.
Given the fact it is going to be a fairly long tube, i suggest rolling the mesh. Make it say 10 inches tall. Attach the bolts to the top of the mesh, push in down or pour the concrete around it, then put the carboard template on and let it cure.
 
DSC_0322.JPG


DSC_0323.JPG


DSC_0324.JPG


Case Mod. :dopey:

Now it fits in my tv cabinet.

DSC_0325.JPG


Since the tv now hangs on the wall, I was able to put the speaker on top of the cabinet and the pc inside.

Still haven't made my new cabinet but that will happen soon.
 
Yeah so, I'm gonna replace that cabinet.

Here's a quick paint creation!

View attachment 585464

It will be just a bit wider and deeper so that the PS4 and amplifier will have a bit more room surrounding them.

HxWxD is 69x90x50cm. It will be the same off-white and greywash as the desk. But first the weather needs to get a bit cooler.


hqdefault.jpg


DSC_0326.JPG


It's a start! It's a couple of millimeters off from top to bottom but I can fix that pretty easily. Now I need to buy a new saw blade because apparently ypu can't cut screws with a blade for wood.
 
hqdefault.jpg


View attachment 706947

It's a start! It's a couple of millimeters off from top to bottom but I can fix that pretty easily. Now I need to buy a new saw blade because apparently you can't cut screws with a blade for wood.

DSC_0327.JPG


DSC_0328.JPG


It's amazing what one can achieve in a short amount of time with the proper tools. Gonna screw and glue it all together and measure and create the doors and then some paint. Should be done this week.

My desk took 6 weeks to be finished because I had to rely on other people and their tools. Never again.
 
A couple of six foot 1x6s.

20180119_101815.jpg

A couple of cuts later.

20180119_102524.jpg

First set of clampage.

20180119_103257.jpg

Cleats installed because I won't be able to get my drill in there shortly.

20180119_104850.jpg

Fast forward to the others attached and mounted to the wall.

20180119_113054.jpg

And loaded up.

20180119_114657.jpg

I didn't take I to account the VHS tapes when I measured. I maybe should have gone a bit larger. Or I should stop buying movies.
 
Didn't really know what thread to post this in but I thought this one was a close fit

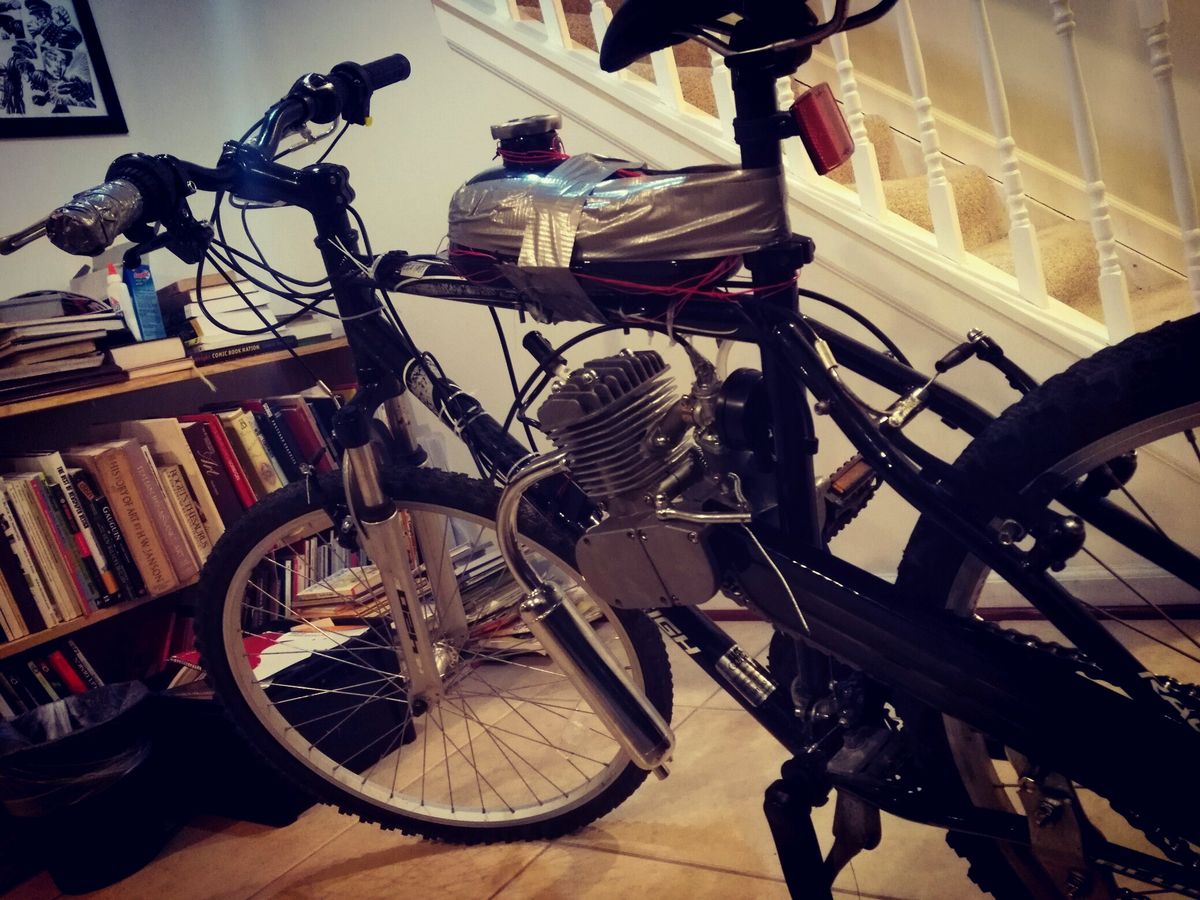
After a couple hours of struggling with the chassis, I've managed to put attach a small 80cc motor to my shoddy bicycle. Ignore some of the shoddy build work ,ah la, duck tape and wires holding the fuel tank, those have been changed.

d9c2cc91ff29dd0faf071bf6f9541fc5.jpg
 
Ignore some of the shoddy build work ,ah la, duck tape and wires holding the fuel tank, those have been changed.

d9c2cc91ff29dd0faf071bf6f9541fc5.jpg
I hope you aired up that front tube as well.

TB
How else will the Blu-Rays assert their superiority if they're all segregated?
Ah, but don't oppressors assert their superiority from atop proverbial pedestals? You should build a pedestal for the Blu-Rays so they can contemptuously look down upon their lessers with their BD eyes.
 
Last edited:
Didn't really know what thread to post this in but I thought this one was a close fit

After a couple hours of struggling with the chassis, I've managed to put attach a small 80cc motor to my shoddy bicycle. Ignore some of the shoddy build work ,ah la, duck tape and wires holding the fuel tank, those have been changed.

d9c2cc91ff29dd0faf071bf6f9541fc5.jpg

That............looks incredibly dangerous.


Love it.
 
Here in the state of VA it must be under 50 cc to ride unless you have a license .

In Maryland, basically as long as it's got pedals and a secondary form of propulsion (ah la internal combustion motor or electric motor), it's legally a moped. That means I have to get it registered at the MVA and have a moped's operator permit along with always wearing a motorcycle helmet. But I do moped things like travel on public roads, speed, and look dumb.
 
https://www.gasbike.net/
I got my bike from the website above. A fair bit of warning. These motors are like universal turbo kits. There's gonna be parts you don't need and there's gonna be parts you might need. Be sure to measure your bike's frame when cheeking to see if the motor will fit.
Ah alright. Something I've always wanted to try just purely for the enjoyment of building it and yours has given me all the more motivation. Thank you for the source and tips.
 
That motorbicycle reminds of when I was 16 and bolted 50cc minimoto engine to a BSA shopper (think Brompton) rear rack and powered the rear wheel. Wheelies for days.
 
Back