3D Modelling, Post your 3D models! (Cars, Planes, People, Landscapes etc!)

TB
I'm hoping things have changed in the last 10-ish years since I've used Revit but when we had some Autodesk people come to do some training, we asked them how we could do track lighting. The best they could come up with at the time?

Flat stair handrails and balusters with electrical connections. :lol:

It seemed like Architects loved it because of what they were able to do with it but the electrical side felt like a complete afterthought.

Well, let’s just say that the program is brilliant as long as you want to use it in the way it’s intended. As soon as you want to do something extra it becomes incredibly hard / impossible.

Adding a cornice (which shouldn’t be rocket science in an architectural program) turned out to be incredibly hard since the ceiling of the house is sloped. When modelling a sweep you can either select a 3D path from existing lines in the model, or you can sketch your own path. If you pick a 3D path there is no way to offset a particular edge. If you sketch your own path you are forced to sketch in 2D. So if you need a 3D path with an offset you either have to draw some invisible walls with that offset, or do multiple 2D sweeps and manually trim them at the intersections.
 
An entirely different style of modelling: a house I'm making in Revit for a university project. It took some time getting used to the workflow after dealing with vertices, edges and faces in Blender (in Revit you basically draw shapes and building components), but now that I figured out how it works I kind of like it. It's a lot faster than Blender, especially if you want to make changes to the design. The drawback is that you don't always have full control of what is happening, it's often some algorithm that decides how some walls are going to join or which part of the wall you're allowed to attach to the roof and it can be frustrating when you don't know why something doesn't work. It can also be tricky to model things that doesn't come with the program by default, such as the chimney on this house.

View attachment 959665

The renders look far from photorealistic, even though there is a primitive raytracing option. But the program is intended for making blueprints and floor plans so photorealism isn't really important.

I understand the frustration and feeling of lack of control in Revit - there's even a website called "what Revit wants". I deal with it every day. :lol:

There's a plugin for Revit called Enscape that uses the Unreal engine to do real time rendering. It's not perfect but it's so easy to use and so fast. You can get reasonably photo-realistic results with a bit of work.

TB
I'm hoping things have changed in the last 10-ish years since I've used Revit

They haven't.

but when we had some Autodesk people come to do some training, we asked them how we could do track lighting. The best they could come up with at the time?

Flat stair handrails and balusters with electrical connections. :lol:

Sounds right.

It seemed like Architects loved it

We don't.

because of what they were able to do with it but the electrical side felt like a complete afterthought.

:lol:
 
Last edited:
I feel so accomplished! I made a remake of one of my old voxel character models. But here's the catch- I did this all in Blender! That's right! No voxel program was used in the creation of this model here. Through some techniques I learned from one YouTube video, and through some experimentation, I was able to re-create one of my old models to near-perfect re-creation. It was a method of taking a mesh plane, subdividing it, and then use a folding technique to put it together. In the future, I may explain my techniques used in a "John's Creative Space" blog post including plans with my Blender re-creation. And so you know what the original model is like, I included the reference model. Check it:

chrblender_orig.png

More of my 3D Modeling work

One of the reasons why I created this Blender rendition is because I wanted to make an evolution of my voxel models by making a model version that could be animated. I didn't know what I wanted to do with my old voxel character models since making them years ago. So what I thought of was trying to bring them into Blender. Not only that, but also try to make these models without having them originate from a previous source (like MagicaVoxel). While these are voxel-style models, I COULD use these simple voxel style models to flesh out into more interesting shapes and models. So my options are open as I have a good bit more leverage with this model. The only disadvantage is that I haven't UV mapped this model. I didn't even attempt to design a texture or color by material for this model. I just left it plain and basic. In future attempts, though, I may have a number of ideas for texturing.

I may consider performing this method to make other voxel-style models, especially those that I haven't previously developed in another voxel program.
 
Here is a carport, designed to carry a snow load of 2.4 kN/m^2. It wouldn’t take horizontal loads along the y-axis very well though, it’s missing a diagonal beam along that plane.

98C5B24F-C74E-4163-87A1-D5E3C9D28EA6.png 9DFA3070-B6A5-4CEB-8485-930E0C7AD527.png 05653095-4B6D-472B-A93C-1E86562AB2A8.png
 
I made some progress in my push for developing a practical 3D asset. The goal is to develop something that I hope can be put into games or game engines. All I have developed of late is a layout for an off-road race track I had in mind. The key here, though, is on my focus to try to develop (especially) locations using measurements.

Since I somewhat had Assetto Corsa in mind (also for GTR2 and rFactor 1), I know my measurements had to be done in meters. I used certain things using Google Earth to get a better idea of what measurements for a specific location I have in mind. So I looked at the width of the road in meters just to get a baseline. Then, I looked at race tracks including drag strips, ovals, and various road courses. So each time modeling a race course in Blender, I have now made a habit of setting units to Meters and using Metric measurements. I practiced using Bezier curves and modeling a road slice followed by the use of an Array modifier and a Curve modifier. I also have to remember to Remove Doubles after completing the main model.

What you are about to see so far is just the layout. Nothing else- not even objects, materials, UV mapping, or anything like that. Here is what I came up with:

offroadwip_orig.jpg

^ My 3D Modeling Portfolio on my JohnMarineDesigns site

A plan I have is to use Blender (especially 2.79b) to simply get an idea of how courses will look when completed. While I do not intend on making a game, I do want to produce 3D race tracks that I am hopeful game developers will implement into games and projects. I have been thinking about using 3DSimEd for development of 3D tracks to be used in games. I should probably focus on a proper workflow to get models into games more than trying to completely create entire maps complete with models. I will also need to find a way to measure the length of track layouts once complete.

It's been a lot, but I seem a lot more confident in modeling locations.
 
Last edited:
PROGRESS! Using Blender and Unity3D, I may have found a suitable workflow for testing my race track designs. I made a first draft of one track I created in one day. I later tested it by exporting it from Blender to Unity3D. The Unity3D Skycar was then used to get a basic driving model. I had to tone down the car's speed and scale up the track by quite some margins. I also may want to subdivide the race track mesh so it runs smoother prior to driving. The textures were part of a rather small single texture. I needed to practice UV mapping and modeling. Since I didn't want to rely on stock images or use textures from other games, I kept things basic. Still, everything worked very nicely. Again- progress! Maybe I'll use these two more often for building and testing race tracks.

unity3dracetrackprototyping_orig.jpg

^ More of my Game Development work on my JMDesigns page

A long while back, I first envisioned using Blender to build a race track for "rFactor." Since taking the producer route, I figured it would be best I develop material to be placed into any game engine or into any game in general. At least this experience of late helps me to get a better overall feel towards developing more content for others to use in the future. You can visit my Weebly site for more detailed analysis and thoughts of this prototyping experience.
 
I don't have pictures to share, but I have somewhat been interested in some low polygon work. I was inspired by a YouTube who has been developing PlayStation 1-style 3D models. I do not consider myself adept at 3D modeling. I have been trying to learn and apply techniques to design 90s-style 3D models. It is amazing how certain modelers make nearly true-to-form PS1-style models. I have yet to produce something of quality to showcase my education of low polygon modeling.

Besides this, I started trying a different method of modeling a human. I modeled body psrts separately- just like with PS1 (and even Nintendo 64 and SEGA Saturn) models. So I took the torso and even modeled a head and neck, an arm and a hand, and a leg and feet. I also used this opportunity to try to clean the topology once I applied a subdivision modifier and a mirror modifier.

Again- all of my work is done in Blender. I don't think I can do any Blender higher than 2.80 with the limitations of my computer. I prefer 2.79 for two reasons- I'm more comfortable with it, and I want the added functionality of the Blender Game Engine for any possible gaming projects developed in Blender.
 
Wings3D is an excellent program if you are not adept with 3D modeling. If you want something more powerful, use Blender. If I could write a letter to my younger self, I'd say to start with Wings3D, then go to SketchUp, then go to Blender. Jumping right into Blender can be pretty difficult. With a lot of my Wings3D creations, I have been strongly considering trying to make similar material for Blender now that I have better skills.

Besides trying to model, I actually have had interest in making motion graphics with Blender. Not many people use Blender for making video content. You can make decent animations if you are good enough. This can be mostly a set of planes animated, or you can go the fancy route and come up with an intense 3D model scene. I haven't come up with anything in this department yet.

Development of anything 3D has been slow for me of late. One thing still fresh in my mind is trying to model characters and make clothing for them. I haven't fully mastered using Unity3D to test vehicle and location designs, and I am still kind of learning how am I to come up with 3D character designs. I am using MakeHuman for now to develop humanoid characters and then import my creations to Blender.


3D modeling is tough business, but don't lose focus. Keep at it!
 
Anyone know where I could get a 12in x 24in x 3in model printed (or 'molded', not sure of the terminology)? I've attached my first attempt at making something in SketchUp. It's basically a lego organizer for when you want to rebuild huge lego sets like the new Star Destroyer or Falcon or Taj Mahal, etc. I have this made out of carboard and it's fine, but it won't last forever, ya know?

Also let me know if (okay probably not if but where) my model has mistakes :lol: Thx in advance for any info!


Jerome
 

Attachments

  • Lego Organizer.zip
    144.6 KB · Views: 10
Last edited:
I've already progressed since I snapped this screenshot to share elsewhere, but here's a sneak peek at the next vehicle I've decided to add to my project, filling a particular gap in the lineup. :D 
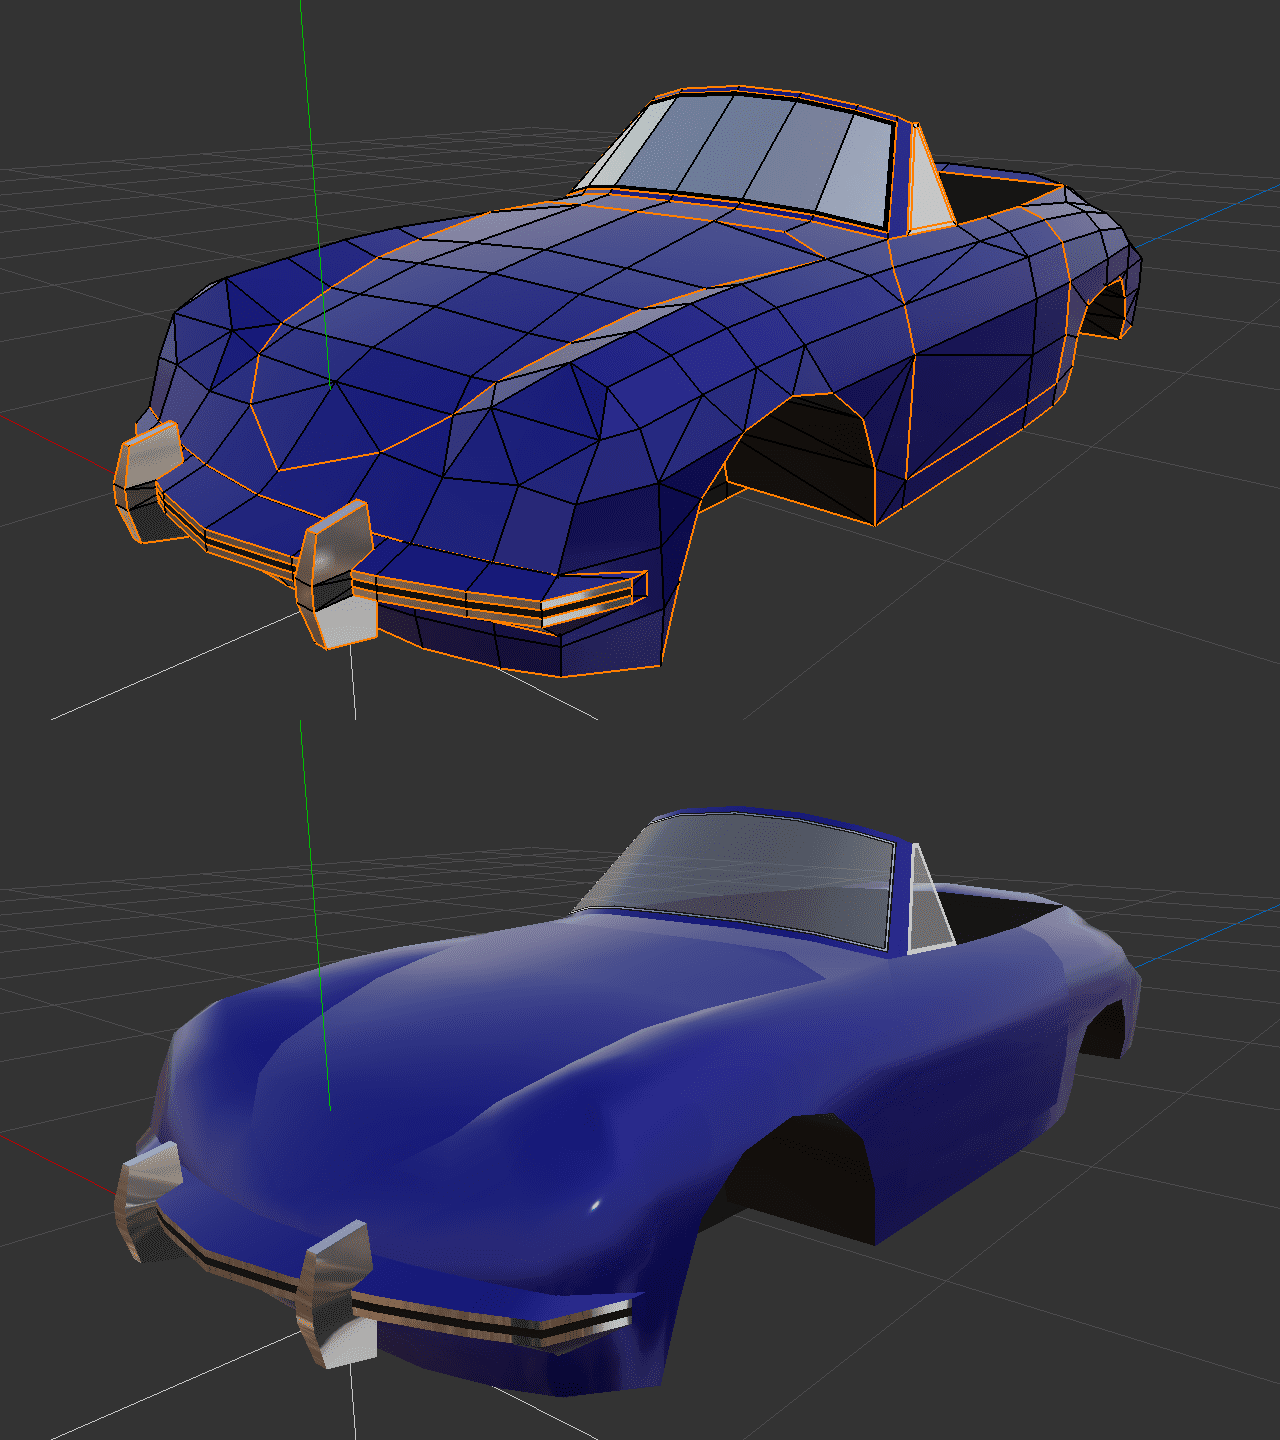
This is the curviest vehicle I've attempted yet by some margin.
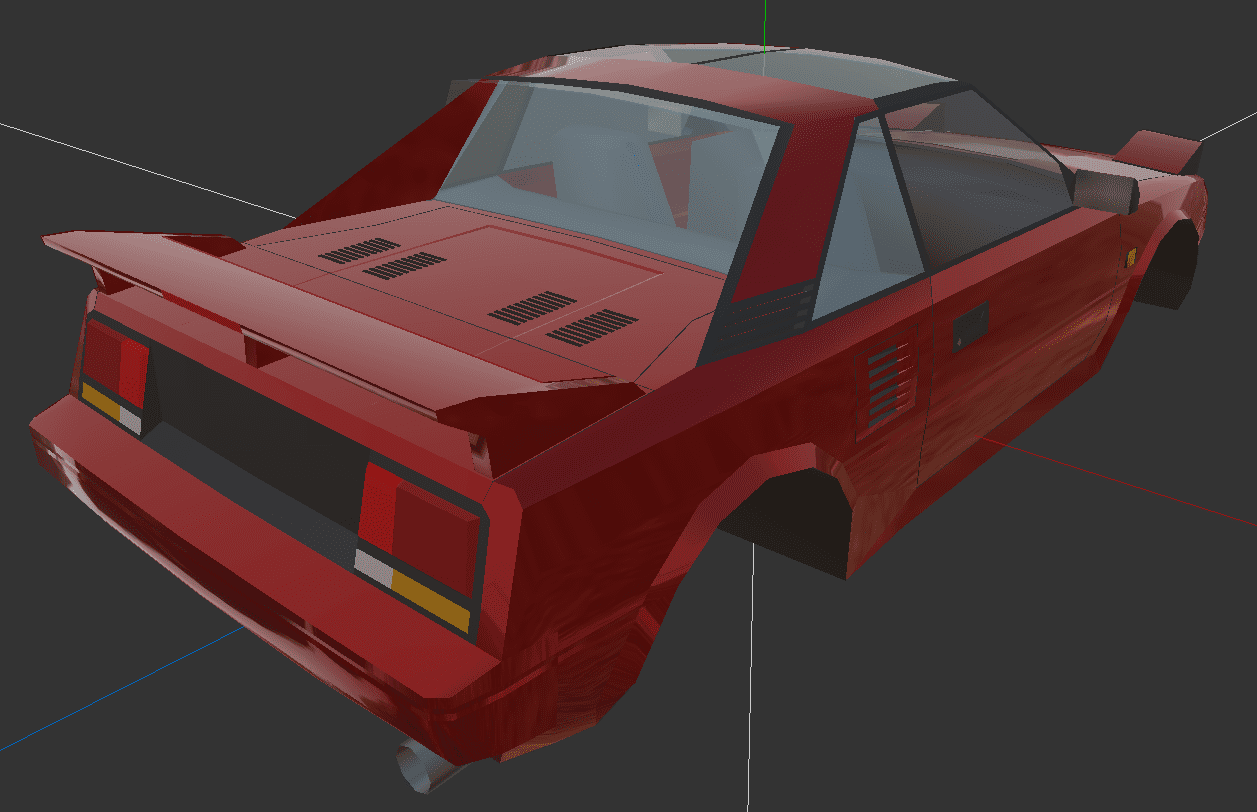
xj6mTPr.png
 
Last edited:
Not sure I posted this here previously - This is a long "project" of mine! It started as a bit of fun in my lunch breaks to create an F1 car, and I did so without any curves or radii (at the time, it was more about keeping it a bit of quick fun having laboured through an accurate Audi R8 build I lost patience with and never finished...) except for wheels and exhausts. It sat idle for a long time, before I picked it back up the start of this year to give it a 2020 design update. I also thickened it all out so that I could perhaps attempt to get this 3D printed at some stage. A very distant long shot that though given the intricacy, but you never know!

3D F1 Car.jpg


3D F1 Car Rear.jpg


3D F1 Car Front.jpg
 
There are reasons why I haven't attempted modeling any formula-type race car. For one, I am not good at chassis designs for formula cars, and I often struggle with designing proper tie rods for formula cars. I am also just not much a formula car type.

I mentioned it in the "What Have You Done Today?" thread, but I have made a push towards getting into low-polygon, low-resolution 3D. I been toying with a few ideas on how else to design 3D models. I started studying various PS1 games for model inspiration. This even includes seeing texture maps of 3D models in PS1 games. Also in my studies are some older PC games. While I am looking for low-poly work, I am not really interested in authentic PS1/N64/Saturn graphics. I am more of making old 3D work in a modern space.

I do like that MR... uh, Inari and that modern formula car!
 
Not sure I posted this here previously - This is a long "project" of mine! It started as a bit of fun in my lunch breaks to create an F1 car, and I did so without any curves or radii (at the time, it was more about keeping it a bit of quick fun having laboured through an accurate Audi R8 build I lost patience with and never finished...) except for wheels and exhausts. It sat idle for a long time, before I picked it back up the start of this year to give it a 2020 design update. I also thickened it all out so that I could perhaps attempt to get this 3D printed at some stage. A very distant long shot that though given the intricacy, but you never know!

View attachment 1072145

View attachment 1072146

View attachment 1072150
I love that F1-style car because it really reminds me of what Need for Madness would look like if it featured more detailed machines. It's also really quite impressive that you've managed to capture the essence of what an F1 car looks like with just straight lines. Top job.
 
I love that F1-style car because it really reminds me of what Need for Madness would look like if it featured more detailed machines. It's also really quite impressive that you've managed to capture the essence of what an F1 car looks like with just straight lines. Top job.
Thank you! I hadn't heard of Need for Madenss, but after looking it up I see what you mean exactly! I also have a Le Mans car I made to similar rules so I will have to dig that one out and post pictures of it too. You can achieve a lot with enough straight lines, and believe me it is still as complex too. The feature tree for this is long, even sorted into folders...


There are reasons why I haven't attempted modeling any formula-type race car. For one, I am not good at chassis designs for formula cars, and I often struggle with designing proper tie rods for formula cars. I am also just not much a formula car type.

I mentioned it in the "What Have You Done Today?" thread, but I have made a push towards getting into low-polygon, low-resolution 3D. I been toying with a few ideas on how else to design 3D models. I started studying various PS1 games for model inspiration. This even includes seeing texture maps of 3D models in PS1 games. Also in my studies are some older PC games. While I am looking for low-poly work, I am not really interested in authentic PS1/N64/Saturn graphics. I am more of making old 3D work in a modern space.

I do like that MR... uh, Inari and that modern formula car!
Thank you too! I do love that "retro" graphics and models are a big thing still. The suspension for this isn't too bad, I made all of the rods the same for the sake of my sanity... The sculpting of the sidepods was probably the biggest headache, trying to get a decent sized undercut and maintaining a downwards slope from the front of the sidepods down to the top of the diffuser...
 
DISCLAIMER: Do not expect anything impressive here!

Progress! I practiced making pixel art and then using a bunch of plane meshes to build a simple room. The room is incomplete in design because this was simply to practice using a single texture atlas along with using plane meshes to build a simple room. What I could have done was take textures someplace else and use them. However, I chose to be original and make a rudimentary room using GIMP for textures and Blender for modeling. I had to adjust a number of render settings to get rid of some of the different lines that appeared in renders. This is actually influencing me to attempt some bigger and better designs. But again- progress! Check it:

simpleroom-render_orig.jpg

^ (More about my 3D Modeling work)

Let me explain my inspiration for this work now. Part of my inspiration to try low-polygon, low-resolution modeling is based on Minecraft. I want to re-imagine some of my Minecraft experiences to possibly make some kind of side-project. The best thing about this is that making a plane with a texture of a texture atlas is that you don't need to keep unwrapping a plane. Either you can upload an image as a plane, or you can take a plane mesh in Blender and unwrap it easily. Pixel-perfect UV mapping can be done by disabling mip-mapping and snapping vertices of faces to pixels. I see great potential in trying this stuff out.
 
This is the interior to a Water Temple I modeled in Blender using tile methods and used GIMP to make pixel art. The planned model was to be a bit bigger than what you see here. I had two rooms but decided to model only one. Making the pixel art took maybe half an hour, and modeling this actual room took maybe 3-5 hours. This included having to rotate some of the tiles and even rotate some of the UV mappings. The carpet on the right is meant to take you into the throne room of this Water Temple. But again- I didn't model the throne room in this model. This may look like Minecraft, but this is anything but. Check it:

watertemple-1_orig.jpg

(More of my 3D adventures)

I learned the tiling method I am trying to perfect is based on an old program released in 2015 called Crocotile 3D. Then for Blender, someone made Sprytile. I am trying to model in Blender simply using plane meshes. The best thing of all of this tile method is that you can use one texture atlas to serve as your UV map and not have to worry about making an absolutely perfect UV map for each individual face. All you need to do is adjust the UV map rotation sometimes and then maybe rotate the sprites somewhat to your liking. What I have not yet attempted is using one plane or set of planes and then adjust them constantly. Everything looks like Minecraft from what I'm doing, but I have yet to try anything advanced or extreme.
 
Last edited:
I recently attempted my first outdoor scene using this low-poly tiling technique. This is a combination of the tiling techniques I've learned coupled with making a skybox. I get cringe when people hate on others who delete the default cube in Blender; as if it were a punishable offense. Well, the cube is all you need to make at least a skybox. Once I learned the proper way to UV map a cube to set up for a skybox, I made a basic skybox in GIMP for the textures to be used for it. There was one modeler who used a cube for a skybox rather than a sphere, and the reason why is because there can be some pinching and some inaccuracies in using a sphere instead of a cube to simulate the sky. The most important thing is to subdivide the cube. If using a Subdivision Modifier, you need at least Subdivision level 2 for the skybox to appear decently. It also helps to have a decent-size skybox so everything doesn't appear overly pixelated and big. If packing into one skybox, 1024x1024 is a good start. It means you have 256x256 faces to set up a basic skybox.

As for the tiles, I made different size tiles. So any small tiles could be stretched out or inwards to make for a variety of effects and variations. My only regret before I show you my finished work is that I probably could have added more variety in art design to make it look better. However, this was a practice run, and I was not looking to be overly serious yet in designing 3D models with impressive art in this run. It helps to have mostly textures with dimensions that are a power of 2 (2, 4, 8, 16, 32, etc.). When you see texture atlases sometimes, though, you could almost use any kind of texture size you and and just adjust the UV mapping to your liking. One example was when I saw a texture atlas for a track in "Rage Racer." Not all tiles were powers of 2, yet you still could map to them to do your texturing of models. I am still learning all of this and thinking of ways how I can properly utilize this technique for much more interesting applications.

Anyhow... here is what I came up with for an outdoor scene:

countryscene-wip_orig.jpg

([URL'https://johnmarinedesigns.weebly.com/3d-modeling.html']More of my 3D adventures[/URL])


One other thing I learned is that it helps to make everything shadeless. If backface culling is disabled, your tiles will appear without one side being invisible. A BIG help in proper UV mapping is in enabling "snap to pixels." It makes the UV mapping process easier without having some tiles bleed into other textures or properly give faces the proper UV map coordinates. Since my models weren't overly complicated with many faces, the UV mapping process was relatively simple. I almost feel like attempting to build a top-down world in 3D in the vein of the first Zelda or Golden Axe Warrior.
 
Does anyone know good site for car pictures, like BringATrailer or RM Sothesby's, but not US market centered? There are sites like netcarshow, favcars etc but many cars don't have enough pictures, they are mostly bit outdated. Since blueprints are generally very flawed, I'm considering the photomodelling approach like fspy, Imagemodeler 2009 or CameraMatch/PerspectiveMatch.
 
When I attempted modeling realistic vehicles, I used The Blueprints. Visit here: https://www.the-blueprints.com/ . I don't know about "US Market Centered," but this covers a great spectrum of vehicles and a lot more.
Im not looking for blueprints, but for images. I know about that site it gets uploaded daily, but photos are inevitable even with blueprints. For more context this is the video showing modelling just from images.


Some Euro cars from 80s and 90s surprisingly lack photos (even official, for example Renault R9 and R11 Turbo phase II), but I managed to find some amazing photos for Citroen BX 19V, Renaults R19 16S, R21 Turbo Quadra etc, official and from auction/classic car sale sites.

EDIT changed video
 
Last edited:
I am in a bit of a dilemma right now. Is it better to model one object (let's say a car) and finish it disciplined way without ever changing to another object, or start modelling multiple objects when inspired/motivated and after some time conclude which one seems most pleasant to get finished?

Also, I forgot just how much of a source flickr is for images. Many things can be found easily.
I would finish the first one before starting the next, just because if it’s your first time modelling a complex object like a car then you will inevitably make mistakes and if you start with many objects at the same time then you will likely make the same mistakes in each model. If you finish a model before starting with the next, you can learn from the mistakes you made and improve for the next one.
 
As I'm still inclined to want to make assets for Cities:Skylines, and motivated by @eran0004's great work, I thought I'd spend some time getting reacquainted with Blender today.

.. when I say reacquainted... I was only an amateur to begin with, and I've not really touched Blender for a few years... so I'm basically starting from scratch.

This was done following tutorials... so, yeah, it looks alright, but that's a reflection of the tutorials, and not my ability...

Donut.png


... blender is ******** massive. I've already forgetten pretty much every step required to do this.
 
******* ** ** ******* ****

I've just remembered. I ******* hate Blender.

Why is something that's so easy to do in SketchUp seemingly impossible in Blender?!!!zzxx!2!OMFFFG.

If I want to snap the mid-point of one edge, to the mid point of another, is it possible? If I want to extrude a face (not scale), without creating a new set of vertices and lines, is it possible (like, I'm making wooden house trusses and I need to make one of the beams longer)?
 
******* ** ***** ****

I've just remembered. I ******* hate Blender.

Why is something that's so easy to do in SketchUp seemingly impossible in Blender?!!!zzxx!2!OMFFFG.

If I want to snap the mid-point of one edge, to the mid point of another, is it possible? If I want to extrude a face (not scale), without creating a new set of vertices and lines, is it possible (like, I'm making wooden house trusses and I need to make one of the beams longer)?
I feel your pain.

Do you have a screenshot of the model and what you want to do?
 
Back