chilicoke's cockpit *03/15 UPDATE: Carbon fiber shifter paddles (pg8)

  • Thread starter chilicoke
  • 245 comments
  • 218,553 views
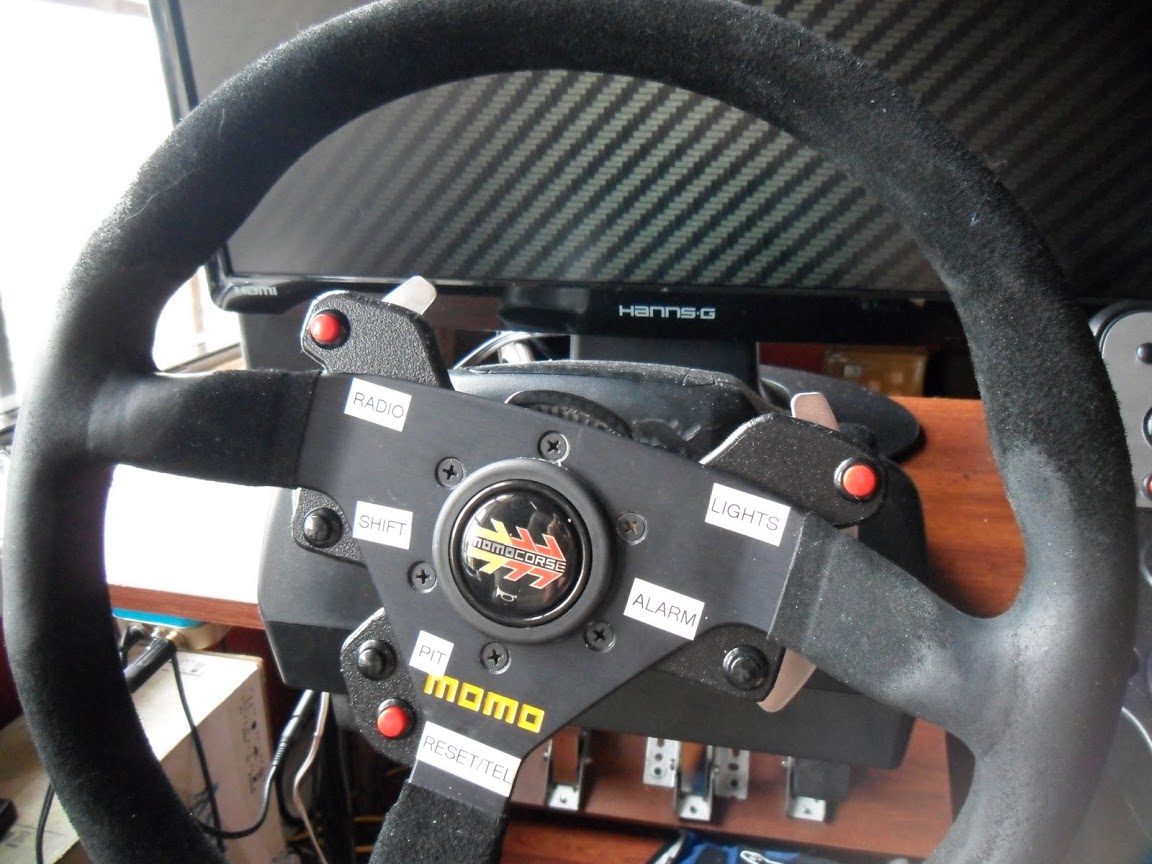
I guess chilicoke is the one to ask. Is the hub on the G27 still 50mm like the G25 was? I built my own hub adapter which also hosts a bunch of buttons that are connected to one of Leo's controllers and I have a 330mm Momo mounted on it. Last night I managed to break the two small screws out of the casing that holds the motors and PCB to the bottom case. So the whole wheel was rocking in the case. My fix was to drill a hole all the way through the flange and through my cockpit and put a long bolt all the way though. That worked perfect but the problem was I snagged the wires that lead to the PCB that is mounted in the hub. I didn't notice until I plugged the wheel back in and the buttons didn't work. I soldered the cable back together so now the buttons on the wheel work and the shifter works in gated mode but the other buttons on the shifter don't work... including the button that puts the shifter in sequential mode. I figured I could live with it but after doing about a half a lap the whole wheel stops responding. I guess when it shorted it damaged the PCB.

So I am going to scrap it and go with a G27 and was just curious if my hub is going to bolt right up. From pictures on your page it looks like the hub is the same but it's hard to tell. It looks like the LEDs may get in the way a little but I am sure I can adapt.

SAM_0107.JPG
 
Last edited:
Sorry to hear about that, sounds like something got shorted.

The three screw holes that hold G25's hub to shaft might be the same as G27, but the 6 steering wheel mounting holes are further apart on the G27 due to larger PCB inside the hub to support additional buttons and the shift light.

G27's shift light window is sandwiched between the standard "horn plate" and the PCB, if your adapter interferes with G27's shift light window it can be easily removed.

g27adapter-05_small.jpg


Hope this helps.


New video
 
Last edited:
Hi there Chillicoke, sweet cockpit as always.;) Although surely your running out of things to modify by now right?💡 I mean youv'e first made up this fabulous cockpit. Making a dead pedal, reverse mounted the pedals and added a hydraulic brake pedal force actuater. Altered the H shifter feel and added a custom leather boot, threw on a new wheel and added new CF paddle shifters. Incorporated a very well done E-Brake and seperate clutch button...have I missed anything out??:lol: Like what you could you possibly do next? :D:tup:
Peace,
R*
 
Hi Chillicoke, Ive watched many of your youtube videos and plan on doing many of the same mods. Your sim rig is very freaking nice, haha, and makes mine look kinda daft. But it's still nice (playseat Evolution). I'll post some pics of it later, maybe tomorrow when we get some sunlight. But the thing that has me wondering is what kind of metal supports did you use for the pedals and do you have a tutorial for the assembly along with the deadpedal? Any help is appreciated. Thanks.
 
Rusty*,
Thanks! I think you listed pretty much everything: D. Don't really have any plans for future mods at the moment, I usually just make my ideas happen when I come across them.
💡

GlobeKIDD,
The entire cockpit (including the pedal support) was constructed out of 1" mild steel square tubing either weld or bolted together.

Dead pedal was more of a side project while I was working on the center console. I simply free handed and cut the metal support out of pieces to (roughly) match the angle of the three pedals.

The shape of the deal pedal itself I traced/replicated off my car, only I forgot to flip it over so it ended up in reverse. But turned out to look pretty decent on the cockpit.


After few hours of Dirt2 made me miss rally in GT4, so I blew the dust off my ps2 and had a go at it. :)

 
Chilicoke, where did you purchase your tubing? Everywhere I've looked is either really expensive (home depot), or they charge a load to ship them. And which tubing length did you typically order?

Thanks!
 
They were ordered and picked up from a local metal supplier, they come 10ft in length and are quite heavy (which explains the shipping cost). I believe I ordered approximately 4-5 tubes with plenty left over.
 
They were ordered and picked up from a local metal supplier, they come 10ft in length and are quite heavy (which explains the shipping cost). I believe I ordered approximately 4-5 tubes with plenty left over.

Awesome. I think I found some suppliers in the northern california area that are pretty local to me. If its only 10ft with 4-5, it should only cost around 80-90 dollars total.

Now I gotta bug my friend with the welder. :)
 
I love your cockpit, and I love you for your great shifter resistance mod how-to. Doing that mod was the best use of a Sunday afternoon I've had in a while. I mean, shifting actually feels like shifting now!
 
Hi Chilicoke, I own a G27 and I wondered if there where any cheap "idiot-proof" solutions that you could show me. One I'm very interested in is that stripe that most race cars have in the center of the upper part of the wheel, it'd be a nice addition. Also, is there a way of getting the CF bits for the G27? If so, what's their cost?

Thanks in advance mate, words aren't enough to describe how cool your cockpit is.
 
Chilicoke, can you still see the LEDs after mounting a Momo on the G27. It looks like I can align the top center hole on the Momo to the top center hole on the G27 hub which will put the Momo wheel a little lower which may leave the LEDs exposed. I am not at home right now so I am just trying to picture this in my head. iRacing supports the LEDs on the G27 and I find them very helpful. I would hate to lose them when putting my Momo back on. Maybe I can relocate the LEDs but that surface mount stuff is hard to modify.
 
Awesome. I think I found some suppliers in the northern california area that are pretty local to me. If its only 10ft with 4-5, it should only cost around 80-90 dollars total.

Now I gotta bug my friend with the welder. :)
👍👍👍 Keep us updated.

I love your cockpit, and I love you for your great shifter resistance mod how-to. Doing that mod was the best use of a Sunday afternoon I've had in a while. I mean, shifting actually feels like shifting now!
Thanks! Glade to hear you found it helpful.

Hi Chilicoke, I own a G27 and I wondered if there where any cheap "idiot-proof" solutions that you could show me. One I'm very interested in is that stripe that most race cars have in the center of the upper part of the wheel, it'd be a nice addition. Also, is there a way of getting the CF bits for the G27? If so, what's their cost?

Thanks in advance mate, words aren't enough to describe how cool your cockpit is.
Easiest way I could think of at the moment would be to use some sort of colored self-adhesive vinyl, cut into a strip and wrap around the steering wheel at the top center point so it could be removed/reversible in the future. If you don't have access to vinyl (or small quantity of it), electric tape would work too.

CF paddles I am considering making available in the near future. Will have to look into it and keep you guys updated. 👍

Chilicoke, can you still see the LEDs after mounting a Momo on the G27. It looks like I can align the top center hole on the Momo to the top center hole on the G27 hub which will put the Momo wheel a little lower which may leave the LEDs exposed. I am not at home right now so I am just trying to picture this in my head. iRacing supports the LEDs on the G27 and I find them very helpful. I would hate to lose them when putting my Momo back on. Maybe I can relocate the LEDs but that surface mount stuff is hard to modify.
Shift-light window does sit behind the Momo, but from my sitting position I was able to see the lights when looking down at it at a downward angle. It just wasn't as exposed compare to how it was originally.
 
I was wondering if it's possible to connect the original G25 wires to a wheel with buttons, like the Sparco P104,

015thip311_sandtler_sparco_lenkrad.png


a wheel I quite fancy.

Chilicoke, your G25 adapter should fit, shouldn't it?
 
Hi there!

Is it possible to get the plans(drawings, measurements) for your cockpit? If you want to share them that is.

/Pertan
Pertan, Sorry I do not have plans on hand, through if you browse through a few threads in cockpit section you should have a pretty good idea on the overall dimensions. I would like to encourage yourself and others to do a little bit of measurement yourself to create a cockpit that is spec'd exactly to your needs, even if it's just a slightly modified version of an existing design.

I (I'm sure many others here as well), will be more than happy to provide help with your DIY cockpit. 👍

I was wondering if it's possible to connect the original G25 wires to a wheel with buttons, like the Sparco P104,

015thip311_sandtler_sparco_lenkrad.png


a wheel I quite fancy.

Chilicoke, your G25 adapter should fit, shouldn't it?

That wheel will fit just fine, wiring those buttons should be very easy with some basic wiring experience. 👍
 
Chili,

What is the general thickness of the square tubing that you used?

I have been asking around about the tubing, and I have gotten a wide variety of prices, ranging from 65 dollars, to 120 dollars, but the pricing seemed to be pretty dependent on thickness of the tubing.

THanks!
 
Chillicoke, Love your setup! Where did you get the Mazda 3 seat? I don't know where to begin in finding something like that. Any advice?
 
Try looking for like Mazda Club communities, for 350z and G35 owners like myself. We have MY350z.com and MyG35.com. Usually those communities have pretty great deals on used items Rims, Aerokits, etc. But if those prices are still a bit too high, try going to a junkyard and haggle with the customer service rep. to buy a seat from a wrecked car.
 
Last edited:
Chili,

What is the general thickness of the square tubing that you used?

I have been asking around about the tubing, and I have gotten a wide variety of prices, ranging from 65 dollars, to 120 dollars, but the pricing seemed to be pretty dependent on thickness of the tubing.

THanks!
The tubing doesn't have to be very thick as the strength of a completed cockpit will far exceed our weight and the amount of force we put on it.

I actually went from approximately 1/8" bars I used on my first cockpit down to approximately 3/32" for my second cockpit to reduce the total weight of the cockpit (despite the increase in size).

Chillicoke, Love your setup! Where did you get the Mazda 3 seat? I don't know where to begin in finding something like that. Any advice?
My close friend's dad works at Mazda and he got the seat for me that was removed from a pre-production car.

Junkyard would probably be your best bet. 👍
 
Ok, i just found some pricing for some tubing in the Northern California area thats pretty reasonable.

For your information:
Tubing for 1"x1" square tubing in approximately 3/32" thickness costs an average of 45 - 50 dollars each tube. Each tube is usually about 20ft per piece. If you have them cut, it can cost a good amount just for the cutting.

Example, from the company (which I ordered) www.tubeservice.com, they charge about 48.50 per tube, not including tax. Ordering 2 tubes of 20ft, then cut into 4 10ft pieces will cost an extra 25 dollars out the door, not including tax. If you can, get then in uncut lengths and have means to transport them home, go for that option. The tubing I ordered is 0.095 thickness, so its a touch thicker, and albeit much heavier.

Some other companies were asking for 130 dollars for the same piece in my area, so the price difference is not very significant (and this is for cut pieces of 4 in 10ft). I would suggest you just find a company that you can order locally, so handling it back home wont be a problem.

EDIT: Chilicoke, i don't think I've ever seen any pics of the base on where your seat sits. Id like a few pictures if possible, im also contemplating on where I could put the buttkicker gamer2 I just bought. If you can get me a shot of the cockpit without the seat on, that would be awesome. Of course, I will be doing my own measurements to fix it up as my car (mazda miata), but It would be nice to have see a base on how to start that area. Thanks!
 
Last edited:
I found some time to build a new hub adapter for my G27. I alinged the top center hole of the G27 hub to the top center hole on my Momo wheel so it would sit a little lower so the shift lights would still be exposed. It worked perfect. I also desoldered the cabbles from the origional G27 buttons and then solder them to the buttons on my wheel hub so now if I want to remove my wheel I can simply pop off the little plugs. I used a cheap plastic cutting board from WalMart to make the hub. I traced the pattern on the board and then marked the holes. I then drilled the holes with a drill press and then cut out the patern with a band saw. Be sure to drill the holes first. If you cut the pattern first you will be left with very thin walls and it will shatter when drilling the holes for the buttons. I also used a router to put nice rounded edges on the hub. Then I sprayed it black.

The cutting board is big enough for 4 adapters:
http://www.walmart.com/ip/Mainstays-15X20-Cutting-Board/13397990

I used these buttons:
http://www.radioshack.com/product/index.jsp?productId=2062510

The wheel is a Momo MOD78 Suede 330mm. I got it for $168. It is going for $180 with free shipping now:
http://cgi.ebay.com/ebaymotors/MOMO...rQ5fTruckQ5fPartsQ5fAccessories#ht_3461wt_939

Here is a pic:
SAM_0221.JPG


BTW, The button labeled "Shift" is not for shifting gears. It is like the shift key on a keyboard. When I hold it I have secondary functions on all my buttons. Thanks to AutoHotkey.
 
Last edited:
Chili I was wondering what diameter are the momo wheels you have? Sorry if you posted it early I didnt wanna dig through this thread. I was going to get one that is 13.78 inches in diameter and I was wondering if it is smaller or larger then your wheels
 
I found some time to build a new hub adapter for my G27.

Very nice, I take it the 911RSR wheel was the inspiration judging by the button placement. ;)

I've been planning to do the same when I find the time, but will need to use a bodnar precision controller as I have G25. Also suede OMP Superturismos aren't cheap!
 
You are correct. The 997 RSR was my inspiration. I would have never labeled the horn "alarm" otherwise. Hahaha! Before the G27 I had a G25 and I used my Leo Bodnar controller for the buttons. I also looked into an OMP wheel but they were way more then I wanted to spend. The Momo MOD 78 was the best bank for the buck I could find. One thing I really wish my wheel had was the center line at the top of the wheel. I run 900deg so a center line could come in handy. Tape never lasts very long. There must be a more effective way to add a center line.
 
Last edited:
HackiRoku, Thanks!👍 I came across the pedal conversion a long time ago while searching for something else. I'm afraid I don't know any more about other mods than other members here.


Sorry I didn't see your post till now. My pedals are mounted on 45 degree supports and the pedals feel very close to my car. Though if you sit in a more upright position you might want them to be less vertical.

Your design looks excellent. 👍

Thanks.
Few days ago I bought S13 so now i have oportunity to compare my design with real car. :)

I solve padles little different and cheaper.
I only made extension of original padles.
Now I have posibility to deatach them when I don't need them without dissasembling G25. I know. Curvature of padles will not be perfect. But it is cheap and you can made it by yourself.
 
...Chilicoke, i don't think I've ever seen any pics of the base on where your seat sits. Id like a few pictures if possible, im also contemplating on where I could put the buttkicker gamer2 I just bought. If you can get me a shot of the cockpit without the seat on, that would be awesome. Of course, I will be doing my own measurements to fix it up as my car (mazda miata), but It would be nice to have see a base on how to start that area. Thanks!
The seat and it's seat rails are bolted to raisers on all four corners. Nothing special about them, just angled tubings that were needed to raise the seat to the correct height.
GT5_cockpit_252.jpg


How about some aluminum paddles?
;)
I'd even take aluminum paddles... something that would match the bigger wheel
That is a possibility. Though I will have to take a closer look when I have time, as I am afraid aluminum at the stock thickness will be too easy to bend (think if someone accidentally pulled a little too hard). CF has very nice flexibility to it that can easily return to its original shape when bent.


Noel Hibbard and Woyta, VERY COOL! Thank you both for the pictures. 👍
 
The seat and it's seat rails are bolted to raisers on all four corners. Nothing special about them, just angled tubings that were needed to raise the seat to the correct height.
GT5_cockpit_252.jpg

Thats exactly what i needed to see. I was building my design on google sketchup, and I realized that doing my original plans could have increased the weight unnecessarily. I want to make sure its sturdy, but not too heavy at the same time.

Thanks for taking the time to take a shot. It helps a great deal.

Also, the picture of that shows how flexible the structure can be when finally mounting it all up. It can be mocked up "as its built" after the basic plans have been set. Saves me some headache on trying to get the seat and the bars lined up correctly!
 
Back