GT6 Tuning Guide 1.15

4,803
United States
Dearborn, MI
MotorCtyHamilton
PDF Version of this tuning guide...

I felt that it was time to update my tuning guide after the 1.09 and beyond physics changes. For the most part, all of the tuning levers seem to work directionally the same as before, but different drive trains have received some adjustments to their starting points.

Building A Tune From Scratch
I am just going to lay my approach out here. This is how I work through a tune. I do things typically in this order.

Oil Change– Are you tuning a short term car or a long term car? For a short term car, donotperform an oil change. It robs power at the same PP level. Take any car and note the stock PP and HP levels (example: Scirocco R ‘10 at 438PP/252HP). Next perform an oil change and note the new PP/HP levels (Scirocco @ 445PP/265HP). Finally, use the power limiter to re-establish the car’s original PP level (Scirocco needs 94.5 power limiter to equal 438PP). The new HP rating for the Scirocco is now 250, a 2hp drop from stock (or 0.8% lower horsepower). I have tested this on many cars in GT6 and the average drop is a 1% horsepower loss. If you are using a car for a short period of time, do not perform oil changes. There are more efficient ways to gain power for a PP build. If I were entered into a weekly racing series I might consider purchasing a brand new car for each event and enter without an oil change.

Adding parts– I don’t build very many maxed out tunes. Most of the racing that I do has a set PP level and tire selection so this is how I decide what to add.

Weight
I start with considering the car’s weight. I try to get into a weight range and then move to power. Weight is always thought about first. When I can get a car into the weight ranges listed below, my lap times are always faster than going only with power. This is what I look for:
- Heavy cars need weight reduction to get them between 1400 and 1450kg
- I prefer average cars that are between 1200 and 1250kg
- Lighter cars in stock form do not always need weight reductions, but 1000kg seems to be the magic number

Power
There are some significant changes to the PP and HP gains in GT6 that are making parts selection much more complicated. In GT5 there were some clear winners (low PP gain vs. high HP gain). In GT5 on almost every car, the first power part that I would add is the racing exhaust. Next were exhaust manifold, intake manifold, air filters and ECU, all being really equal on PP/HP efficiency. The least efficient items in GT5 were the catalytic converter, turbo and supercharger. On almost every car that I tested in GT5, this order was really consistent. Not so in GT6. For comparison, I built ten different cars from FF Ford Focus ST to FR BRZ S’12 to MR NSX R to Honda S2000 to Ford GT to Ferrari FXX to Mustang Boss 302, etc. and every single one had a different list of parts that were most efficient PP/HP. In GT6, racing exhaust no longer won hands down and catalytic converter moves from the junk pile to the most efficient part on most cars.

So how do I choose? Below are two examples of popular cars in the GT series. I have listed all of the weight and power parts and their effect on PP and weight/HP. Note that these are done without oil change for the reasons mentioned earlier in this tuning guide. Most of the columns are self-explanatory. The one that may be confusing is “Gain/PP.” For weight reduction parts I have listed weight loss divided by pp gain. All three stages of weight reduction seem to have the same efficiency value per car (18kg per 1pp for the M3). When you scroll down to the power parts under “Gain/PP,” it gets much more interesting. This formula is horsepower gained divided by PP gained. A higher number is more desirable, more efficient. In the column next to the power part gain/pp I have listed a rank based on this efficiency. Below are results for the M3 Coupe '07 @ 525PP and Ford GT ’06 @600PP.

11812338905_27d43cec89_z.jpg


Choosing Parts and Why - M3 Coupe '07 @ 525PP
1. Window weight reduction and carbon hood. It only cost 1PP for both. I will be adding this to every car I tune in GT6 from here forward.
2. Weight reduction stage 3. This car is just too heavy. Stage 3 takes it down to 1340kg and combined with window and carbon hood the car will now be all the way down to 1325. I will probably add ballast and run this car at 1400kg. Ballast will allow me to play with the front/rear balance during tuning.
3. Sports Catalytic Converter. The winning power part, hands down with 3.25 hp per 1 pp.
4. Engine Tuning Stage 3.
5. Semi-Racing Exhaust.
6. Power Limiter 98.2%.
Build is now at 525PP and 491HP.

11812753304_baf92033ce_z.jpg


Choosing Parts and Why – Ford GT ’06 @ 600PP
1. Window weight reduction and carbon hood. It only cost 1PP for both. I will be adding this to every car I tune in GT6 from here forward.
2. Weight reduction stage 3. This car likes around 1200kg. Stage 3 takes it down to 1204kg and combined with window and carbon hood the car will now be all the way down to 1189. I will add ballast instead of using the power limiter. I want to run this car somewhere between 1200 and 1250kg. Ballast will allow me to play with the front/rear balance during tuning.
3. Sports Catalytic Converter. The winning power part, hands down with 4.25 hp per 1pp.
4. Racing Exhaust at 4.0 hp per 1 pp.
5. Isometric Exhaust Manifold at 4.0 hp per 1 pp.
6. Ballast at 24kg.
Build is now at 600pp and 628hp.

Other parts
If you are PP racing, I would always add the Triple-Plate Clutch, Carbon Drive Shaft and Racing Brakes, if available. If I am on a budget and do not plan to use a car long-term, I skip all three of these parts. They provide minimal gains so they are not really worth the money for a sometimes car, but why not take advantage of every little bit if you are racing online or in a time trial.

Chassis stiffness – I am not a fan of this. It adds understeer just as it did in GT5. I would use it as a last resort on very difficult MR or RR cars. The Yellow Bird comes to mind. So does the Enzo.

Wings on street cars– I do not add wings to my street car builds. It adds more rear grip and on most cars in the GT series I am trying to do the opposite, gain front grip. In GT5 it also cost PP to add wings so that just robs from the ability to drop weight and add power. Currently in GT6, downforce does not add to PP. Only add if you need more rear grip.

Wings on tuner cars– There are many tuner cars that reveal their front grip adjustments when you add a rear wing. I do add the rear wing if it allows for me to adjust the front downforce all the way up and the rear all the way down.

Downforce on race cars– Since adding downforce does not currently add to PP, use as much as you can on race cars for circuit tuning. I will often reduce rear downforce to improve cornering. Also, if I am racing on a circuit with an extremely long straight, I will lower front and rear downforce to around the half-way point. There does seem to be a top speed penalty for max downforce, but it is worth so much in the corners on most circuits.

Downforce on NASCAR -At Daytona I use min/min front/rear for the straight line speed gain. At Indy or Motegi, I use much more downforce.

Flat Floors– I avoid using flat floors. There is currently a PP expense to flat floors and the extra downforce does not seem to get paid back in exchange for the reduced power and/or weight.

Transmission– You must add all power parts before setting the transmission. I use the flip trick. I like to set it and forget it. Others like Praiano use a similar method but will match the shift points to the engine’s RPM. A customized transmission is worth more than adding most power upgrades and it doesn’t cost any PP points. The transmission is a must on a car that I plan to use long term. If I am detuning for the A-spec races I will sometimes run the stock gearbox. Also, I like numbers that end in zero or five simply because they look cleaner and they are easier to type into tuning sheets.

Transmission Flip
1.) Final Gear to maximum (all the way right)
2.) Max Speed to minimum (all the way left)
3.) Highest Gear to maximum (all the way right – probably rounded)
4.) 2nd Gear to about 80% left (example: for a range of 1.915 to 2.427 I pick 2.000)
5.) For gears 3rd through highest, make relatively even spacing between gears. I tend to leave a little more space between 2nd, 3rd and 4th than I do between 4th, 5th and 6th. If you look closely at my settings you will see that the gear lines get slightly closer as you move from left to right (1st to 6th).
6.) Set top speed through Final Gear, not Max Speed. Do not touch the Max Speed adjustment at any time past step two. Use the Final Gear setting to achieve just before redline on the longest straight.
7.) Set first gear. If for rolling starts I tend to move this slider to the right and match my even spacing. For standing start racing you will need to test out a few. I have been burned a few times in online racing for having these settings too far left. For standing starts, 1st gear may need to be much further to the right. When you have the launch you are looking for, you will then need to go back and even out all of the gears again.
8.) Further optimize the gearbox for a specific track. You may find that a 2nd, 3rd or 4th gear shift is in a bad spot, mid-corner or right before a braking zone. Re-adjust these gears to optimize for the specific track. For example, if the car wants a 2nd to 3rd gear change just before the exit of a key corner, move the 2nd gear slider to the left and re-adjust the spacing of the other gears. Or, for example, if you are nearing a shorter straight section and find the need to shift from 4th to 5th right before a braking zone, move the 4th gear slider to the left then re-adjust the spacing of the other gears.

Limited Slip Differential –The limited slip differential is the very first handling bit that should be tuned. The LSD remains what I call a “super tune” just as it was in GT5. If you only have the time, patience or limited understanding of this tuning guide, learn this section. Combine this knowledge with any suspension tuning method and you will be faster in GT6.

LSD Accel: This setting has one purpose, to manage inside and outside wheel spin. If the inside wheel spins first, raise this setting. If the outside wheel spins first, lower this setting. Most often the tire in need of help will turn red upon throttle application from the corner apex. Sometimes, a car will get loose on you, but neither tire turns red. In this case, put two or three levels harder tires on the car and mash the throttle in the slow, 2nd gear corners and you should be able to find which tire turns red first. Keep adjusting until both drive tires spin at the same time and this setting will be optimized. On a few cars, you will find a situation where one click higher will make the outside tire turn just a little red and one click lower will make the inside tire a little red. On these rare cars, you cannot fully optimize this setting and will need to choose one. In general, I am using settings between 8 and 20. I have seen very few cars needing higher than this.

LSD Decel: This setting has one purpose, to manage stability when off throttle (under braking, turn-in or when coasting). If your car is loose (oversteer) in these situations, raise this setting. If your car has understeer during these conditions, lower this setting. Nearly all of my FF car tunes have settings between 5 and 7. This setting is completely car dependent. If PD programed a car to be loose on entry, then this setting is very useful. I cannot find a pattern among cars. For example, I have tested twelve Miata in GT6 and they are ranging from 9 to 22 at the moment.

LSD Initial Torque: This setting determines how much power is needed to activate the diff, to make it lock. What this means is that a higher number produces more understeer and a lower number produces more oversteer. It is that simple. The LSD does not add or subtract acceleration. The LSD cannot send more or less power to the drive train. The LSD can only distribute the given amount of power to each of the drive wheels. I see many on this site confuse the LSD with slipper clutches. This must come from R/C off road racing where slipper clutches are popular. In R/C racing a sipper clutch is added as a bolt on to the drive train and will actually slip as power is applied and grip in the higher revs to keep the rear wheels from spinning. There is still a limited slip differential in those gear boxes and they are not set up to slip. They are set up to do the only job of the LSD, to distribute power from side to side under acceleration and braking. If you set them up to slip, they melt. Same goes for real world, if your LSD slips, it melts. Heat is the #1 enemy of the limited slip. This is why we have traction control in the real world and in GT6. Traction control limits power through the drive train to the wheels, not the LSD.

LSD tuning on 4wd– I will admit that tuning the LSD for 4wd cars is much more challenging than for other drive trains. It is more difficult to diagnose the problems, even when using hard tires. I have not landed upon a solid method for the 4wd. Most of my tuning here has still been trial and error. Below are my typical settings.

Rally Car for Dirt/Snow
Front LSD Initial/Accel/Braking 15/15/10
Rear LSD Initial/Accel/Braking 14/12/12

Street Car for Tarmac
Front LSD Initial/Accel/Braking 10 to 12 / 12 to 15 / 5 to 9
Rear LSD Initial/Accel/Braking 8 to 10 / 10 to 12 / 5 to 12

The theory behind my settings is that by using slightly higher front settings and lower rear settings is that the car will rotate better on corner entry. The stronger front settings will attempt to add stability while the looser rear settings will allow for rear rotation.

Torque-Distributing Center Differential on 4wd– If you are looking to get your 4wd car to drive like a FR drive train, then use wide splits on this setting, like 20/80 or 10/90. This is a quick way to reduce the typical 4wd understeer, but I never do this for two reasons. First, if you wanted a car that handled like a FR drive train they why not just buy a FR car. There is no shortage of really good FR cars in GT6. Second, you will not be faster than taking the time to properly tune this setting.

On rally tunes for dirt and snow, 50/50 has been the best. I can put the power down best from mid corner to exit with this high front value. Lowering it on dirt/snow can help corner entry and mid corner rotation, but the loss of exit speed kills the lap time. You will have to find other ways to improve corner entry for 4wd cars.

On tarmac tunes– I start out at 50/50 and try to other tuning adjustments first. If I cannot get the car to enter the corner and rotate, I begin to lower the torque split. I don’t like to go below 35/65 as the car begins to handle much more like a FR drive train. What you lose is that aggressive 4wd jump from mid corner to exit. I cannot find a hard, fast rule for this setting so it becomes a bit of trial and error.

More information on Limited Slip Differentials. https://www.gtplanet.net/forum/threads/lsd-guide-summaries.203009/#post-5293084
 
Last edited:
Suspension Tuning

If you started at the top of this tuning guide and did every step up to here, you might be totally satisfied with your tuning improvements and choose to go no further. For GT6, the driving physics have improved so much that every car is more fun to drive than its GT5 version. Much speed improvement and balance improvement can come from the items listed above. Some will be content to add the Fully Customizable Suspension and just use the stock settings. You can do that and still be fast. Everything from here down could be seen as fine tuning.

So let’s talk tuning. Tuning is complicated. In the real world, there are general understandings of what settings can do, but some things work on some chassis and others just do no. I think we have set a pretty high expectation for GT6. We start to develop a basic understanding of what settings generally do and then we jump in a car that bends or breaks all of the rules. What happens next, we start believing in backward settings.

For me to develop an understanding of the GT6 physics, I needed to go back to my real world roots. I re-read my two favorite tuning books, Caroll Smith’s Tune to Win and Don Alexander’s High-Performance Handling Handbook. Five years ago when I race a Honda Civic, we had adjustable shocks. When I transitioned to Spec Miata, we have non-adjustable, sealed Bilstein shocks so this unutilized knowledge began to fade from memory. Once I reconnected with this past knowledge, tuning in GT6 started to make more sense. With a better understanding of real world theory, I would at least know where to start in GT6. It had been a complete guessing game and trial and error for me in GT6 up to that point.

I now think about tuning in GT6 in a different way. It involves really focusing in on the problem to solve, then making a list of the possible options at play. It is one thing to know generally that lighter front springs and heavier rear springs can mean less understeer, but to know when to try that vs. other options available is the real key to my new system.

Below I will outline three different levels of detail. I know that some will visit this guide just for some quick understanding of things and others will read every word, make notes and test for themselves.
1. Basic functions of the settings
2. Added detail behind each function
3. Tune problem solving

Fully Customizable Suspension

Ride Height(in-game description)
- A lower front end will encourage oversteer (false)
- A higher front end will increase understeer (false)
The in-game description is incorrect. A higher front and lower rear will encourage more cornering ability.

Do not go too low on ride height. Slammed at either end seems to be bad. There is a point where the rear gets too low and will produce loss of grip and a snap oversteer situation. I think that is the point where bottoming out is occurring, though not visible in the replay, so maybe there is another situation. The in-game description mentions that when lowering the car we need to add spring rate to make up for the shorter suspension travel. I think that lowering the car in GT6 also shortens the shock travel. This would take away up travel (i.e., hit a bump and the shock compresses, then on extension the tire stops before the chassis does). This condition would remove the tire from the road or at least unload it and reduce grip. So it may work to encourage rotation. Slam the rear of a car super low, drastically shorten the shock throw, stiffen the spring and lose a ton of up travel. That would cause a wheel to unload, especially the inside rear. Do not go too low on ride height.

Higher front and lower rear provides more cornering ability. Max/min seems to be too much so you are going to have to find a sweet spot for each tune. Not all cars need to use this ride height glitch, but many are helped to turn better with a higher front than rear.

Spring Rate
- Low front rate/high rear rate will encourage oversteer
- High front rate/low rear rate will increase understeer
- Higher spring rates help reduce pitch and roll, and turn more sharply
- Higher grip tires can handle higher spring rates

Springs seem to work similar to real world, but have their limits. What I mean by limits is that if I were to build a Honda Civic with super soft front springs and super hard rear springs, the car would be un-drivable - it would spin in every corner. In GT6, it may still understeer.

I have found success staying near stock settings when on Comfort Soft and Sport Hard tires. Racing tires can handle much higher spring rates. I tend to place comfort tires in the lower 1/3 of the spring sliders, Sport tires around the middle of the sliders and Racing tires closer to the upper 1/3 of the slider.

Dampers
- Shocks can be used to fine-tune the handling balance of a racecar during transitions, but will not fully cure a big handling problem
- Should normally be set relative to spring rate (similar distance across slider)
- Damper tuning is complex and will be covered in more detail in the section below

Shocks can be used to fine-tune the handling balance of a racecar during transitions, but will not cure a big handling problem. If changes to dampers seem to produce very little results, there may be something else wrong with your tune. Go back to some of the mechanical settings first, then come back to dampers.

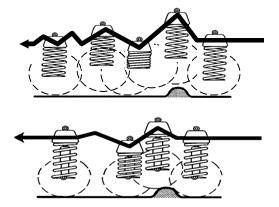
In general, rebound damping controls how fast weight leaves a tire, while bump controls how fast weight goes onto a tire. You can see in the drawings below that the top graphic shows a non-optimized shock, while the bottom picture indicates a properly dampened shock.

12166317754_61bf2713e4.jpg


The true magic of tuning damper settings is in controlling weight transfer throughout the corner. By manipulating weight transfer, handling can be changed slightly. When a tire turns red in GT6, it means one of two things. Either that tire is overloaded beyond its available grip level or it is sliding or skimming across the pavement. The first thing that I look for is to view the car in chase view to determine which condition may be causing the red tire. For example, if my outside front tire is turning red during mid-speed sweeping corners and the weight seems to be leaning more rearward, the car needs more weight pushed onto the front tires. Another example involves a red outside front tire in a slower, 180 degree corner where the car’s weight seems to be leaning forward, over the front axles. In this case, the front tire is being pushed beyond its grip limit and less weight needs to transfer to the nose of the car. Dampers can be used to help solve these two tuning problems and more.

Anti-Roll Bars
- Affects lateral rolling movement, not longitudinal pitching movement
- Generally, ARBs need to strike a balance with spring rate, like using soft springs with stiff bars or vice versa
- Stiffer ARBs can transition a small amount of weight from outside tire to inside tire
- Softer ARBs can be useful on bumpy tracks to keep both inside and outside tires more
connected to the track
- Low front rate/high rear rate will encourage oversteer
- High front rate/low rear rate will increase understeer

ARBs seem to have been minimized a bit in GT6. I have been using settings near the stock settings of 3/3 and just adjusting a split to induce oversteer or understeer. That has been working very well on most cars. There have been a few cars that show large amounts of body roll when viewed in chase view. For these cars I have used closer to max settings on roll bars. But, other than these few odd cars, I have not found large gains in lap time with ARB settings.

Camber Angle
MCH GT6 Camber Theory

One fact that became clear over five weeks of camber testing is that front and rear must be tested separately. The camber tests that many are doing which move both front and rear in equal increments, I believe that this method is ghosting the results. The method that I am using has been tested across all drive trains and from 400 PP on comfort soft tires all the way to 700 PP on racing hard tires (about 50 cars). Each car seems to require a different amount of camber, but I think I have found consistency in the adjustment. By this I mean that when I move the lever one way, I get a predictable result. And when I move the same lever the other way, I see the opposite result. Below is my new camber method.

1. Camber must be adjusted separately between front and rear. Change only one end of the car at a time.

2. Front camber increases turn-in grip and reduces corner exit grip. Use front camber on a car that already has oversteer on exit and problems turning in. If your car already understeers on exit, adding front camber will make it slower on corner exit. Front camber also makes it easier to lock the front tires under braking so lowering the front brake balance may help or you will need to be easier on the brake pedal.

3. Rear camber allowed for more rotation so it can be used on cars with plentiful rear grip. Zero rear camber has the most rear grip. There is a consistent drop off in grip across the spectrum as you add rear camber. Use rear camber on cars that understeer from mid-corner through exit. On most MR drive lines, I am still using zero rear camber. On most FF and 4WD drive lines I am 2.5 degrees and higher.

Every car that I have tuned since the beginning of this year is faster and more fun to drive. I even have front drive cars that will now travel through the corner dancing between grip and oversteer. Every car in the game has become more fun to drive. I remain firm on the belief that camber is not “fixed” in GT6. It is still very broken, meaning that it does not operate anything like real world settings. I would be laughed off the grid if I showed up at any SCCA race track with zero front camber and 3.5 degrees of rear camber. But, on the other hand, this is just a video game, so when you find something that works to make the car better, you use it.

Toe Angle
- Front toe-in will increase entry turn in, but also reduces mid-corner to exit grip
- Front toe-out will increase mid-corner to exit grip, but also reduces entry turn in
- Rear toe-in will increase understeer
- Rear toe-out will increase oversteer
- Rear toe settings seem stronger, meaning lower increments of movement tend to produce
stronger results than higher increments of movement to front settings

I tend to set rear toe early in tuning. Rear toe seems to have a stronger effect and front seems to be more of a fine tune. On most FR, MR and RR cars I will generally have between 0.05 and 0.25 positive toe. Some rare cars, like American Muscle, will need negative rear toe. FF and 4WD cars almost always need negative rear toe and I generally set between -0.05 and -0.35. I am looking for a good rotation around the apex of the corner. A lower number produces more rotation and a higher number provides more stability.

Then I move on to front toe. Front toe is simply used to balance the corner, to gain a similar level of turning ability at entry, through the middle and out to corner exit. Positive front toe provides more turn-in ability and negative front toe produces more front grip from mid-corner through corner exit.

Brake Balance
- Low number equals less braking power, high number equals more braking power
- ABS1 allows for higher settings than using ABS0
- Lock up can occur at lower numbers when using harder tires
- Higher numbers can be used with softer tires as lock up is more difficult to induce
- Higher front than rear will increase stability during trail braking
- Lower front than rear will induce oversteer or turn in during trail braking

I use ABS1. I also use the NIXIM brake pedal mod on my G27 pedals. It provides three levels of feel; soft at first, medium pressure through the middle and finally hard pressure at the bottom. If you are still using the stock brake spring on a G25 or G27, the NIXIM is worth every penny.

I try to set the overall levels first; 5/5 or 4/4 or 3/3, etc. On comfort soft tires I am noticing settings between 2/2 and 4/4. With sport hard tires I use 3/3 to 5/5. With sport soft tire and higher, settings can be between 5/5 and 7/7 or 8/8. I pick the number set using three inputs. First is by turning up the TV volume and listening for tire squeal or lock up under hard braking. For rally cars on dirt, PD did not program tire squeal. Rather, they programmed the engine noise to stop completely as an indication that the tires are locked up. Second is by watching for red tires in the tire indicators. Third is by noticing how deep my foot is into the brake pedal. If I can barely get on the brakes and lock up occurs, I lower both numbers. If I am fully deep into the pedal I will raise brake balance.

Next I set the front/rear split. Not all cars need a split. The challenge to setting this split is that PD has not given us very good indicators in GT6. A wheel turns red and we do not know if the wheel is red due to being overloaded or under loaded. Thus the trial and error nature of the game and the tendency for people to think settings are programmed backward. I will change to chase view to better see the car’s weight transition. Generally, if the car is loose under braking, therear brake balanceis too high. Most often with this condition there are no red tires present, just the noticeable over rotation during trail braking. As for red tires on the front during braking, the red indicator can be notifying us of one of twoconditions.Frontcondition one- overloaded front tires. For this, lower front brake balance and/or raiserear.Frontcondition two– sliding front tires. For this condition, the front tires need more weight on them so raise front brake balance and/or lower rear.

Downforce
- Low front rate/high rear rate will encourage understeer
- High front rate/low rear rate will increase oversteer
- Higher downforce will reduce top speed

I play GT6 to road race. I do not drag race, nor do I do top speed runs. Someone else can test that. What I am more concerned with is the fastest corner speed possible. Corner speed wins road races. I do not add downforce to street cars on street tires. I try to use mechanical grip first. Plus, most street cars in GT6 understeer. I will almost always use max front downforce on race cars. I will use max rear downforce if I can get the car to mechanically turn well. If not, I reduce rear downforce until I find a desirable amount of corner rotation.

Ballast
- First, view the car in chase view to determine whether red tire is overloaded beyond its grip limit or if it is sliding
- For sliding front tires, move ballast forward (negative number), which adds weight to the
front tires and encourages more grip
- For overloaded front tires, move ballast back (positive number), which removes weight from the front tires, returning them to be within their grip limit
- For sliding rear tires, move ballast back (positive number), which adds weight to the rear
tires and encourages more grip
- For overloaded rear tires, move ballast forward (negative number), which removes weight
from the rear tires, returning them to be within their grip limit
 
Last edited:
Tune Problem Solving

PD did not give us many tools to diagnose tuning problems. When a tire turns red in GT6, it means one of two things. Either that tire is overloaded beyond its available grip level or it is sliding or skimming across the pavement. The first thing that I do is to view the car in chase view to determine which condition may be causing the red tire. For example, if my outside front tire is turning red during mid-speed sweeping corners and the weight seems to be leaning more rearward, the car needs more weight pushed onto the front tires. Another example involves a red outside front tire in a slower, 180 degree corner where the car’s weight seems to be leaning forward, over the front axles. In this case, the front tire is being pushed beyond its grip limit and less weight needs to transfer to the nose of the car.

Below is how I problem solve for GT6 tuning. This is how I evaluate what a car is doing at given points in a corner. I have written a few scenarios under each photo and a few hypotheses. Since game update 1.09, I have also been posting my tuning notes along with my shared tunes. The below problem solving guide, along with my tuning notes should provide a rich understanding of how I approach tuning in GT6.

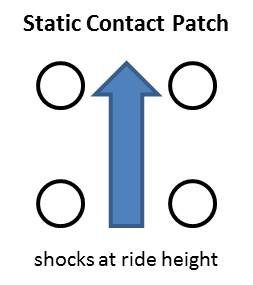
Here is a graphic indicating a car at rest or in a coasting position. The springs are at their ride height position and the dampers are not moving. This is chassis neutral.

12118245866_038c353b06.jpg


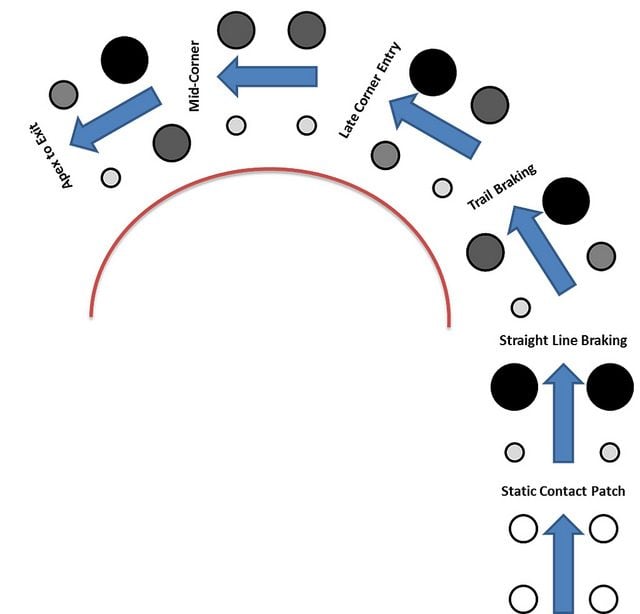
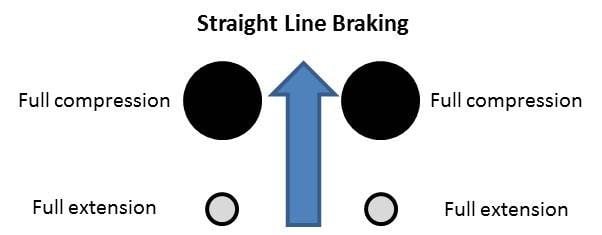
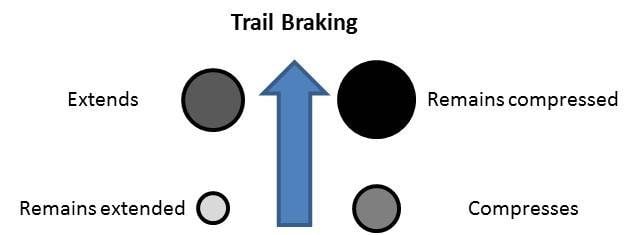
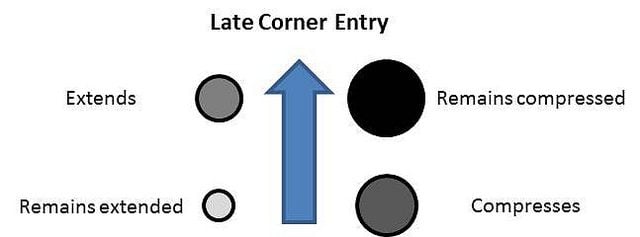
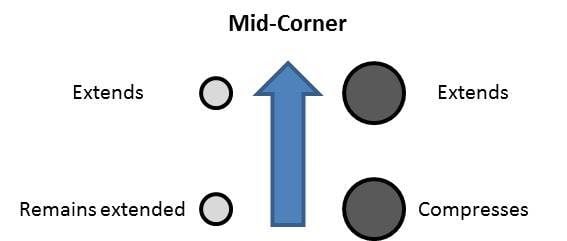
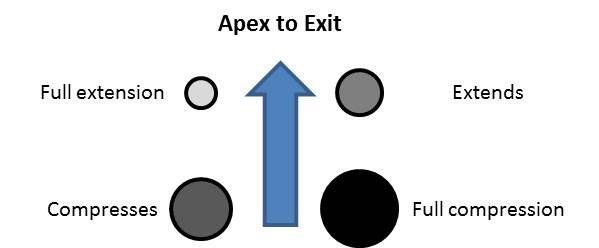
Shock absorbers do nothing in this vehicle state. The four circles in these diagrams are meant to represent the tire contact patch. You will notice below that I have indicated weight transfer by making the tire contact patch grow as well as the color darkens in the following drawings. A large, black colored circle is meant to indicate maximum load from weight transfer. A small, light gray colored circle is meant to indicate minimum load.

12117987794_7132dbaf4f_z.jpg


I find it useful to think about how weight transfers around the car at different stages of a corner, as shown above. Below are a few handling scenarios and some suggested tuning adjustments to improve the car in that situation. Remember that tuning is full of trade-offs so an adjustment to help corner entry may be offset with a negative result for corner exit.

12117587755_a335481f8c_z.jpg


12117987564_77226c9dab_z.jpg


GT6 Handling Tips:

Condition 1: Glowing red front tires under braking

Options: Reduce rear shock extension (lower number) and/or reduce front shock compression (lower number). This should speed up the transfer of weight to the front wheels and provide more front grip under braking. This can be effective to shorten braking distances, up to the point of maximum front tire grip. A second option is to reduce front brake balance or increase rear brake balance. A third option is to reduce LSD decel.

Condition 2: Loose condition under braking

Options: Increase rear shock extension (higher number) or increase front shock compression (higher number). This should slow down the transfer of weight to the front wheels and hold rear wheel grip longer into the braking zone. This can be effective to shorten braking distances, up to the point of maximum rear tire grip. A second option is to increase front brake balance or reduce rear brake balance. A third option is to increase LSD decel.

12117878863_5d96380762_z.jpg


Late corner entry can be difficult to diagnose while driving in GT6. You may need to watch a replay instead of trying to see what the tire indicators are doing while on a hot lap. There is one condition that I see most often in GT6 at this point in the turn; a red, outside front tire.

GT6 Handling Tips:

Condition 1: Glowing red outside front tire in a medium to low speed corner

Options: Hypothesis is that the front tire is overloaded and past its maximum available grip. To fix this condition, test increasing front compression and increasing rear extension. A second option is to add ballast and move weight to the rear of the car.

Condition 2: Glowing red outside front tire in a medium to high speed corner

Options: Hypothesis is that the front tire does not have enough weight on it and it is just sliding across the pavement. To fix this condition, test decreasing front compression and decreasing rear extension. A second option is to add ballast and move weight to the front of the car.

12117587805_b029881975_z.jpg


Mid-corner issues can be difficult to diagnose. Many times the mid-corner problem is actually starting at late corner entry. If trying to diagnose while driving on a hot lap, it can be difficult to see when the problem tire begins to turn yellow, then red. Watching a replay can help to make this determination. I tend to see a few conditions appear in GT6.

GT6 Handling Tips:

Condition 1: Understeer or glowing red outside front tire while off throttle through mid-corner

Options: Hypothesis is that the front tire is overloaded and past its maximum available grip. To fix this condition, test increasing front compression and increasing rear extension. A second option is to add ballast and move weight to the rear of the car.

Condition 2: Understeer or glowing red outside front tire while coming back to throttle at or before the mid-corner apex

Options: Hypothesis is that the front tire does not have enough weight on it and it is just sliding across the pavement. To fix this condition, test decreasing front compression and decreasing rear extension. A second option is to add ballast and move weight to the front of the car.

Condition 3: Oversteer or glowing red outside rear tire while off throttle through mid-corner

Options: Hypothesis is that the outside rear tire does not have enough weight on it. To fix this condition, test decreasing front extension and decreasing rear compression. A second option is to add ballast and move weight to the rear of the car.

Condition 4: Oversteer or glowing red outside rear tire while on throttle through mid-corner or both rear tires turning red through mid-corner

Options: The first thing that needs to be checked is LSD Accel. If the outside rear tire turns red when getting back to throttle, lower the LSD Accel number, then adjust the dampers. Hypothesis is that the outside rear tire is beyond its grip limit and weight must be transferred forward. To fix this condition, test increasing front extension and increasing rear compression. A second option is to add ballast and move weight to the front of the car.

12117689105_9d04d605ac_z.jpg


Apex to exit issues most often appear in a few ways. The goal with this section of the corner is to begin to apply throttle as early as possible in the corner without having to lift off again before the end of following straight away. Take note of the tire patch sizes in the graphic above and how much weight is on the outside rear tire. In contrast, the front tires are experiencing much less load. Apex to exit tuning is about controlling this weight transfer.

GT6 Handling Tips:

Condition 1: Glowing red inside drive line tire while on throttle through corner exit

Options: If the inside drive line tire is red, this is 99% of the time caused by having the LSD Accel number too low. The only other settings that can have an effect on this on-power condition are ARBs, springs and damping. The idea is to control body roll by not allowing weight to shift to the outside. Higher ARBs, higher springs and higher rear damper compression can help a little, but these settings will not overcome a bad LSD setting.

Condition 2: Glowing outside rear tire while on throttle through corner exit

Options: If the outside rear tire is red, this is normally caused by having the LSD Accel number too high. It can also be caused by an oversteer slide. It should be easy to see the difference between these two conditions by viewing in replay mode. Start with optimizing the LSD by adjusting the Accel number lower. This does not always fully solve the issue, especially on MR and RR drive trains. Also try these changes to encourage more rear grip. Lowering the rear ARB, lowering rear spring rate and lowering rear damper compression can all place more weight onto the outside rear tire and increase rear grip. Increasing rear toe in can also help.

Condition 3: Understeer or glowing red outside front tire from apex to exit

Options: If the outside front tire is red on a FF drive train, this is normally caused by having the LSD Accel number too high. A red outside front tire on all other drive trains usually means that the outside front tire is sliding. The challenge with this condition is that as you apply throttle, weight transfers to the rear and the front tire patches become small. Dampers and springs are the best way to control this weight transfer. Raising rear damper compression and raising front damper extension are the two best options for curing this issue. My second choice for solving a red outside front tire is spring rate; changing settings to lower front springs and higher rear springs.
 
Last edited:
A must read for anyone trying to get grips with tuning cars in GT6. This guide not only explains how settings actually work in the game but let's you know which are most important and how to identify and fix the most common problems you'll encounter.

Should be stickied now that it's released from the bowels of MCT garage, happy Xmas tuning noobs.
 
All hail the great and powerful Motor City Hami!!

Thanks for this update. It is my GT6 bible, and I thoroughly appreciate the update for the newer physics model.
 
@Motor City Hami in the introduction, you discuss your findings regarding HP and Oil Changes, and for the most part I agree. I do have one question about it though, as the oil change does dramatically increase the torque.

Have you found any benefit to having the higher torque number at the same PP, even though the HP may be lower? I do run in a bi-weekly league, and with the high level of competition we have I am looking for any edge I can get :)
 
Last edited:
@Motor City Hami in the introduction, you discuss your findings regarding HP and Oil Changes, and for the most part I agree. I do have one question about it though, as the oil change does dramatically increase the torque.

Have you found any benefit to having the higher torque number at the same PP, even though the HP may be lower? I do run in a bi-weekly league, and with the high level of competition we have I am looking for any edge I can get :)

Torque in GT6 intrigues me. If power limiting is fully allowed, adding all of the power parts available and using as much power limiting as possible will provide the most torque available. Yet, this does not seem to produce the fastest result. Why would using less power limiting produce a faster car? To me it seems that HP is favored more in the GT6 pp equation. I have not tested oil change, back to back against non-oil change, but on paper it changes the relationship between HP and torque just as power limiting does.

More testing on this subject would be useful. As soon as the rest of the FITT community reads this post, I am sure we will have some volunteers to put this to a test.
 
Why would using less power limiting produce a faster car?

I get confused when people get scientific about torque and, gearing aside, think of it as the force that produces acceleration.

Often the max torque available is outside of the power band and not fully utilised. On some power limited cars the graphs show severe drop offs in the amount of torque as revs increase. It may be that some of the power parts, by increasing the engine's rpm have reduced usable torque and in turn hurt acceleration.
 
On the subject of BHP vs. Torque


I'm not going to go into a long drawn out explanation about the difference between torque and horsepower (Bhp) as it involves a lot of maths and makes my brain hurt.

If we imagine a man pushing a boulder we can visualise torque as his ability to get the boulder moving in the first place, his overall strength so to speak which dictates how easily he moves the weight and whether he can push it up an incline. Bhp is represented by his ability to keep the boulder rolling once he has gotten it moving, the more Bhp he has the faster and easier he can keep travelling at speed, almost like his fitness level.
To use another analogy, torque is like a weight lifter, Bhp is like a 400M sprinter.

Instead I will run through the way I choose parts in order to get the best performance from a car when I am building to a PP/BHP limit.
The important thing to remember is that torque is just the amount of twisting force delivered to the wheels by the engine, it can be both a good and a bad thing depending on what you want to do with a car and what the car is capable of in terms of grip.

When changing parts in order to get improve our torque we must first observe our toque curve within the tuning menu and understand what this represents in terms of our driving experience/performance.
One important thing is not to get too caught up on peak values, just because we have a bigger number doesn't mean we will go faster. We must understand how the gearing will utilise the power through all of the gears.
As we go up through the gears while racing you will notice that you start the new gear at different point in the rev range:-

1st: 1000 Rpm (idle) - 7500 Rpm (redline)
2nd: 3000 Rpm - 7500 Rpm
3rd: 4500 Rpm - 7500 Rpm
4th: 5100 Rpm - 7500 Rpm
5th: 5800 Rpm - 7500 Rpm
6th: 6000 Rpm - 7500 Rpm

As we can see, we are using less and less of the rev range as we go up through the gears, this means that we need to look our power curve to reference how much of this performance we are able to access.

Torque gives us our low speed pushing power, it is extremely useful on courses that involve climbing up a gradient and is essential for heavier vehicles. As a downside, if your tyres can't handle the force generated by the torque you are going to get a whole lot of wheel spin when exiting low speed corners. When applying these tuning principals we must think about what we want as a result, do we want low end grunt or top end performance?
If the course is full of low speed corners and/or hills and the tyres are up to the task then we will be looking for more torque. Conversely if the track is fast and open we are looking for a better Bhp range


Lets look at some examples so we have some visuals to better explain the ideas.

Car: Hyundai Genesis 3.9 - Stock
stock.jpg

Here we have the car in stock form:
359 Bhp @ 6500 Rpm
42.3 Kgfm @ 5000 Rpm
Redline: 7500 Rpm
Power limiter: 100%

As we can see the car has a fairly normal power curve. The Bhp grows fairly equally until its peak at 6500 Rpm before dropping off quite steeply in the last 1000 Rpm of the top end. The torque curve grow gradually to its peak at 5000 Rpm where it holds until about 6400 Rpm before dropping off sharply. This pattern means that the car has good mid range torque which will allow it to pull strongly through the mid range and will keep accelerating well until near the redline.

Now we will set a tuning limit of 400 Bhp and see what various parts are doing to the power curve and what this means to performance.


Tune 1
1.jpg

Parts fitted: Low-Rpm Turbo, Isometric exhaust manifold
400 Bhp @ 6400 Rpm
53.4 Kgfm @ 4500 Rpm
Redline: 7500 Rpm
Power limiter: 97.7%

With the Low-Rpm turbo fitted we see a change in the shape of the torque curve, it is peaking slightly earlier and then dropping off at almost the same rate it climbs. We are making more peak torque but less in the higher ranges. In terms of gearing this means that we would get better performance in gears 1-3 but would begin to see performance drops in 4-6 because we are starting the gear past the peak on the downward slope. In those higher gears we may actually be producing less torque than stock.
The Bhp is in a similar state to stock, the peak/drop off haven't changed enough to cause a major difference to performance.


Tune 2:
2.jpg

Parts fitted: Mid-Rpm Turbo
400 Bhp @ 5600 Rpm
60.0 Kgfm @ 4500 Rpm
Redline: 7500 Rpm
Power limiter: 95.1%

Again we see a higher peak torque figure but a more peaky range where it quickly climbs and then drops off. The drop off is slightly more aggressive than the previous tune but the peak is substantially higher so road testing would be necessary to decide which was best.
The Bhp on the other hand looks much better, the peak is earlier and sustains itself well without facing a nasty drop off in the high Rpm's.


Tune 3:
3.jpg

Parts fitted: High-Rpm Turbo
400 Bhp @ 5600 Rpm
54.6 Kgfm @ 5300 Rpm
Redline: 7500 Rpm
Power limiter: 97.7%

We can see that the lines are much less peaky with this parts configuration, there are no dramatic inclines or decline in power. We may be making less peak torque than the Mid-Rpm turbo but we are making a lot more within the usable range, this would give us great drive through the higher ranges and smooth power delivery in the lower gears. Because we are using a larger % of engine limiting we see a flat line at the top of the Bhp curve, it hits a peak and doesn't decline. This setup would definitely go on the short-list if I was looking for options.

Tune 4:
4.jpg

Parts fitted: Stage 1 engine tuning, Isometric exhaust manifold
400 Bhp @ 6600 Rpm
46.7 Kgfm @ 5100 Rpm
Redline: 7600 Rpm
Power limiter: 99.3%

We see a very similar power curve to the engine in stock form, the redline has increased by 100 Rpm and the peaks have moved in a similar fashion. This would be a good way to increase your power output without changing the engine characteristics too drastically if you liked it in stock form.


Tune 5:
5.jpg

Parts fitted: Stage 2 engine tuning
400 Bhp @ 6500 Rpm
47.0 Kgfm @ 5200 Rpm
Redline: 7700 Rpm
Power limiter: 97.2%

Again we see a similar trend as we would expect with engine tuning, the Redline is again raised and the peaks follow along in a similar fashion. Because we are using increased % of power limiter we are again seeing a flatter Bhp peak.


Tune 6:
6.jpg

Parts fitted: Stage 3 engine tuning
400 Bhp @ 6400 Rpm
50.4 Kgfm @ 5300 Rpm
Redline: 7800 Rpm
Power limiter: 89.3%

Here we are starting to see the engine being strangled by the limiter, the decline in torque is slightly steeper than before for a small increase in peak figure. I try to avoid using the limiter past the stage where it is flattening the torque curve where possible as it often makes the power less progressive through the range.

Tune 7:
7.jpg

Parts fitted: Stage 3 engine tuning, Sports ECU, Racing exhaust, Isometric exhaust manifold, Intake tuning, High-Rpm turbo
400 Bhp @ 5100 Rpm
62.8 Kgfm @ 4600 Rpm
Redline: 8300 Rpm
Power limiter: 50.5%

Here we see what happens when we go for maximum peak figures, we end up with a very odd torque peak where the power drops off sharply and dramatically but the Bhp peaks early and maintains to the redline. If you were looking for high speed performance this would be the option for you because of the Bhp consistency but your low speed grunt would be reduced.


I hope that helps to some degree 👍
 
Last edited:
Thanks to all for the comments, however my question was not about the difference between torque and horsepower. I have a solid understanding of each and fully understand the power curves and gearing, etc.

My question was specifc to MCH's comment about the oil change and whether it is worth doing or not. The oil change gives you a boost in both horsepower and torque. If you use the power limiter after the oil change to return a car to the same PP level, you will in fact lose a percentage of your horsepower. The reason for that is actually quite simple. The torque number is also used in the PP calculation.

Now, as I power limit the engine, the HP reduces, but the torque does not, or at least not at the same rate as the HP.

My question is..... Does this gain in Torque provide a significant enough benefit to still make the oil change worthwhile, or am I better off keeping the higher HP and the lower torque number?

Let's look at my scenario. In my league we have HP and Weight limits rather than a PP limit. The car I am using has 2 options in order for it to be legal.

  1. Without oil change, 330HP and 320 ftlb with engine at 99.8%
  2. With oil change, 330HP and 342 ftlb with engine at 91.3%
The small reduction in the limiter has minimal impact on the power band.

Real world wisdom would say use option 2, as this will give you more get up and go in the lower gears and therefore should be the faster option.

But we all know that Real world tuning and GTx tuning are rarely the same, so my question really is "Does this still hold true in the game?". Is option 2 in fact the better choice, or am I better of as MCH suggested with not doing the oil change?

Has there been any testing done on this? I unfortunately am not consistent enough to provide reliable data.
The peak figures are sort of irrelevant and should only be used as a reference point when viewing the rest of the graph, the effect on the torque/power curve is the deciding factor.
Basically if you are making more peak torque but negatively altering the shape of the curve by using the limiter then you might be producing less torque in the usable range and harming performance.

As for the PP effects and differences I can't comment, not something I've felt the need to look into.
 
Option 2. Irrelevant of the torque figures, having more limiter in option 2 and same HP means max HP over a larger RPM range which is a good thing (on a 330HP car anyway). On top of that, higher torque will help acceleration whenever your not in high RPM (because higher torque lower in the RPM range means more BHP lower in the RPM range)

DolHaus has gotten himself into a muddle trying to explain torque.

You cant have one tune with 400HP and 50kgfm at 7000RPM and another tune with 400HP also at 7000RPM but less torque than the 1st at 7000RPM. If they both have 400HP at 7000RPM, then they must have exactlly the same torque at 7000RPM also. It's just how torque is, just like 2+2=4, you can't argue this.

To make higher BHP at low RPM you need higher torque in low RPM, that's why the torque curve looks like it does when you use a huge amount of limiter.
 
Last edited:
You cant have one tune with 400HP and 50kgfm at 7000RPM and another tune with 400HP also at 7000RPM but less torque than the 1st at 7000RPM. If they both have 400HP at 7000RPM, then they must have exactlly the same torque at 7000RPM also. It's just how torque is, just like 2+2=4, you can't argue this.
Correct... Torque = (HP*5252) divided by RPM. The graph in GT has a lot to be desired. According to the math, the HP and the Torque should always cross around 5252 RPM. Too bad the graphs lack the detail to show us what we really need to know like true torque numbers at a certain RPM aiding those who use a manual transmission in when to shift. The best shifting point is trying to match the same torque figures through gear ratios, even though the RPM drops when you shift. And of course us auto users are stuck at certain shifting points and have to try and manipulate the figures to suit.:ouch:

Edit: As always Hami, I'm looking forward to studying your guide forwards and backwards...keep up the great work, sir.
 
Last edited:
Nice to see you've give your tuning guide it's own space 👍, if there was one thing I would like to see added to this tuning guide, it would be the methodology you use to test different components. I found an old gt5 post where you mentioned that in testing ( I think it was ) dampers, you drove around the track at a fixed gear to be able to compare the differences in the setup value changes. I found this great info. It's great to know what the parts do and how they behave, it's even greater to know how to go about to test these parts and feel what your doing. Good idea and noble of you to add your tuner notes, thanks for your hard work and your generous time. :cheers:
 
Man, as always you live up to your great reputation ^^
Let me just take a second of your time to give you a huge thank you.

I played gt1, briefly, and really dont remember it. So really, I came into this series at gt5.
You were one of many who took the time to explain tuning in gt5, however I stuck with you because you were always very organized and had great structure to your guides. You made a so-so game into one I could get into and get my hands dirty in. For that I thank you.
As far as GT6 goes, as stated above, you have continued that reputation.
You have influenced me in most positive ways as far as tuning and for that matter enjoying this game.
I just wanted you to know that all your effort is doing great things for this community.
Thank you man ^^
 
Thank you, thank you, thank you MCM.👍👍👍👍👍 The best tuning example I've ever seen here. I too was a road racer in the SCCA. I started with MGBs in the mid '70s and then to Datsun 510s in the mid '80s. I was both a mechanic and driver. In GT5 I was able to take what I knew from RL to tuning. In GT6 PD changed the spring rate designation and that baffled me. I even did a Google search to convert the new designation to the old one. It really didn't help me much. So again thank you. I have copy and pasted your info into a Word document so it will be readily available. This should be a sticky.:cheers:
 
Thank you very much for this @Motor City Hami(tup) Your write ups have helped me a ton!!!


One observation I've made on my own, that seems to contradict what you say, has to do with ride hight.

I don't have much experience or knowledge in tuning grip cars (I usually just use your tunes :dunce: :lol:), but drift cars on CH is another story...there, I feel like I know my stuff.

On CH tires, with a RWD car, I think the in-game description accurately describes the behaviour of adjusting the ride hight.

If I lower the front / raise the rear, the result is a less stable car which over steers much more. I use equal ride hights, or slightly higher in the rear, on some of my very low powered drifter (eg Bluebird 510). This helps the rear step out more easily.

If I lower the rear / raise the front, the result is a more stable car which understeers more (due to the front having less grip). This also helps increase rear traction and forward bite, and can help reduce excessive wheelspin.


Reverse rake is how pretty much all pro drift cars are set up in real life as well.


Also, one question about building cars for PP levels.

What are your thoughts on sacrificing top end HP for low end torque?
 
Stickied!👍👍 As I strongly believe it should, and thank you mods!
One of the things I like most about your new guide is how you break the corner down by segments. That will be huge to me and most others because it shows how you might need to do the opposite of what you think depending on when the "issue" occurs.
 
Thank you very much for this @Motor City Hami(tup) Your write ups have helped me a ton!!!


One observation I've made on my own, that seems to contradict what you say, has to do with ride hight.


What are your thoughts on sacrificing top end HP for low end torque?

Ride height - I wrote the guide to cover the majority of cars. There are some cars that I have tuned that did not respond to the ride height glitch or just were not needed. With the majority of car, I have seen lap times drop using the ride height glitch.

HP vs. Torque - I lean more toward HP. That is what has worked for me. My testing has shown very little difference in lap time between HP builds and torque builds.

A recent example with a Lotus Elise Type 72 '01:
1. Turbo 3 - 450 PP, 96.6% limiter, 160 hp, 158 ft.lbs. torque
2. Engine 2, Sport Comp, Sport Cat, Ehaust Man - 450 PP, 90.3% limiter, 158 hp, 164 ft.lbs. torque
3. Engine 3 - 450 PP, 96.1% limiter, 159 hp, 162 ft.lbs. torque
4. Engine 1, Sport Comp, Sport Cat, Racing Exh - 450 PP, 98.6% limiter, 162 hp, 149 ft.lbs. torque

There was very, very little difference in any of these settings. It may also be because the car was for a competition using the fixed five speed transmission. The transmission settings change between torque and top speed automatically to compensate for each build.

I think there is more work to do in this area, but it may return only small gains?
 
Stickied!👍👍 As I strongly believe it should, and thank you mods!
One of the things I like most about your new guide is how you break the corner down by segments. That will be huge to me and most others because it shows how you might need to do the opposite of what you think depending on when the "issue" occurs.

We don't need for you to get any faster. You are already getting difficult to beat in the FITT competitions. :cool:
 
Thank you. And, I am not sure how things get pinned around here? Seems like there is enough interest. It might take a number of you requesting it through the report button?

I did make a report asking to make this a sticky. I think that is what they call it know. I told them that it had helped me and that there were posts above and below mine saying the same thing. So thanks again. I also quoted using your LSD guide guide in my win at Suzuka East. Thank you again so much.👍
 
Back