Metalsun's GT6 Gallery * Rain Forest 3D Render *

  • Thread starter Metalsun
  • 84 comments
  • 7,228 views
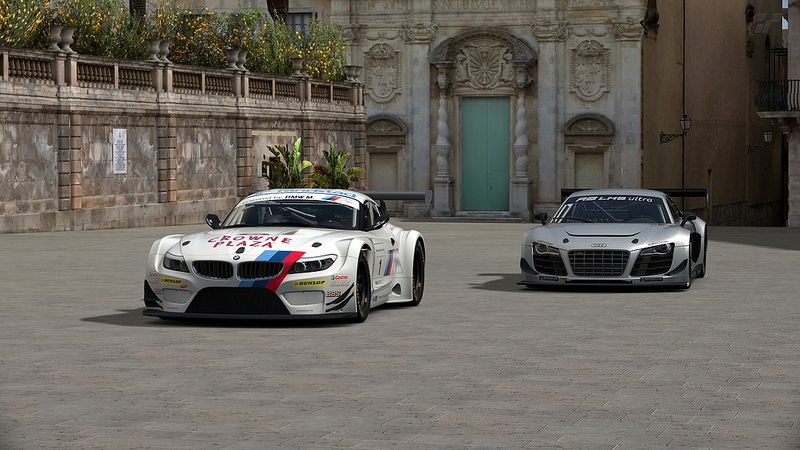
3D Ferrari Enzo Gemasolar by Metalsun1, on Flickr

Some of you will recognize these photos quickly but for the rest, get ready for some ocular gymnastics. These are stereoscopic images. One of various ways to represent a 3D image using 2D photos. I wanted to do this for a while but now got around to it. I have prepared these shots for you to see using the freeviewing “cross-eyed” method.

First, a little background. We perceive depth in space because of our binocular vision; one eye sees a different image than the other. Place your finger in front of you and close one eye while the other is open, then switch back and forth. Our brain takes into account the differences in the images, eye position and ocular lens focus in our eyes to determine depth.

To see these images correctly, here comes the gymnastics:
1. Position yourself directly in front and centered on the image.
2. Cross your eyes, but not too much, no need to embarrass yourself. You will see two images at first. Slowly ease up and straighten your eyes. The images will begin to get closer and join and end up with what seems 3 images. Keep your attention on the center one.
3. An alternative way would be to look and place you finger in front of your nose then slowly move your hand closer to the computer monitor.
4. Now, to work on you focus. This is completely unnatural, but some might get it right away. If not, keep staring at the center image and give it some time to get the focus right. Eventually, you’ll see it in complete focus and get blown away!

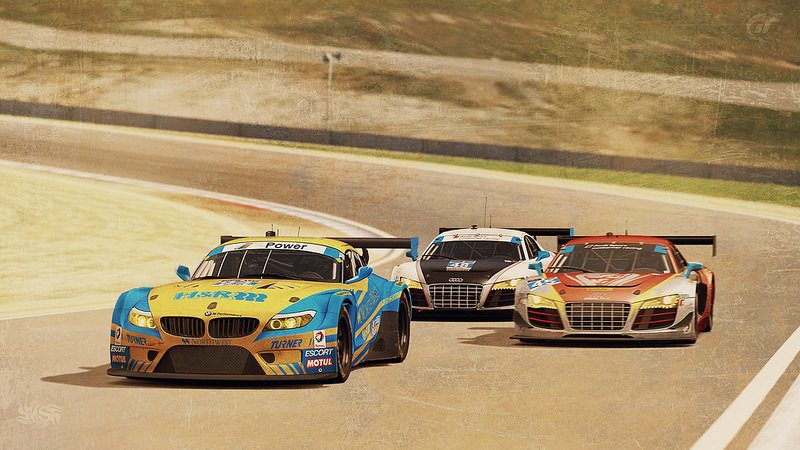
3D Lamborghini Aventador Syracuse by Metalsun1, on Flickr

“That’s crazy, how’d he do that?” Well, it’s quite simple. We need to recreate with our GT6 cameras what we do normally with our eyes. That is, take an image of our subject, then move the camera some distance away and take the other image. Use your photo editing software to combine the photos into one side-by-side image. Easy, right? Kind of. Things to consider:

1. At first, I tried to move the camera at similar distance as that of our eyes. Unfortunately, there is little effect on the 3D perception. So I increased the distance little by little, so much that then it became awful. So, you need to find that sweet spot in the middle.
2. Find a place in your image and define it as your center. That is where you will aim your camera reticle and take the shot. Your focus point could be somewhere else. On the second image, move the camera slowly some distance and use the same center reference.
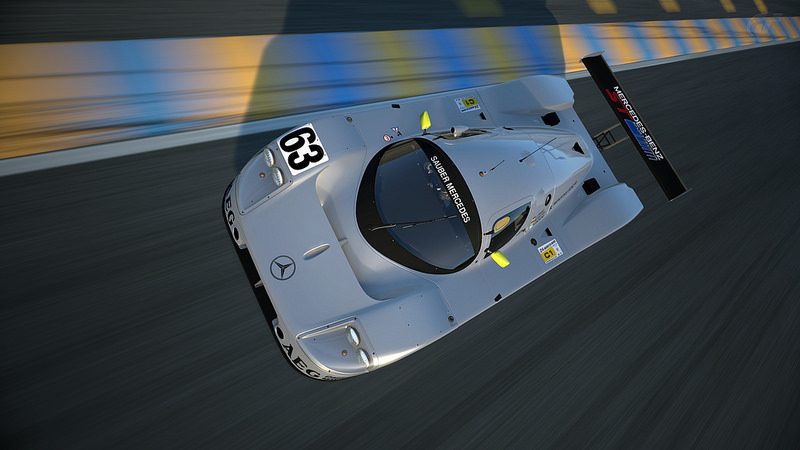
3. Remember, the 3D effect works because of the differences in the images. So compose your shots to take advantage of different depths. A car with distant mountains is not “gonna” do it. You will end up with a “cardboard” car in a flat background. Put your subject in the middle of the environment. Case in point, look below at the way not to go.

GTR Nurbergring by Metalsun1, on Flickr

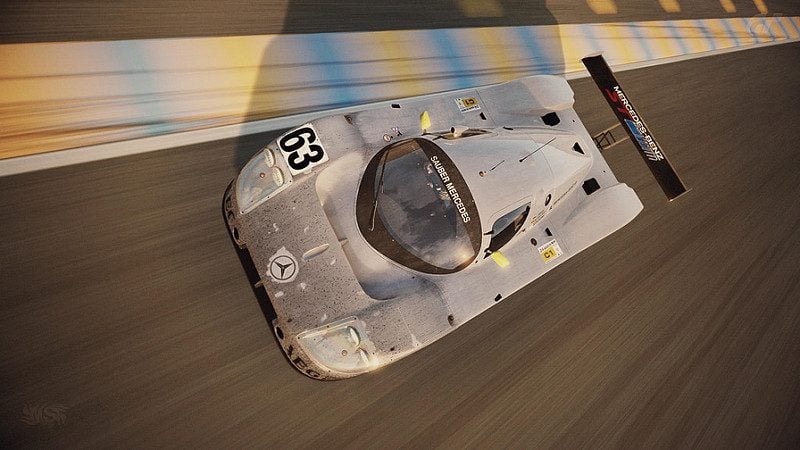
4. The depth-of-field adjustments of the f-stop will work, but be careful. Bokeh images look great in 2D but when using this method, the foreground and/or background will be blurry. This effect will mask out any differences in the images making them a little more flat, unless, that’s what you wanted to do for that particular image. Try to keep the image sharp.
5. If you "see" it and it still looks weird, switch positions. Your right photo image to your left side of your finished composition.

I hope this opens up a new world for you guys to explore. A good photo is not good enough, you now need to consider an effective 3D scene. Hey, after thinking about it, this is an effect that can be easily included in the game by PD.
 
Last edited:
It seems that I'm not very good with this kind of gymnastic, I don't get the 3d image even if I stay 1 minute in front of them...
 
I wanted to do a historic moon edit but what always came into my mind was this launch. I've seen this video countless times on TV and the net. The gold foil is rendered terribly in GT6 so I replaced it with a .jpg I found in the internet. It's really easy because it is crumbled. I trimmed and scaled it appropriately then added shading to give it volume. The descent module is a modified GT6 photo where I erased the ladder to make it appear as the rear of the LEM. The ascent stage is imported, the GT6 image was too dark since in the game the LEM always faces the sun. The wheel is also imported and modified to fit the perspective. Finally, some painted debris and radial motion blur.

13408410403_15889b609f_c.jpg


Apollo 17 Ascend Stage Launch
by Metalsun1, on Flickr

December 14, 1972 marked the end of the sixth and final moon landings, closing an era in moon exploration. For it was on this date that the ascent stage of the Lunar Excursion Module and its Apollo 17 crew left the moon and with it the last humans to visit the moon. These men were Eugene Cernan and Harrison Schmitt while Ronald E. Evans remained in orbit above in the Apollo command module. Here, we have the lunar roving vehicle (LRV) as the protagonist in an iconic historical moment. Recording the launch of the ascent module via remote control from NASA back in Houston, TX. The LRV was used in the 2 previous Apollo moon missions but the launch recordings were not very successful, until Apollo 17. A tricky feat, due to the great distances and communications delays between the earth and moon. Camera operator Ed Fendell had to tilt and zoom the device ahead of the launch, blindly and hope for the best.[/COLOR]
 
Last edited:
I wanted to try out a bit more atmosphere in my edits. I am in a point where my editing is pretty good. I see editing very "mechanical" - I know where I want to go so I modify a particular image asset to that point. The hardest thing here was that I had to modify the cars from right-hand to left-hand drive and add the roll cage. Now to convey a feeling is a bit harder. First, you have to define the feeling. Second, have a an image in your mind on how to represent it then thirdly have the sufficient knowledge of your image processing program to make it happen. I find that getting all three right is hard in post editing.
I looked at my original image and saw that it and was too cartoonish, too many bright colors. The sky was barren, nothing going on up there. So I desaturated the background, boosted the reds a bit and added a little of blue. I had isolated the cars and desaturated and boosted the red to a smaller degree. I took an artistic license and added the stormy skies. The day of the real race had no impending hurricane forecast, but it added more details and the atmosphere I wanted. The post editing was very simple, but I wanted more, it didn't happen because I lack the sufficient experience in my last two steps as I described them above. Overall, I am quite proud of the final result and will push myself in future post editing.
One more thing, if you look carefully, Nick and Chris are driving the cars.


...and just like that, the race was over. If you didn't get a chance to see the final episode of the 2013 GT Academy Championship, well, here is your chance. Just in case, SPOILER ALERT, watch the video. It was an almost certainty Christopher Hill, car 33, was going to get the win, he dominated the whole race. Outback, Nick McMillen in car 28, had a lousy start and dropped to 3rd. He eventually persevered, quickly reached 2nd and gaining steadily on Chris. Although, Nick was slightly faster than Chris, it would be another thing to pass him in the last lap. Only thing to do is to keep on the pressure, wait for a mistake and have the win come to him…and then it happened.
 
Last edited:
The Mazda 787B is my favorite racing car. This stems from the fact that sometime in the early 90’s I saw this car displayed in a mall. I had never seen a world class racer before and the fact of having this colorful, Le Mans, Group C prototype winner in front of me made a very lasting impression. With this shot, I am continuing my need to add a post-editing artistic mood to my pictures instead of the sterile editing I have done before.
Although the car is a premium car and the modeling and texturing is great, the livery is pitiful in close-up. Here and in other cars, the livery floats above the car’s surface, leaving shadows, stretching and bleeding when placed in curved places. So, for this edit, I had to replace them for added accuracy. I also cleaned up edges/corners, updated the antennas to the period-correct ones and added a red colored tape; placed in the front edge sometime during the race. In GT5 I had done a “dirty” F2007 Ferrari and had always wanted to do another. For the mood, I wanted to show an old photo but not too aged. Didn’t want to do cross processing again so tried using a brown/beige overall quality.


Winning an endurance race depends on three important factors, driver skill, automotive speed and reliability. In the 1991 24 Hours of Le Mans, the Porsches, Jaguars, Mercedes-Benz and Peugeots were clear favorites in the Group C category. So it was no surprise that Mazda, with its reliable reputation, was just another car on the list. Racing strategy is very dynamic but in essence, it’s a speed vs. reliability. Some teams went for speed, others, like Jaguar and Mazda went for reliability, slowing their cars on purpose. Eventually, the No. 55 Renown sponsored Mazda driven by Johnny Herbert, Volker Weidler, and Bertrand Gachot slowly crept through the field from a 19th place starting position to 1st after 22 hours. Jaguar 2nd and 3rd and the other 2 Mazdas finished 6th and 8th.
 
Last edited:
I don't even know how it happened that I still have not left any comments in your amazing gallery.
I love your editing and love your pictures :drool:
 
Just brilliant mate. So well thought out and editied. Love the Mazda shot but the GT academy edit is really nice too. 👍
 
The level of details in the edit shot with the two Nissan is awesome. As usual with you maybe, but I'm always very impress by the amount of work you put in these creation.
And the last one is just superb, the dirt, the motion blur, the light : perfect work !
Bravo !
 
Your latest edit looks awesome!:eek: The dirt build up, subtle lens flare as well as the enhanced light reflections all add to the convincing realism of the shot. Brilliant work!👍
 
After seeing this race, it had me thinking of how enjoyable it was to see 2014 TUDOR United SportsCar Championship races. The cars are pretty much balanced, so much so, very few cars have repeated wins. None for the GTD category and with that crazy ending, that was it. I love the GT6 BMW Z4 GT3 model, it is very photogenic. So after the race, I knew I had to reproduce the event it in GT6.

I had done multiple cars racing before. I would do a run in the track, take many pictures at very similar angles. Do another run with the same or different car. Take multiple pictures at similar angles again. In Photoshop, I would then choose the best pictures that "fit" the perspective. Very tedious, until now.

First, I set up my shot with the main subject, the Z4, right where it passed the R8.


14443501064_c6df972d68_c.jpg


Thanks to the new option in GT6 of having 2 cars present in Photo Location, I went to Syracuse to set up the Z4 and the #48 R8. In this Photo Location I tried to keep the same angle of the sun as it was in the real race. The advantage here is that I get a high resolution image of the car, unlike in the track which is lowered a notch. One key element in making a believable shot is maintaining the perspectives. So the Photo Location took care of that easily. All I had to match was the BMW to the "track BMW" above.

14258022598_62af4b88fc_c.jpg


For the #45 R8, again it was simple. Move it to the desired location and a correct perspective is assured.

14421516456_abdd58fbfc_c.jpg


Now, to tie it all together. I isolated the BMW and #48 AUDI from the Photo Location and imported them to the Laguna Seca shot. Then, isolated only the #45 AUDI and placed it in the appropriate location in the track. That was the easy part, 1 edit is hard, I had to do 3. In post editing I added a dirt and grime texture, desaturated the colors and pumped up a cream overall finish. I wanted to give this hot, desert feeling. After all, the Spanish appropriately named the area LAGUNA SECA, spanish for DRY LAGOON.


Turner Motorsports BMW Z4 GT3 2014 Laguna Seca
by Metalsun1, on Flickr

Surprise endings continue to happen. This time, at the Mazda Raceway Laguna Seca, in the 3rd round of the 2014 TUDOR United SportsCar Championship in the GTD category. The #45 Flying Lizards Motorsports AUDI R8 LMS was set for a win starting from the pole position. After a 2nd yellow flag, 34 minutes into the 2 hour race, many teams came in for a driver change and a splash of fuel. A 3rd yellow flag opportunity never materialized. In a strategy move 1 hour into the race, the Turner Motorsport #94 pitted again for fuel, out of sequence, to take their car to the finish. The Flying Lizards’ pit strategy had the car skip the stop and continue on racing while conserving fuel. Then the surprise. In the last lap, above the “Corkscrew” turn, the #45 ran out of “fumes”. Eventually, giving way for the Turner Motorsport #94 BMW Z4 GT3 driven by Dane Cameron and Markus Palttala, who were 11 seconds behind from P10, to take their first checkered flag (fast forward to 1:38:00) of the 2014 season.
Update: After 8 races into the series the #555 AIM Autosport (now with a modified livery) still leads in in the GTD championship by 2 points.
Update 2: The Turner Motorsport #94 BMW Z4 GT3 became the 1st GTD team to repeat a win in the series after reaching the checkered flag first at Watkins Glen. Now with 3 wins, the team is 3rd in the championship.
 
Last edited:
You deserve recognition for your hard work alone!! :bowdown: 
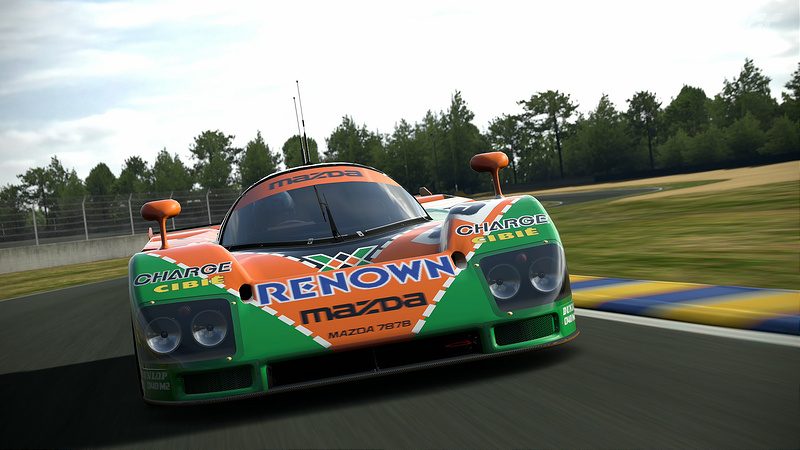
Then there's the beauty of the 787B photo which is staggering! :drool:👍
 
Nice edit Metalsun. Well done on putting together. As NB states it's good to see the breakdown of the elements. And to livery 3 cars, excellent effort. 👍
 
Thanks, GTracer98, the Laguna Seca edit took me a while to finish. At least I had a head start in editing, in that I didn't need to modify the car's "physical" exterior, only the livery. I am beginning to think that the 787B is my best work so far. Although not the most difficult, it certainly is the most beautiful. The honor of Most Difficult goes to the Level 5 Ferrari, where I had to paint-in the wider wheel arches, among other things.

As far as the compositional work, NBDESIGNZ and GPR, I had started taking the multiple pictures when I got the idea. It was a real time saver. It is something to consider, even when doing a single car in a dynamic scene. Since the center of the wheels are barely seen in the Z4, I didn't need to do a RADIAL/SPIN motion blur. I just used the SMUDGE TOOL at a partial strength and it worked just fine...2 minutes, tops.
 
Last edited:
After finishing the Laguna Seca edit, I emailed Tuner Motosport, Dane Cameron and Markus Palttala to tell them about us with a link to gtplanet's Photomode forums and my edit in flickr. I got a response yesterday from Markus Palttala, he liked the edit very much. He is now at the 24 Hours of Nürburgring preparing for the race tomorrow. He's racing for the BMW factory team, Marc VDS on a #26 Z4. He suggested, "Perhaps there’s something cool you can do with this [Marc VDS] combination?". He also asked me if he could "show it around", I said I had no problem and if he publishes it, he should give me credit. Then I sent him a HI-RES jpeg file with the question, "Do you play/practice with Gran Turismo?".

Update: I was very excited while watching the race on Saturday. The #26 crept slowly up the field and battling the R8s for a 1st place position and held it for a long while. I think it was sometime near midnight, while Markus Palttala had his stint, the car suffered throttle problems and had to go into the pits; exiting 36 minutes later in 26th place. Sometime around 2:00am, Bas Leinders crashed into the barriers reacting to slower traffic, taking the car out of the race after 60 laps.
 
Last edited:
In this project, I did very little modifications to the racecar. Reconfigured the windshield wiper to the actual position the #63 car had during the race. The other two cars had them vertically. There seems to be some sort of beige cover to the left side window in the GT6 model, but in the race, the car had a transparent cover over the window vent. Other than that, the car was set to go.
I want to do a series of Group C cars and including some "wear and tear" goes a long way to tell the story. After my last 787B edit, I got the confidence to add more elements to the weathering. In my previous Laguna Seca, I experimented with textures and took that experience to the C9 car itself. Here, there are about 4 different textures along with some painting and some splatter brushes for the grime. I have seen here in gtplanet and in other sites weathering on images and scale models that go too far. I believe that one should restrain a bit, being subtle in some areas is the way to go. Do not go overboard in weathering, then it'll just look bad, a Le Mans car after a rally race (although, some really do look like that in real life). I really like the clean Mercedes-Benz logo. I have a reference photo from the race that showed the mechanics had wiped it in the pits.


14526748813_5911371ba1_c.jpg


Sauber Mercedes C9 1989 24 Hours of Le Mans
by Metalsun1, on Flickr

Mercedes-Benz had retired from top tier racing since the tragic accident in the 1955 24 Hours of Le Mans. That’s until the privateer racing team Sauber, asked M-B in 1984 for some time in their new wind tunnel so they can develop their C8 race car. M-B’s involvement crept from there to engine supplier, then full factory support by 1988 with the C9. Among other improvements above the previous generation, the development of a 4-valve DOHC increased the power output to 720 bhp in race trim. The C9s were very dominant in the 1989 season, winning all but one race. During the 1989 24 Hours of Le Mans, the C9 reached 248.0 mph (400 km/h) during their qualifying sessions down the Mulsanne Straight. Eventually, the #63 Sauber Mercedes driven by Jochen Mass, Manuel Reuter and Stanley Dickens took the checkered flag in a 1st, 2nd, and 5th finish. By the next season, 2 new chicanes were installed in the track to slow the cars down.
 
Last edited:
My third Group C edit, love those cars. The obvious edit here is the deletion of the building in the background. When driving around trying to find a good shot, this ended up being the most interesting. I was looking for an early morning shot and the combination of camera/light settings here did it for me. The problem was that in 1988, the Alain Prost Kart Circuit did not exist. I could not replicate this shot to my liking anywhere else, so I had to remove it. Added the triple ARMCO barrier and some trees.
I did little editing to the car itself. There was the SILK CUT sponsor lettering on the side, dirt, brake dust and dust around the car. I always try to do something new and here I did a rear shot and refined the heat distortion element I started doing in the Level 5 Ferrari 458 GT3 above. I created a custom texture using the FILTER/RENDER/CLOUDS which helped "mix the air" better. Of course, I had to include my obligatory lens flare. The shot here was so realistic that I wanted to go a little further a mimic a period photograph. Usually, I put so much time in editing that I avoid blurring the image, but since I did little of here, it was no loss. That left the door open for me to blur the image and add some NOISE. As the finishing touch, I gave the image the overall cream color that I have been using in my rercent images.


14595685774_c9d69475b9_c.jpg


Jaguar XJR-9 1988 24 Hours of Le Mans
by Metalsun1, on Flickr

By the time the 1988 24 Hours of Le Mans came around again, Porsche was still a dominating force. If you were a privateer team and wanted to win this race, an obvious car to invest in and take to the race would be a Porsche 962. They had won for the last 7 years straight. The odds were stacked against the other teams. Tom Walkinshaw Racing (TWR) brought to the fight 5, factory supported Jaguar XJR-9s. A development of the XJR-8s, the XJR-9s had increased its horsepower to 750hp and aerodynamic efficiency by 15%, in part by re-installing the rear wheel covers over, low rear spoiler and truncated bodywork. After 31 years, Jaguar without a win, Johnny Dumfries, Jan Lammers and Andy Wallace take the checkered flag in the Silk Cut sponsored #2 XJR-9, chassis number TWR-J12C-488, and saw Jaguar take the World Championship with wins in six out of 10 Group C races.
 
Last edited:
I was contributing in another thread about how I do the weathering on cars, how I get them dirty and realized it's kind of a tutorial. So here it is, try it out, experiment a little or a lot!

My first edits were done with GIMP but shortly after I switched to Photoshop CS6. That means that my instructions might not be similar to your photo editing software.

Using textures helps a lot in that you don't have to paint the dust/dirt. You can use any image in the internet and turn it into a texture. Of course, you have to apply an appropriate image to your subject. A scene of a kid’s birthday party on the side of a car will not do. So you have to do an image search of say, “dirty window texture”, “dusty window”, “grime textures” “rusty metal textures” and so on. There’s lot out there. I taught myself Autodesk’s 3DS Max Design a few years ago and used these textures on 3d models. For Photoshop, I use it differently in that I want a high contrast image. (Contrast is the quantity of different color gradients from the lightest to darkest colors. For example, a black image in a white paper has just two colors; low contrast. A gray scale image has more; higher contrast.)

1. I would have the texture/image in its own layer.
2. Lower the saturation to turn it into a black and white image.
3. SCALE it appropriately, don’t want rain drops the size of watermelons.
4. DISTORT/WARP it to “fit over the physical” car.
5. Play with the different types of BLENDING modes available. This is where the magic happens. Depending on which mode you use, the lighter (white) colors become transparent. In 3d modeling programs, this contrast is used to define depth in textures, Texture Mapping. The darker parts of the image define deeper physical surface limits.
6. Use the OPACITY setting to adjust overall transparency.
You can also use the standard brushes in Photoshop for the grime/oil specks or even modify them. You could take a picture of a splatter of paint in your house, desaturate, lower contrast and make a custom brush. I went into the internet and did a search for “splatter brushes” and got some.

These instructions by themselves are usually not enough, I sometimes need to combine multiple textures over each other and paint dark layers to form shadows or color the dust. So you have to take the time, be patient and learn to work with other disciplines. I didn't know anything about Photoshop a year ago, other than making "tileable" textures for 3d models and still consider myself a beginner. Other key things you need to watch for is:

1. Don't over do it. Many times you like what you see, keep adding more and didn't stop, resulting in an image that maybe is too dark.
2. Go do searches in the internet and learn how the cars actually look when they are dirty. Where does the dust/dirt/grime collect? How dark should it be? What color is the dirt/dust?
3. Specks of oil will be seen on a real car up-close but not from far away, so watch out for your “scaling”.​
 
Last edited:
This new project continues my wish to edit all GT6 Group C cars. With this edit, I did not explore any new techniques but rather incorporated some of those I had learned before. I started with a static shot and turned it into a dynamic scene. I did this because the motion blur effect of the light through the trees did not look great in GT6, so I did it in Photoshop. I then worked on the road, as it was in 1989. I changed the color of the safety lane, added some grass on the edge next to the Armco and changed the solid line on the edge of the lane to a broken white line.
The one thing that was different from the other cars is that this, and the rest in the series, are Standard cars. So I fixed some lines, the sharp edges, livery, added some shadows. I also replaced the wastegate and exhaust pipe area, updated the fender antennae and windshield wiper. I saw from my reference photos that the car was, on the most part, clean (of course, they never finished the race) except for the exhaust gas discoloration on the side. I finished the shot with some lens flares, a cream overall color, some blur and noise.


14595685774_c9d69475b9_c.jpg


Nissan R89C 1989 24 Hours of Le Mans
by Metalsun1, on Flickr

The R89C was the result of Nissan's effort to compete in the 1989 World Sportscar Championship season in the Group C category. The race car progressed from Nissan’s previous generation into a new Lola chassis and twin-turbo VRH35 engine, 3.5L V8 DOHC. Unfortunately, race tuning, reliability and track set-up was slowly being optimized and results suffered. The R89C, as a whole, was an unsuccessful race car for Nissan reaching its most prestigious position of 3rd place in both Donington Park and Spa Francorchaps. They never finished the 1989 24 hours of Le Mans due to engine failures and crashes, eventually finishing 5th in the 1989 championship. All wasn't for nothing and the lessons learned from the R89C were put to good use in the very successful future.
 
Last edited:
I posted this in the SUGGESTIONS threads in hopes that someone at PD could fix the problem. I did little editing to it, just a little brightness and sharpening.

"What's the driver looking at? This particular observation doesn't really affect anybody racing cars in GT6 but it does for those of us using Photo Mode. I guess that when racing, the guys at PD have the drivers always looking at the apex of the next turn. The problem is that, the closer the car gets to the apex the avatar looks lower and lower into the dash. When we snap the picture, well, what's the driver looking at? Is he changing radio stations, dropped a coin, texting? It's not natural, he's going to make us crash! I find it distracting in photos. You can clearly see from the photo the top of the crash helmet when you normally would not. Click on it to see a bigger image. Yes, the head should follow the racing line but not so much the apex, like what I think is happening. At least not look down when he is close.
Also, the drivers in some cars seem to sit too far back, they should be moved forward a little, but not so NASCAR wheel-in-the-chest forward. Other times they sit too low. Case in point..."


BMW Vision GT SSR5
by Metalsun1, on Flickr
 
Last edited:
I struggled a lot to find a good angle on this car. It is not that popular and I understand why. To make things worse, PD still keeps it in the “standard car” drawer and I think it is one of the worse looking lo-res car I've worked on. So, while watching a race on tv, they switched into a rear facing camera and then I found my solution. A low-res solution for a bad lo-res car!
First, I cropped the 16:9 aspect photo to a 4:3 CRT (regular tube tvs). Edited the car by rounding sharp edges, changed the primary sponsor EXXON logo to ESSO, fixed a couple of things that - - you can’t see now, put some dirt/dust. Later I added the camera car’s shadow below and a chassis element above.
In post editing, I blurred, added noise and over exposed the image. I made 3 copies of the image, one red, blue and green, set them to OVERLAY and moved around their position a fraction to replicate the color bleeding of CRTs. I created two, heavily NOISEd horizontal bands to mimic video distortions. Later, I desaturated the image and added an overall blue to replicate the tvs illumination. Lastly, looked up some vertical and horizontal scan lines in the internet and OVERLAYed them. In all, the image is not pretty but it is an original perspective I haven’t seen before.


Peugeot 905 EVO 1B 1992 24 Hours of Le Mans
by Metalsun1, on Flickr

In the 80’s, Peugeot had great success in Group B rally racing but after the elimination of the category they focused their efforts in Group C racing to win the World Sportscar Championship and Le Mans. By 1990 they were ready with the Peugeot 905, basically an F1 car in disguise. It had only one race win by the end of the 1990 season. For the next season a new car was engineered, the 905B, which finished 2nd in the 1991 WSC. Further development resulted in the 905 Evo 1B (depicted in this photo) and it had a very successful 1992 WSC season. It had won both the championship and for the first time, the 1992 24 Hours of Le Mans at the hands of Derek Warwick, Yannick Dalmas and Mark Blundell. Although the WSC ceased to exist at the end of the 1992 season, Group C cars were allowed for one last time to race in the 1993 24 hours of Le Mans. This time, Peugeot raced their 905 Evo 1B to a dominating 1-2-3 finish.
 
Last edited:
Back