Hey guys, here's a tutorial to guide you through making a custom sound file for cars.
This tutorial will only cover replacing sounds, not adding new ones, since that's a more complicated matter. This tutorial will also assume you know how to open a .vol file as well as compile one.
Images will be provided to demonstrate various aspects during the tutorial.
PLEASE NOTE: I will not, and can not provide any sounds here that are from other copyrighted things, you'll need to find those on your own.
---------------------------------------------------------------------------------------------------------------------------------------------------------------------
For this tutorial you will need the following tools:
1)
Audacity or a sound manipulator of your choice.
2)
Awave Studio
3) A hex editor, in my case, I will be using
HxD
4) A Calculator with Decimal and Hex functions.
5) Not really a tool, but a handy Sound Bank ID list, thanks to Submaniac93 for the list!
Click me!
With these tools on hand, let's get started!
---------------------------------------------------------------------------------------------------------------------------------------------------------------------
1. Getting Started / Stereo to Mono Conversion
Firstly, you'll need to find some sounds to work with. Ideally, sounds with multiple RPM ranges will work best.
Once you've gathered the sounds you have, load up Audacity and open the first sound in it.
As we can see, the sound is in stereo. Since GT2 car sounds are mono, we need to convert this to mono (If your sounds are already mono, you can skip the following information and go to step 2). To do this, click the black down arrow next to the sound name, then select "Split Stereo to Mono", the sound will be split into two different tracks. Close the bottom most track by clicking the X next to the sound name, and that will cover stereo to mono conversion. Save the sound as .wav by selecting File > Export > Export as WAV, then repeat this for the rest of your sounds. It's recommended to save these elsewhere from your original sounds, or give them a "_mono" suffix at the end if you want, I usually prefer this myself.
---------------------------------------------------------------------------------------------------------------------------------------------------------------------
2. Awave Studio / Re-sampling Sounds
Now that we've got our mono sounds, let's load up Awave Studio and prepare the sounds for use in GT2.
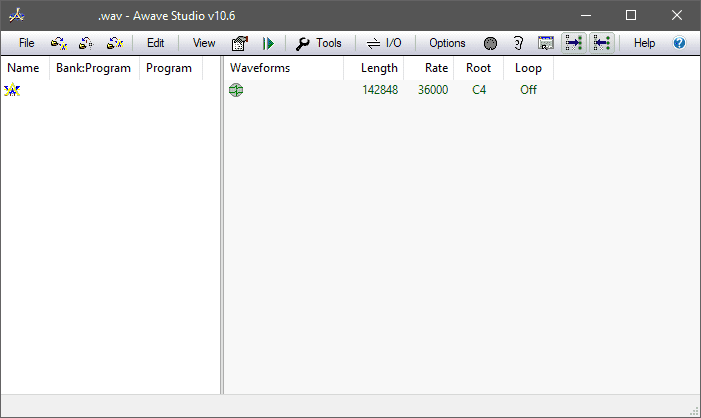
When you fire up Awave Studio, you'll be greeted to this window.
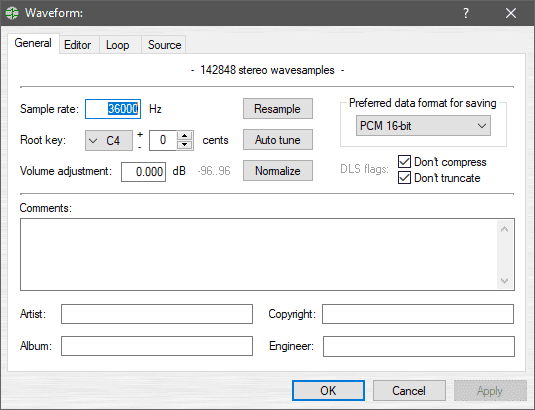
In this window, we can see various information about our WAV file. Root won't be important here, so this can be left alone. The rate and length will need to be adjusted here, so let's right click on the sound file, then click "Properties for waveform".
Here, we can change a fair amount of things with the sound file. What we want to do first is change the sample rate of the file, so it's smaller and lighter for the .es file we'll be adding the sounds to. So let's click on the Resample button to do just that.
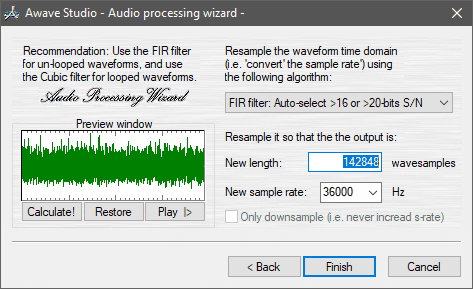
Now here's where things get a little confusing at first. With your calculator, you'll want a length that's a multiple of 28 (This is a limitation with the sound format we'll be saving the edited sounds to, so we have to follow this. This must also be in decimal too). So for example, in this picture above, 142848 wavesamples will equal 36000Hz, that's too high to really work with for multiple samples at once, so let's try a much lower value. If we use 34720 wavesamples (a multiple of 28), we get a sample rate of 8750Hz. Clicking "Calculate!" will change the waveform in the preview window, then click play to listen to it. While this sample rate is acceptable, you may notice the loss of sound clarity when played in-game, so let's try something higher. With 50036 wavesamples, we get a sample rate of 12610Hz. The sound clarity is much better this time, so we'll choose this for our sample rate and click Finish.
I should note, it is recommended to try and get a sample rate that ends with a 0. I will explain why this is the case later on in the tutorial.
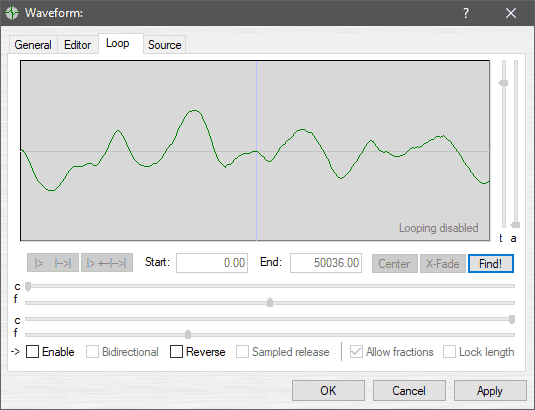
Next, we're going to click on the Loop tab and change the loop settings.
Click on the Enable check box to use the play buttons on the left side of the window.
The first button will play the sound with the loop points specified only, while the button next to it will play the entire sound. Once it reaches the loop point, it will start to loop from the specified start point and repeat.
To test if your sounds require a loop point, try playing the sound without adjust loop points. If the sound plays seamlessly, you can skip this step and move on to the file saving part, if not, we'll need to specify a loop point. This is done by either manually finding one, or using the "Find!" button.
---------------------------------------------------------------------------------------------------------------------------------------------------------------------
2a. Awave Studio / Looping Sounds
This section of Awave Studio will cover looping sounds, manually and automatically.
In all honesty, you will need to do manual work for either one, but automatic loop point search will require less work than manual. First we'll cover automatic loop point searching.
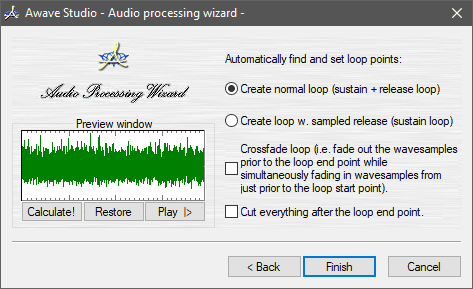
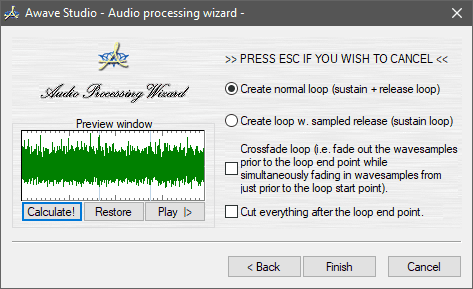
In the loop search window, there's a few options at our disposal, but we'll only need one of them for this tutorial, which is "Create normal loop". Clicking on "Calculate!" will get the program to search for a loop point and then show the loop points on the preview window.
Clicking on Finish will go back to the Loop editor with the loop points added to the Start and Finish boxes.
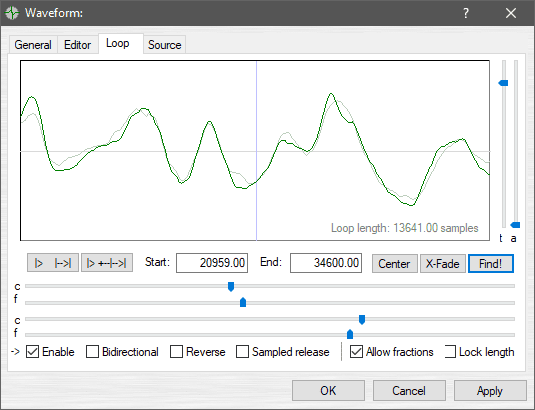
If you noticed, the loop finder attempts to loop a sound by its waveform, looping by similar curves in the file. However, there's a problem.
Loop points are also required to be multiples of 28, just like the wavesamples. To fix this, we need to find a loop point closest to the values found by the loop finder, which are multiples of 28. 20944 is quite close to 20959, so we could use this for the start point, or 20972. 34608 is the closest end value to 34600, so can use that for the end loop point, or 34580. The goal here, is to make a loop point that doesn't involve any audible pops during the loop, and as seamless as possible. Here, 20972 and 34608 work fairly well. It's not perfect, but it's good enough.
Manually looking for loop points will require going through the file without the loop finder with multiples of 28. This can take more longer, but you can find more accurate loop points with this.
Once you are happy with the loop, click Apply, then click OK.
Now that we've edited our WAV file, we now need to save this as a .VAG file. This is the sound format that is used in many PlayStation games, and GT2 is no exception (and is the culprit of the multiple of 28 for wavesamples). Make sure the sound is selected, then click on File > "Save selected waveform as", and in the "Save as type" drop down options, choose "VAG - Sony Playstation/PS2 compressed sound". The Data format option will be ADPCM 4-bit, which is normal, so is the channels option, being Mono. Save the file wherever you'd like, then repeat this editing and saving process for the rest of the sounds.
---------------------------------------------------------------------------------------------------------------------------------------------------------------------
3. Hex Editing / Sound File Editing
Now for the fun part, editing the .es files!
It's important to understand what each file means when editing them. For example:
00006.es is the Engine sounds
00006_n0.es is the Stock Exhaust sounds for NA cars.
00006_n1.es is the Sports Exhaust sounds for NA cars.
00006_t0.es is the Stock Exhaust sounds for Turbo cars.
00006_t1.es is the Sports Exhaust sounds for Turbo cars.
You may notice there are files that are only 4kb. This is a fail safe to prevent the game crashing, but these result in the infamous UFO sound being played.
Load up the hex editor you're using, and then locate a .es file you'd like to replace the sounds for, this is in the engine folder of the GT2 data. In this tutorial, I will be replacing the Corolla Rally Cars sounds, which is 00001 in the Sound Bank ID list. I will be editing the exhaust sound here as well.
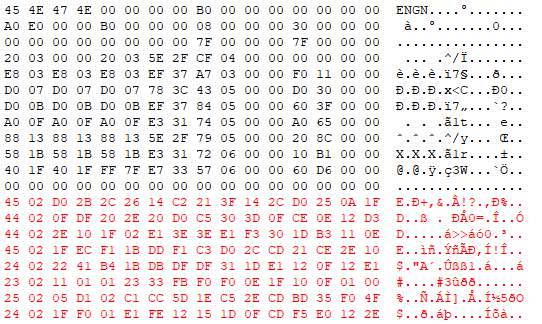
I've colored in the most important areas of the .es file, here's what each one does:
Red (0x00000000): File Header
Yellow (0x00000004): File Start Offset, you don't need to mess with this one here
Cyan (0x00000008): End of Sample Settings Offset, we'll need to edit this one once we've gone through the Sample Settings later in this tutorial
Pink (0x0000000C): Sample Offset Reduction, this isn't needed here, so can be left alone
Blue (0x00000010): File Size, required to make the file work correctly. Will be covered later in the tutorial
Green (0x00000014): End of Sample Variables Offset, needs to be the same value as 0x00000008
Dark Green (0x000000018): Number of Samples to use
Gray (0x0000001C): Offset to first Sample Setting
It is important to note that this is big endian, and will require a slightly different editing method. This will be explained later on.
The two 7F values can be left alone, they do nothing as far as I know.
Say for example we have 6 sounds in total to use, we change the value at 0x00000018 to 06 to tell the game we want to use 6 samples for our exhaust. Don't worry about the rest of the values for now, let's move on the Sample Settings next.
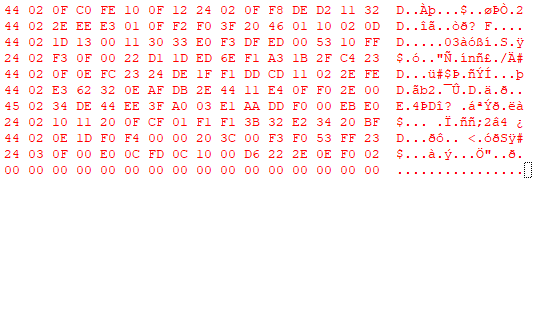
If we head down to address offset 0x00000030, just like the value at 0x0000001C said, the first Sample Settings starts at that address. Now let's take a look at what each value here does:
Red (0x00000030): RPM Pitch
Yellow (0x00000032): Sample Fade-In RPM
Cyan (0x00000034): Sample Fade-Out RPM
Pink (0x00000036): Sample Volume
Blue (0x00000038): Sample Frequency (First 4 digits in sample rate. This is why we needed to get a 0 in the 5th digit of our sample rate. You can get away with a non 0 number, but it won't be 100% accurate. To get the value needed, take the first 4 digits of the sample rate, and convert it to hex. We get 4ED, so to add this to a big endian file, enter the last two digits first, then the first two digits, so here it will be ED 04.)
Green (0x0000003C): Sample Offset in the file
The next Samples settings starts at 0x00000040 and so on. Each Sample Setting is 16 bytes long. Please note, that the RPM Fade-In/Out values can not overlap each other, and must be played one after another. If your sound files have a RPM number on them, that will help with this.
After the Sample Settings is a 16 byte gap, this is needed to separate each sound in the file. Then you'll see a huge bunch of hex, this is the sound data, which leads us onto the next step.
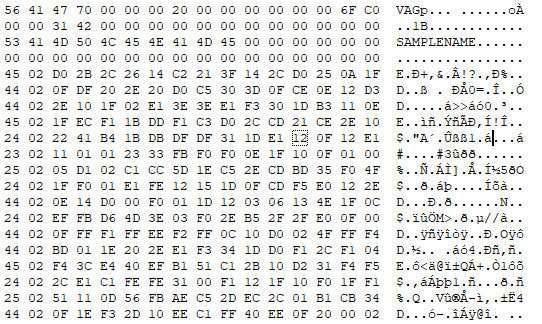
Open the .VAG file we saved from earlier into the hex editor, and you'll get something like this:
The header and the name in the file can be forgotten about, what we need is the data at address 0x00000040, this is the start of the sound data. Click and drag from that address all the way to the end of the file, then copy it. Now we can go back to the .es file and place this custom sound file into it.
Since 0x000000C0 is where the sound data starts, we can delete the entirety of it by click and dragging to the end of the file and deleting it. Now paste the data in, and you should see something like this:
With the new data in place, go to the end of the file, and separate the sound file with a 16 byte row of 00's.
After the row of 00's, you can then get the sound data from the second .VAG file we saved and then copy from the same starting address to the end of the file, and then paste into the .es file. Repeat this until you have all sounds inserted into your file. Make sure to separate each sound with 16 byte row of 00's!
Now that we've done this, let's go back to the top of the file. At address 0x00000008, enter in 90 as the value, this is because the starting gap before the sound data starts at address 0x00000090. Do this for address 0x00000014 as well. Now let's deal with the Sample Offsets.
To calculate the offset the file expects with samples, take the offset of the starting audio data, and add by 10 hex. In this case, the data starts at 0x000000A0, and adding 10 hex equals 0x000000B0. Next, take the value at either 0x00000008 or 0x00000014 and add by 20 hex, so 90 + 20 equals B0. Take 0x000000B0 and minus B0 from it to get the first sample offset in the Sample Settings, so this will be 00000000.
The next sound starts at 0x00007060 for example, so adding 10 hex to this will equals 0x00007070. Take the value at either 0x00000008 or 0x00000014 and add by 20 hex, it equals B0. So, take 0x00007070 and minus B0 from it. We get 0x00006FC0. This is the Sample Offset for the second Sample Setting. Repeat this for each sound data until you have all the offsets in place in each setting area. Remember about big endian and how to input each value, last two digits first, first two digits last!
Next, we'll deal with the file size value, this one is fairly simple. Once you've finished adding all the sounds to your .es file, press ctrl+a to select all of the file. HxD will tell you the size of your current select, in this case, the entire file. Say for example, the whole file has a size of 0x000124CA. To get the size the file expects, take 0x000124CA and minus by the value at either 0x00000008 or 0x00000014, which is 90 hex, so we get 0x0001243A. This will be the file size the file expects, so lets enter it in as 3A 24 01 00.
Be sure to save a backup, in case something goes wrong!
Once you are done, we are ready to save and test it out in GT2!
---------------------------------------------------------------------------------------------------------------------------------------------------------------------
4. Finishing Notes
I would like to stress that this is not an easy process for the first time, and you're bound to run into various things such as game crashing and sounds not sounding correct. It's very much a trial and error thing, but with enough practice, you'll be making some pretty sweet custom sounds for your cars in no time, like in the video below!
Don't be discouraged if you fail, it took me quite a few tries before I got it right and to write this tutorial for you guys.
If you have any questions, please feel free to ask them.
Thank you!
~Xenn


 I look forward to seeing more stuff like this again. Please keep up the good work!


")