Basic plan
Since I've left the overclocking scene, sim racing has taken over as my hobby of choice. I'm working on plans to upgrade my racing rig. It started this past summer as a wooden wheel/pedal stand. I pull it up to my couch where I sit. It has been working pretty well, but I don't feel I have the optimal seating position, and I wanted to upgrade that.
I found a seat at the local junkyard and came up with a more optimized driving position. I also mounted a Thrustmaster TH8 RS gated shifter to a new center console. The new driving position is much better than before, and the shifter is in a great position.
I also wanted to add more immersion into the setup, and had been looking at "full motion" setups with hydrolics for some time, but the cost put me off, and living overseas, getting the equipment would be more difficult & expensive. But a couple months ago, a new software was released called "SimVibe" which look to have great potential as a poor man's motions alternative.
SimVibe
I'm going to incorporate SimVibe software with 6 Aura bass shakers and 4 Dayton "puck" shakers. The SimVibe software intercepts the telemetery data from most racing sims, and allows up to 7 discrete channels of information to be output to tactile transducers ("bass shakers" or just "shakers"). I will be using three sound cards; one for normal audio, one for SimVibe "chassis mode" and the third card for SimVibe "extension mode".
Chassis mode
The first extra soundcard will output 4 discrete audio channels to a 100Wx4 channel amp, which will run four Aura bass shakers, one at each corner of my rig. These will each simulate the tractile response from each wheel of the car I'm driving. This is what SimVibe refers to as "chassis mode" and it can be used independent from the "extension mode".
Extension mode
The second extra soundcard will output 3 discrete audio channels to a 100Wx4 channel amp, one audio channel will be split to two amp channel to run two Aura shakers mounted to the bottom of my seat. The other two audio channels will each run to two Dayton "puck" shakers (their quite small), a pair will be mounted under my pedal plate, and the other pair will be mounted around my shifter.
SimVibe components
x2 - 24 VDC 14.6A 350W Regulated Switching Power Supply - $100
x2 - 4x100W @ 4 Ohm TK2050 Class-T Digital Audio Amplifier - $100
x6 - Aura AST-2B-4 Pro Bass Shaker Tactile Transducer - $270
x1 - Dayton Audio TT25-16 PUCK Tactile Transducer Mini Bass Shaker 16 Ohm 4 Pack - $45
x1 - ASUS Xonar DGX 5.1 - $40
x1 - Syba SD-PEX63034 7.1 - $20
x1 - SimVibe software - $80
The current configuration
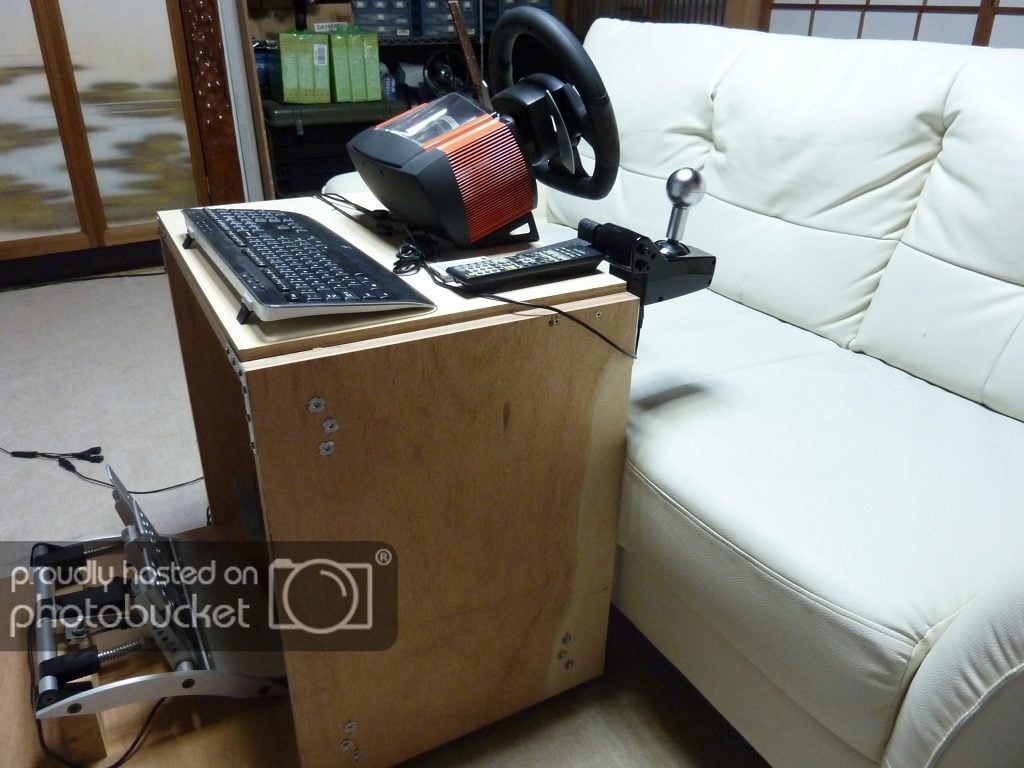
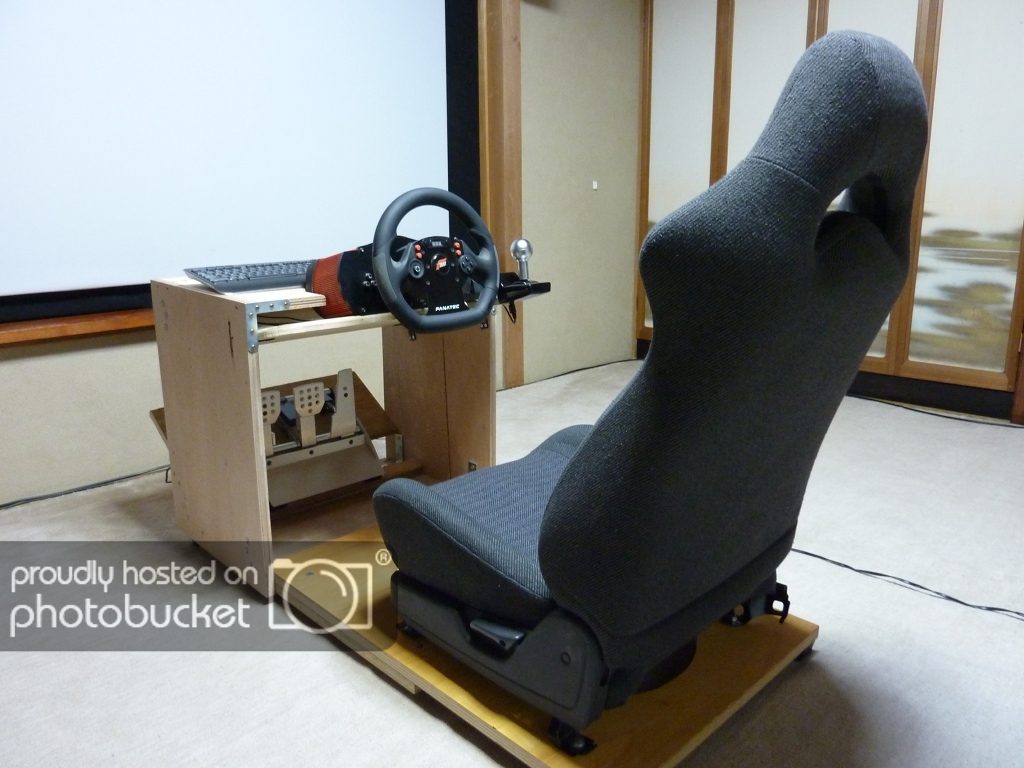
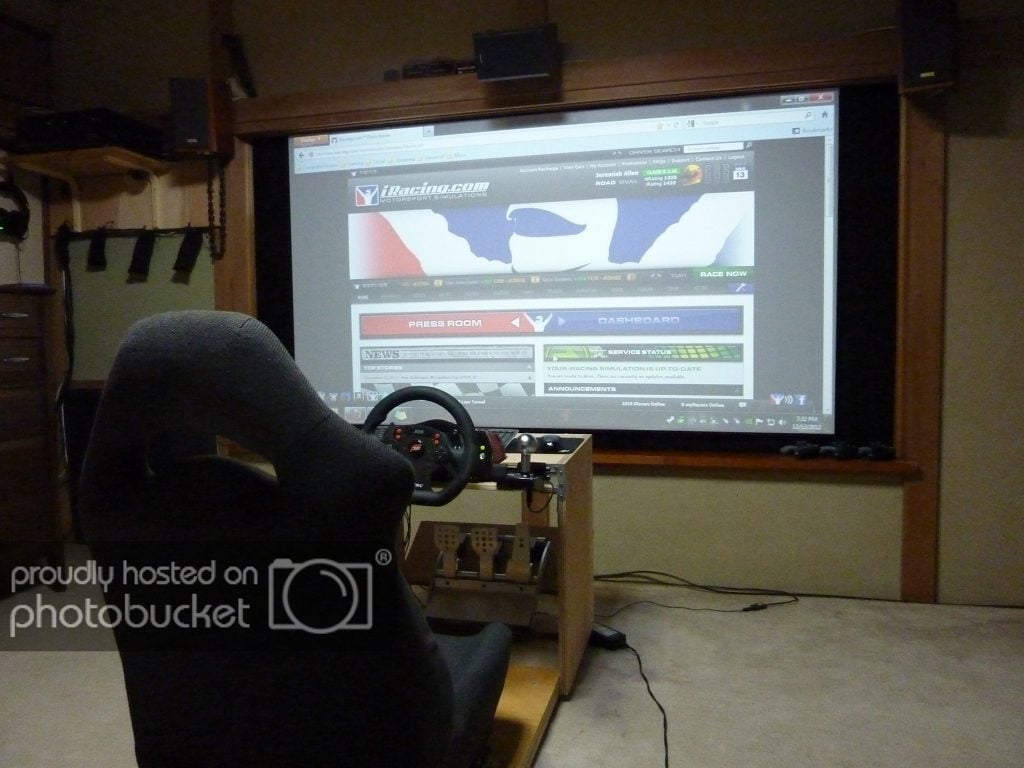
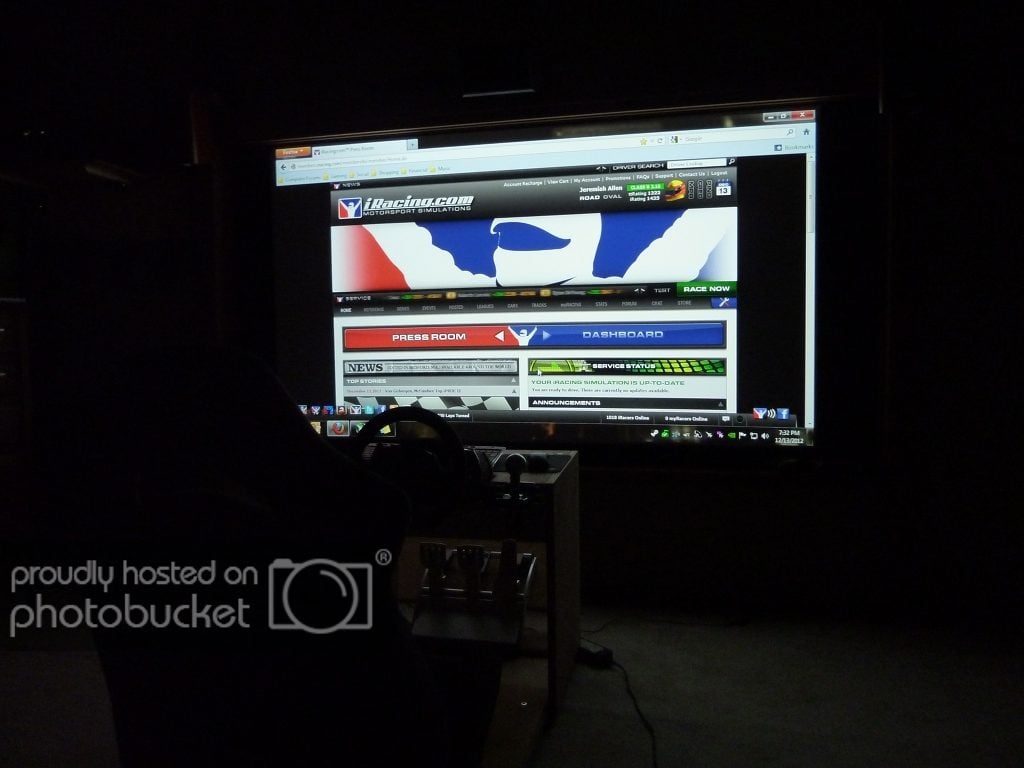
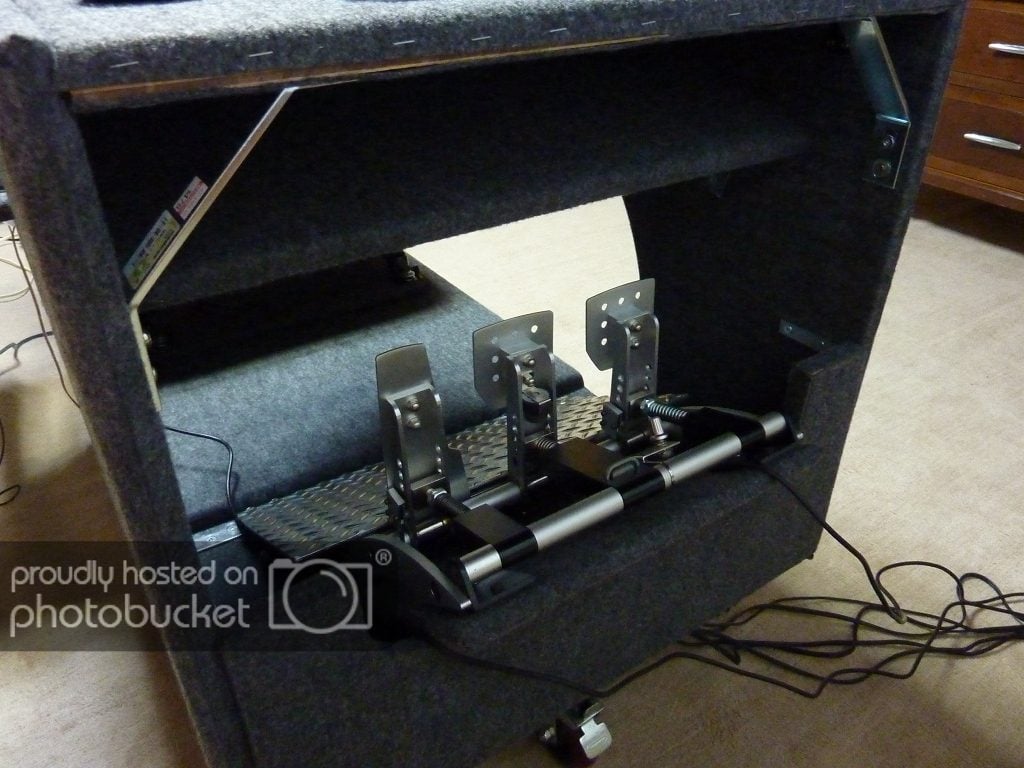
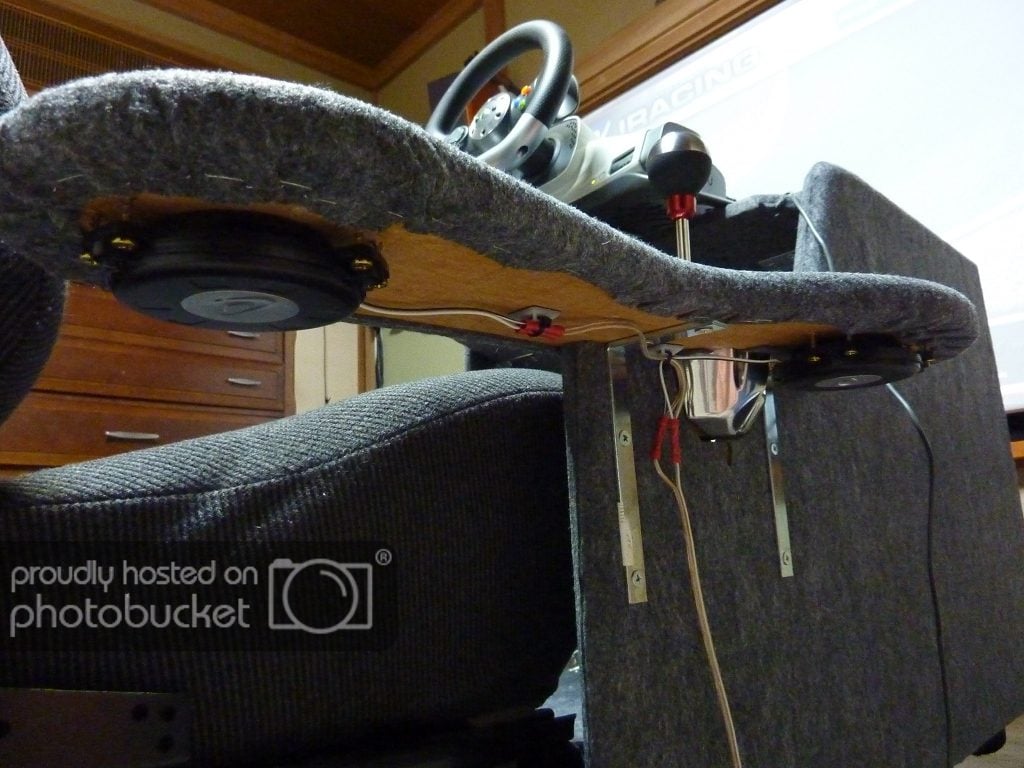
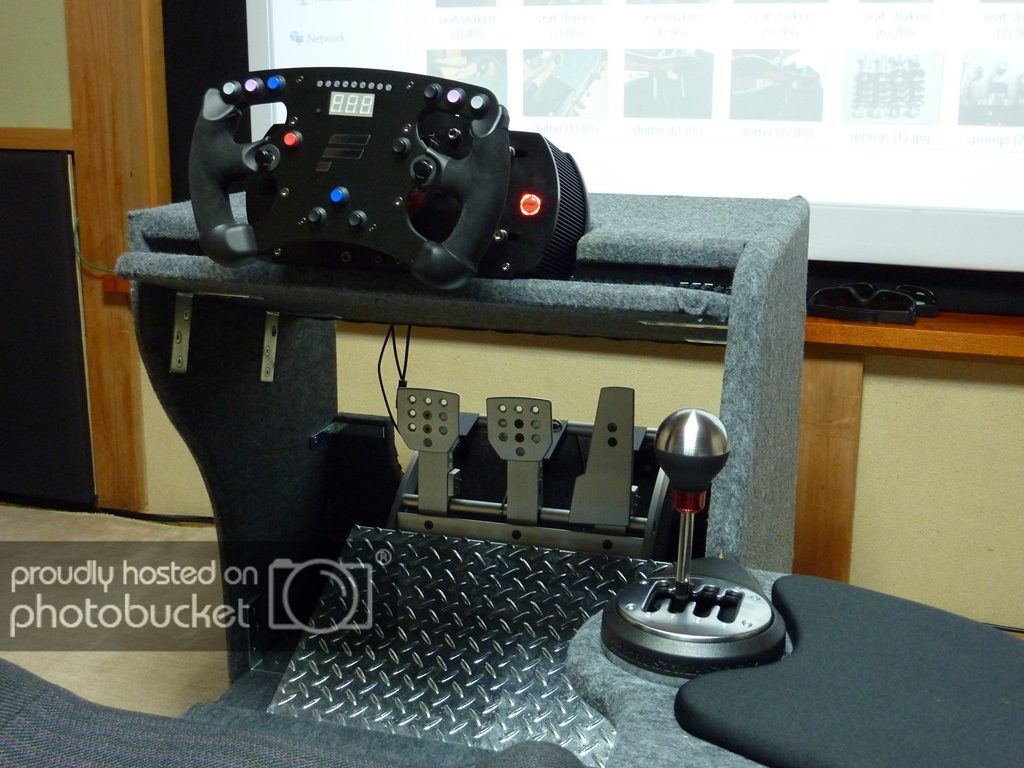
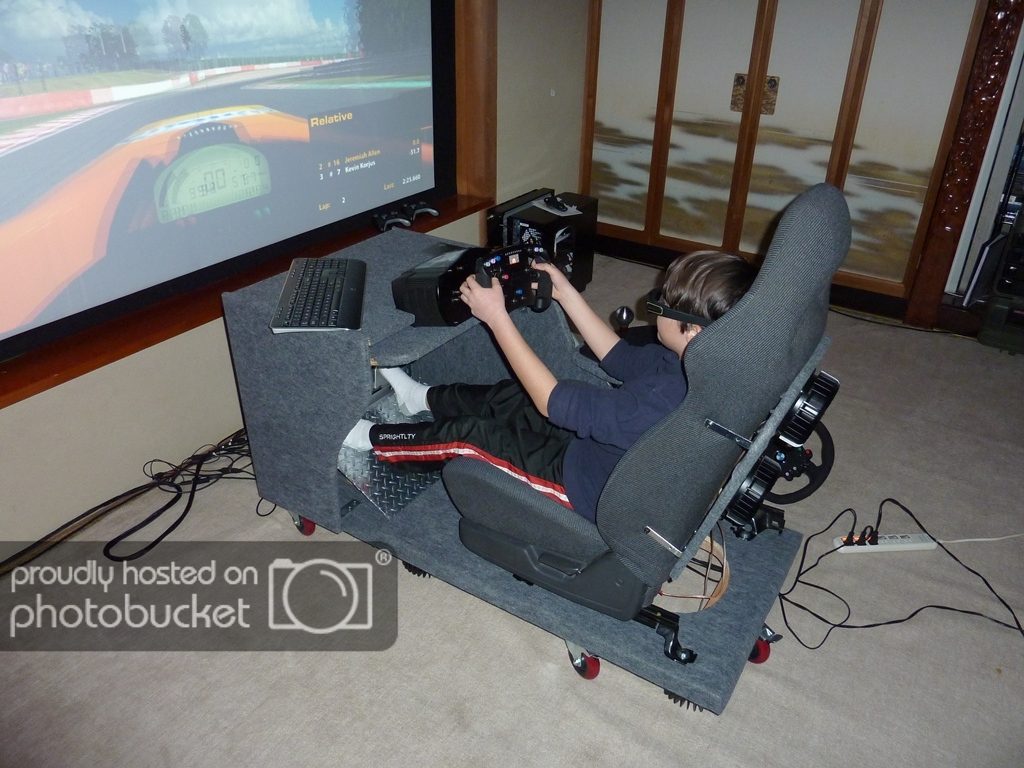
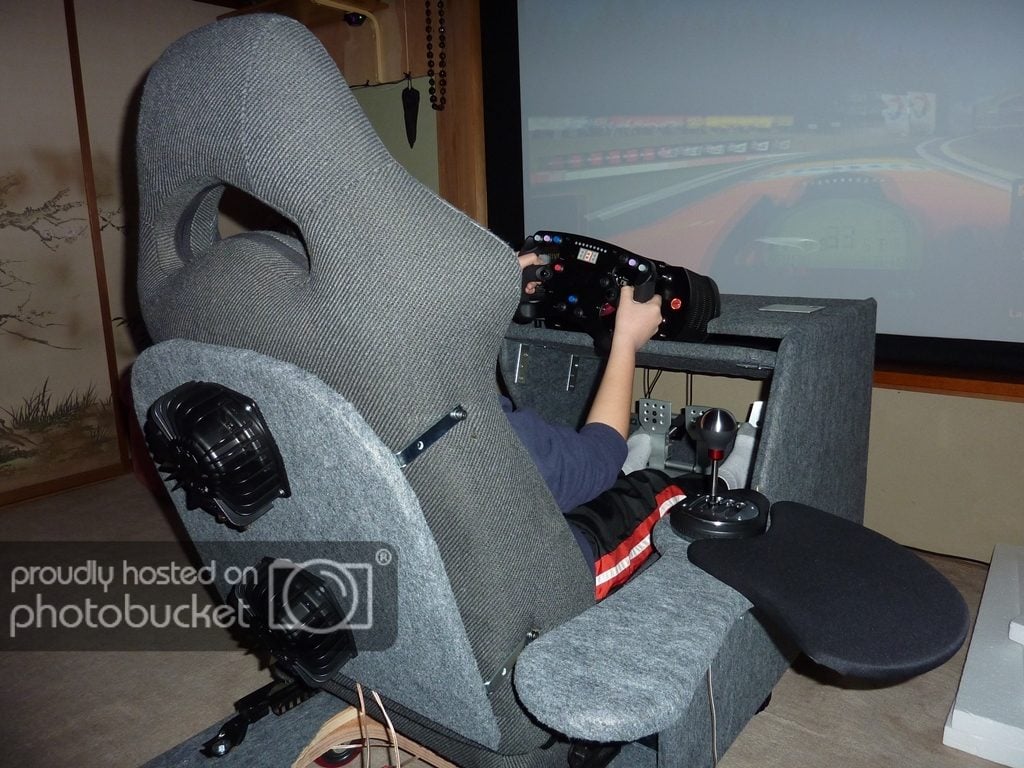
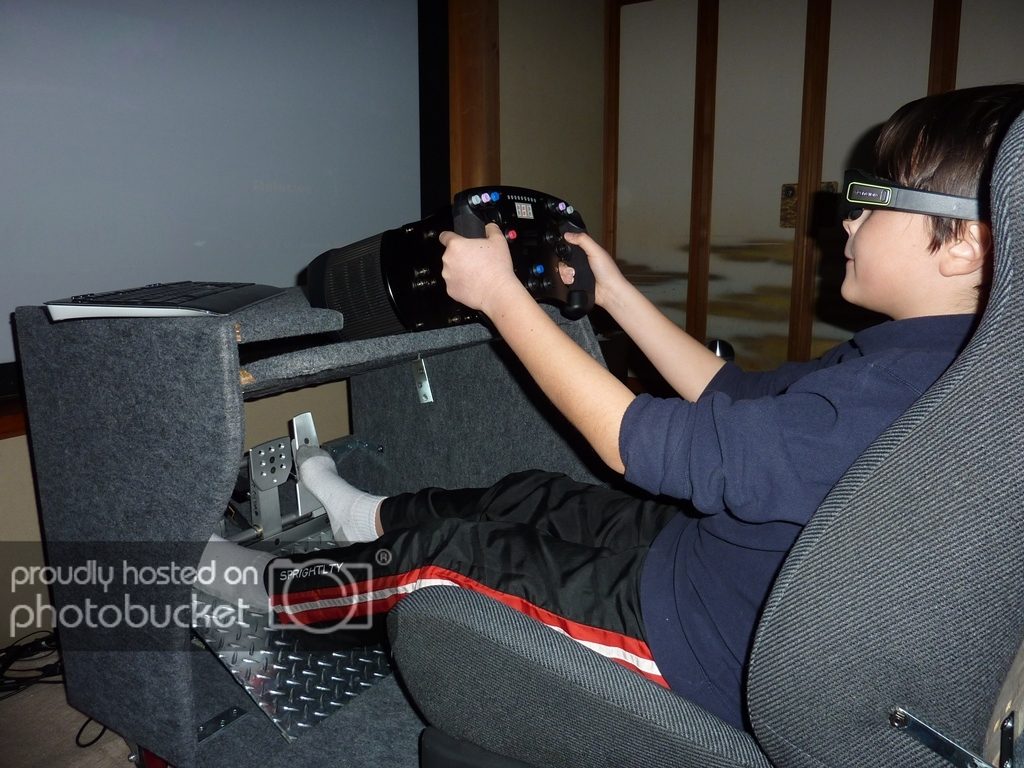
Here are some pictures of my setup in its current configuration. My current setup is not bad by any means, I sit on a couch in which I installed an Aura bass shaker and recycled sub amp. It works great for gaming & movies, but its just inline with my subs, so I'm expecting a huge improvement switching to telemetrics based shakers. I'm exclusively a PC gamer and play with nVidia 3DVision on a 100" screen (mostly iRacing). I have a proper 7.1 surround sound system, and tri-SLI 580GTX video cards being fed by an i7 3820 running @ 4.8GHz (all water cooled).
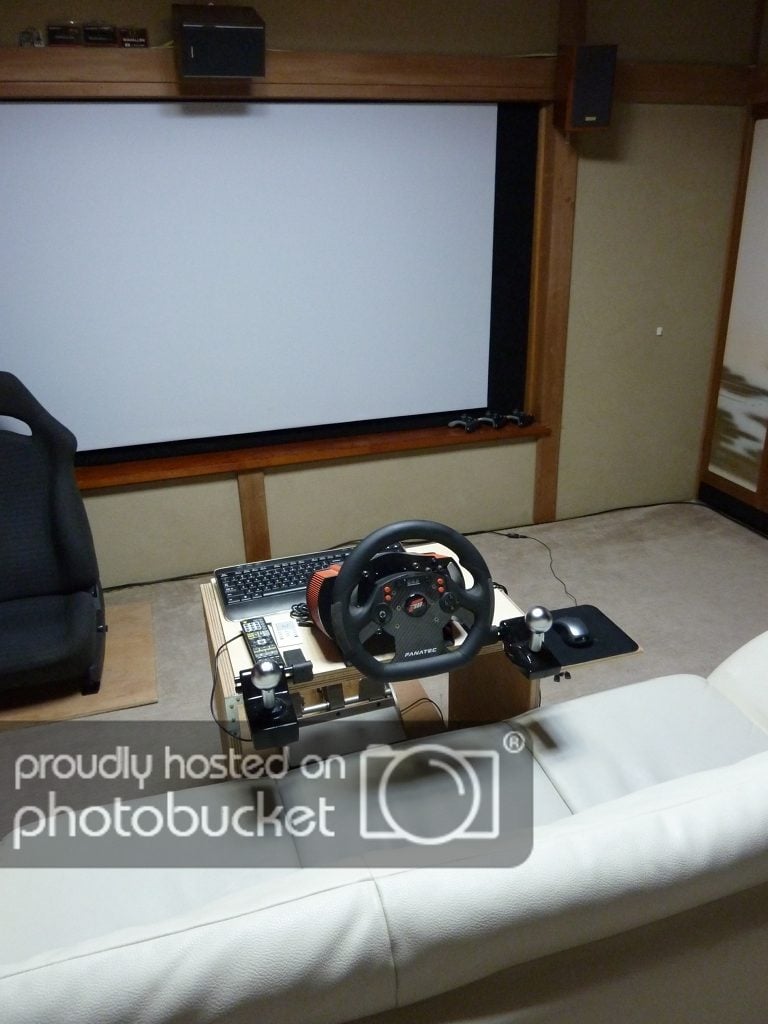

The problems with the current system are that the wheel is too close to my torso. My pedals are too low, and the whole rig pushes forward on the carpet if my brakes are too stiff. So I'm planning to address all these issues with this upgrade.
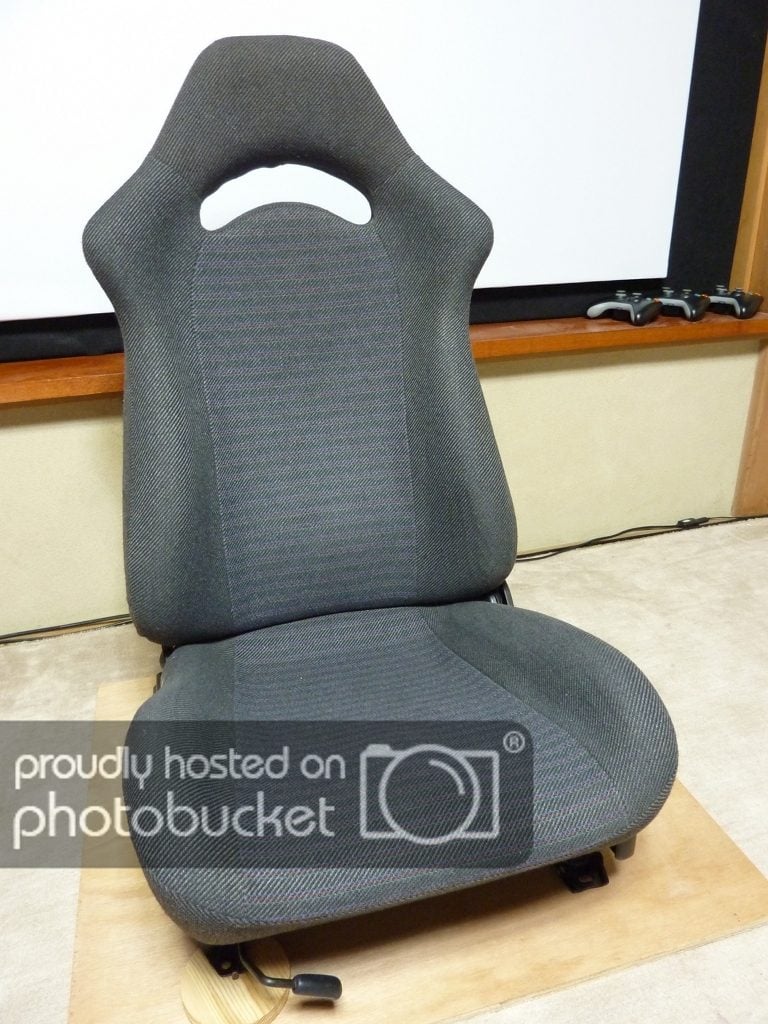
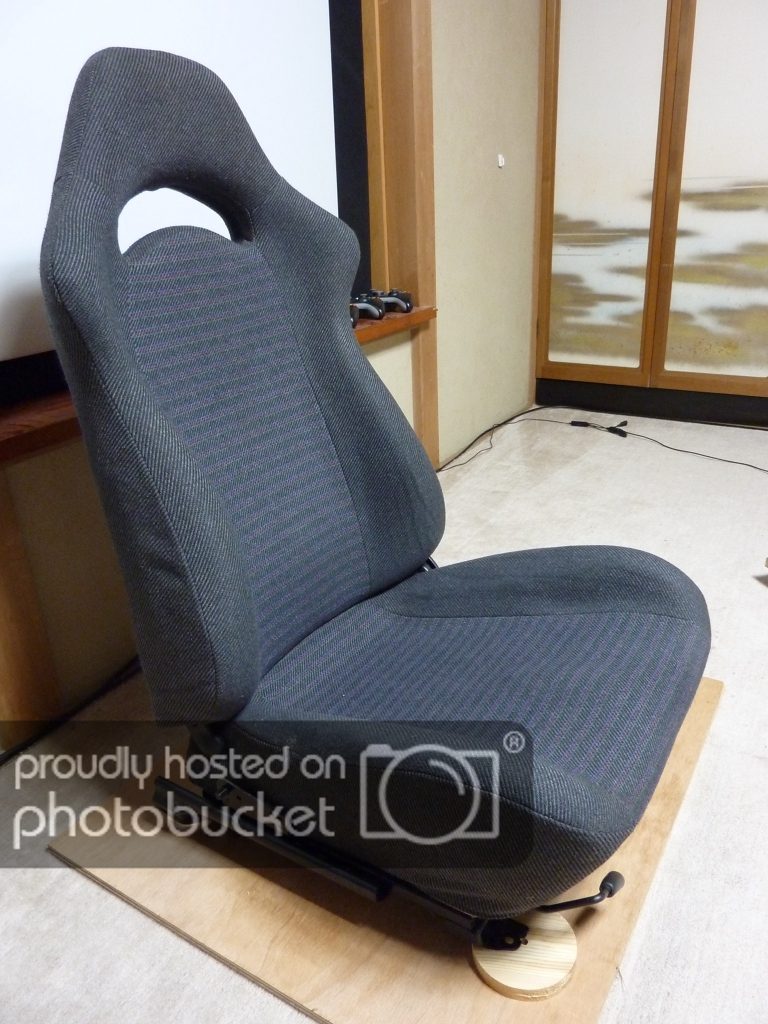
Here are a couple picture of the new seat I picked up at the junkyard yesterday for about $40. It came from a late nineties JDM Subaru Impreza. The seat is super comfortable and I'm really excited to race in it")
I did a build log of my DIY screen here.
I did a build log of my DIY computer system in my desk here.
I did a build log of my DIY 18" subwoofer here. (I also have a Polk 10" sub behind the couch).
Day 1
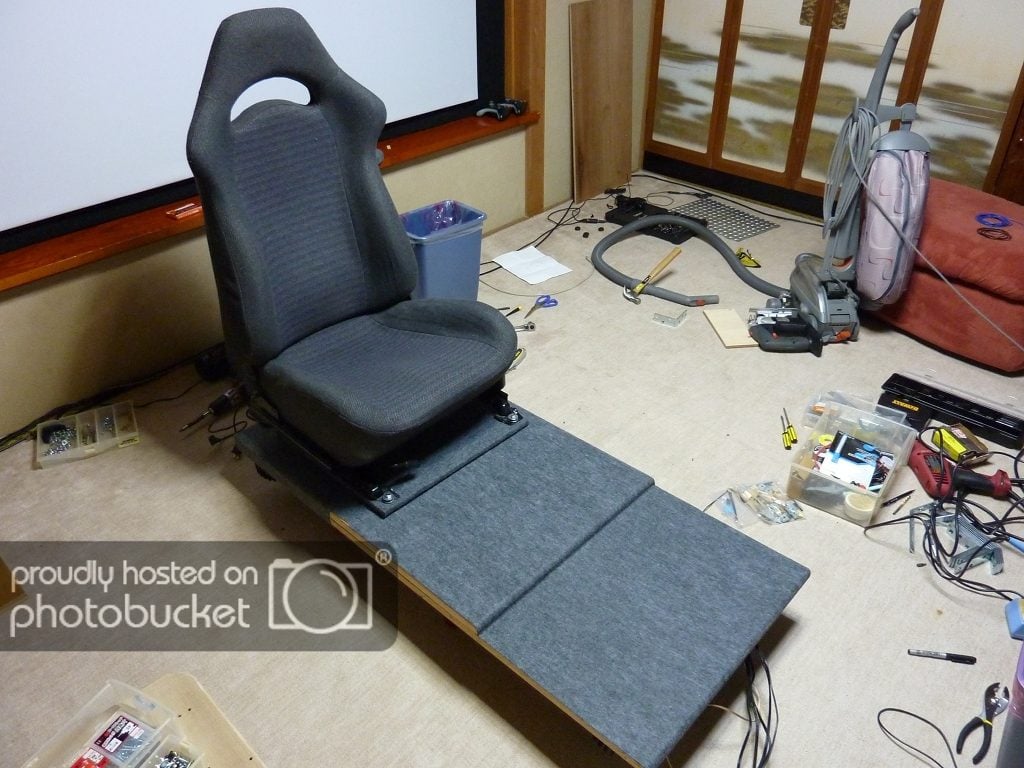
After disassembling the old setup, I fist had to get measurements I wanted to use to find a comfortable position for the new setup. The seat will be the only adjustable bit, so getting the pedals and wheel in the optimal placement was essential. I used a double tray, with the wheel mounted on the lower tray, which gives extra room for keyboard, controllers, etc on the top. I also built a new mount for the pedals and moved the lower platform way back. Then I added a second lower platform to extend the overall length to provide room for the seat to get mounted.

I also tried mounting a seat shaker to the bottom of the seat cushion. I wasn't 100% sure I'd leave it here, but I wanted to try this method.
So, this is where I finished on day 1:

Day 2
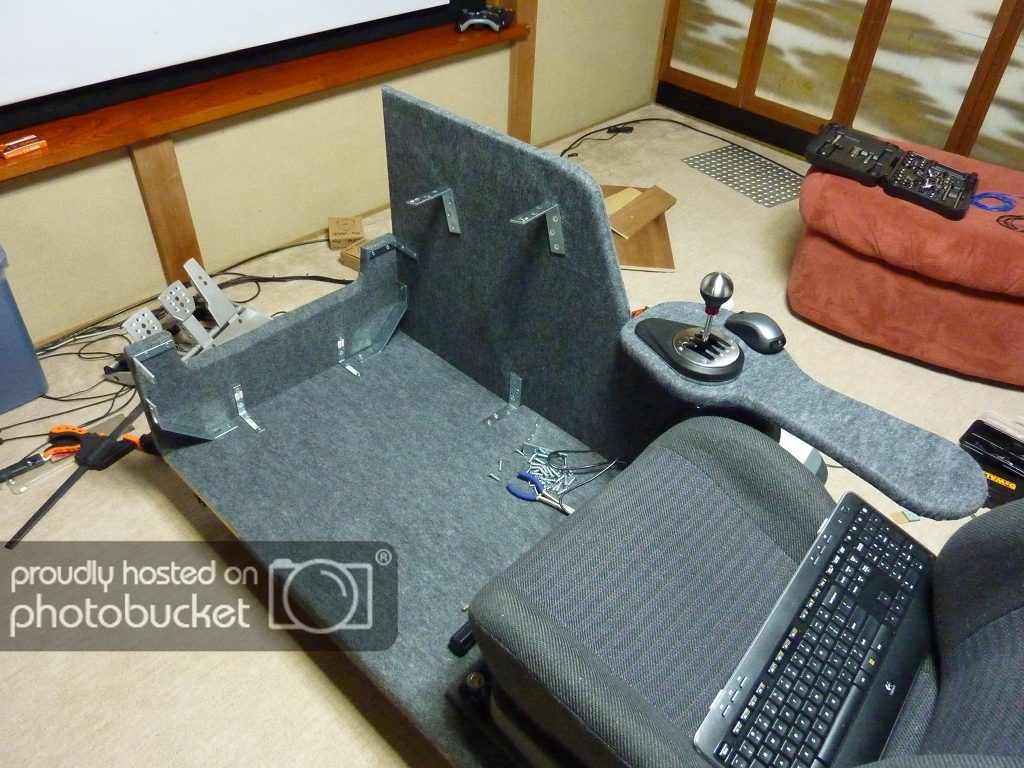
I started by working on getting my shifter installed. I wanted to be able to have a "center console" of sorts with a place to rest my arm. So I started by created a new right side panel sculpted to fit the requirements. Then I cut the center console with room for the TH8 RS shifter. This is what I came up with:


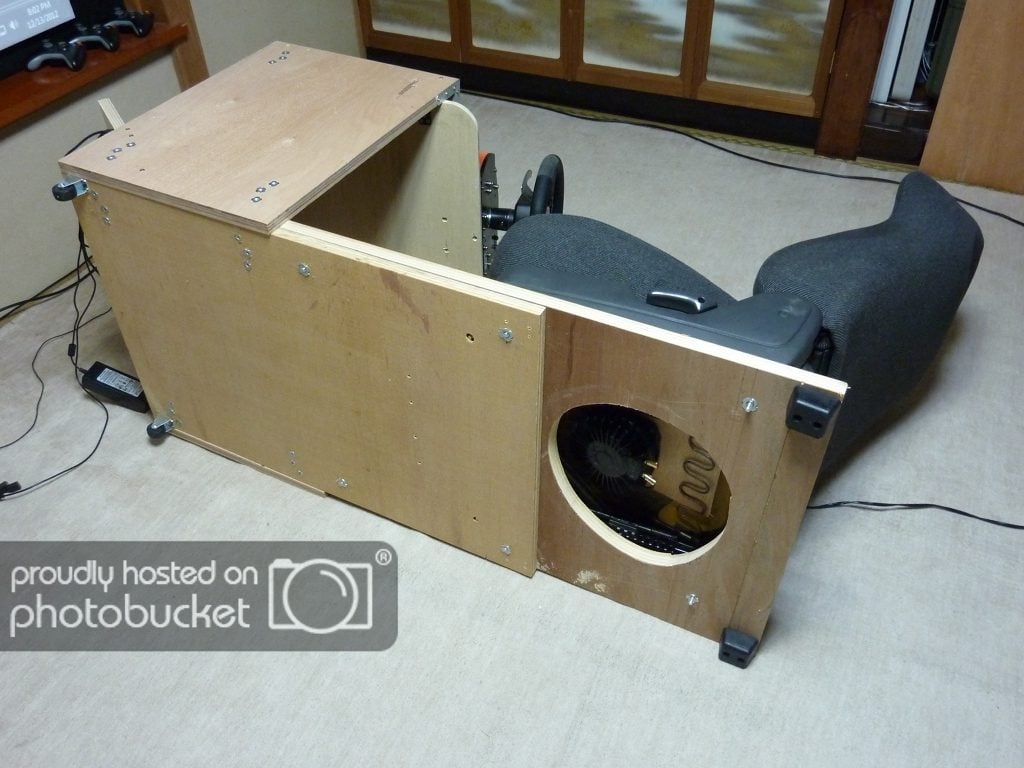
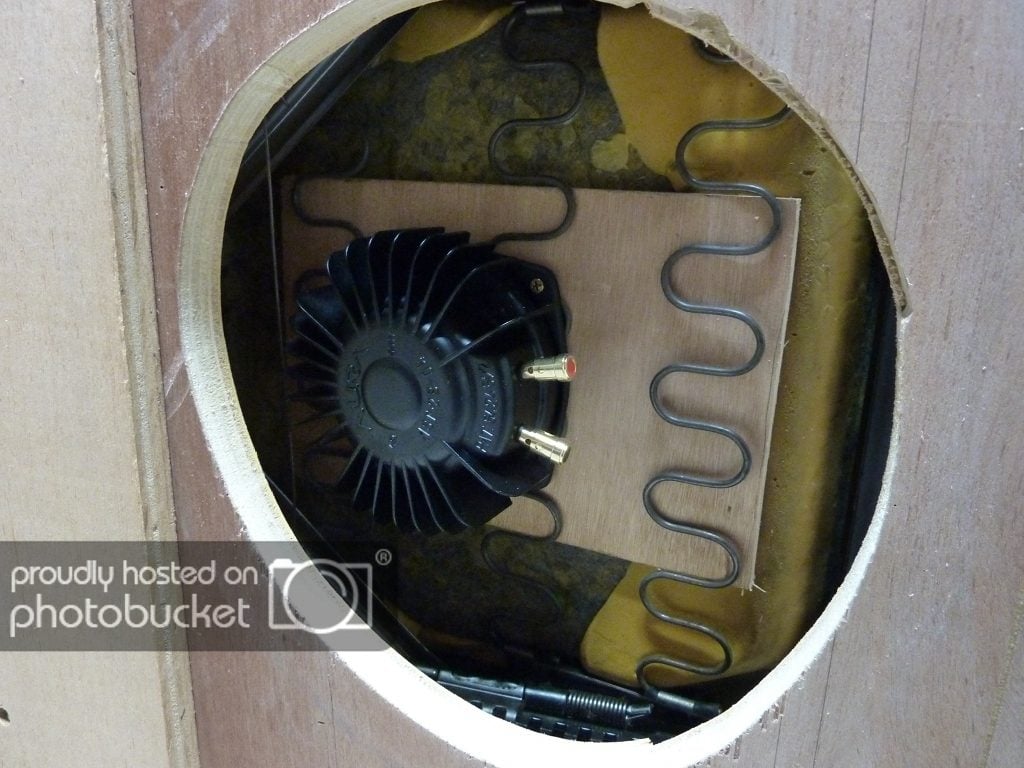
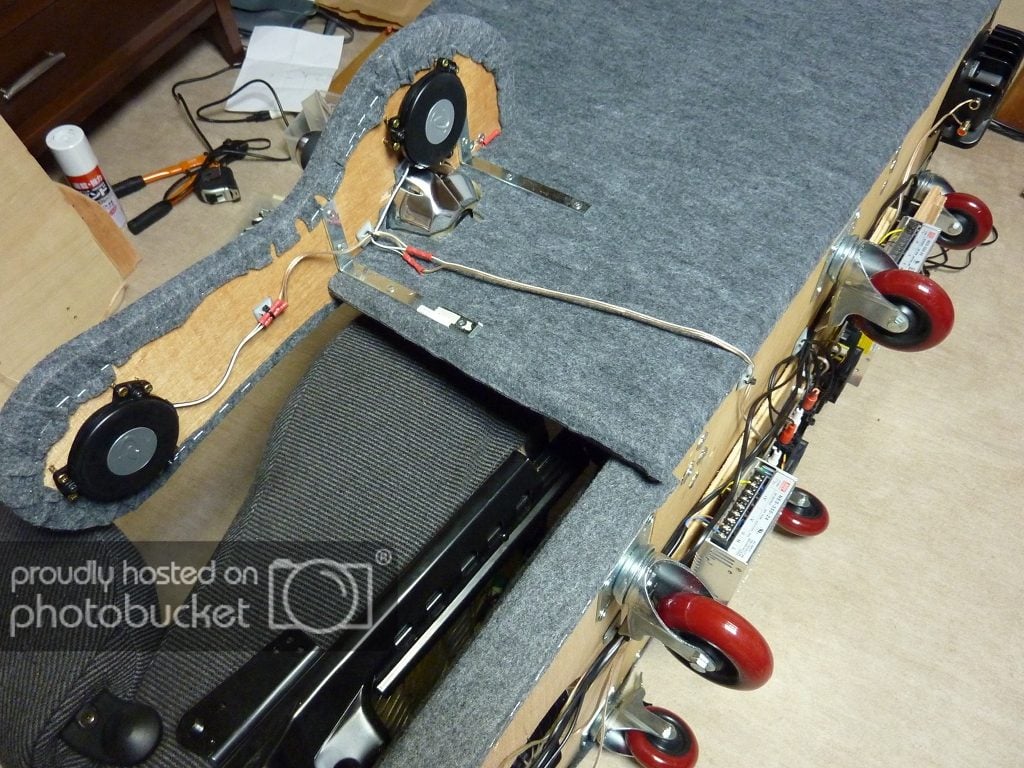
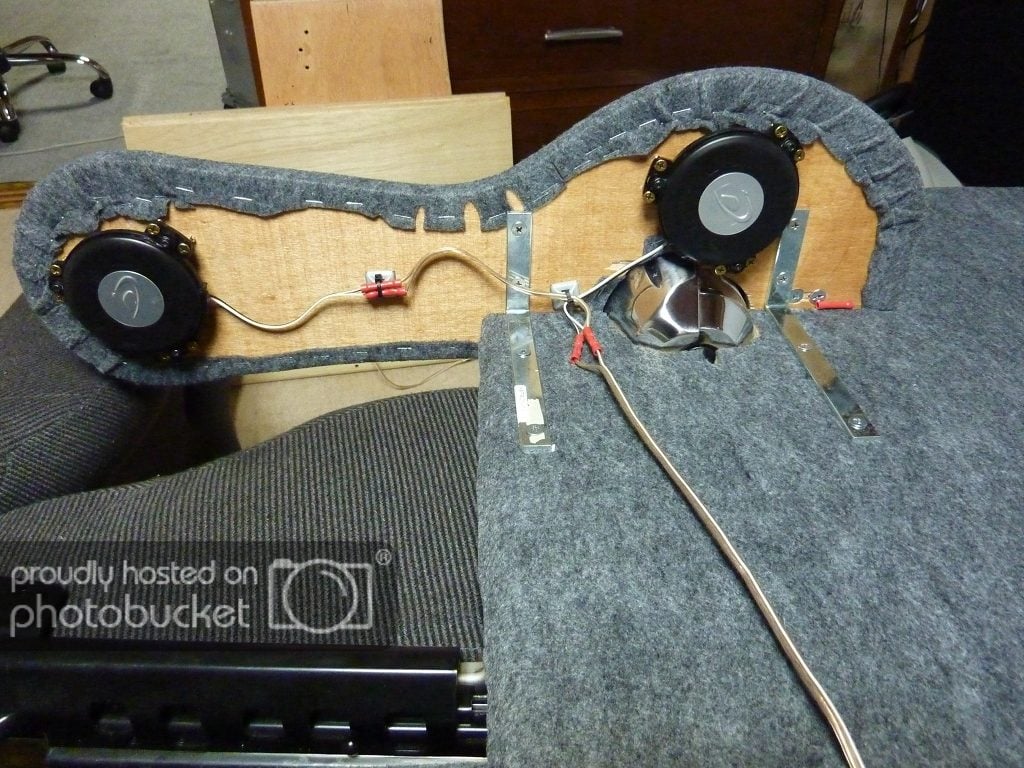
I've mounted the shakers on an extra piece of plywood and it will be mounted to the seat rigidly...then the whole thing (seat/wood/shakers) will be mechanically decoupled from the rig with a rubber bumper above and below its mount points.

The shakers are mounted to the bottom of the plywood (and not touching the rig's chassis).

I also added a diamond plated pedal plate, its much more comfortable now

Day 3
My casters arrived today. I got six of them, and I've installed them in an unusual way:
The basic idea is that the shakers at each corner will be more effective if them have more wiggle room....so I've given each on an area where it can shake the base by not putting a caster under each corner. The red lines I added show where the base will flex a bit to give each shaker a bit more effect (hopefully).
I also ordered some carpet to cover the rig, so I'll let you all know how that goes.
Here is another shot of the rear, as you can see...I also installed the other two Aura's I already received...now I'm just waiting for the other order from parts-express.

Day 4
Today I broke everything back down to begin the final rebuild

The difficult part of this build is that I wanted a clean look, so I've opted to use wood anchors, instead of normal nuts and bolts. So the anchors are hidden under the carpet. Because of this, I really needed to plan ahead and ensure I had all the anchors placed correctly before laying out the carpet. So that when I begin to assemble post carpet, the bolts will find their places.
Then I used 3M 77 multi purpose spray glue to attach the speaker carpet, and stapled around the bottom edge.
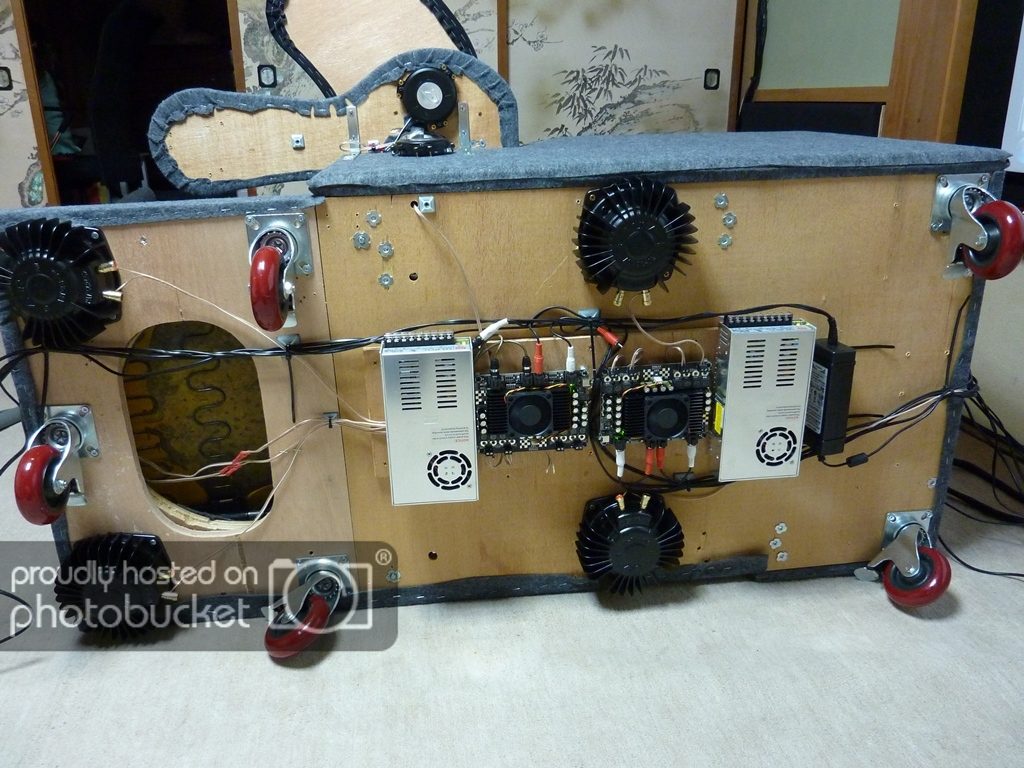
After that, I got started building my amp rack. There is a lot of wiring, and part of the reason I got such large casters was to allow space for all of it to be mounted to the bottom.
To the left of the amp rack, I also mounted the Fanatec CSR-E power supply.
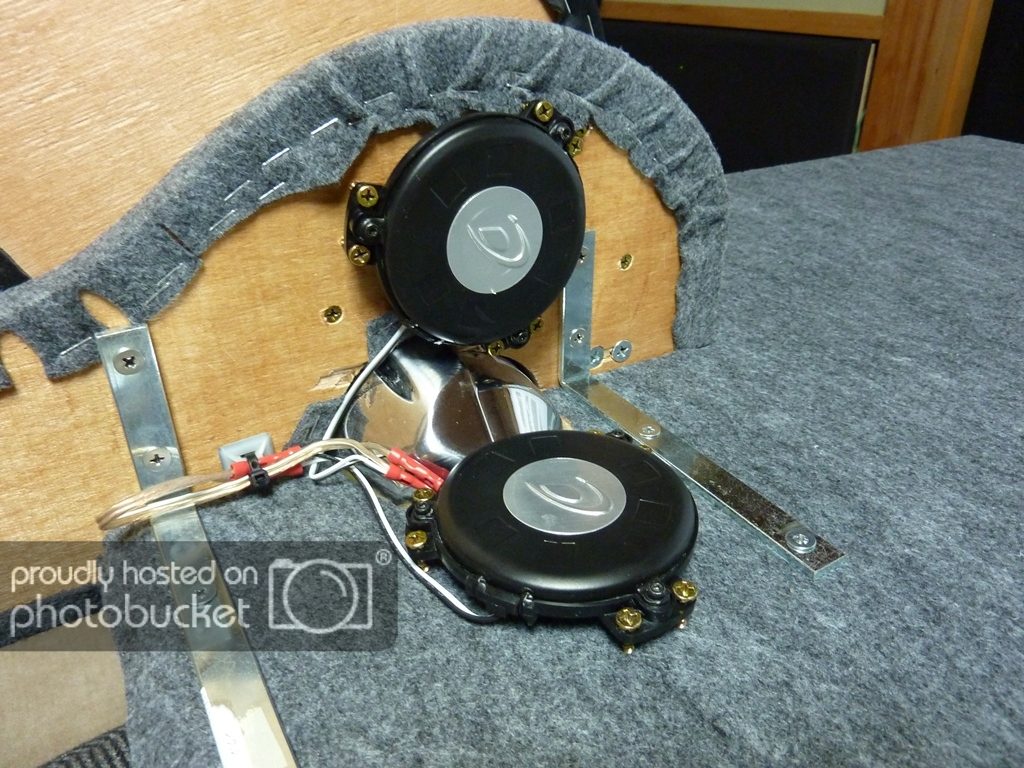
With all six Aura shakers installed, it looks like this.
Then I got my seat installed back in place.
Day 5
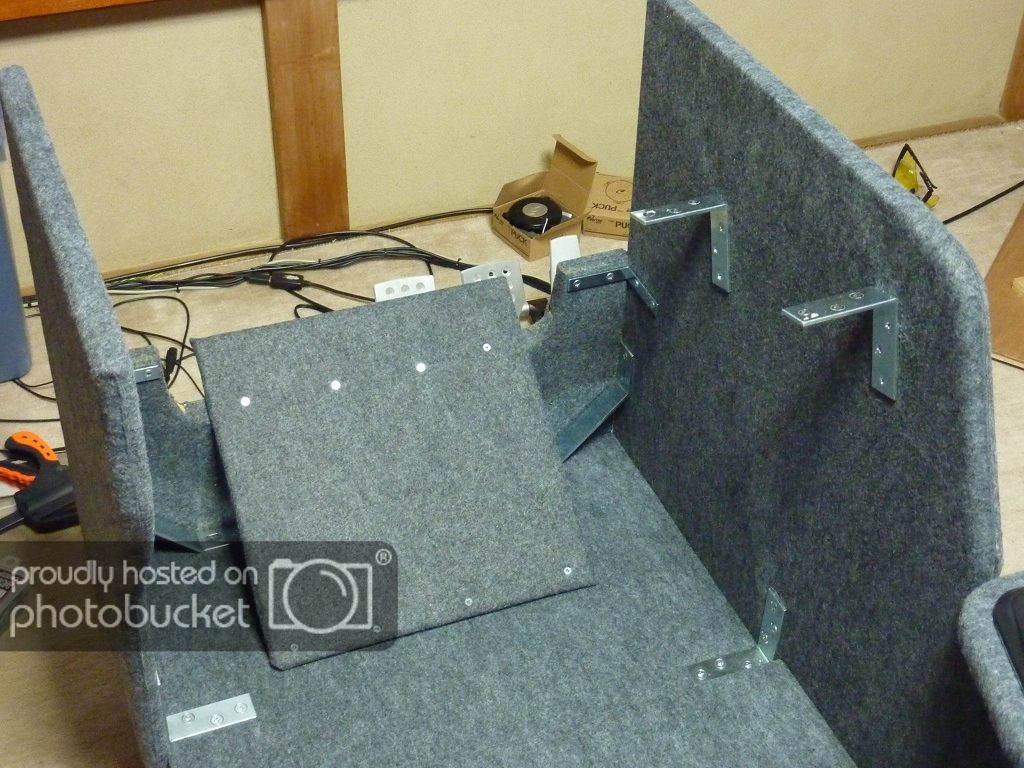
Today I finished the right wall, the shifter plate, and the front wall where the pedal plate will be braced.
I mounted two shaker pucks below the shifter.
But during testing today, these two pucks would not respond. So I'll have to figure that out later.
Day 6
Alright, I finished up the rest of the pieces today, carpeting went pretty well while I was using the 3M 77 glue, but then I switched to a different on that is like stringy spray. Its a darker orange color and it made a mess with overspray, yellowing the carpet. It also didn't work as well in general. Read this is a simple endorsement for 3M 77.
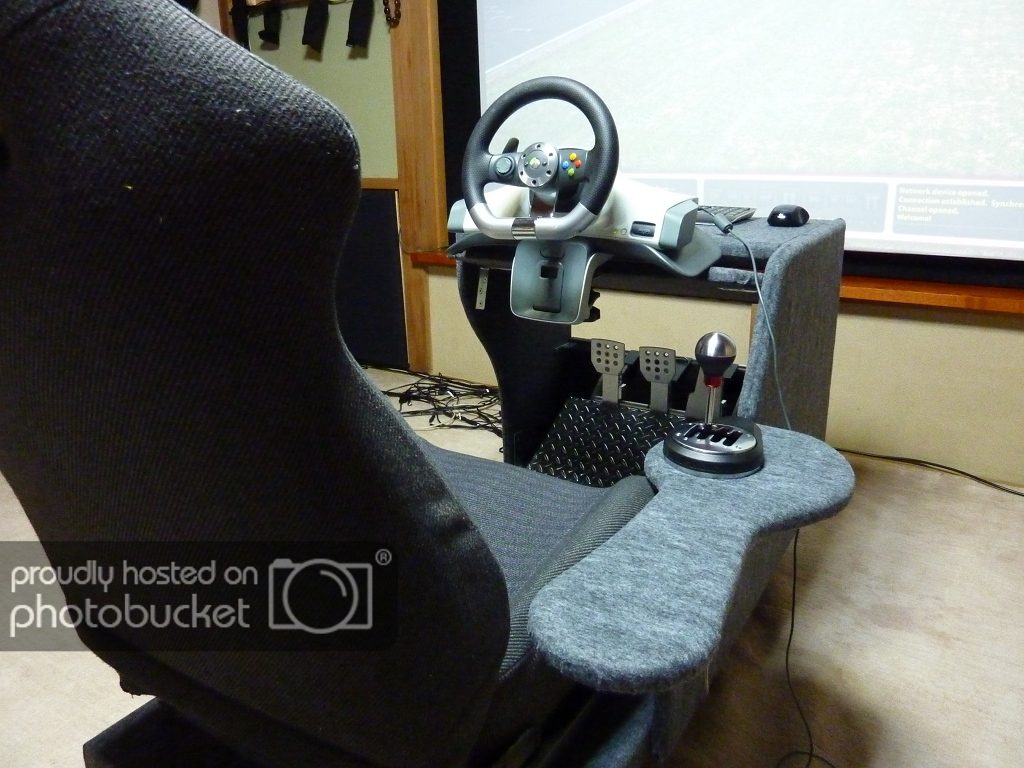
The pedal plate is at approx a 30 degree angle.
The pedal faces end up being almost vertical.

As you can see above, I also reshaped the left wall to allow for easier egress.
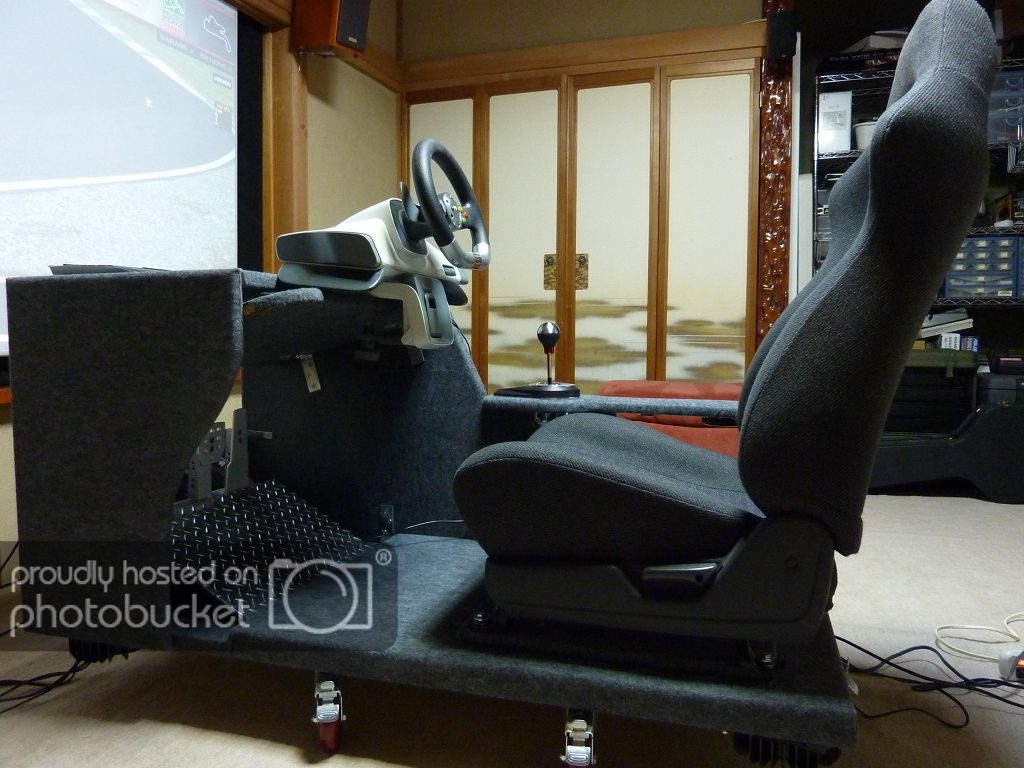
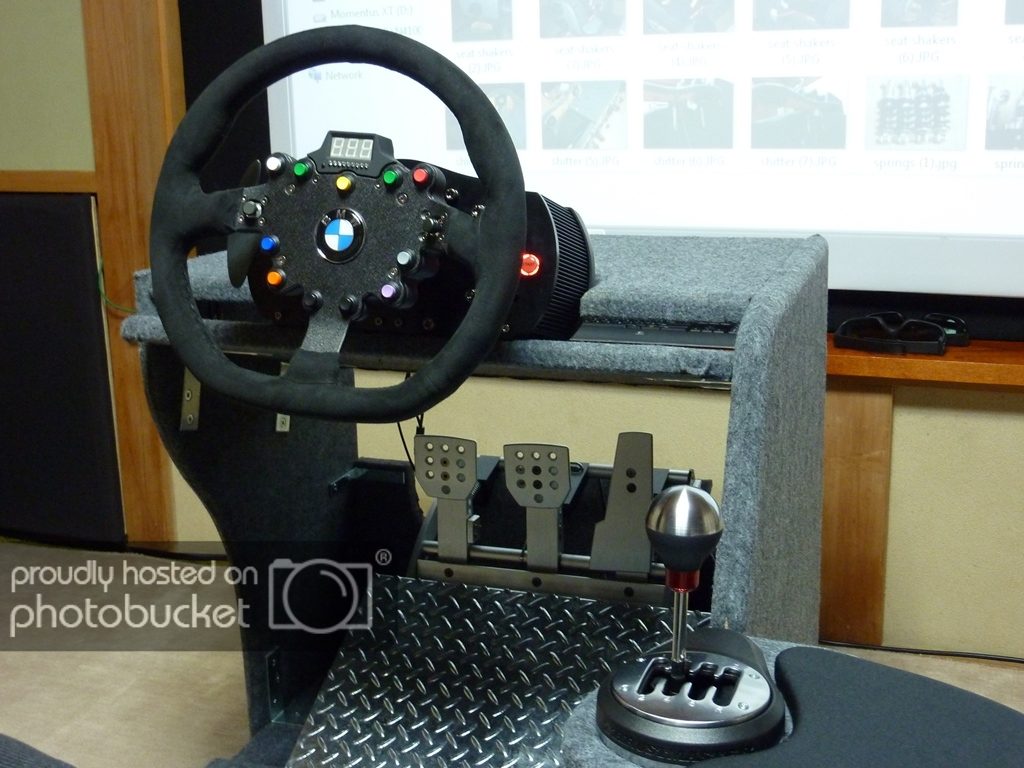
With the wheel plate and top plate installed, the final result looks quite nice.

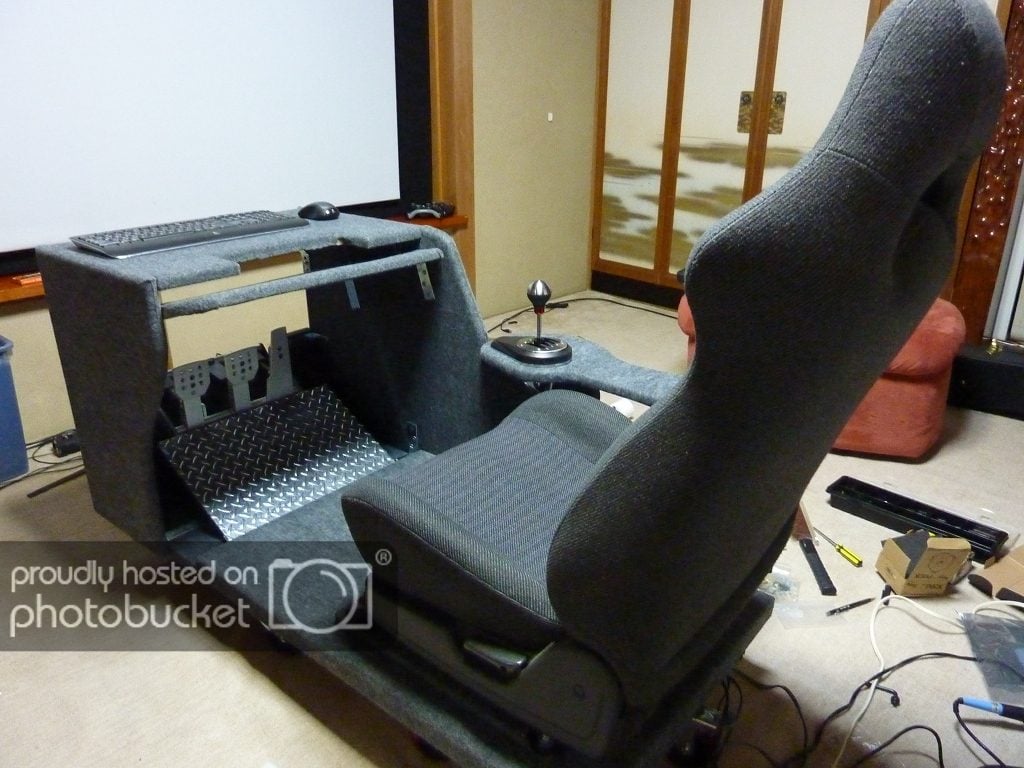
My backup wheel is the old 360 wheel...which is horrible next to my CSR-E, but it will have to suffice for the next couple weeks while I wait for my replacement from Fanatec.


I did more testing today, and it appears one of the amps from parts-express has two dead channels. So, my pedal plate shakers, and shifter shakers are not working yet. But they'll be ready to go once I replace the amp.

Now I'm working on tuning the SimVibe software, so far pretty good, although I'm not convinced my from shakers are mounted in the best way, the four in the rear kick butt....literally.
I'm a huge 3D Vision fan. I've been gaming on my 100" Acer projector for about a year now, and I love it. But the resolution sucks! 720p is just not enough, especially on such a large screen.
The largest size 1080p screen which supports 3D Vision in 1080p is 27". I was hoping that would change and something would be announced this year at CES, but my hopes were dashed to the rocks....and we are still stuck with the 27" limitation.
So, I've broken down and ordered three Asus VG278HE 3D Vision monitors. They normally sell for $500 each, which is a lot for my budget, but I found in the Amazon warehouse deals section, they are going for less than $400 each, I just ordered three for $375 a piece.
Asus VG278HE 27" 144Hz 3D Vision monitor
Its still a large investment, but I think it will be worth it. I'll be running them with two MSI Lightning Extreme 3GB GTX580 graphics cards in SLI (water cooled)....they should have plenty of power for the configuration, I'll also have a standard 580 for PhysX and additional screens.
Day 7
I've discoved a problem with using two Asus soundcards together. The driver control software is not setup to handle two soundcards simultaniously. When I open the software, it just acts as if there is only one card present. This is a problem because even when setting the Windows properties to "quadrophonic", the driver default for these soundcards is 2-speaker stereo...so it takes the Windows commands to send sound to the rear speakers and redirects it to the front speakers.
So I was able to get one card working properly in quadrophonic mode, but the second card was only outputting sound to the front two channels. To solve the problem, I performed the following steps:
1) In the Asus DGX control software, set the 1st soundcard output to 4-speakers
2) In Windows sound output properties, set the 1st card to "quadrophonic"
3) Manually close the Asus DGX control software
4) Go into the Windows device manager and disabled the 1st DGX soundcard
5) Manually open the Asus DGX control software again (this time it takes control of the second soundcard since the 1st one is disabled).
6) In the Asus DGX control software, set the 2nd soundcard output to 4-speakers
7) In Windows sound output properties, set the 2nd card to "quadrophonic"
8) Manually close the Asus DGX control software
9) Go into the device manager and enable the 1st soundcard
This seems to have solves the issue somewhat, but I'm still getting inconsistent results. I thought for a while the amp was bad, but I think the problem is attempting to run two of these cards in one system. So I've sent back one of the DXGs and I've ordered a cheap VIA Envy based card to replace it.
I'm getting bored waiting for my new wheel and monitors to arrive, so I'm working on some of the details of my rig. Today I made a mouse pad ;D
It started life as a SteelSeries QcK+ Gaming Mouse Pad....but I made short work of that.
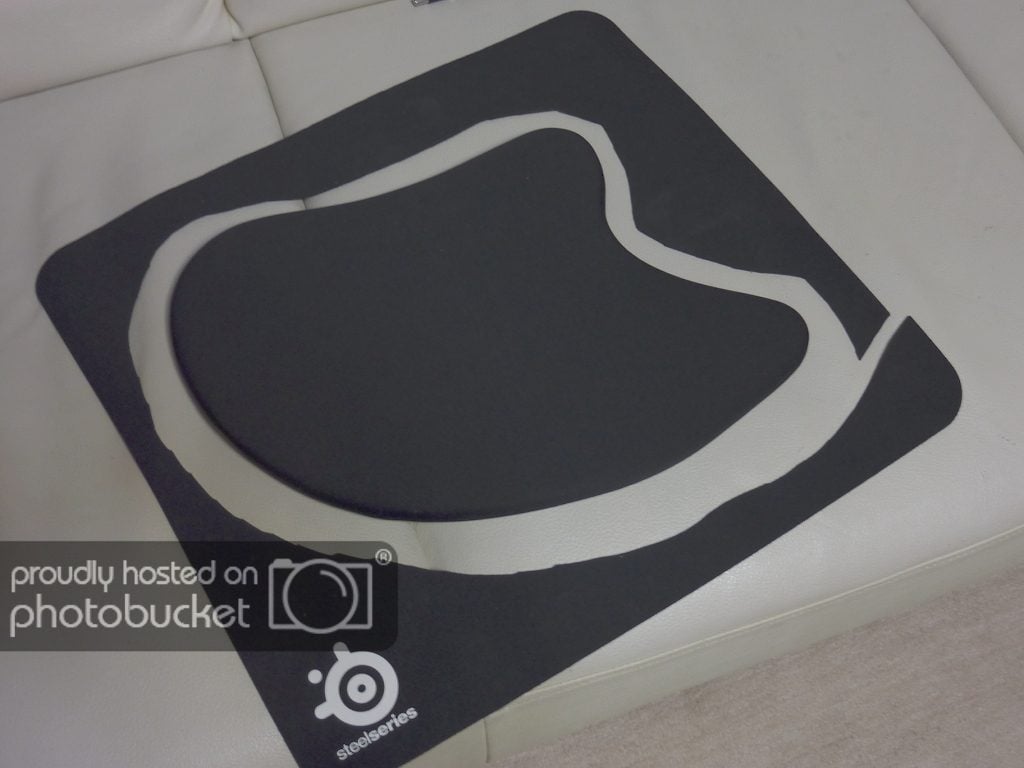
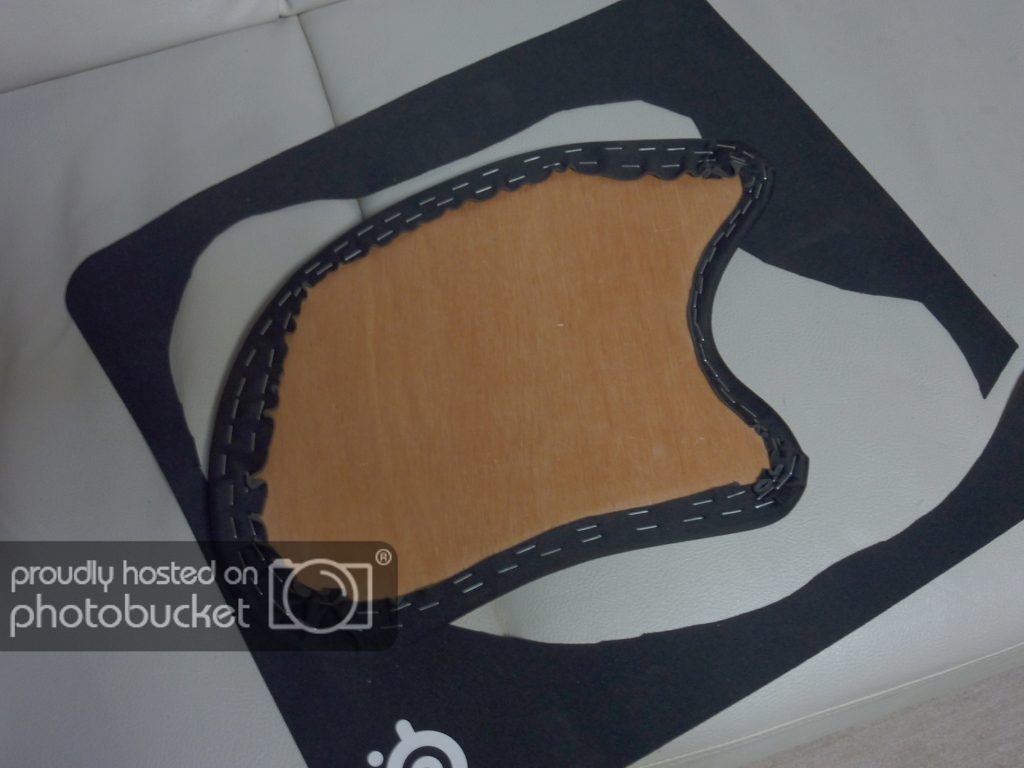
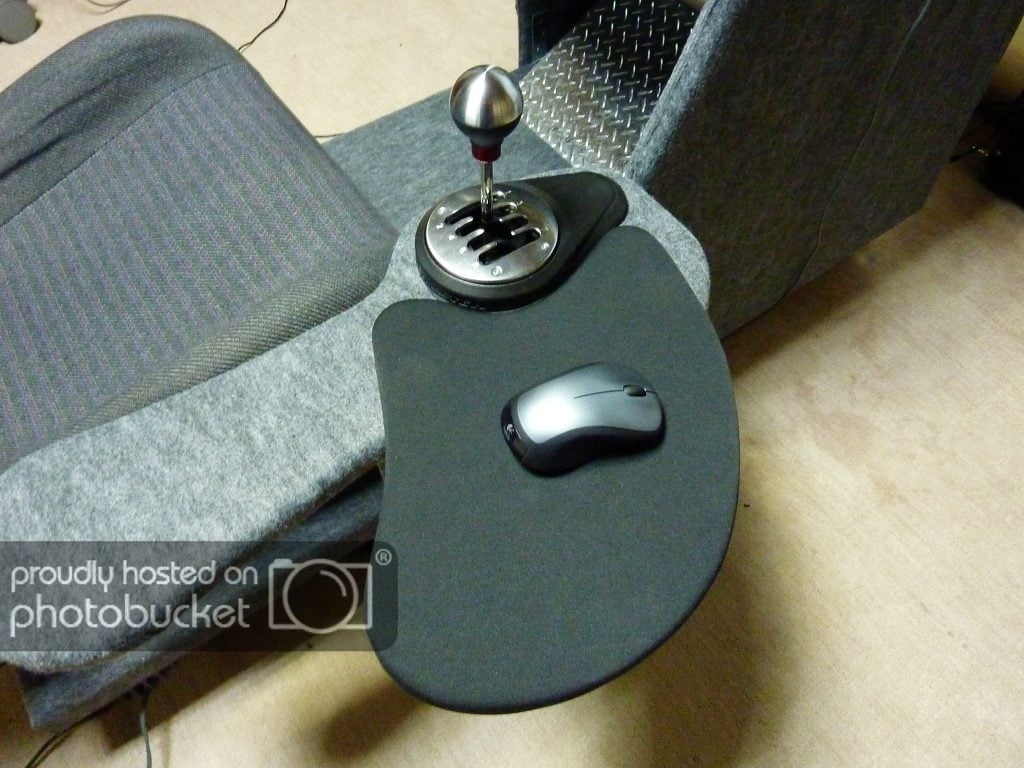

The size and position is perfect.
Since I've left the overclocking scene, sim racing has taken over as my hobby of choice. I'm working on plans to upgrade my racing rig. It started this past summer as a wooden wheel/pedal stand. I pull it up to my couch where I sit. It has been working pretty well, but I don't feel I have the optimal seating position, and I wanted to upgrade that.
I found a seat at the local junkyard and came up with a more optimized driving position. I also mounted a Thrustmaster TH8 RS gated shifter to a new center console. The new driving position is much better than before, and the shifter is in a great position.
I also wanted to add more immersion into the setup, and had been looking at "full motion" setups with hydrolics for some time, but the cost put me off, and living overseas, getting the equipment would be more difficult & expensive. But a couple months ago, a new software was released called "SimVibe" which look to have great potential as a poor man's motions alternative.
SimVibe
I'm going to incorporate SimVibe software with 6 Aura bass shakers and 4 Dayton "puck" shakers. The SimVibe software intercepts the telemetery data from most racing sims, and allows up to 7 discrete channels of information to be output to tactile transducers ("bass shakers" or just "shakers"). I will be using three sound cards; one for normal audio, one for SimVibe "chassis mode" and the third card for SimVibe "extension mode".
Chassis mode
The first extra soundcard will output 4 discrete audio channels to a 100Wx4 channel amp, which will run four Aura bass shakers, one at each corner of my rig. These will each simulate the tractile response from each wheel of the car I'm driving. This is what SimVibe refers to as "chassis mode" and it can be used independent from the "extension mode".
Extension mode
The second extra soundcard will output 3 discrete audio channels to a 100Wx4 channel amp, one audio channel will be split to two amp channel to run two Aura shakers mounted to the bottom of my seat. The other two audio channels will each run to two Dayton "puck" shakers (their quite small), a pair will be mounted under my pedal plate, and the other pair will be mounted around my shifter.
SimVibe components
x2 - 24 VDC 14.6A 350W Regulated Switching Power Supply - $100
x2 - 4x100W @ 4 Ohm TK2050 Class-T Digital Audio Amplifier - $100
x6 - Aura AST-2B-4 Pro Bass Shaker Tactile Transducer - $270
x1 - Dayton Audio TT25-16 PUCK Tactile Transducer Mini Bass Shaker 16 Ohm 4 Pack - $45
x1 - ASUS Xonar DGX 5.1 - $40
x1 - Syba SD-PEX63034 7.1 - $20
x1 - SimVibe software - $80
The current configuration
Here are some pictures of my setup in its current configuration. My current setup is not bad by any means, I sit on a couch in which I installed an Aura bass shaker and recycled sub amp. It works great for gaming & movies, but its just inline with my subs, so I'm expecting a huge improvement switching to telemetrics based shakers. I'm exclusively a PC gamer and play with nVidia 3DVision on a 100" screen (mostly iRacing). I have a proper 7.1 surround sound system, and tri-SLI 580GTX video cards being fed by an i7 3820 running @ 4.8GHz (all water cooled).
The problems with the current system are that the wheel is too close to my torso. My pedals are too low, and the whole rig pushes forward on the carpet if my brakes are too stiff. So I'm planning to address all these issues with this upgrade.
Here are a couple picture of the new seat I picked up at the junkyard yesterday for about $40. It came from a late nineties JDM Subaru Impreza. The seat is super comfortable and I'm really excited to race in it
I did a build log of my DIY screen here.
I did a build log of my DIY computer system in my desk here.
I did a build log of my DIY 18" subwoofer here. (I also have a Polk 10" sub behind the couch).
Day 1
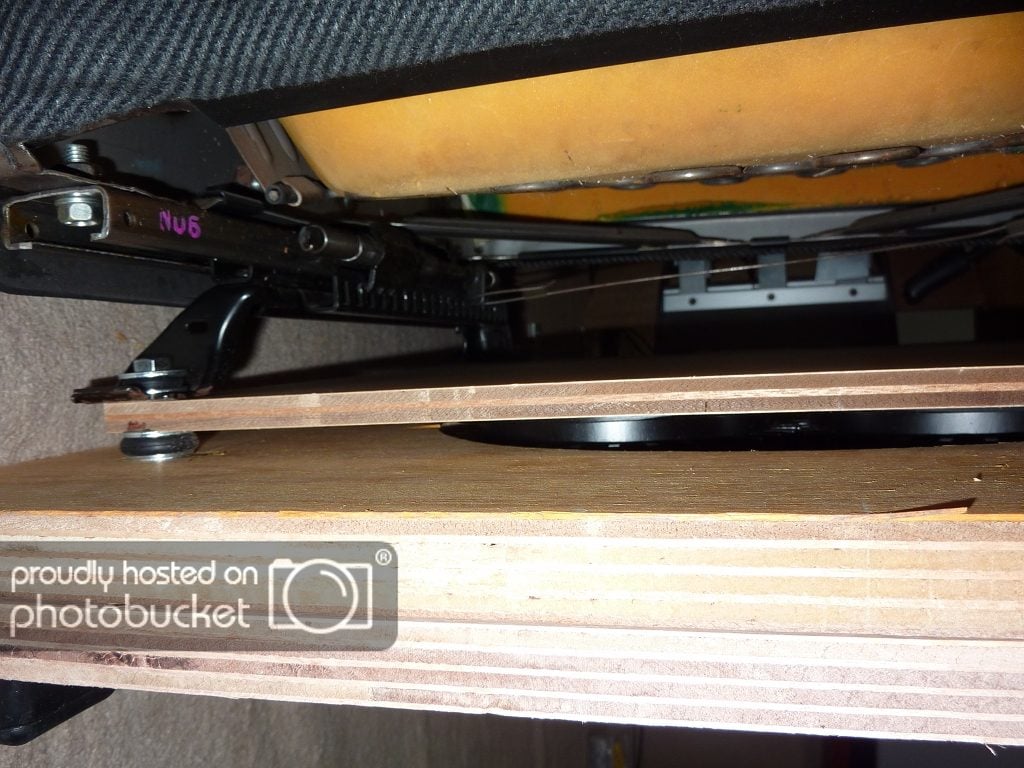
After disassembling the old setup, I fist had to get measurements I wanted to use to find a comfortable position for the new setup. The seat will be the only adjustable bit, so getting the pedals and wheel in the optimal placement was essential. I used a double tray, with the wheel mounted on the lower tray, which gives extra room for keyboard, controllers, etc on the top. I also built a new mount for the pedals and moved the lower platform way back. Then I added a second lower platform to extend the overall length to provide room for the seat to get mounted.
I also tried mounting a seat shaker to the bottom of the seat cushion. I wasn't 100% sure I'd leave it here, but I wanted to try this method.
So, this is where I finished on day 1:
Day 2
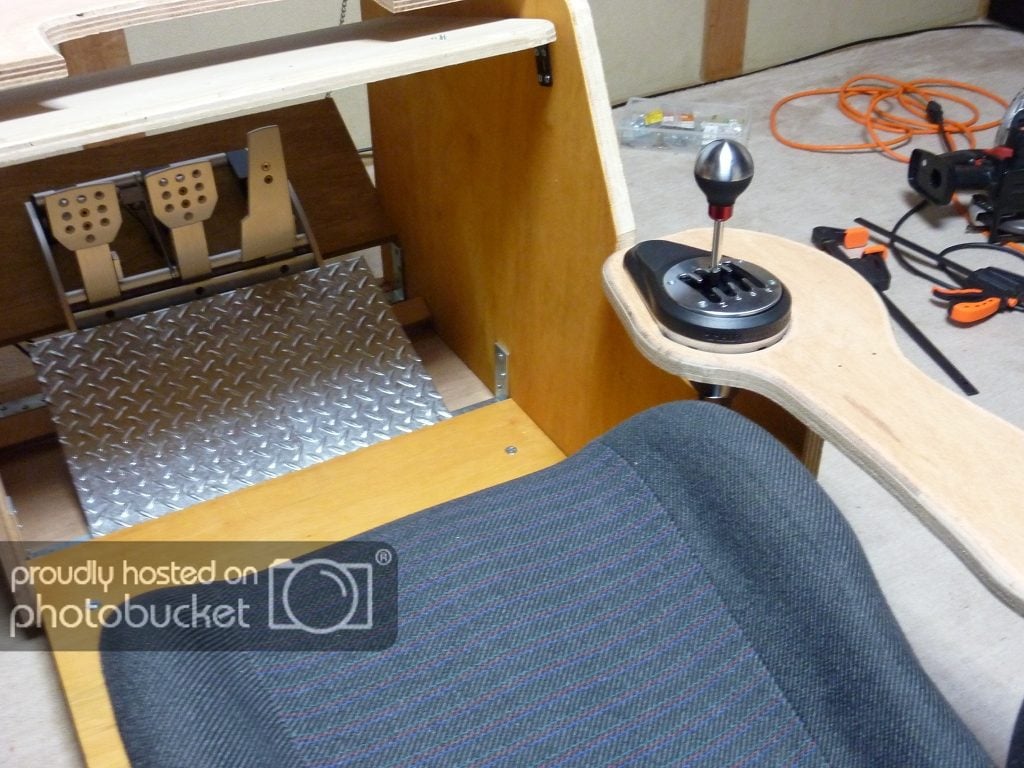
I started by working on getting my shifter installed. I wanted to be able to have a "center console" of sorts with a place to rest my arm. So I started by created a new right side panel sculpted to fit the requirements. Then I cut the center console with room for the TH8 RS shifter. This is what I came up with:
I've mounted the shakers on an extra piece of plywood and it will be mounted to the seat rigidly...then the whole thing (seat/wood/shakers) will be mechanically decoupled from the rig with a rubber bumper above and below its mount points.
The shakers are mounted to the bottom of the plywood (and not touching the rig's chassis).
I also added a diamond plated pedal plate, its much more comfortable now
Day 3
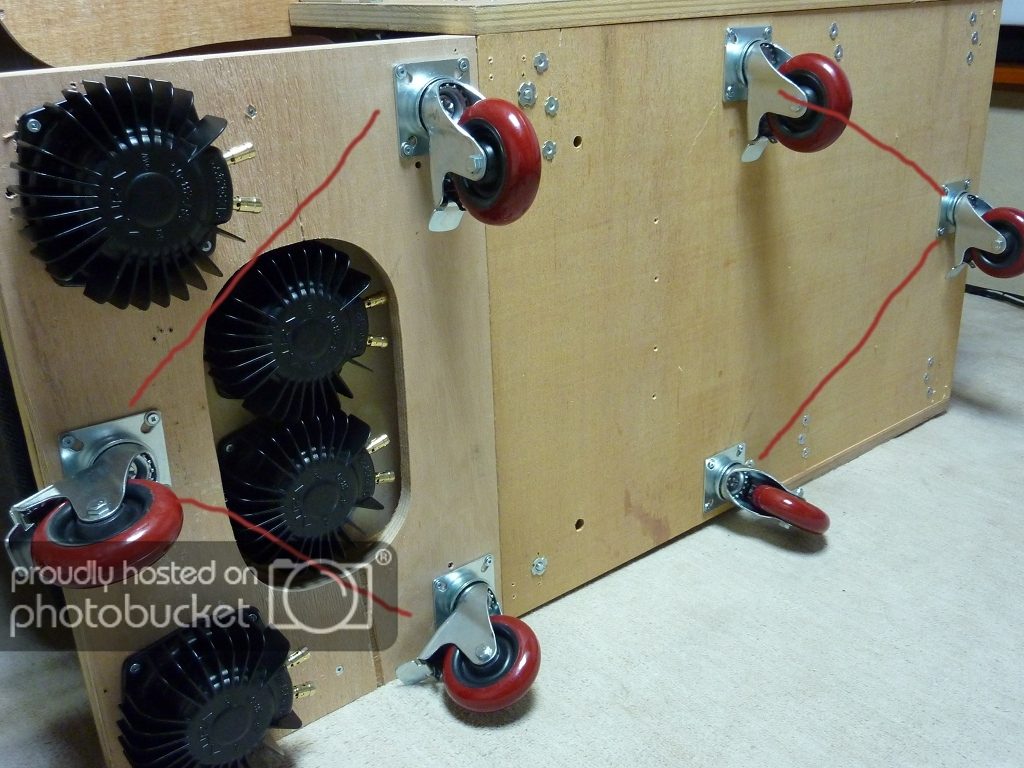
My casters arrived today. I got six of them, and I've installed them in an unusual way:
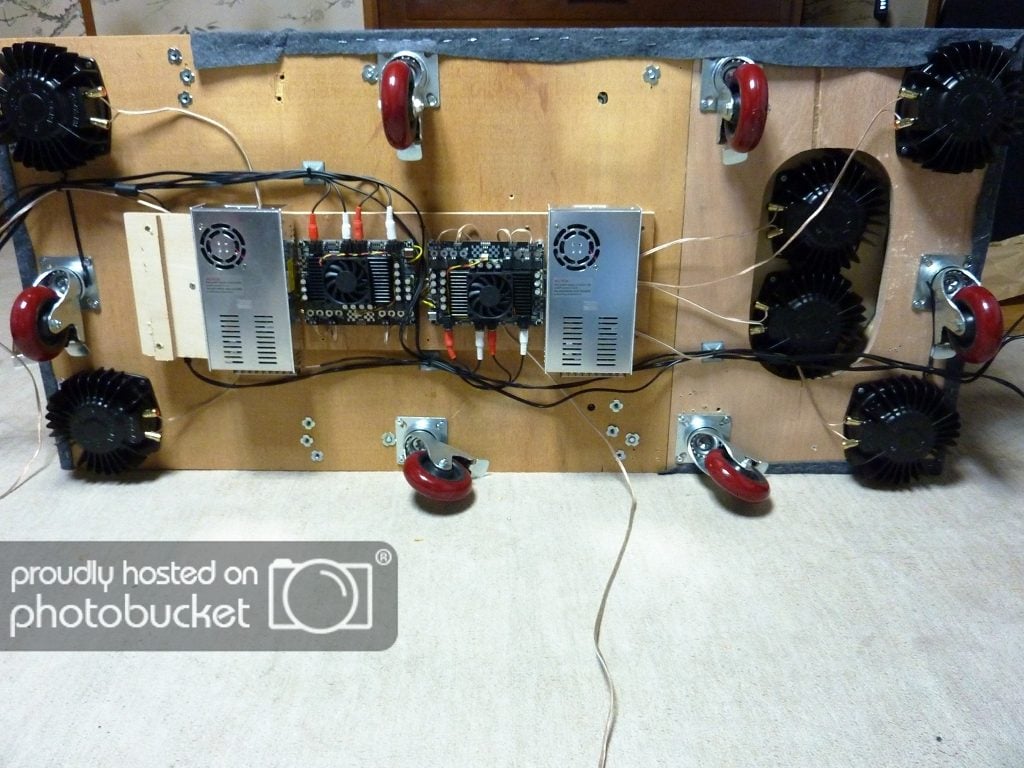
The basic idea is that the shakers at each corner will be more effective if them have more wiggle room....so I've given each on an area where it can shake the base by not putting a caster under each corner. The red lines I added show where the base will flex a bit to give each shaker a bit more effect (hopefully).
I also ordered some carpet to cover the rig, so I'll let you all know how that goes.
Here is another shot of the rear, as you can see...I also installed the other two Aura's I already received...now I'm just waiting for the other order from parts-express.
Day 4
Today I broke everything back down to begin the final rebuild
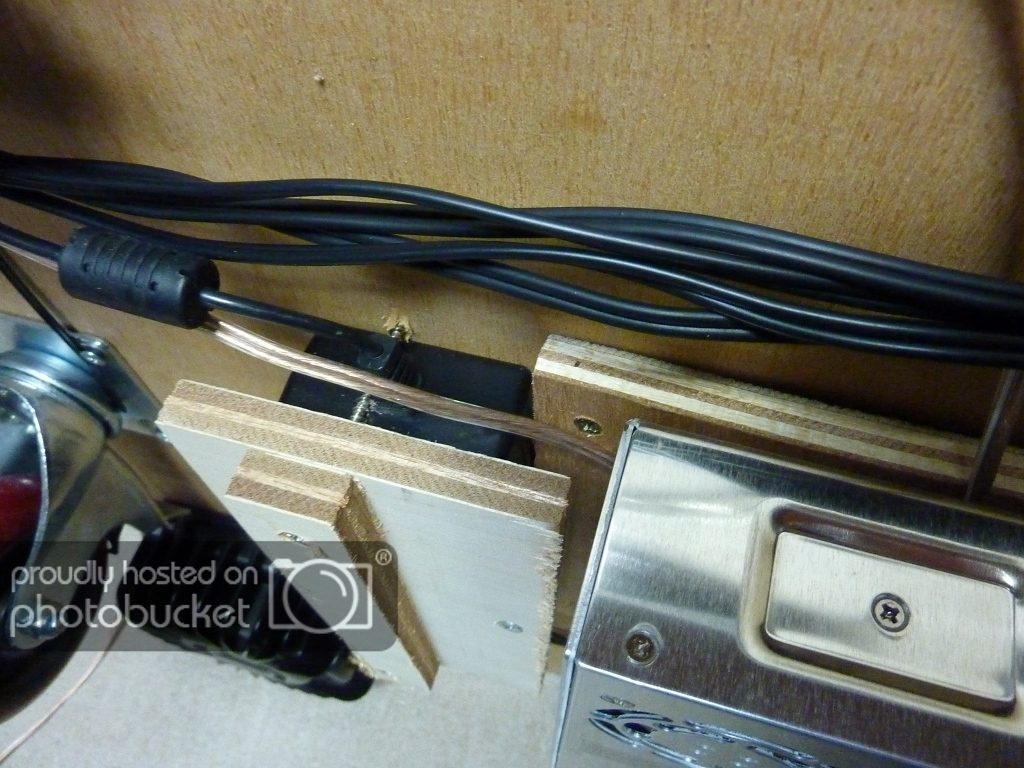
The difficult part of this build is that I wanted a clean look, so I've opted to use wood anchors, instead of normal nuts and bolts. So the anchors are hidden under the carpet. Because of this, I really needed to plan ahead and ensure I had all the anchors placed correctly before laying out the carpet. So that when I begin to assemble post carpet, the bolts will find their places.
Then I used 3M 77 multi purpose spray glue to attach the speaker carpet, and stapled around the bottom edge.
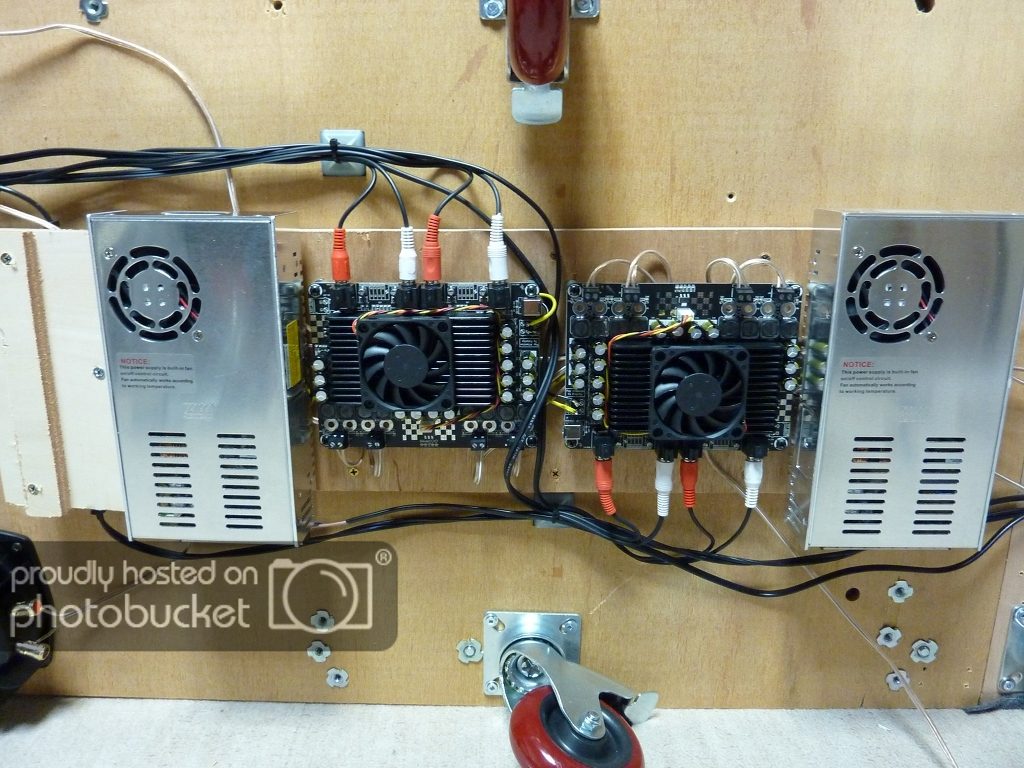
After that, I got started building my amp rack. There is a lot of wiring, and part of the reason I got such large casters was to allow space for all of it to be mounted to the bottom.
To the left of the amp rack, I also mounted the Fanatec CSR-E power supply.
With all six Aura shakers installed, it looks like this.
Then I got my seat installed back in place.
Day 5
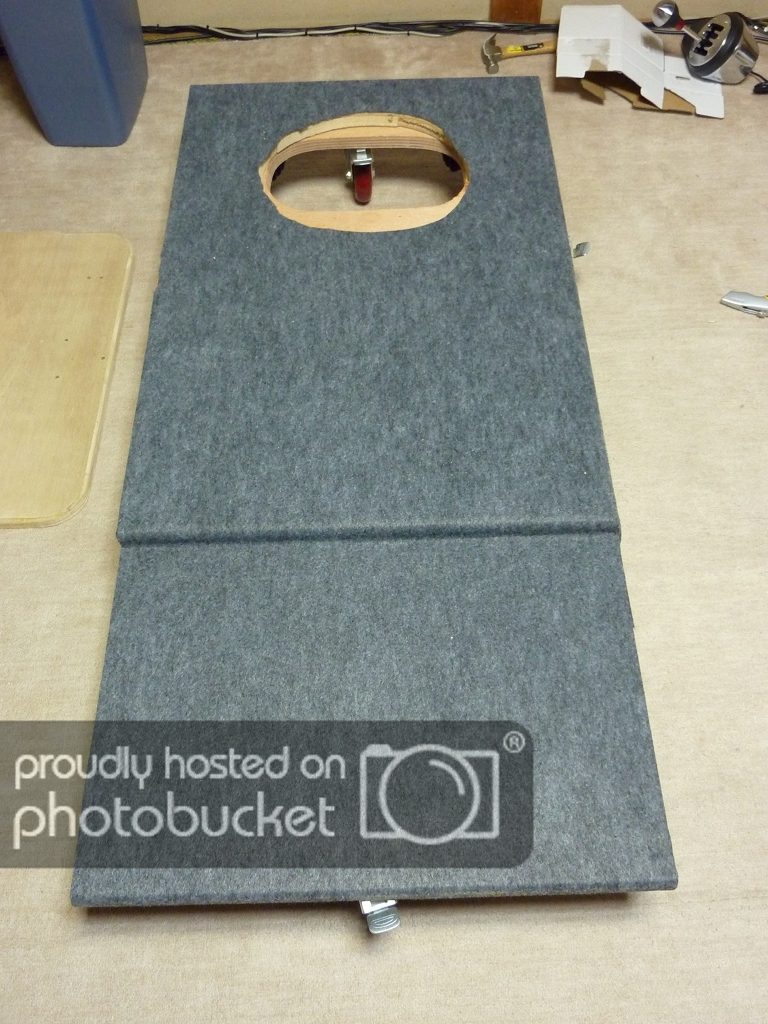
Today I finished the right wall, the shifter plate, and the front wall where the pedal plate will be braced.
I mounted two shaker pucks below the shifter.
But during testing today, these two pucks would not respond. So I'll have to figure that out later.
Day 6
Alright, I finished up the rest of the pieces today, carpeting went pretty well while I was using the 3M 77 glue, but then I switched to a different on that is like stringy spray. Its a darker orange color and it made a mess with overspray, yellowing the carpet. It also didn't work as well in general. Read this is a simple endorsement for 3M 77.
The pedal plate is at approx a 30 degree angle.
The pedal faces end up being almost vertical.
As you can see above, I also reshaped the left wall to allow for easier egress.
With the wheel plate and top plate installed, the final result looks quite nice.
My backup wheel is the old 360 wheel...which is horrible next to my CSR-E, but it will have to suffice for the next couple weeks while I wait for my replacement from Fanatec.
I did more testing today, and it appears one of the amps from parts-express has two dead channels. So, my pedal plate shakers, and shifter shakers are not working yet. But they'll be ready to go once I replace the amp.
Now I'm working on tuning the SimVibe software, so far pretty good, although I'm not convinced my from shakers are mounted in the best way, the four in the rear kick butt....literally.
I'm a huge 3D Vision fan. I've been gaming on my 100" Acer projector for about a year now, and I love it. But the resolution sucks! 720p is just not enough, especially on such a large screen.
The largest size 1080p screen which supports 3D Vision in 1080p is 27". I was hoping that would change and something would be announced this year at CES, but my hopes were dashed to the rocks....and we are still stuck with the 27" limitation.
So, I've broken down and ordered three Asus VG278HE 3D Vision monitors. They normally sell for $500 each, which is a lot for my budget, but I found in the Amazon warehouse deals section, they are going for less than $400 each, I just ordered three for $375 a piece.
Asus VG278HE 27" 144Hz 3D Vision monitor
Its still a large investment, but I think it will be worth it. I'll be running them with two MSI Lightning Extreme 3GB GTX580 graphics cards in SLI (water cooled)....they should have plenty of power for the configuration, I'll also have a standard 580 for PhysX and additional screens.
Day 7
I've discoved a problem with using two Asus soundcards together. The driver control software is not setup to handle two soundcards simultaniously. When I open the software, it just acts as if there is only one card present. This is a problem because even when setting the Windows properties to "quadrophonic", the driver default for these soundcards is 2-speaker stereo...so it takes the Windows commands to send sound to the rear speakers and redirects it to the front speakers.
So I was able to get one card working properly in quadrophonic mode, but the second card was only outputting sound to the front two channels. To solve the problem, I performed the following steps:
1) In the Asus DGX control software, set the 1st soundcard output to 4-speakers
2) In Windows sound output properties, set the 1st card to "quadrophonic"
3) Manually close the Asus DGX control software
4) Go into the Windows device manager and disabled the 1st DGX soundcard
5) Manually open the Asus DGX control software again (this time it takes control of the second soundcard since the 1st one is disabled).
6) In the Asus DGX control software, set the 2nd soundcard output to 4-speakers
7) In Windows sound output properties, set the 2nd card to "quadrophonic"
8) Manually close the Asus DGX control software
9) Go into the device manager and enable the 1st soundcard
This seems to have solves the issue somewhat, but I'm still getting inconsistent results. I thought for a while the amp was bad, but I think the problem is attempting to run two of these cards in one system. So I've sent back one of the DXGs and I've ordered a cheap VIA Envy based card to replace it.
I'm getting bored waiting for my new wheel and monitors to arrive, so I'm working on some of the details of my rig. Today I made a mouse pad ;D
It started life as a SteelSeries QcK+ Gaming Mouse Pad....but I made short work of that.
The size and position is perfect.
Last edited:


")
 ) for me LOL