The DIY-ers corner

  • Thread starter Jet Badger
  • 342 comments
  • 34,043 views
Sadly not, I got a new job and have been away from home for training since that post. The training has finished but with 10-12 hour days I haven't got much time to do anything!
That's a shame--it was a lovely design.
 
Little something I'm working on - a temperature controlled soldering station controller. :) It's going to have an Arduino loaded ATMega and I think I've figured out pretty much everything. Now just waiting for the 16x2 LCD to arrive in the mail.

upload_2015-9-28_19-41-17.png


upload_2015-9-28_19-40-55.png


upload_2015-9-28_19-53-8.png
 
After living in the house for two and a half years, it's finally time to get the garage organized. Which means shelves.

Rather large ones.

Problem is most large shelves are 8 feet wide but I only have 6 feet between two windows. Also, said shelves are 2 feet deep and I want them to be 3 feet to fit the storage containers I have.

Sounds like a custom job.

Eighty dollars, a load of lumber and 3 evenings after work and I went from this flimsy pile of garbage:

20151013_205657.jpg


to this behemoth:

20151015_214915.jpg


All I have left is pick up 2 sheets of OSB and it's ready to be loaded up. Also visible ate my 2x4, 2x2 and chain "speaker mounts" for the old Cerwins.

Next up: recycle center then insulating the garage attic space.
 
Nice job. Did it take much more than a hammer and a saw?
Skilsaw, drill, socket driver for when my battery started to not want to sink in the 2-1/2" lag bolts and clamps. I still need to buy the OSB which will need a bit of jig sawing to notch the corners. Very simple construction. 👍
 
TB
Skilsaw, drill, socket driver for when my battery started to not want to sink in the 2-1/2" lag bolts and clamps. I still need to buy the OSB which will need a bit of jig sawing to notch the corners. Very simple construction. 👍
Are you going to give it some finishing, like varnish, wax or stain?
 
Are you going to give it some finishing, like varnish, wax or stain?
My wife wants me to paint it white to match the window trim.

A friend wants me to paint it flat black (he has 95% of a gallon can from when he built my speaker stands he wants used up).

I'm thinking about adding a splash of color and going with chartreuse.
 
TB
My wife wants me to paint it white to match the window trim.

A friend wants me to paint it flat black (he has 95% of a gallon can from when he built my speaker stands he wants used up).

I'm thinking about adding a splash of color and going with chartreuse.
Damn you, you made me google what chartreuse meant. *shakes fist*

I always prefer, no matter what I do to wood, to keep the grain visible, even if faded. Whenever possible, I prefer to enhance it even. 👍
Do post pics of it finished, I'm curious on how it will turn out.
 
Had parts for this thing cut and laminated a few weeks ago. Just a simple drawer, but in stores all are mostly just flimsy overpriced cardboard jobs. Turned out at maybe 70eur and an afternoon of drilling and screwing.

drawer.png

DSC_0046.JPG
 
Shelf finished and already almost full. :irked:

20151018_214643.jpg


@Beerz - I couldn't bring myself to spend the time on painting something that sits in the garage and will just get scratched to hell.

Once the rest of the straightening in the garage is done, this is the next project. :P
 
TB
Shelf finished and already almost full. :irked:

View attachment 465089

@Beerz - I couldn't bring myself to spend the time on painting something that sits in the garage and will just get scratched to hell.

Once the rest of the straightening in the garage is done, this is the next project. :P
Since nobody else dare to ask this question in a DIY thread, I'm going to.

What car is that?
 
So the latest idea soon to be half- or maybe even quarter-arsed then forgotten about after it stops being fun is a homemade projector.

Some context: I recently moved into a converted warehouse/snooker club which is shared by 10 people (but half of them might be leaving soon, due to be replaced by three more). We have two sofas and a really nice lounge, but our TV is a CRT from maybe 2003. It works, just, but everything we watch is cropped by maybe a fifth on the right hand side and the CRT whistle drives me up the wall.

Then I noticed there was a projector, so I asked around about it and the owner said I could hook my PS3 up to it so we could watch and play stuff, so I did, then she took it away three hours later...

So while looking for a replacement I thought hey, I have an iPad LCD that's not being used for anything else, why not build one?

Now I'm on the prowl for broken projectors or redundant OHPs I could use for parts like optics and light sources, but ultimately I'd like an LED because they're more efficient and easier to work with. Sadly it seems hot mirrors (that pass 90% of visible light but reflect IR and UV, I think) are hard to find so the LCD life may not be great, first surface mirrors (a shiny surface that isn't coated in glass like most mirrors) are equally rare or expensive so the case will have to be entirely linear, that's simpler but bulkier. I have an old Canon EF-S kit lens at my parents' house that may serve as a projection lens, I'll have to try it out. Apart from that I may order some fresnel page magnifiers and see if I can make a decently sharp image from some transparency film before I start spending serious money.

Oh and the LCD is embedded DisplayPort which means super easy interfacing... But only to a PC or laptop, no PS3 because you can't use an HDMI output with a DP display. To that end I'm looking for a 720p or 1080p 7" LVDS LCD that I could get an interface board for from eBay, problem is 16:9 isn't the most popular tablet resolution...
 
TB
View attachment 465089

@Beerz - I couldn't bring myself to spend the time on painting something that sits in the garage and will just get scratched to hell.

You disappoint me, bro. :indiff:

Yeah, if it's going to get that beat up, better to leave it as is. Although my OCD still kicks in...
If you pay for the trip, I'd gladly stop by and finish that shelf for you. :D
 
Did something I wanted to do for a long time - maded automatic headlights for the automobile thing (law requires either DRLs or low beams during daytime). No more drained battery after accidentally leaving those suckers on.

I used a regular 12V relay to switch on the ground to the headlight relay as that is how the switch normally operates and spliced the taillight wire into ignition through a diode to make it one-way, you don't want your light switch turning on the ignition now, do you? :P

Untitled.png

DSC_0051.JPG

DSC_0054.JPG
 
Last edited:
I've been meaning to share this one:

12182887_1169048986444110_7232846897395598758_o.jpg


$2 dish rack.

Bend the legs.

It's now repurposed to create storage space under the table.

Before, my WiiU sat on those cardboard boxes and heat was piling up down there. At least now there's more room for the heat to go about before it backs up into the console housing (which is unlikely at this point).

This would be the fourth under-the-desk mod I've done to this room. The first being towel hooks being used to hang up my headphones (which you can barely see off to the right).
 
So after having our car for 7 years (2008 Mazda 6) I finally got sick of only being able to listen to music via CD's or radio, that and a button on the factory radio labelled Media had been taunting me all that time as it does nothing.

I thought about it and had two options, buy a new car or a new stereo with more playback capabilities, Ie an Aux jack at least.
The new car option was thought about and forgot as it's a bit over the top getting a new car just for the purpose of having a larger selection of ways to listen to music.
After investigating a new radio it was going to be a pain to get something to fit nice in with the surrounding dash as I didn't want to really cut the dash in any way.
So what to do?
Google to the rescue.

Turns out that media button that does nothing can be activated with one link in a spare socket in the rear of the factory radio. Off to the electronics store and bought a pack of these for $3.50, only needed 4 all up. :lol:

20151107_183212.jpg


Next remove radio and install link.

20151107_153628.jpg


Now to fit a 3.5mm cable to plug into a phone.
Cable I had lying around made up and plugged in.

20151107_154651.jpg


Other end of the cable in the centre console after running it under the gear shifter etc.

20151107_171057.jpg


Success, press the media button or scroll through the options on the steering wheel and Aux input comes up. :D

20151107_171123.jpg


I've got an old Galaxy S2 running on a custom rom which is absolute bare bones and pretty much just a music player which I'll leave in the car now. In hindsight I should have also ran a chassis mount usb port or a power outlet for charging the phone so I can just leave it there and forget about it, probably do that in the not too distant future.

In the end it cost me $3.50 and didn't have to drill/cut anything in the car.
All up with just a little soldering to make the lead and remove and refit the radio it took just over and hour.
 
@Shaun

I did that (roughly) same trick in a BMW E46. Instead of buying a €100+ compatible mp3 player for in the booth the guy now drives around with a 15,- tiny mp3 thingy. :lol:
 
I haz a pile of wood.

IMG_20151124_145310.jpg


Pile of wood cut to size and placed strategically to see if I didn't forget anything.

IMG_20151124_153055.jpg


I have a bunch of miniwood. (there are more)

IMG_20151124_162846.jpg


And glue.

IMG_20151124_163210.jpg


And now I need to find a way to drill the holes straight for the miniwood, on the long side of all the wood. For the others I'll use a pillar drill.

I hate working with wood.
 
TB
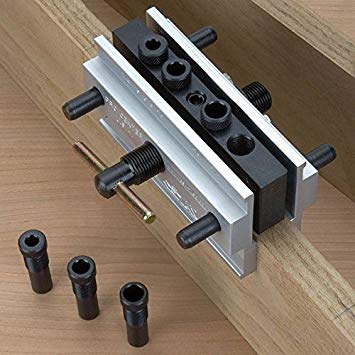
Dowel jig.

510Du976UWL._SY355_.jpg

Was looking to buy something like that but the ones available won't fit on a 50x50mm piece of wood. I'll turn a small block of aluminium into a homemade jig.
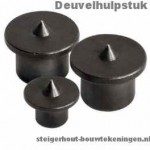
I also have these to assist me lining up the holes:

deuvelhulpstuk-150x150.jpg
 
IMG_20151125_151305.jpg


The left and right side are now glued and drying with weights on top. For the long side I'm gonna pick up some long clamps this evening and glue those.

Still have to cut the top board, the plank for the keyboard and mouse and the small one for the pc to size. And then I need to dismember my old desk to salvage the pull out thingies for the mouse and keyboard plank. And sanding. And painting.

Almost.
 
Dude.

Totally make the keyboard try height adjustable! This feature is where it is at with computer tables. :D
 
Dude.

Totally make the keyboard try height adjustable! This feature is where it is at with computer tables. :D

I have it all measured out with my fixed chair. And it will be the gf who sits there the most. So no need for that.

Also. Paint.

IMG_20151127_141819.jpg


I kept the wood quite rough and used a somewhat transparent paint. Now I have to wait for the boards to arrive.
 
I have it all measured out with my fixed chair. And it will be the gf who sits there the most. So no need for that.

Yeah but like, wouldn't it be cool if it was height adjustable should you or her get a new chair?
 
Yeah but like, wouldn't it be cool if it was height adjustable should you or her get a new chair?

I could still do that with a sort of pin system, but the sliders from my old desk don't give me the room for that.
Could be a possibility in the future though.

And in the meanwhile I am still waiting for the 3 boards that need to be cut to size.

When the times comes and my wallet is full again I'm going to invest in some woodworking hardware. This is ridiculous. Waiting almost a week for someone to cut through a piece of wood.
 
I'm going to invest in some woodworking hardware. This is ridiculous. Waiting almost a week for someone to cut through a piece of wood.

This is my own belief: Every household that is occupied by a person(s) should have enough hardware (of decent quality) to do basic tasks: cut, drill, join and fasten.
 
Back