The DIY-ers corner

  • Thread starter Jet Badger
  • 342 comments
  • 34,014 views
I think that it's time that I need to build me a bigger shed in my back yard with proper work bench.

I was asked to figure why this thing stopped working :

View attachment 755371

And this was how I had to work :

View attachment 755372

......

Edit.

Got it working though.
Every tinkerer/craftsman needs a good work bench. I have several... somewhere.... under piles of prized goods my wife deemed junk...
 
Slowly trying to make a RPi work with the car. Been ages since I've done any sort of electronics project, maybe I'll even finish this one :dopey:

upload_2018-8-20_21-33-57-png.760609
 
48431BEA-D051-4775-BC7C-91C50F408646.jpeg


A geographically accurate map of my favourite cycling destinations drawn freehand and some book coverings to add some much needed antiquated elements to my very modern home.

Edit: technically more arts and crafts than DIY, but I did do it myself so I guess that counts.
 
Slowly trying to make a RPi work with the car. Been ages since I've done any sort of electronics project, maybe I'll even finish this one :dopey:

upload_2018-8-20_21-33-57-png.760609

That reminds me I have a spare RPi at home that I keep meaning to investigate if I can use it control my home's split system air conditioner while I'm away from home.
 
That reminds me I have a spare RPi at home that I keep meaning to investigate if I can use it control my home's split system air conditioner while I'm away from home.
That should definitely be possible. Rpi has ethernet and digital I/O, so should only be a matter of coding and some relays or such.
 
I wanted to have a full size spare in my trunk so I did the only logical thing I could think of. I had to "raise" the floor by three inches for the stock rear wheel to sit in the donut spot. There's lights in the back half as well.
20181124_151949.jpg
20181124_162803.jpg

The hinges are there to allow entry and exit of the whole thing in one piece. There's support pieces that fold out from under the flaps that allow it to stay sturdy in the corners. Less than 1/2 inch along all sides between the trunk liner and piece itself.
Below is the first coat of polyurethane as it was drying.
20181122_214456.jpg
 
Got a little xmas gift to add to my BBQ.
20181225_174740.jpg
This will be set in a weather proof box (I smoke/grill/bbq year round) along with a plug. I am going to get a hole saw and a section of 4 inch pipe and cut a hole between my two grills. Hook up an old hair dryer I stole from the wife, and voila! A smoker/slow cooler that maintains it's own temp, no more constant messing with heat for me!
 
Last edited:
0C29FDDD-6346-4918-8C40-71F4E23B2737.jpeg

52DBC0AA-BB46-4377-A17C-091D42A5157E.jpeg


LED backlit reg plate for my bike.

Started with a stencil and a few bits of plastic, some foam board, some adhesive plastic covering and a knife. Chop, chop, stick, mount LED strips inside and seal.

Very pleased with the result. Now I have to work out how to wire it to my bike.
 
Got the contraption boxed! I also managed to get a pipe hooked up with a hair dryer on one end and a 4in. pipe connected between the two "chambers". Tomorrow i'll run a round or two of charcoal through the bbq with this on auto tune and after that should be ready for smoking and slow cooking. I'll show some more pics and maybe a video when I have it all fired up.
20181231_120037.jpg 20181231_120055.jpg
 
And it's done! Even more exciting is that it worked and worked well right away. All I need to is add some insulating tape around both grill lids and adjust the monitor interval so the fan starts up faster when the temp drops. Right now I lose about 10°f before the fan kicks back in. The best slow com temp is 180 to 210, at 190, it holds above the minimum, but I am going see if I can dial it in to kick on at about 185.
I had just enough charcoal for a test run today. Tomorrow I'll be getting some meats, some more charcoal and see about getting some good pieces of wood to chuck up for smoking. Definitely looking forward to giving this a go!
No video, it was getting dark, but I did snap some pics of it in action.
20190101_173055.jpg
20190101_173337.jpg
20190101_173113.jpg
20190101_173103.jpg
 
I won't bore you with all the details (but I'll happily bore you with most of them), but I've been addressing my SO's biggest complaint with our rental flat, at least the biggest one I can actually fix - the cables connecting my toys to my other toys and our TV.

I need to get some stuff to finish it all off, but here's where I'm at so far:

15465573167221358461615178071310.jpg
15465576417752158629093330010316.jpg

So in the first photo you can see a thin black cable coming down on the left, that's a Vive lighthouse power cable that I'll tape up, the PS4's cables are only visible from a small area in the room but I can still wrangle those a bit better. The Vive probably also counts but I need to find a proper home for that anyway.

In the second photo, from left to right there's a TV aerial cable coming through a wall grommet, speaker cable, a mess of cables that used to be on the floor, a bundle of two ethernet cables, HDMI and another speaker cable and a thin white DC power cable.

The aerial I can't do much about, though I might try using white gaffer to hide it as we don't use it. All the rest can be hidden behind the benches if I can run them up the back of the legs - I'm thinking screwed-in cable tie bases or P-clips to secure them.

I'll still have two black 13A mains cables and a flat Ethernet going under the rug and between the two benches, but I'm not a magician so I don't know what to say, apart from that I hate how this room is laid out. I don't really want my TV sat directly in front of a radiator, after all.

Anyway, I may be doing it for her but I too appreciate not having to look at them so I'll be happy when it's all done. Will she? I somehow doubt it.
 

Attachments

  • 15465561183553624108556664932680.jpg
    15465561183553624108556664932680.jpg
    58.7 KB · Views: 20
Made chuck roast for dinner last night. Decided to slice off a couple of slabs to try a different idea with my PID.
Sous vide!
20190114_171131.jpg

It worked really well for what it is. Which were zip locked, vacuumed with a straw bits of meat soaking in a warm bath. A vacuum sealer and a bubbler will finish off the idea well though. That said, the results were quite tasty. I soaked them for 2 hours at 135°f and finished them on my charcoal grill. Even being cooked not quite in the ideal conditions, and being a chuck roast slab, it was very juicy and despite being in the chewy side, it felt very tender. I may have turned my grill into a smoker for no good reason...
 
15488888021328797196981415736887.jpg


Two more steps and project rat nest will be complete - feed some slack through to the power cable that goes off to the left so I can suspend it under the bench, and pull the slack on the other cable through under the rug and probably shorten the cable.

15488888483736953757340940349621.jpg


After this I need to address the fact that my surplus of controllers, Vive and the Roccat Sova MK lap-desk-keyboard-thing I ordered all need a home (and a place to charge where the wires will be somewhat hidden), I'm going to get some longer legs for the sofa and try to find a large but flat storage box to go underneath so they could go in that, but the opening will be less than 15cm so who knows how that'll go. Oh, and the Vive wouldn't fit in something that small.

15488893451445680127188679578413.jpg


Then there's the rats nest under the sofa to eventually take care of... I can't see those, though, so I don't care that much. Oh and this mess is the worst of all, my SO has a tendency to fill any less visible flat surface with crap and the surface in question is a crate that had a "live laugh love" decal on it when we moved into this place:

15488889854888006152261945120463.jpg
 
Just something to consider for the controllers. This was originally part of a Lego stand I built for my headset. It broke apart one day and somehow an xbox controller ended up on that piece. The height it's at, 3 blocks and that thing flat piece is the perfect height for an xbox controller, i would add one more block for the DS4.
20190130_182919.jpg 20190130_182941.jpg 20190130_182959.jpg
 
A buddy of mine just dropped of this! :D
20190130_195929.jpg

He just so happens to be in the business of repairing and maintenance of large boilers, furnaces and other such industrial hot stuff. They had an extra bucket of mud, a couple boxes of brick and some large sections of kaowool left over. Someone is building a forge this summer!
 
Made chuck roast for dinner last night. Decided to slice off a couple of slabs to try a different idea with my PID.
Sous vide!
View attachment 792633
It worked really well for what it is. Which were zip locked, vacuumed with a straw bits of meat soaking in a warm bath. A vacuum sealer and a bubbler will finish off the idea well though. That said, the results were quite tasty. I soaked them for 2 hours at 135°f and finished them on my charcoal grill. Even being cooked not quite in the ideal conditions, and being a chuck roast slab, it was very juicy and despite being in the chewy side, it felt very tender. I may have turned my grill into a smoker for no good reason...
So, in my efforts to sous vide everything I found myself running out of room in my little crockpot, so I made a thing.20190331_191609.jpg 20190331_191602.jpg 20190331_191551.jpg 20190331_191827.jpg

Got a cheap heating element off Amazon, used a 1 inch paddle bit to pop a hole in an old cooler, ran the power cable through and caulked it all back up. I tried epoxy and hot glue my first round. That didnt end up lasting long and left a huge mess at my buddies place. It worked. We did two racks of ribs and a couple steaks 6 hours total on the ribs, it held the heat really well the hot glue melted into the water, giving things a gross coating. Luckily all the meat was sealed and wasn't affected at all. Lessons learned.
I replaced all of that with high temp silicon. I also have a little air pump and bubble stone to add some agitation to the water. All I need to do now is build a rack for it..
 
Today at work I was clearing out the store room in preparation to receive a gallery's worth of screens and stuff (3x 32" screens, 3x 24" touchscreens, a few speakers, amps, Mac Minis, a NUC... Not much) and found some light boxes that used some pretty fancy-looking LED strips. I was told I could throw them away, so naturally:

15544923507395981812989970972909.jpg

15544923949907990563471780466845.jpg


I did this in about 15 minutes which is why the middle one is too far forward and too far to the left, I'll address that some other day maybe, I don't really care though. There are also two cable tie bases with no cable ties or cables attached because I gave it all exactly no thought.

They're dimmable (but strobe badly at low settings because PWM is hard, ok?), individually switchable, 5W each and very white, which is useful.
 
Today at work I was clearing out the store room in preparation to receive a gallery's worth of screens and stuff (3x 32" screens, 3x 24" touchscreens, a few speakers, amps, Mac Minis, a NUC... Not much) and found some light boxes that used some pretty fancy-looking LED strips. I was told I could throw them away, so naturally:

View attachment 812508
View attachment 812509

I did this in about 15 minutes which is why the middle one is too far forward and too far to the left, I'll address that some other day maybe, I don't really care though. There are also two cable tie bases with no cable ties or cables attached because I gave it all exactly no thought.

They're dimmable (but strobe badly at low settings because PWM is hard, ok?), individually switchable, 5W each and very white, which is useful.

Are these plugging into an outlet or the wall switches?
 
Are these plugging into an outlet or the wall switches?

Outlet. Our kitchen is really badly done but there's a 2-gang wall box on top of the cupboards, so the 12V DC PSU plugged into that and sits up there, the DC cable comes down the left side and into the controller (which is a sealed unit so I'm not worried about fat and steam getting into it) and then all the strips daisy chain into that.
 
I built a big thing!
20190504_175219.jpg
Only took me 2 years!
The previous owner made some additions, those additions were very poorly built. Posts were just set on the ground with no footing, drywall screws used to attach boards (my front porch, built quite similar, literally fell apart on me as I walked on it because of this) and the beams were attached using regular screws instead of lag bolts. Within a year of us moving in the right side of the deck had sagged nearly a foot.
Still got a few things to finish, capping the posts, facing the joists, stain. But by golly, I finally finished it. The wife is quite happy.
 
Ok, so... I made two things!
20190504_221924.jpg 20190504_221919.jpg
I plan on running cord through some parts and gluing others so I can make it collapse on itself and use the cord to lock in place for use.

Edit:
In action
20190504_234631.jpg
 
Last edited:
So, we all love sharing and appreciating ours and others DIY successes. But as we all know, the DIY lifestyle also comes with it's unfair share of failures.
Today, I would like to share one of mine.
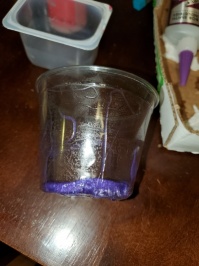
I was going to make a "secret wood" egg cast with some left over wood and 5 minute epoxy. I know that this kind of epoxy sets hot. I didnt realize how hot. I thought I could get away innocently enough with what I assumed was a small amount.... opps.
20190506_191948.jpg 20190506_191941.jpg 20190506_192241.jpg 20190506_192214.jpg
That small amount melted itself into the cup. It did however produce an unexpected result....
20190506_192232.jpg
The milkiness in the center there, that's smoke from everything being so hot but got trapped because the bottom of the cup melted, then was enveloped by the epoxy.
Oh well, guess I'll need to finally fix that compressor and get pressure pot set up so I can use proper casting epoxy.
 
I made some more things today!
20190724_230202.jpg 20190724_230303.jpg
Definitely getting better and making these things. The white ring on the right is made of teak, I couldn't tell you what the other woods are off hand, but they are likely some of the exotic woods from a veneer pack I bought. The three were all bent wood rings I made freon said veneers, while the teak ring was made from a solid ring I cut out of some left over boards I have. I don't think the teak will last long though as it seems to have a tendency to break along the grain. I may try using my scroll saw to cut some thin strips and see how well they bend when steamed.
 
In my quest to prepare for camping, distance hiking and possibly hunting, I've come to the step where I clean and prep my equipment. With my pack pretty much set, I've begun focusing on my bowie and machete. Both needed a good cleaning and sanding. Both still need more sanding true be told, but I still struggle with that sort of patients and so I'll get there. Anyway, i'll do the machete at another point as I still need to make a replacement handle for it.
So, a little about this knife. It was my grandfather's. He got it serving in the Army during the Korean war. He gave it, and the machete, which he made, I'm guessing from some scrap metal (he was a welder by trade) to my father just before passing. After I returned home from my time in the Army, my father gave them to me.
The years haven't been the best on them. They were stashed on a cabinet in a little work area in a basement. Both have some putting from surface rust. The bowie being of higher quality has held up better. Neither have a sheath though.
And so, here is my DIY in progress. I am making sheaths for them both from some scrap 1x4 wood, epoxy and paracord. So far I have chiseled out the area the blade will slide into and epoxied the two halves together. I think next I am going to drill some holes along the outer perimeter of the blade and fill them in with epoxy to help further fasten the two pieces and add more color to the finished sheath. Anyway, to the good stuff.
Here is what I started with
View attachment 750408
And after the first round of sanding.
View attachment 750409
And here is where I have gotten with the sheath.
View attachment 750392 View attachment 750396 View attachment 750395
Should have this done by tomorrow night. Think I am going to stain it black and maybe do some inlay work using some colored epoxy.
Speaking of epoxy...
Not sure what to do with these yet. Just left over epoxy from other jobs. Tossed some wood in with a couple them. My mom seems to think I should keep making them, wrap the edges in metal, make them pendants and sell them on etsy. Ehh...
View attachment 750389 View attachment 750391 View attachment 750390 View attachment 750397 View attachment 750393 View attachment 750394
So, I made this post way back when. Made a sheath for that Bowie, which didnt work, and made a sheath for my machete, which did, then didnt work. The sheath for the Bowie knife ended up being to narrow after clamping and gluing and the knife gets stuck half way inserted. I have a couple ideas on fixing it, but I think I'm going to get a different kind of wood to make it from instead. Something darker and more leather like. I also need something to rebuild my machetes handle with.
Anyway. Back to the scabbards, and in this case, the machete's scabbard. I had said it worked, then sadly didnt. Well, thats because i didnt get the paper off the sheet I was using as the spacer. It got wet, then it fell apart.... whoops.
So now I have fixed that issue and gotten a pretty good looking cover for my blade I think. i have some web straps that i punched some snaps into. those are fastened with some wood glue and a couple pieces of pine and some odd brads tapped in and cut down. all was the sanded, polyed and wrapped with paracord. I do wish I had different colored paracord, but this is what I had on hand so it will do for now. I plan on unwrapping and retying it with the same and several differnt styles, so i will change up colors several time I am sure. i also think at some point I may resand it, stain it, may try my hand at some carving and poly and wrap it all over again. anyway, here are some pictures.
20190924_210233.jpg 20190924_205949.jpg 20190924_210004.jpg 20190924_210236.jpg
I definitely need to be more consistent on the pressure I use tightening each of the knots. Probably dont need to use so much force doing it either, now that i see how tight it gets over time. i do like the looks of it over all, even if i would like it all darker. Gonna need to get some callouses back on my hand quick like though....
 
Living in an apartment my opportunities for DIY projects are pretty much non-existent. So when I decided to pull the trigger on a racing cockpit I decided to make a DIY project out of it. 60' of PVC, a bunch of fittings and more than I probably should have spent later, it's finished for now. I also decided to hang the flags I bought at Road America earlier this year as well as buy a few more to add to my collection.

41D118E5-675C-47CB-8285-56EFC2B26491.jpeg


F4E87503-EDFB-438D-B1DC-37B00258BC4D.jpeg


Playing racing games in a proper rig is so much more enjoyable than just setting the wheel up on my desk like I was doing before. :D

Edit: Also, the Aston flag is proper British Racing Green, the photo doesn't do it justice.
 
Last edited:
I just hope that you are not like me. I have my DIY PVC rig for a while now and changed it's layout 3 times now. I think I found the endgame at last :lol:
 
I just hope that you are not like me.

Unfortunately, I am like you. The one in the pictures is technically the second version as I changed things a bit part way through to add some strength to the section supporting the wheel. I also plan on getting a proper car bucket seat at some point as an old office chair that I can't (easily) adjust gets a tad uncomfortable after awhile. I also need to get some zip ties to make the wires more organized.

There's also some blank wall space just asking to be filled with flags.
 
Making my PVC rig, I learned that bolts over glue is really good for those that just cant stop tweaking their rig...
 
Unfortunately, I am like you. The one in the pictures is technically the second version as I changed things a bit part way through to add some strength to the section supporting the wheel. I also plan on getting a proper car bucket seat at some point as an old office chair that I can't (easily) adjust gets a tad uncomfortable after awhile. I also need to get some zip ties to make the wires more organized.

There's also some blank wall space just asking to be filled with flags.
One big improvement you could make would be to raise it up at least 18 in. Makes getting into; more important OUT of rig easier.
 
One big improvement you could make would be to raise it up at least 18 in. Makes getting into; more important OUT of rig easier.
Having it that low makes it's easy to just roll out and have a nap, then roll right back in...
 
Back