Might be worth checking what the XML in the SVG looks like, it's not beyond the realms of possibility. SVG does allow for colour profiles but I'd be suprised if PD are supporting it with the decal uploader.
Working in print I get what you're doing with CMYK rich black, however as SVG's do not support CMYK* or even HSV values (*yet - appears to be coming in SVG 2.0) and the game displays as RGB so I'm surprised if there is a difference though I'd be happily proven wrong.
If you can make a simple black square decal using your Rich Black and post the SVG code here I'd be interested to see what colour code is assigned to it.
Also can you post a comparison in-game of an RGB 'Black', CMYK 'Rich Black' and Game 'Deep Black' decal side by side because if there is an improvement it would be handy to know!
Your RGB black isn't RGB black, it's #231F20 instead of #000000, and your CMYK colour file has no colour info so I'm guessing it's defaulting to RGB black like it does when it can't read gradients.
RGB black is still as black as it gets, the fact you see CMYK Rich black as darker is an accident. Change your workspace to SVG colours or RGB, select black, and it will be no different.
Those squares were each made in a new document, with the color mode set to their respective mode. The RGB black square was made RGB black, then saved as a SVG. If it changed during that save, I'm unaware of it, but it started out correct. This is what I've been dealing with since I started using the livery editor, which is why I started using rich black. Whatever the case, it made a difference for me, so my original statement is still true. Whether it's happening by mistake or not is another issue.
I threw those two squares on a car last night, along with an ingame black square, for the hell of it.
So the reason why you feel 'CMYK' black is darker is that your software hasn't been producing a proper RGB since you began.
As @MatskiMonk says, if you don't define a specific colour for a fill in an SVG, it'll render as RGB black (#000000).
Probably worth checking your document or export settings as chances are it's messing up other colours too, likely rendering colours unnecessarily lighter and making making in-game colour matching even harder.
I know mine has a checkbox for convert to sRGB, should I have set the document up in anything else, but sounds like you might have other print/colour profiles going on (common on a computer/software setup used primarily for print).
Well with that myth debunked we're back to square one!
My gradients was black, then they look like crap, and at last i make great gradients svgs for my pleasure! Spent two days reading this thread, thank you all! Researching complete!!!
Does someone knows if the « pattern » function works in GT Sport ?
My tests show as black squares, and I don’t know if it is my problem or if GT Sport can’t handle them at all.
@BLiTZ Maybe it is the way your carbon decals are made ?
Does someone knows if the « pattern » function works in GT Sport ?
My tests show as black squares, and I don’t know if it is my problem or if GT Sport can’t handle them at all.
@BLiTZ Maybe it is the way your carbon decals are made ?
Have had no success with patterns. If you have two duplicate paths on top of each other make one with a gradient and make the end points close together and set the gradient to repeat (reflective or direct). Do the same to the other path with the gradient at a different angle. Some basic patterns can be achieved. Add more paths and gradients for extra options.
Has anyone been able to get the blur function to work?
Does someone knows if the « pattern » function works in GT Sport ?
My tests show as black squares, and I don’t know if it is my problem or if GT Sport can’t handle them at all.
@BLiTZ Maybe it is the way your carbon decals are made ?
It seems as good a time as any to ask: is there any way to get gradients to work on GTS with Inkscape? I'm fine with editing the code via notepad... as long as I have a stupid-friendly step by step tutorial on how to do it. I'm not very good with computers unfortunately.
The few videos on the subject I've seen aren't all that helpful. Sorry if this has been asked elsewhere; I couldn't find much help on the subject.
With Inkscape it is achievable by using the save as option and picking optimized svg. More detail Here.
Linear gradients are fine done this way. Radial gradients are still a bit hit and miss. This was done with Inkscape.
With Inkscape it is achievable by using the save as option and picking optimized svg. More detail Here.
Linear gradients are fine done this way. Radial gradients are still a bit hit and miss. This was done with Inkscape.
Hey, sorry for the late reply. Work has been wiping me out lately.
I tried the steps linked in your post, and made two simple rainbow square decals, one opaque, one at 50% opacity. It shows up just fine on the GTS website's decal uploader:
However, both versions turned out to be opaque red squares in game.
I know there are rainbow square decals in discover, but I'd like to learn how to do them on my own, especially since I want to toy around with transparency as well. The failed svg files can be downloaded here for reference.
Hey, sorry for the late reply. Work has been wiping me out lately.
I tried the steps linked in your post, and made two simple rainbow square decals, one opaque, one at 50% opacity. It shows up just fine on the GTS website's decal uploader:
However, both versions turned out to be opaque red squares in game. I know there are rainbow square decals in discover, but I'd like to learn how to do them on my own, especially since I want to toy around with transparency as well. The failed svg files can be downloaded here for reference.
Make sure before adding a gradient that starting color is 100% opacity.
Use gradient tool to add color points - use the slider in the A row in the "Fill and stroke" or the opacity slider at the bottom. Also keep blur at 0.0%
Edit: In the pic above. The arrow on the left is create and edit gradient (not node tool mode)
Once gradients are added do not alter the path size or move it. However if you have altered it a [edit] [cut] then [edit ] [paste in place] can usually keep it working.
Included working versions of your gradients.
Make sure before adding a gradient that starting color is 100% opacity.
Use gradient tool to add color points - use the slider in the A row in the "Fill and stroke" or the opacity slider at the bottom. Also keep blur at 0.0% View attachment 798570
Edit: In the pic above. The arrow on the left is create and edit gradient (not node tool mode)
Once gradients are added do not alter the path size or move it. However if you have altered it a [edit] [cut] then [edit ] [paste in place] can usually keep it working.
Included working versions of your gradients.
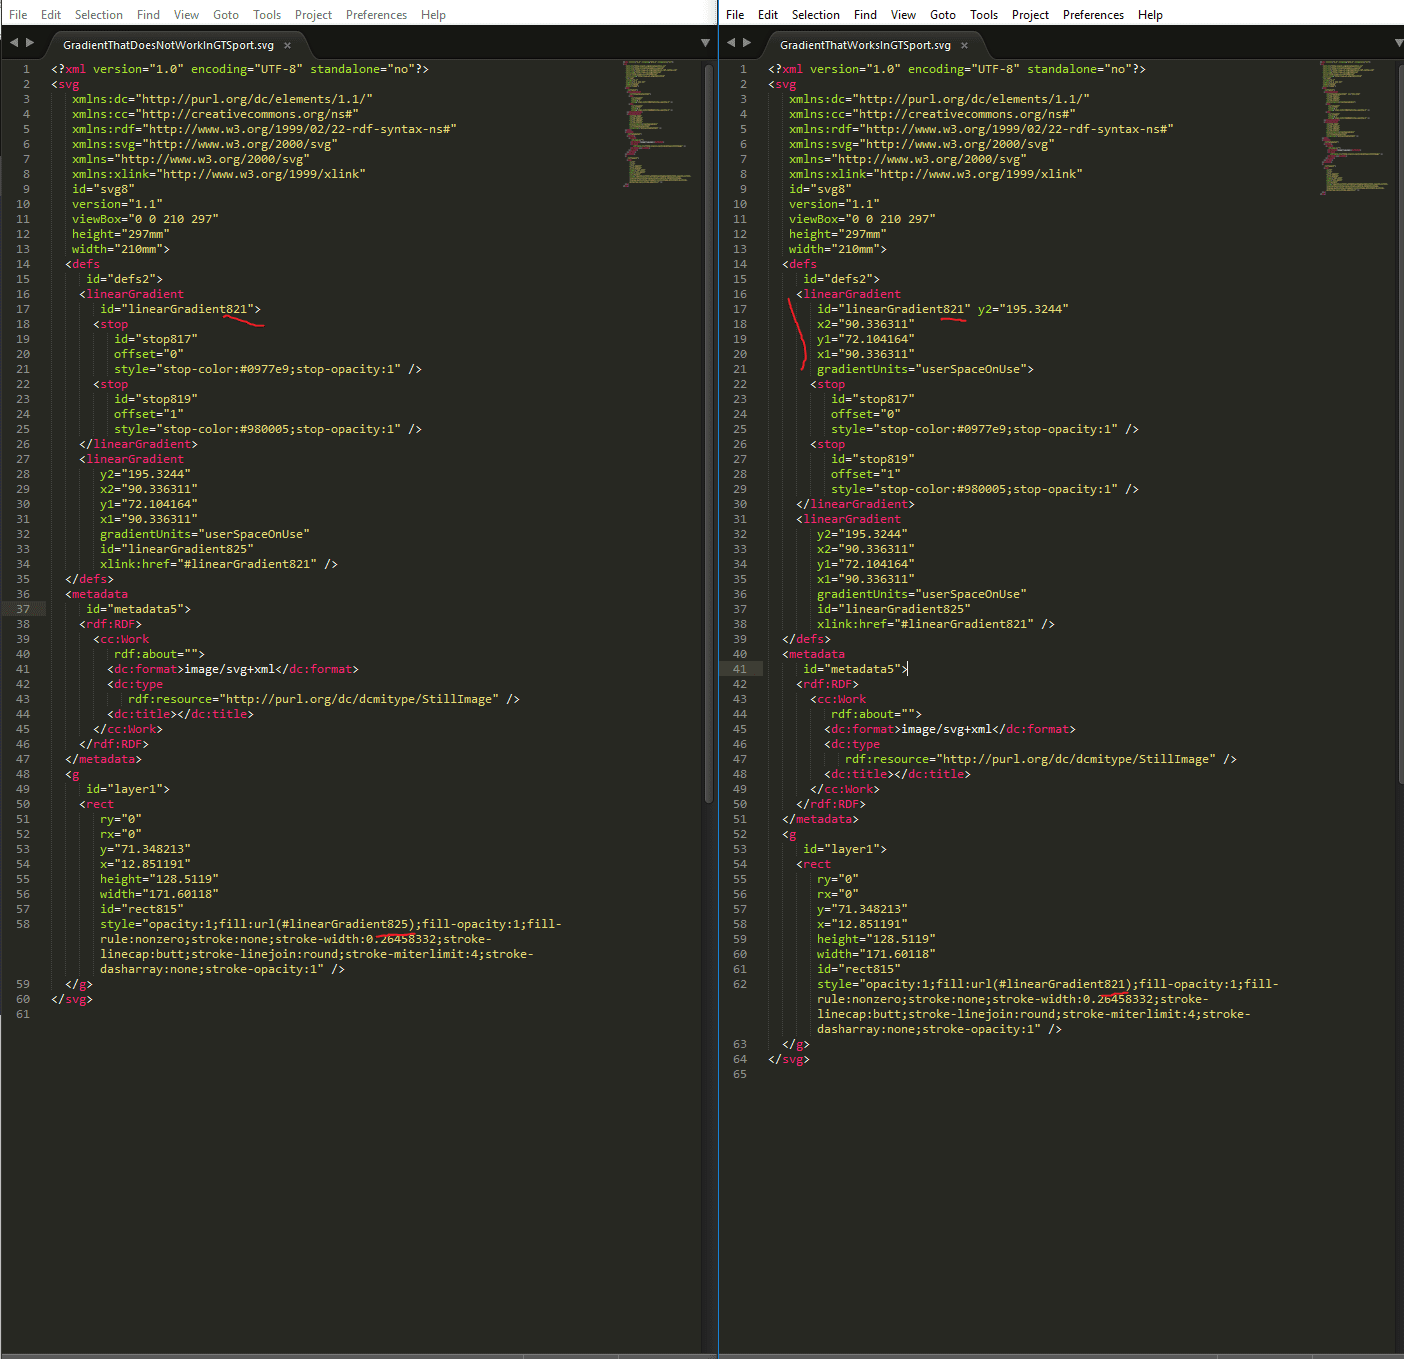
Ok, so I think I have figured it out now! I noticed that the difference between Illustrator and Inkscape in this simple example is that Illustrator only had ONE <linearGradient> tag. Inkscape splits it into two and then links the one with the other through 'xlink:href="#linearGradient821"'.
And then in the <rect> object it calls the second linearGradient in the "style" attribute. Change the linearGradient being called in the "style" attribute fixes the problem, you only need to call the first linearGradient. If you need stuff from the second one (like direction coords) just copy paste them into the first one!
Maybe not the best explanation so here is an image
Thank you zials for the Illustrator SVG example!
edit: When I moved on to a more complex SVG I had, I noticed that it used a matrix to calculate positions - gradientTransform. This needs to be removed and the x and y values need to be recalculated to absolute numbers, not that big of a deal but I thought I should mention it here as well.
I just want to say thank you for figuring this out! I was stumped for months trying to figure out why gradients didn't work using inkscape. I never would have dreamed that a double reference would destroy gts' ability to render gradients. LOL
Sorry... didn't get back to you earlier. No real guides specific to GTSPORT that I know of. Sort of boils down to how in depth you want to get. Either stick to scanning the Image or jump all the way in and manually trace.
A Few You tubes here
Also lots here.
The help section within Inkscape also has quite a few tutorials as well.
If you just start making some you can PM me for any help.
Guide for Mirage Racing Logo in Inkscape. (suggested by @Litchi ) A Hand trace of a small section of a picture.
I start with my master svg file that has 2 layers and background set to checkerboard.
I import the picture and make a duplicate, drag the duplicate to one side (this is to ink blot colors from)
Size original picture to fit in the box area. Make it around 65% opacity and click the little lock in the object section. This is so you can pick your paths which will be below the faded picture and not the picture itself.
Using the Draw Bezier tool: Work in layer1. Click for a node to appear in the middle of a corner of the thick grey line around the outside of the "/" shape. Click to make nodes in each corner until joining back to the original. This path can be made a white stroke and no fill color at this stage. Size the stroke so that it is the same width as picture. Repeat for the thick line around the red area. With both paths selected use [path] [combine]
This path can be duplicated. Make the stroke color grey and use stroke style to make it thinner. Note I am clicking the little eye icon in the objects list to hide the original pic in layer2.
Use the bezier tool to make the white, grey, and two shades of red paths. The fill color can be picked by ink blotting off the duplicate picture. Pick No paint for the stroke. these paths can be dropped below the stroke paths (green down arrow at bottom of objects list) so that they don't have to be aligned perfectly with the edge of the white stroke.
Now I will add a gradient to the grey stroke path. Use the gradient edit tool with the grey stroke path highlighted. In the fill and stroke area make sure you have the stroke color highlighted and pick linear gradient from the icons. I have set the end color of the gradient line to a lighter grey and also picked reflected on the repeat gradient (this is in the top area underneath help in top menus). Also dragged the gradient start and stop points around to an angle and shortened it so that the repeat gives it light and dark sections similar to original picture.
Can now add gradients to other parts . Make sure to shift from stroke to fill tab before adding gradient to red section.
Note: I have actually missed a gradient on the white stroke that I did in the first make of it .
I have also duplicated the original white stroke made it black, dropped opacity and moved it to the bottom of objects list. Shifted it right and down to work as a shadow.
Now highlight all the paths in layer 1 and use [edit] [resize page to selection]
The images in Layer 2 need to be both deleted.
Now do a [file] [save as] pick optimized svg in the drop down box and use the following settings.
Hopefully this helps (and is not to hard too follow)
There are a lot of good tutorial posts, (like the one above and @eclipsee's gradient post to name a couple,) scattered thoughout this thread. I'm going to sort out the first post with links to these posts. It would help me greatly if you all could assist by posting links to those tutorials, or handy "how to" posts, if you know of any.
Just dropping in to say a massive thankyou - created my first SVG image. Didn't think it was possible without some clever expensive program so very thankful you've shown me otherwise. Cheers!
JESUS. Just got Inkscape the other day because the other tools are quite expensive, and @daan's tutorial is a godsend. I thought the tracing part converts the bitmap image but no, it just creates a vectorized version on top of the bitmap. That was the one thing preventing me from uploading my decals 🤬 Kudos for the tutorial. 👍👍
Just a tip, aside from Importing a PNG onto the canvas, you can also directly Open the PNG itself so that the canvas adjusts automatically.
Any tips for pre scaling a decal? Making a simple number panel that I want roughly the same size as Racing items - Car Number - Type 2, everything I upload always turns out bigger even after resizing the boxes in Inkscape!
Any tips for pre scaling a decal? Making a simple number panel that I want roughly the same size as Racing items - Car Number - Type 2, everything I upload always turns out bigger even after resizing the boxes in Inkscape!
The idea is that the « square » from GT Sport is 500mmx500mm.
Trace a background square in Inkscape then draw/scale your decal so the decal is at the right size when the square is 500mm. (i.e. a 250mm number will be half the size of the square.
If you decal is at the center of the square, it will be easier to duplicate in reverse.
Use the « Adjust to selection » so the area fits the square (and not your decal), then delete the square.
When you upload the decal in the game, it will have the right size.
Further to what @Cytoria has said, here's a quick tutorial I wrote for him a while back which helps illustrate the topic:
From what I've found, the 'default' decal size renders roughly as a 500mm square. So anything under 500mm is possible.
Say you want a 400 x 350mm number board. Create the decal to scale then place it centrally in the middle of a 500mm canvas/artboard/page/viewbox (whatever your software calls it)
You'll end up with a square decal with the thing you want in the middle like this:
(imagine the grey box is transparent)
I haven't tested every car but the scaling appears consistent accross most of them I've tried.
If file size becomes an issue with bigger sizes you can scale everything down so long as the ratio is correct (IE 40x35mm on a 50mm canvas), for a while I used to work at 40% scale in px so most of my decals were set against a 2000px background and reduced to 40% but where possible I now use a 5000px background for 1:1 ease and less maths!
(I treat 1px as 1mm as my software works in px by default for strokes etc)
So trying to make my own decals with multiple colors now (been using Inkscape for single color) using Vector Magic online version (which is now $10/mo) and can't seem to get the file size under 15kb. Closest I have come is 22kb and that is making the image small, around 500px wide, using custom colors and using SVGOMG to reduce the file size.
So trying to make my own decals with multiple colors now (been using Inkscape for single color) using Vector Magic online version (which is now $10/mo) and can't seem to get the file size under 15kb. Closest I have come is 22kb and that is making the image small, around 500px wide, using custom colors and using SVGOMG to reduce the file size.
Now you need to delete all the unnecessary nodes. Upload your svg in a zip and I can have a look. Maybe could do a tutorial using your original scan.
Hand tracing is the best way for size but try these in Inkscape.
Combine all the paths of letters and shapes that are the same color, so NEXEN TIRE = one path GENISIS = one path.
Remove background nodes. If the black path has holes for the word GENISIS all of those nodes can be deleted.


")
 🤬 Kudos for the tutorial. 👍👍
