GDII's SW20 MR2

  • Thread starter GDII
  • 777 comments
  • 96,860 views
I have found that wheel cleaners going purple is a trap for most detailers.
I have now changed to a different method of cleaning wheels where I first spray a designated wheel cleaner, let it sit, and then agitate it. I'll then continue cleaning with a wheel soap, before finally spraying an iron contaminant remover, like CarPro IronX.

What I've found is that wheel cleaners usually advertise themselves by "when it's going purple, it's working". But if you spray IronX on a dirty wheel, of course it's going purple, but as a wheel cleaner it is too aggressive. I've found that after cleaning with a wheel cleaner (Auto Finesse's cleaner does not change colour) and a soap, the wheel looks spotless. But if you then lightly spray some IronX, the wheel will turn purple, but only very lightly. Which to me is a better indication of knowing when products like IronX work most effectively, and to me it also proves that after a wash with a wheel cleaner and a wheel shampoo, there still are contaminates present on the wheels.

If you got something to remove iron contaminants laying around, try it and see whether you find the same results. 👍
 
I only use AMMO PLUM when the wheels are really dirty. I know these kinds of products are harsh so only use them when needed. Most of the time I'll just use AMMO BRUTE wheel soap or CarPro RESET to wash them.

Ive got IRONX for the other car I regularly wash but it's only when needed. 21" wheels, massive Brembo brakes, steel rotors and it being used as a daily makes the wheels quite dirty. I plan on putting CarPro DLUX on the wheels to make it easier to clean and protect then a bit better.
 
I haven't done anything to the MR2 for some time. Just driving it as my daily now that the Demio is used by the wife.

Went out with the MR2 Owners Club to grab some more photos. @SVX came along too and took some great shots.

IMGP4456 by subiesvx - real life photography, on Flickr

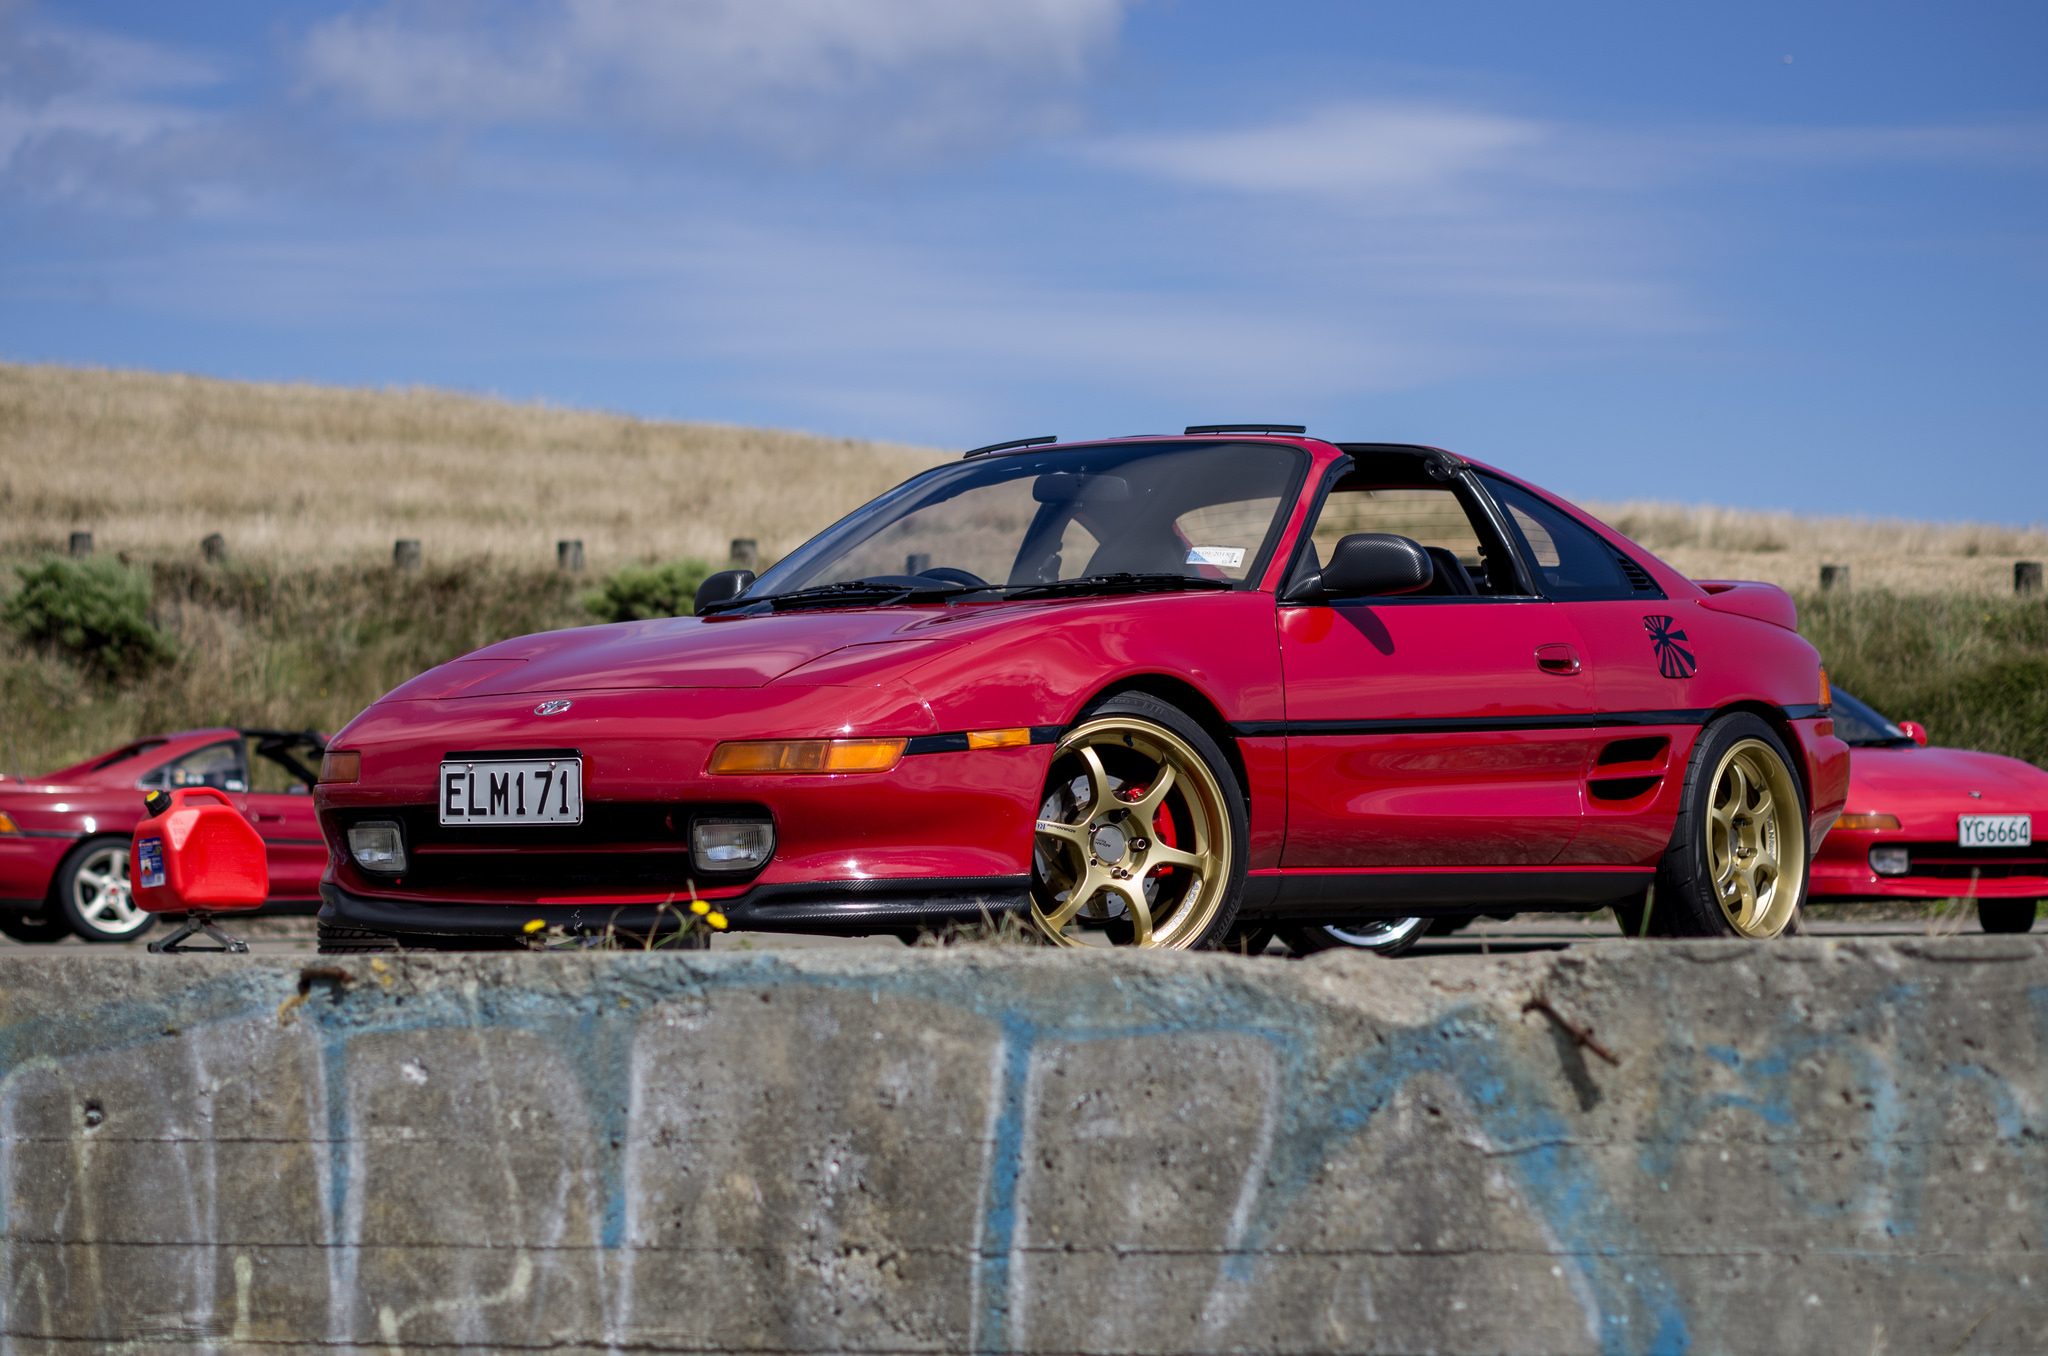
IMGP4487 by subiesvx - real life photography, on Flickr

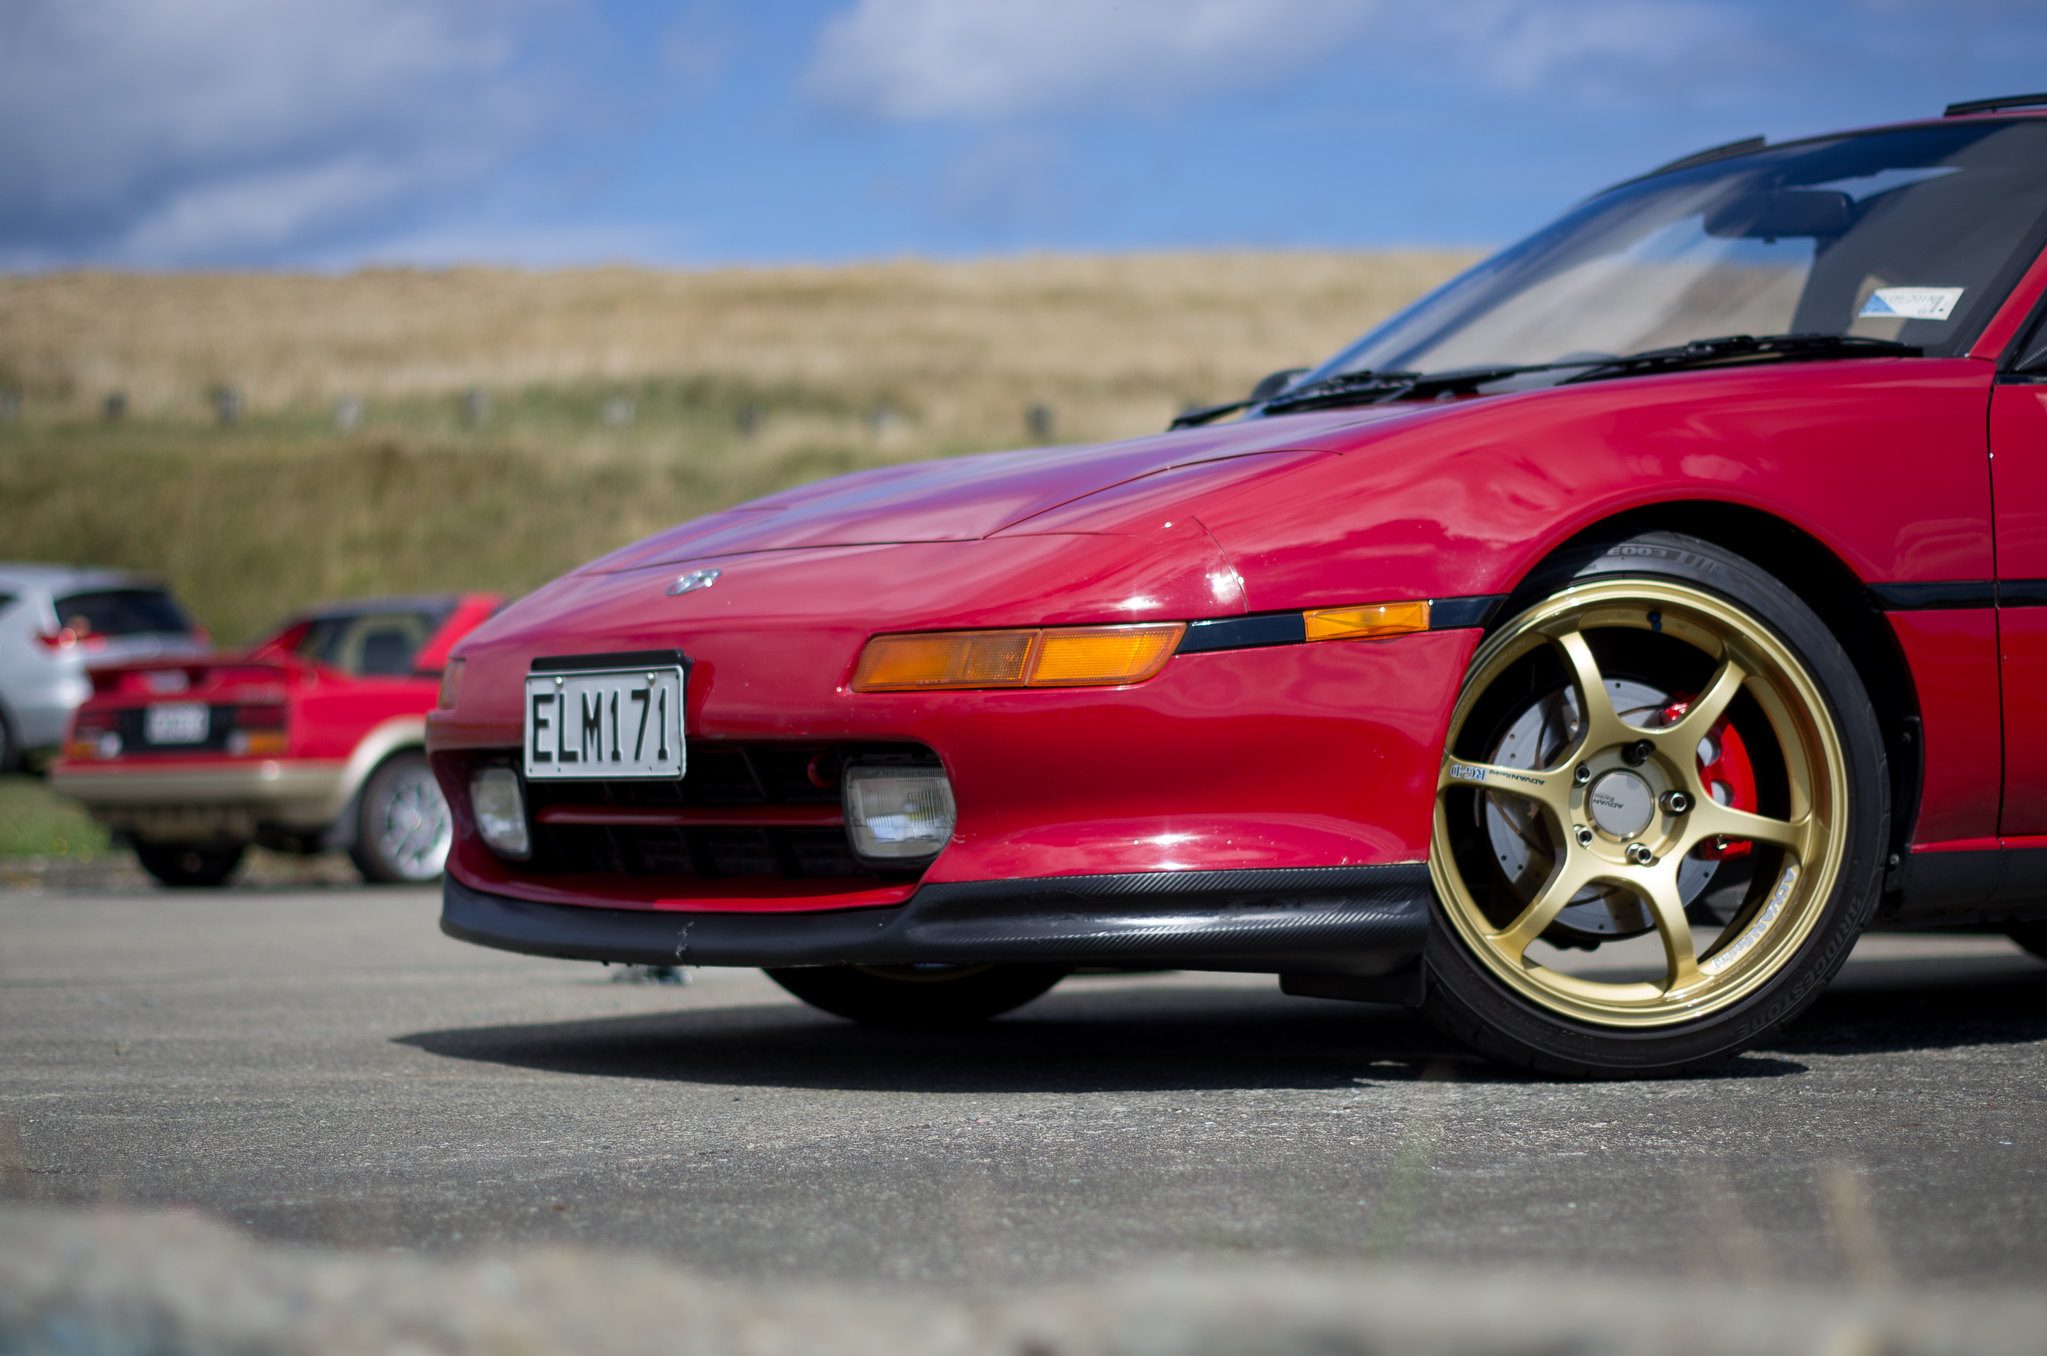
IMGP4491 by subiesvx - real life photography, on Flickr

IMGP4525 by subiesvx - real life photography, on Flickr

The rest are here. https://www.flickr.com/photos/129582248@N05/sets/72157691601572421/with/26344163838/
 
Last edited:
I need to stop looking at SW20s, or I might go out an impulse buy one at this rate!
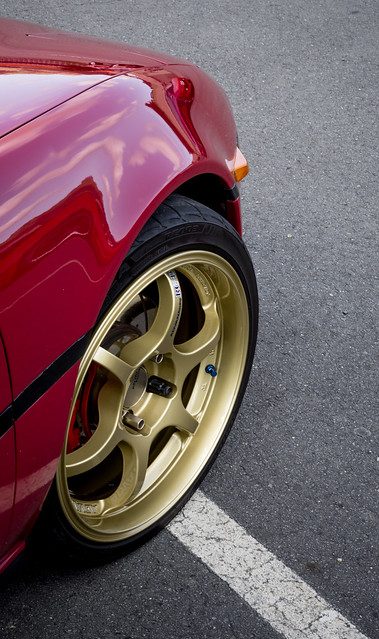
These cars are worth it if you have space and time for a toy. Although this car has served me well as an on and off daily for the last 9.5 years.
 
Wow, 9,5 years, that's a fair bit of time! I've been wondering, are the SW20s rust-prone? Have you done any rust repairs or maybe rust isn't that much of an issue in NZ?
 
Yes bought it when I was 19. It was the first car I ever purchased myself.

It's subject to where you live, if the car is kept clean and if it is garaged or not. The SW20 is far less prone to rust in NZ than the AW11. Most of the AW11s have been scrapped because of rust. I have had no rust issues except around a drain plug hole in the floor due to the leaking T-Top roof. Fixed that a long time ago and no issues ever since.

I know the SW20 in England gets pretty rusty due to the road treatment in winter. We don't treat our roads as it doesn't get cold enough in most areas.
In the USA it depends on the State you live in. I guess that also depends on what part of NZ you live in too. Coastal areas can see rust easily but then places like Central Otago where it's classed as a desert, it's very dry there, low humidity levels compared to where I live now. You see temperatures of over +40ºc and down to -40ºc. Not too much rain but snow does fall.
 
Thanks for info! So basically it doesn't rust if drains were kept clean and water doesn't get stuck in sills? There are no weak spots or design flaws similar to NB Miata's front chassis rails where you can't do anything about water getting stuck?
 
The sills are an issue but if you keep it dry then it's going to be OK. If it's already started then it's going to continue.

It's almost 28 years old now.
 
Last edited:
It's pretty quite around these parts lately. But using the MR2 as a daily isn't too bad. It's just not really the car to drive slow in traffic. It just doesn't like it.

OCD says wash the car when it's barley dirty.


A closer look at the actual car reveals the dirt and water spots. Concrete parking buildings with leaky floors aren't kind to your paint.
icon_lol.gif
icon_lol.gif
icon_lol.gif
What water spots. OCD!!!
icon_rolleyes.gif


Pre rinse with a hose after cleaning the wheels with my new Chemical Guys Wheel woolies. Christmas gift from the family.
https://www.detaildepot.co.nz/product/c ... l-brushes/
And I purchased some Chemical Guys detailing brushes, one for wheels and dirty sections of the car and one for the interior.
https://www.detaildepot.co.nz/product/c ... ail-brush/
Full plastic handle and bristle mount with horse hair bristles so you don't damage your paint.


The Wheel Woolies are great for cleaning the barrels and brakes. Saves getting your hands inside the wheels. Although RGDs make it super simple to do so. I don't miss cleaning my BBS RG097 wheels. These create plenty of soap suds so really good for protecting from brake dust the best you can while cleaning them.
 
Nothing new to add to the MR2 but still using it as a daily. It's gets dirty far to quickly using it like this but you can't complain being able to drive a car like this everyday. With a new house build pending all my spare cash is going towards that so not able to chuck anything at the MR2 for quite some time.

Just wash it, drive it and repeat.


I've also been working on fixing up and restoring a friends Honda Logo with @SVX as it failed it's WOF on a few things. I decided to take the opportunity to learn how to use a DA polisher on the paint. It was in pretty bad shape when I got it but now it's looking a lot better. The Logo got a full detail inside and out. Engine bay too.

It needed the rear brakes adjusted, head lights polished, new tyres and a CV boot. That was a mission, none of the aftermarket boots for this car from Supercheap, Repco, BNT and even Honda themselves would fit so I had to get a used one from PAP. I managed to find a few issues and fix them up at the same time. New air filter, thermostat, blower motor resistor, missing clips and plugs for interior trim panels, dint in the door, broken drivers mirror mount and leaking rear light seals and cracks in the body sealer in the roof around the top of the boot. These leaks were filling up the spare wheel well in the boot which really annoyed me. I managed to fix all of this for well under $100 excluding tyres. Tyres weren't much anyway. So I saved my friend a lot of money and now it's in good condition to sell and worth a whole lot more I hope.


I'm also working on a red JDM MKIV Golf with @SVX too. OMG how can people own European cars!! They are so hard to work on and have really poor construction. Everything on the inside is failing apart. It's had a respray at some point but they forgot to clearcoat the bonnet, left side front guard and front bumper so they had turned almost white. Looks much better now with a going over with @SVX DA polisher and some CarPro Clearcut.

e0fb8a5e-07ad-4fed-b276-509f09352cd2.jpg


1b38226e-4ea9-468f-b5b4-2e38eb089b82.jpg


47d50318-18cb-441d-ad0c-8bac1b493727.jpg


e05b6e60-6276-4cfe-b4a0-0eb2c2933ba8.png


It also had the common failure of the solder joints in the door lock circuit board so the drivers door wouldn't unlock properly all the time. The other issue was the key barrel had broken metal rings inside it making the part of the barrel that contacted the micro switches inside the electronic unit not work properly. The other issue is the mechanical part wouldn't unlock the door so you had to open the door from inside the passenger side.

33053bc3-5a40-4f77-8c85-4d449cf1b85c.jpg


SVX sourced a new glove box. The handle had completely disappeared so it didn't open easily. It was also held in by wood screws and nuts as washers and "Knead it". Something like JB weld but not. So that got ripped out and replaced with OEM screws I found in the car.

This car also got the full detail treatment inside and out. The inside plastic trim has this odd rubber coating that is pealing off, it's horrible stuff. Who ever thought this was a good idea should be fired.
 
A few repairs to do. Prototype parts sometimes work and sometimes don't. The custom links I designed and had made wore out the unprotected ball joints and started knocking. They still work but they are just noisy.
https://www.gtplanet.net/forum/threads/gdiis-sw20-mr2.209447/page-13#post-11405452

So yesterday I picked up a pair of 'universal' swaybars links from BNT for a good price with the MR2OCNZ discount. Not much of a price drop but better than nothing. These are around 200mm long with a slight extension if required. Most of this is really just for allowing the ball joints to be located/directed where needed. In the case of the SW20 both ball joints face the same way.

If people need to order some the part number is LR200 and/or B1707. No branding on them.

Removing the custom links. The bar itself is fine, it's just the spherical bearings that didn't last.


To remove the link without having to loosen the knuckle to strut connection just lift up the knuckle assembly with a jack to push the top of the link into the indentation in the body of the car. This allows it to move backwards.


Old link out. They look nice but sadly not suited to weathering.


To install the top ball joint place it behind the strut tab with the suspension semi compressed.


Fits in the gap.


Push it into the hole.


Then to do it up for these particular links you need a 17mm spanner and 5mm allen key. The stock links use a 14mm nut and are not nylock.


With my Whiteline adjustable swaybar it seems to have a slight twist to be unequal heights at each end. The custom links allowed for this so I could tune out the preload and set it to Zero. Unfortunately with the stock or these links you can't do this so I have a bit of preload set on the bar which is not ideal but as it's now just a road car it won't really be an issue you'd notice.
You can see here the custom ones are set at different lengths.


As I have been using this as a daily it's starting to have things wear out or just do the normal things of use.

The right rear suspension was knocking and I thought it was the swaybar links. There was also a creaking from the right rear corner just behind my head.
The links were worn out and changing them reduced the knocking but not eliminated it. The creaking also remained. So over the weekend I decided I would look for the problem and at the same time change the rear top hats from GEN2 to GEN3-5. These have longer studs for mounting the extra stiffening plates the GEN3-5 had. I'm using a TRD rear strut brace with a very thick plate so the GEN1 or GEN2 studs become maxed out. I want to install my gas strut engine lid prop AND the TRD brace so wanted the newer top hat.

Please excuse the terrible out of focus photos this time round. Difficult taking photos at odd angles by yourself.

To remove your rear struts you need to take of the side inspection panels. There are 2 phillips #2 screws under the engine lid and a 10mm earthing strap on each panel. Apparently someone found out that if the panels are not earthed the paint changes colour at a different rate. It probably also stops things from holding electricity.


Then before you jack up the car you should always crack the main top nut holding the damper rod to the top hat otherwise it's very very hard to remove with hand tools with no weight holding everything in place and preventing the damper rod from spinning.


Then remove the 3 14mm nuts off the top hat studs.


Once that is done undo the swaybar link off the strut. Check back a few posts on how to.

Then undo the 2 main lower strut to knuckle bolts. 19mm.

Remove the brake hose from the strut. If you've never removed the strut you may need to cut the steel locating tab to get it out without removing the brake hose from the caliper.


Once those are all off you can pull the knuckle out a bit and push down to get the damper and spring assembly out.
To swap the top hat I needed to remove the main top nut so this can be done with a 19mm socket and ratchet. Because I have TRD springs they don't have much force on the top hat so you can undo this with no fear that the spring it going to fire the top hat across the garage. No need for a spring compressor. The same can be done with stock springs on the SW20 as it has very little force. You can lock on a spring compressor or even cable ties just to hold them in place. I can do a spring swap by myself without the compressors although having another person for stock springs is helpful pushing them down while you do up the main nut.

I disassembled and cleaned the spring and struts.
But before I put them back together I sanded back the rust on the spacer and painted it Brass Aluminium tint over etch primer just to protect them as this part fills with water and goes all nasty.


New TOYMAD designed and made stainless steel gas strut bracket vs my rather crude aluminium and painted version. The new one may not work 100% due to my gas strut being a bit short. No matter I can sort it later. Test fit for now but the longer studs easily allow for the TRD strut brace and gas strut bracket.


The creaking noise I found was a dry bush. So I removed the 17mm bolt from the front trailing arm and gave it a bit of a clean. Then applied some new grease and it's now quiet again. The knock has also gone. I'm not 100% what I did to fix it as all the bolts were tight. Possibly a top hat nut but it was super tight so can't have been. Maybe the top hat. I'll never know but the car feels better to drive, maybe it's just due to the knock not being there hitting bumps is no longer a horrible experience.


Excuse the soap, just cleaning up some dirt.


Ready for it's WOF in a few weeks and also in 2 weeks I will have owned it for 10 years and driven it ~100,000km. Heres to another 10 years and 100,000km more!!
icon_razz.gif
 
The MR2 has been sitting in the garage for the last 3 weeks as I have been borrowing @SVX ZZE112R as a daily for work. Fuel consumption on the MR2 is about twice the Corolla.
icon_rolleyes.gif


TLDR. Damge to car by other bad drivers. Fixed by insurance but paint shop damaged other paint in the process. This leads to me fixing it on my own for a much better result than what they might have done. Painting they did was great but the damage they caused to other parts really wasn't necessary. Skip to photos.
icon_arrow.gif


Some disappointing things have happened to the MR2 over the last while. I've been hit twice in my parking building in 2 weeks and had some minor damage done to the right rear, right rear bumper and right rear wheel. Luckily the damage on the right rear was able to be buffed out so no need to claim insurance on that one. I wasn't able to find out who did it so I'd have to pay excess to get it fixed. Fixing it only took 10mins in my own garage with the polishing machine. I was given a Rockwell Shop Series DA polisher for my birthday. More on that later. The other bit of damage scraped the paint off the rear bumper just behind the rear wheel and also nicked some paint on the wheel. Luckily I was able to find who did this and left a note on their car. The damage was obvious as the colour and everything matched. The car was parked right beside mine....
icon_rolleyes.gif
They were good enough to claim on their insurance and I was able to get a repair done on my bumper. A freshly painted bumper skin that removed the crappy pealing pink clear coat previously applied by someone else and repair other damage to the bumper.

This is where things got a bit annoying with the paint shop that did the work.

I was concerned that if they removed the bumper off the car they would break rusty bolts and other parts like the black pods on the corners. So yes they managed to do a bit of damage to those and neglected to do up the bolts properly leaving bits loose. I made a complaint and took it back to show them what the issue was. What really takes the cake though is the paint damage they did to my right rear quarter panel in the process of using their paint matching machine. They used some form of strong solvent to remove the protective coatings I have on the paint but then as they wiped it they scratched the whole panel. Like using sandpaper it was that bad. So I pointed this out to them and they told me I used a filler product on the paint to 'hide' the scratches and it wasn't them. I called BS. I had literally just polished that part of the car 4 days before because of the other damage. They offered to polish it out but after the bad workmanship on looking after the car that was in their care I didn't want to take it back. So I left it in my garage for a few weeks as I have been far too busy with other things until now. The paint finish was very good and colour matching was very close. So good on them for that but rage about the rest.

So today I decided to repair the scratches in the panel using my new DA polisher, a Chemical Guys Hex Logic White Polishing Pad and CarPro FIXER which is a light polish that isn't too aggressive. The reason is I didn't want to remove too much paint as there isn't much left from my lack of previous knowledge about detailing and paint correction. Now I know more so can fix paint and care for it without going too overboard. Once I had done that all the fine scratching I had installed on the rest of the car look bad. This is from washing and drying the car. With MR2 paint it's super soft so very easy to scratch even using correct washing methods. So I continued to give each panel a light polish. They didn't need much but it's a big difference to the final look of the car.

Photos don't do it justice but I think this is the best its ever looked. Probably better than when it left the factory.


Last edited:
What do you think of the Rockwell DA polisher? I've been looking at getting one.
I have not used any other ones but for the price they work well enough for a beginner. They have an 8mm throw and a 6" backing plate. I feel that's too big so I have swapped it out for a 5" plate for 5.5" pads. It's kinda loud but you are able to open it up and grease the gearbox up more to reduce that from what I have read. There is a Mechpro blue from Repco that had an introductory price of $100 but is now $260. This one has a 21mm throw which I think is too big if it's the only DA you own. It does have controls comparable to the TORQ FX10 (which is another really good one but the price is higher) rather than a speed dial on the back and a switch on top but for $100 the Rockwell is good enough for a beginner. I have polished 6 cars, all with different paints so I'm still learning how each car is affected by compound and pads. 3 of these cars have sold for a good amount of money more than what they should have. Doing jobs for neighbours and friends to help out while learning.

I'll do a little write up and some photos of the DA, pads and compounds I have been using.
 
Sorry to hear about the car being in the wars mate, and even more so that the smash repairer created even more damage in repairing the original damage :rolleyes:

Very glad you can correct everything they mucked up, and got pleasure out of doing it as well!

Car looks showroom mate ;)
 
Sorry to hear about the car being in the wars mate, and even more so that the smash repairer created even more damage in repairing the original damage :rolleyes:

Very glad you can correct everything they mucked up, and got pleasure out of doing it as well!

Car looks showroom mate ;)
Yeah its not ideal getting damaged or getting the car damaged more at the place that is meant to be fixing it.

In the end I did get a free quality bumper skin respray with no over spray as they removed it and the results of my polishing are the best the car has ever looked since I owned it.
 
This is the DA polisher I have.
Rockwell Shop Series DA from Supercheap Auto. 650W motor. It has an 8mm throw and comes with a 6" backing plate and a 7" cutting foam pad. This pad is way too big for for the backing plate and the machine power. So I purchased a 5" backing plate with a 5/16 24 thread to use a 5.5" pad.

For the pads I have been using Chemical Guys Hex Logic range. They have 8 pads in the range from heavy cutting to wax and glaze application pads.
I have been using the Orange Medium-Heavy Cutting pad for jobs that need a heavier cut such as a black Subaru Outback or a heavily oxidized white SW20 that needed a lot of work done to it. For polishing out the haze I use the White Medium-Light Polishing pad and for wax application I use the Black Finishing pad.

file.php


For products I have been using a few different compounds, polishes and waxes with the pads.

I use either Meguairs Ultimate Compound for cutting and major defect removal or the other cheaper option is to use CarPro ClearCut which is a gritty compound that fines out for a good finish and only need to use a polish on the paint to clear out the minor haze left by the machine. For finishing I use CarPro Fixer which is a fine nano polish which will give a very nice mirror finish. This is a gentle product for refining the finish rather than trying to remove too much paint of which my car hasn't got much left. Over polishing does that. I use Meguairs Carnauba wax or CarPro Hydro2 which is a spray on coating not used with pads and a machine. Spray on, water blast off for great protection and water beading.


As you can see here the large backing plate and a small pad don't work too well. You can see the foam all over the backing plate from the orange pad as it destroyed itself after a run in with an MR2 boot panel edge. It was getting old anyway. The red pad was white, red paint with no clear coat will lift a lot off even with a fine polish. SW20 paint is very soft so easy to remove a lot fast. The black pad is just for waxes and you use the machine on a slow speed as you are not trying to cut, just apply. Makes it way faster and easier on your hands.


The DA has a switch that locks so you don't need to hold it while doing the work. It's not in the best position as your hands are never in that location when using the machine. You always turn the machine on or off with the pad on the paint. That way you don't sling compound everywhere.


I usually run the machine on 5 for compounding and 4 for waxes. Any lower and the machine doesn't want to spin the pad. Lower spec unit so not the best but it works once you know how it wants to operate. It can go up to 6.


This is the 5" backing plate. Designed for sanding machines but fits straight up to this polisher.


Larger 6" backing plate that could be used with the Hex-Logic 6.5" pads if I ever need to do a bigger vehicle with large flat panels.


As you can see here the orange pad has exploded, the white pad has turned red, and the black pad has picked up a little bit of red too. I didn't wash it for these photos from yesterdays work.


The little bit of masking tape on this backing plate is there so I know if the pad is spinning or not. If the pad isn't spinning it's not doing any work. The smaller yellow one has some writing on it so you can see it spin.


For a DIY beginner this DA works. Sure it may not be the best but it does work well enough. Once I get more into it I may end up purchasing something like the TORQ FX10. Repco do have a Mechpro Blue DA with similar features to the FX10 but it has a 21mm throw which is big if it's your only machine. Good for bigger panels but not very good for door shuts and more curved exterior panels.
 
Some bad luck there, wow. Glad it all turned out well, the MR2 looks mint once again. Thanks for posting your detailing experience. Somewhere along the way I'll buy a DA as well, not sure what to go for yet.
 
I've been doing a few cars which I mentioned before with help from @SVX too.

This 2004 Subaru Outback (Australian new imported to NZ) was one of the biggest transformations we've done so far. And being black it's hard to get right. I didn't get it perfect as I didn't spend heaps of time on it completely refining the paint but was a great learning experience.

Before

IMG_0149.jpeg

IMG_0150.jpeg

IMG_0145.jpeg


After

DSCF7444 copy.png

DSCF7449 copy.png

IMG_0156.jpeg


You can actually see the blue and green speckles in the black paint from 4m away compared to not even knowing it was there at all.

This was a 3 day detail. Full interior clean and engine bay detail and doing the best we could with the exterior paint. This was 2-3 passes using the orange pad and CarPro ClearCut. No polishing pad or polish used here. There was still minor machine swirls in the paint that only show up in the sun but it's sold now so I can't finish is completely now that I have the extra tools and knowledge on how to make the paint even better.
 
Last edited:
Right. Brakes update.

If you recall when I did my 36T30 and 22V brake upgrade I went with the 1" master from a Previa. This was a good option for when I took it to the track and did 20min sessions. However on the street and cold braking was rather unpredictable and the pedal was very heavy.
http://mr2.org.nz/phpbb3/viewtopic.php?f=27&t=9444&p=133372&hilit=znoelli#p133372

At the time of doing the brake swap I had installed the 15/16" master from another Previa but didn't bench bleed it properly so the brakes weren't working. Left the car in the garage for the week then headed to PAP to get some brake lines to allow a proper bench bleed. While I was there I found a 1" so took that and installed it. More than a year later I finally got a chance, with help from a friend, to change the master to the 15/16" that the OEM GEN2-5 car uses.

Results, an actual braking system that bites when cold like it should. A longer slightly softer pedal with proper pressure modulation available. The brakes feel so much better and I now have much more confidence to drive the car and knowing it will stop the same every time I use the brakes. No more having to pre heat the brakes 3-4 times on the way to work to ensure I had enough heat to stop if needed. The things you learn while doing things to cars. Even with semi track pads the brakes work like normal road pads.

So if you are looking at a good pad the Znoelli SP500 is a good all round cost effective pad contrary to what I have said before. I knew it was my setup that affected it. Just need to use the right brake setup. In this case OEM works. Trying to go outside of that system may not always work for everyday use.

So a WIN WIN here today. A better car now. Next I need to dial back the alignment specs to reduce the caster angle as it makes the steering silly heavy. That was done for track stuff too. It currently has 4.5º caster. Maybe I go to the GEN2-5 front arm setup which doesn't have caster adjustment but does change the height of the connection to the chassis.
 
Great work man! MR2 is looking better than ever. I'm looking to get a DA polisher as well this winter. I'm probably going with a one step polish for now until I get the hang of the different sort of pads, and how different paint hardness reacts to all the pads. The GT86 only needs a single stage for now, so fits in nicely!
 
Great work man! MR2 is looking better than ever. I'm looking to get a DA polisher as well this winter. I'm probably going with a one step polish for now until I get the hang of the different sort of pads, and how different paint hardness reacts to all the pads. The GT86 only needs a single stage for now, so fits in nicely!
Thanks. I'm pretty happy with it right now.

A DA is great. Makes quick work of defects however trying to finish the paint down to a high shine with no DA marks left in it can be difficult. I'm mostly using a compound and then a polish due to the condition of cars I'm working with. They need a decent amount of paint removed to get the finish to look good. My level of 'good' tends to be a lot higher than most people. Just did an E36 BMW in black and it still has plenty of scratching in the roof and bonnet but the owner was extremely happy with the results. And black being extremely difficult to finish it still has DA marring in some panels due to no completely finishing down the paint with a polish after using CarPro ClearCut. I used CarPro Fixer on most of the car just to remove the fine scratching.

This is most likely the process you'll want to take. Just a fine polish rather than a cutting compound. Also something I learnt from Larry Kosllia at AMMO NYC is that using a soft pad to polish some paint doesn't always work. I've put this into practice too trying a soft pad for polishing and a harder cutting pad and the cutting pad seemed to work a bit better on some paints. My soft paint on the MR2 prefers the softer polishing pad. My cutting pads are the Orange and Green and my polishing pad is the White with the black pad for wax only.

Learning how paints react by actually working on it is really the only way to know what to do. You can't apply the same pad, product and method to every car. I've done 8 cars with at least 6 unique paint types so I've seen what each paint does.

Yesterday I worked on a white AE111 Toyota Carib. I didn't really get a chance to do any paint correction as the car was so dirty it was almost green. All the rubber trim needed scrubbing with a tooth brush. This has the same 040 white paint as an MR2 I did and my mum has this car but the Corolla so I know the paint type rather well. It oxidizes really badly as its a single stage paint but easy to bring back to a shine. Just need to clean your pad a lot due to the amount of paint that comes off.
 
Back