Right, Its been nearly two months since I received my GTrr from Mr Timo and its about time I shared some thoughts on the rig after some extreme use and to offer a kind of review of sorts...
Firstly, ordering the rig was very easy, simply a matter of paypalling Timo and supplying an address, the stuff arrived just a few days later, excellently packed and all the needed parts were safe and secure and in perfect condition. 👍
Assembly
Assembly if I'm honest was not easy as many of the parts look alike, but if you follow the drawings in Timo's PDF's you can not go wrong... suffice to say I did not follow them and bugged Timo to help me figure it out, so any difficulty in assembly was all my own fault. Also as you build the rig you'll see that it is easier to build it in sections then assemble the sections afterwards and as you assemble more pieces it becomes easier to identify what goes where. Its just a matter of being logical and methodical unlike me.

You'll see that at first it is quite daunting, but as the rig comes together the sheer simplicity and elegance of the design becomes very clear. 👍
Fitting the Seat
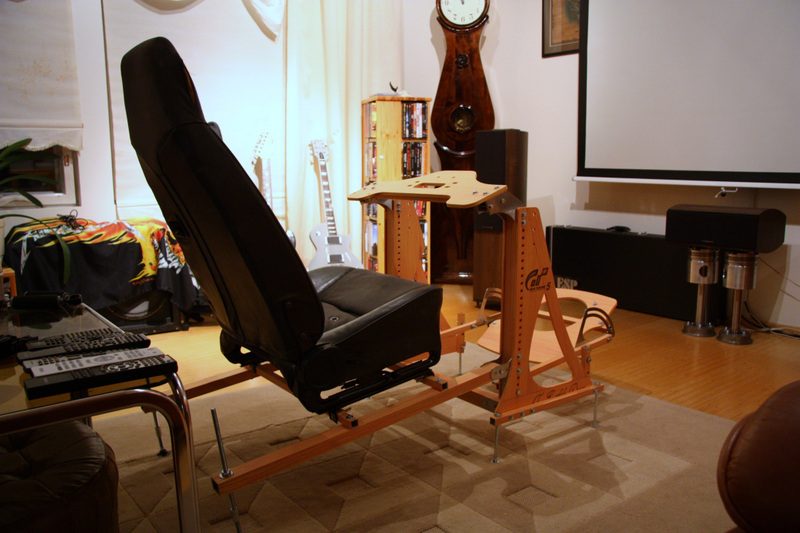
I chose a cloth seat from an MX5 Mk1 for my seat, mainly because it has housing for two speakers in the headrest for the surround sound, also they're very comfortable and reasonably light as well as pretty cheap and readily available. Fixing the seat involved drilling holes in the main box section of the rig to allow the cross-members to be positioned correctly for the seat. This was most easily done by mounting the seat to the cross-members and then placing it on the rig and drilling through while in situ. It was very easy and any monkey with a drill could manage this... Hell, I did!
Fitting the wheel
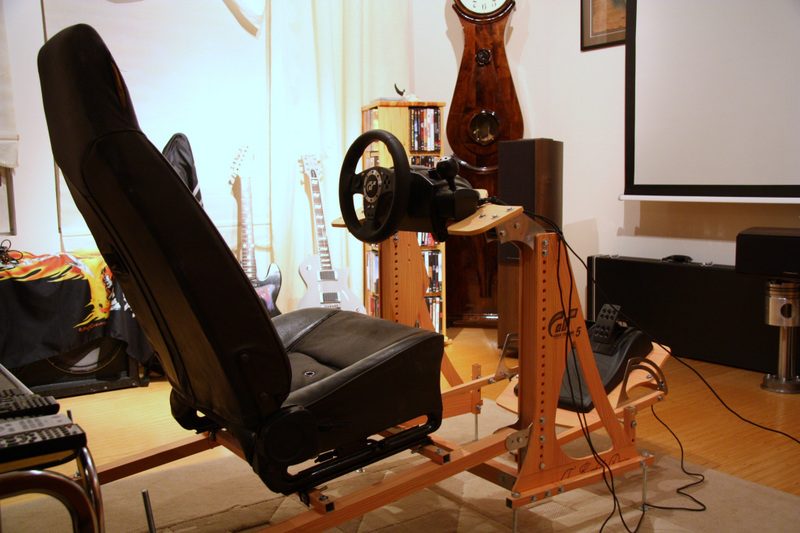
This was extremely easy as the pre-drilled and cut ply wood was a perfect match, and took all of a couple of minutes to complete. There isn't much more to tell, its just a piece of cake.
Adjusting to fit
I'm a pretty tall fella at 6'3" and this was a worry for me, so when fitting my seat I attached it about an inch (25mm) further back than the pre-drilled holes and together with seat forward/backward adjuster rails this gave plenty of room.
The pedal angle has a lot of adjustment as you can see, but the lowest setting was fine for me as I like pedals somewhat flat to the floor they're at maybe 10-15 degrees now and that is just fine. The precision cut bezel is extremely well made and allows for some extremely fine adjustment for those that are very particular. In my opinion this is perhaps the most genius bit of the design.
Wheel Adjustment is very good, with a very large choice of positions available. I prefer mine at maybe 5 degrees off vertical which is approximately in the middle of the available range. One thing I will mention is that you do need to really tighten the bolts up extremely tight to make sure the wheel doesn't shift angle while driving. This happened to me at first, but after tightening them down really well it hasn't moved since. I have the wheel set at the second from top height just to allow my long legs to get under the wheel, but for
normal sized people there is ample room and I would imagine most would have the wheel at a lower height.
How the rig feels
Well, this the real heart of the matter no? If a rig doesn't feel good you won't use it will you?
Due to the vast range of adjustability you are damn near guarenteed to be able to find a position that works for you whether you're a little fella or a jolly green giant, no shadow of a doubt in my mind about that! I can tell you that for the first month since GT5 was released I spent almost every waking moment in the rig and never felt fatigue or discomfort. Previously I often felt pain in my wrists while driving for extended periods but this rig has been the magic bullet that cured that annoyance. I can just drive and drive and never feel like I have to hang on to the wheel for dear life as I would before. It makes the whole experience vastly more relaxing and enjoyable. But really and perhaps crucially, the rig has helped me progress as a driver, I don't need to think for even a nanosecond about
has my seat shifted or worry that my arms are getting tired, all my focus and attention can go into the driving and can say that my consistency has leaped to a new level since I started using the rig... I just enjoy driving so much more now! 👍
Stability
I've got to say when I first assembled the rig it looked like it was going to flex like crazy due to the number of joints and bolts, I really had doubts. Thing is that Timo is no fool and the pieces are so precisely manufactured that once all the bolts are correctly tightened there is virtually no perceptible flex, its really quite astonishing, the rig doesn't wobble as many off the shelf ones do and is incredibly sturdy, I can see this lasting me for years and years.
One thing that did worry me was that the ply the wheel attaches to is seemingly quite thin and before the rig was even assembled I was considering ways to stiffen it. Again, this was all part of Timo's grand plan... The thinner ply does indeed flex and with a G25 attached there is maybe 5mm of vertical play if you
really tug on the wheel. I was hoping there would be zero play, but what this play gives you is a massive benefit which I shall explain:- When you get a big kick from the force feedback the flex takes the edge off it and what you get is an effect where its a lot easier to maintain control, it's like passive suspension and may also be part of the reason my wrist pain has ceased. Absolute genius...
Gonna wrap this up now as its getting long, but heres a final few thoughts...
Aesthetically the rig is beautiful as you can all see from the pictures throughout the thread, theres not much more to say other than its even sexier in real life. The materials and workmanship are of the highest caliber, and the aluminium box-section is really easy to work with for any custom seat mounting that is needed. All you'll need to customise and build the rig is a couple of adjustable spanners and a drill for your seating requirements.
I can personally guarantee that anyone that buys one of Timo's rigs will have made a great investment in their gaming, it is so abundantly clear how much care, thought, effort and love have gone into the design and I'm very please to be able to confirm that the experience of using the rig fully validates that.
Thanks Timo


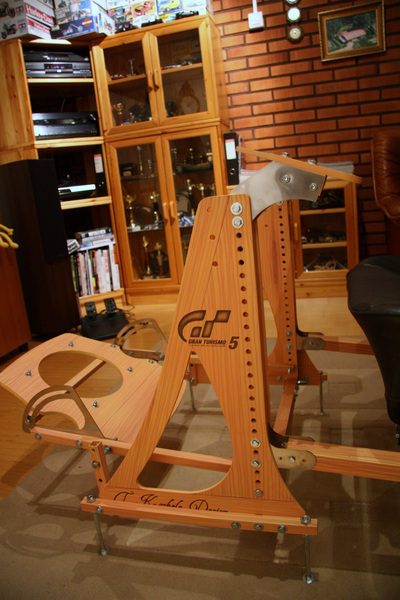
") Little mistake happened as the text on the lower side was left behind the 20x20 bar, but I think it looks quite nice (text says T.Koskela design - was his own idea and will to put it there btw 👍). I was going to ask from him if we could join forces and I could deliver hand painted custom paints
Little mistake happened as the text on the lower side was left behind the 20x20 bar, but I think it looks quite nice (text says T.Koskela design - was his own idea and will to put it there btw 👍). I was going to ask from him if we could join forces and I could deliver hand painted custom paints ") We'll see about that later..
We'll see about that later..


 Too hectic day @ work.. I put a reminder now, so will remember tomorrow.