Hot Wheels and Matchbox Customizing Thread

  • Thread starter CodeRedR51
  • 9,226 comments
  • 1,186,429 views
So I have been watching Matchbox Garage on Youtube lately and I have noticed he uses caustic soda combined with boiling water to remove the paint. Has anyone tried this by the way? Is it more effective than paint stripper and how safe (or unsafe) is it?
Caustic soda, aka sodium hydroxide, aka lye.
Use gloves, don't get it on your skin, and keep a bottle of vinegar handy in case you splash some.
 
Caustic soda, aka sodium hydroxide, aka lye.
Well that clears the naming confusion I had earlier.
Use gloves, don't get it on your skin
Rubber gloves?
and keep a bottle of vinegar handy in case you splash some.
In the case I get it on my hands? What exactly does the vinegar do in this case?

The reason I ask about this stuff is because if I ever mess up on painting a vehicle and have to strip it and start over, the paint I applied is pretty difficult to remove with paint stripper. Paint stripper is good for removing the standard paint used on most diecast cars, but it struggles to remove spray paint and I am wondering if the caustic soda will be any better.
 
Last edited:
Well that clears the naming confusion I had earlier.
Rubber gloves?
In the case I get it on my hands? What exactly does the vinegar do in this case?

The reason I ask about this stuff is because if I ever mess up on painting a vehicle and have to strip it and start over, the paint I applied is pretty difficult to remove with paint stripper. Paint stripper is good for removing the standard paint used on most diecast cars, but it struggles to remove spray paint and I am wondering the caustic soda will be any better.
So lye is a base, like baking soda but much stronger. So, using vinegar, an acid, will neutralize the lye. It's not nearly as bad as fight club makes it seem. But using rubber or nitrile gloves certainly are a good idea. Mixing it up with some hot water will make it work better, both on the skin and on the paint. However, as long as you dont let it sit for a long amount of time, you'll be fine, just clean up any spills or any that splash on you with a sense of purpose and you'll be fine.
As for how well it will strip paint. I dont know as I dont know what paint you have, nor would I really know even if I did have the paint info. Best to find a small bottle of lye and give it a try
 
So I have been watching Matchbox Garage on Youtube lately and I have noticed he uses caustic soda combined with boiling water to remove the paint. Has anyone tried this by the way? Is it more effective than paint stripper and how safe (or unsafe) is it?
It is rather unsafe and not very much more effective - SidewaysKing75 on youtube did a video on all different stripping methods- I'd go take a look at that, it compares them first hand.
 
In the case I get it on my hands? What exactly does the vinegar do in this case?
The thinking is that the acetic acid neutralizes the intensely basic lye. It does. However, lye reacts with water to give off heat, and even a higher strength cleaning vinegar at 6% acidity is still 94% water.

I've always been advised to have ready access to flowing water rather than have a bottle of water with some acid in it (vinegar) handy. The water and lye still react, but the water flow flushes the reactive lye away and having so much water available so readily dissipates the heat quicker than can be accomplished by dumping that bottle.

When I deal with lye for anything, my foremost concern is eye protection. I wear goggles that surround the eyes rather than glasses that protect against projectiles. The second most important thing is working in a well ventilated area; I do it outside. I wear sturdy gloves and fabric sleeves (just sleeves) that protect against random splatter but that I can whip right off in a dumping scenario. And I have a hose by me with a sprayer set to "soak" and under pressure, just in case.

Use common sense and I can't imagine it's any more dangerous than chemical strippers.
 
So, using vinegar, an acid, will neutralize the lye.
I gotcha. Fortunately I have some.
Mixing it up with some hot water will make it work better, both on the skin and on the paint.
That was what I planned on doing since that was how Matchbox Garage did it.
However, as long as you dont let it sit for a long amount of time, you'll be fine, just clean up any spills or any that splash on you with a sense of purpose and you'll be fine.
Yea I read it was more corrosive than paint stripper and I have seen another video comparing the two and it seems to take some of the finish on the casting off. It can be repolished fairly easily though.
As for how well it will strip paint. I dont know as I dont know what paint you have, nor would I really know even if I did have the paint info.
I mainly use Testor's model car paints or the Krylon paints for my customs. All of which are pretty darn stubborn about coming off when using paint stripper and I am hoping this stuff will power through it so I don't have to waste so much time wirebrushing it off with my Dremel. (and getting bits everywhere that hurt when I step on them)
It is rather unsafe and not very much more effective - SidewaysKing75 on youtube did a video on all different stripping methods- I'd go take a look at that, it compares them first hand.
It certainly struck me as "unsafe" after reading about it. I looked at that video after you mentioned it and does give a pretty good background on each. However, I am a little skeptical as to why his was taking so much longer than it was for Matchbox Garage and whether he even put enough in there. Different caustic sodas maybe? Plus he's just working with regular Hot Wheels paint, which generally comes off very easily.

For me, the real test for its effectiveness is how it deals with a casting that has already been resprayed, granted enough caustic soda is used.
When I deal with lye for anything, my foremost concern is eye protection. I wear goggles that surround the eyes rather than glasses that protect against projectiles.
This is something that I have considered, not just for using caustic soda, but just about anything I do when customizing Hot Wheels. I guess I better get some now.
The second most important thing is working in a well ventilated area; I do it outside. I wear sturdy gloves and fabric sleeves (just sleeves) that protect against random splatter but that I can whip right off in a dumping scenario. And I have a hose by me with a sprayer set to "soak" and under pressure, just in case.
Fortunately I have a door leading outside not too far from where I usually work and it has a water hose next to it. I guess that's where I will do this.

If I do use this, the plan is to take a tall glass jar, pour some hot water in there and then some caustic soda (not sure how much exactly) and leave it for about 10 minutes. Of course, I am going to be wearing some rubber gloves and goggles when I do this. However, I may not use caustic soda to remove paint unless I have a failed respray, regular HW paint can taken off easily with just paint stripper.
 
If I do use this, the plan is to take a tall glass jar, pour some hot water in there and then some caustic soda (not sure how much exactly) and leave it for about 10 minutes.
Any particular reason for starting with hot water? Lye easily dissolves into water at room temperature and the resultant solution heats up considerably.
 
Any particular reason for starting with hot water?
Because that's what Matchbox Garage does on Youtube and according to Rallywagon, it works even better.

Another question I have is how well does it work with plastic? Such as the plastic base to a Hot Wheels casting or the wheels. I have seen MBG and another Youtuber use it at least once on plastic, but not much info was given about it.
 
Last edited:
Because that's what Matchbox Garage does on Youtube and according to Rallywagon, it works even better.

Another question I have is how well does it work with plastic? Such as the plastic base to a Hot Wheels casting or the wheels. I have seen MBG and another Youtube use it at least once on plastic, but not much info was given about it.
I don't know that it's not more effective, but I'd be concerned with the temperature increase. Also consider that it's the corrosive chemical action that's doing the work, not the thermal action.

The type of plastic makes a difference and I don't have the slightest idea what Hot Wheels uses. Some plastic containers have heat and chemical resistant properties that actually make them suitable for working with a lye solution.
 
20200308_194956.jpg


My custom hw "TRACK RIPPER" with matchbox wheels.
 
I don't know that it's not more effective, but I'd be concerned with the temperature increase. Also consider that it's the corrosive chemical action that's doing the work, not the thermal action.
I guess I'll have to test it an find out.
The type of plastic makes a difference and I don't have the slightest idea what Hot Wheels uses. Some plastic containers have heat and chemical resistant properties that actually make them suitable for working with a lye solution.
Well I noticed MBG would drop the wheels in there after he has already removed the paint from the body. My guess is that dropping it there and then adding the soda would destroy the plastic, but if you do it after you've already put the solution in for a few minutes, it's died down enough to where it can take the paint off without damaging it. I should note it took the paint on the wheels in a matter of seconds and it seems to work on plastic bases too based on what I have seen on Danny's Diecast Disasters.

Another question I have is I noticed there appears to be two types of caustic soda, one for food and one for drains. I think MBG used the types for drains, but I still have to ask, which is more suitable for removing paint?
 
Another question I have is I noticed there appears to be two types of caustic soda, one for food and one for drains. I think MBG used the types for drains, but I still have to ask, which is more suitable for removing paint?
I'm given to understand that the sodium hydoxide undergoes further refinement to be usable for food, as less refinement is more likely to result in impurities. Because the sodium hydroxide is the active ingredient and impurities won't have the same effect, I'd imagine it would be more likely to get the job done...not that the alternative wouldn't accomplish the same task.

I'm afraid I can't offer any advice regarding plastics beyond recommending you experiment with materials you can afford to lose, if that's an option.
 
I'd imagine it would be more likely to get the job done...
What, the kind for drains?
not that the alternative wouldn't accomplish the same task.
What alternative? Paint stripper?
I'm afraid I can't offer any advice regarding plastics beyond recommending you experiment with materials you can afford to lose, if that's an option.
That may be what I end up doing.
 
What, the kind for drains?
If my understanding that food grade is simply more pure is accurate, I would think food grade to be more effective because of the higher concentration of the active ingredient.

What alternative? Paint stripper?
The less pure product, which is to say the sodium hydroxide that has not undergone additional refinement. It may remove paint just as effectively as the more pure product. I have no experience with it in that capacity.
 
If my understanding that food grade is simply more pure is accurate, I would think food grade to be more effective because of the higher concentration of the active ingredient.
Gotcha.
The less pure product, which is to say the sodium hydroxide that has not undergone additional refinement. It may remove paint just as effectively as the more pure product. I have no experience with it in that capacity.
I guess I'll have to find out myself.

Anyways, thanks for the tips guys!
 
So remember that beat up Corgi Volkswagen Beetle 1300 I posted a while back? Well, I finished it back in April, but I haven’t taken the time to post it until now.

Back in early March, my interest in Corgi castings had really grown and I started looking them up on eBay. Eventually, I saw this one on there and when I did, it just spoke to me. Not only was I pretty fond of the Volkswagen Corgi had made, but I felt bad for it seeing it in this condition and was just anxious to fix it up some. So I bought it and this was how it looked when I received it:
IMG_0950.JPG
IMG_0951.JPG
IMG_0952.JPG

As you can see, it was in really bad shape when I received it and I think this is more or less what it’s supposed to look like brand new. No idea what all it went through prior to me getting it, but there was obviously a lot wrong with it and it certainly needed a lot of work. It actually did not feature rivets like Hot Wheels typically do and it felt like it was ready to come apart when I got it. So I took it apart:
IMG_0954.JPG

And here’s where the restoration begins!
As you saw in the photos, the body had certainly seen better days and was missing most of its paint. Although I neglected to get any pictures of this, I stripped off what was left of the remaining paint with paint stripper, fortunately, it didn’t need much since most of it was already gone. If you look at this photo here, you can see the casting has casting lines on the hood and part of the fenders and it had it some near the back, which you cannot see in that photo. I found these to be a bit distracting, so I filed them down. (sorry for lack of pictures)

Here it is with a new coat of primer.
IMG_0967.JPG

^As you can see the casting lines are gone now and it looks a lot better. I will admit though, I kind of messed up on the fenders a bit and you can tell in this photo, but fortunately, the hood turned out great! The metal on this one is considerably thinner than most Hot Wheels castings I have worked with in the past. I didn’t bother filling in the hole on the top because I hope to one day put something there and I didn’t think filling it in was worth the effort anyway.

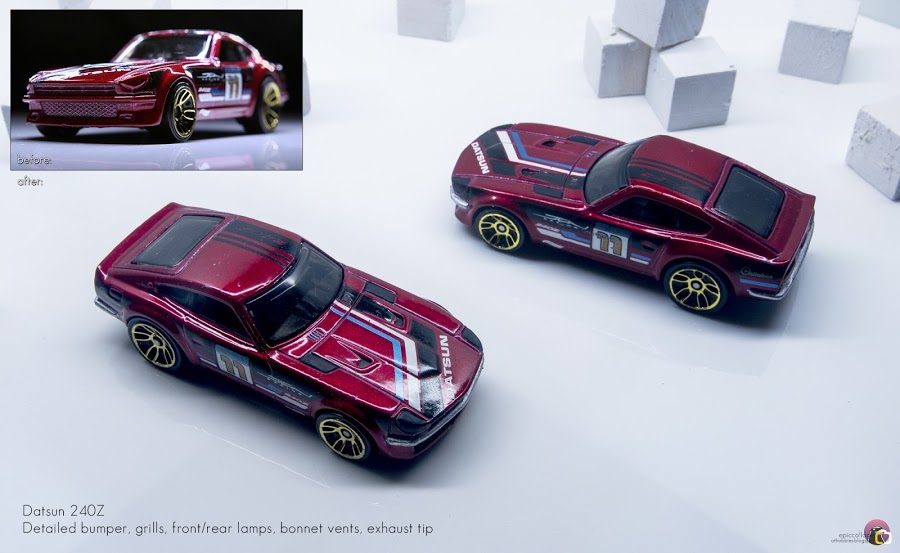
Upon doing some research, I learned this casting was originally metallic green. I wanted something reminiscent of what it had originally while giving it a new and improved look. So I chose Testors Mystic Emerald for this one because I felt this was perfect for it. And here it is with the aforementioned new color:
IMG_1045.JPG
IMG_1046.JPG

^I detailed the turn signals, door handles, and even the Volkswagen letters on the back after I finished painting it. It was pretty tricky, but I eventually got it.

I will admit, I had numerous mishaps with painting this thing and I had to strip and redo it multiple times before I got it to what you see here. While it still has some imperfections, namely the front having some small pores and the silver going a little off from the turn signals, it’s not a huge deal, so I left it alone because I felt it wasn’t worth the risk of ruining it again.
Don’t know what’s up with the base, but it obviously isn’t what it should be.
IMG_0957.JPG

So I put in a small bowel of LimeAway for a bit and then took my wire brush on my Dremel and went over it a bit. It gave off a rather musky smell while I did this for some reason, makes me wonder what’s on the base. And here’s how it turned out:
IMG_0976.JPG

It ain’t as good as it could be, but it’s at least passable now. Maybe when I get better polishing methods, I’ll go over it again someday.
When I received it, it looked like this:
IMG_0955.JPG
IMG_0956.JPG

It had a lot of evidence from where the previous owner apparently tried to repaint the casting because it had paint around the edges and it also had marks from where it had been gone over with a sharpie as well. Generally speaking, it was bad.

So I got the paint off eventually and then followed baremetalhw’s tutorial for fixing up windshields. It was going pretty good at first and I got about 80% of the way there, until I accidentally broke it. :ouch: The windshield on this one ain’t like your typical Hot Wheels casting. While most Hot Wheels windshields are thick and somewhat flexible, this one is thin and brittle, the kind that would break into many pieces if you were to step on it. So it’s understandable why it broke so easily.

So I eventually caved in and bought another Volkswagen much like this one so I could replace the windshield on it. Got that one apart and then washed the windshield with soap and water and then soaked it in some Pledge Floor Care. It didn’t have the hole in the top like the original one did, but carefully drilled out a new one without damaging it. Here is the result:
IMG_1044.JPG

^It has some minor scratches on it still, but I didn’t worry about it because they weren’t even all that bad and I did not want to risk breaking it again. I also had some unrelated drama going on at the time and the last thing I wanted was another thing to add to my frustration. So I decided to call it finished right there.

Regarding the Volkswagen I used to get this new windshield, which is in the background on the last photo, I will be doing something with it in the future.
The interior looked like this when I got it:
IMG_0958.JPG

It was honestly in good shape, in fact, it’s the only thing that still is. I liked it as it was and didn’t really want to recolor it, so I just washed it some and detailed some parts of it. The result was this:
IMG_1048.JPG

Pretty happy with the result! I feel like it adds to it without taking anything away and it ultimately looks better than it did.
So not only were the wheels in really bad shape, but they weren’t very good wheels to begin with, so they obviously had to go. I wanted to get a set similar to the ones it had originally, but in better quality, so I decided to use Hot Wheels MC5 wheels for this one. Due to COVID-19, I was skeptical when I would see these wheels again, so I took an unopened FNF Supra I had from years ago and gutted it for the wheels. I was hoping they would fit without needing any tubing, but sadly they were slightly too short, so I had to use the tubing to make them fit. Fortunately, the axles sit up high enough to where I didn’t need to modify the base. It also had these rods on both sides to help hold them down, which is something I have never seen before.

So once I got the tubing in place, I bent the rods slightly to help hold it down and then intentionally over applied hot glue to hold them down and also keep the interior and windshield from moving. Here is the result:
IMG_1047.JPG

To be honest, I am not a huge fan of these wheels in general, but I have found they are good for customs because I have found myself using them sometimes and I feel they are the perfect replacement for this one.
So once all that was done, I reassembled the casting and put superglue to hold it in place, and here is the finished result!
IMG_1049.JPG
IMG_1050.JPG
IMG_1051.JPG
IMG_1052.JPG
IMG_1053.JPG
IMG_1054.JPG
IMG_E1055.JPG

This is actually my first non Hot Wheels custom I have ever done. It was a bit harder than I expected it to be, but I eventually got it done. While it’s certainly not perfect, it’s MILES better than it was when it started and overall I am very happy with the result! If I get the materials, I might go back and polish the base some more and if I find any axles with these wheels at the right length, I may put them in as well. I definitely want to get something to go on top of it as well since it has that hole there, but I don't currently have anything I want to use. Until then, I am sticking with this.

At the end of the day, not only did I want this thing to look good again, but I wanted to give it a new look while still staying true to its roots (as in, what it looked like originally) and I feel like I have done that. What do ya’ll think about it? :)
 
Last edited:
Well that clears the naming confusion I had earlier.
Rubber gloves?
In the case I get it on my hands? What exactly does the vinegar do in this case?

The reason I ask about this stuff is because if I ever mess up on painting a vehicle and have to strip it and start over, the paint I applied is pretty difficult to remove with paint stripper. Paint stripper is good for removing the standard paint used on most diecast cars, but it struggles to remove spray paint and I am wondering if the caustic soda will be any better.
I painted cars for 30 yrs , I used to drop the body in a can of laquer thinner over night ,next day scrub with toothbrush, every now and then ,may have to scrub and re dip in thinner ,then scothbrite when done !
 
I painted cars for 30 yrs , I used to drop the body in a can of laquer thinner over night ,next day scrub with toothbrush, every now and then ,may have to scrub and re dip in thinner ,then scothbrite when done !
Yea I am familiar with that method, my brother uses it all the time. I tried it once and it actually did a lot worse than paint stripper for me, but maybe it has something to do with the lacquer thinner my brother has. Thanks for the suggestion though! 👍
 
Didn't know about this, but it looks like D Model actually sells their own 1/64 wheels. Thought some of you may find this useful.
Source: HobbySearch

5TJjLKa.png
 
Breathed some life back into an old friend. For those not in the know, this is a 1978 casting known as "Flat-Out 442", which was a popular casting that had extremely thin axles and low rolling resistance wheels that really helped with speed.

Mine were in incredibly poor shape.

What you see here is a fairly suitable replacement; back in 2006 Hot Wheels released a series of cars known as Faster Than Ever which featured nickel-plated axles that generally were much quicker than mainline cars. So here's a blending of the modern and the old, and it moves right smart.


20200910_201115.jpg
 
So I got this Corgi Juniors Massey Ferguson 3303 tractor back in November with the intension of customizing it and I finally finished it just last week.
So here is what is was when I received it:
IMG_1506.JPEG
IMG_1507.JPEG

Condition wasn’t “terrible”, it was considerably better than that Volkswagen 1300 I did last year, but certainly not good either. So I wanted to give it a make over because I still felt it deserved one, after all that was why I bought it in the first place.
So I got it apart, the thing didn’t even have rivets on this one either, it was just a little tab I had to grind off on the front of the casting. And here it is:
IMG_1516.JPEG

And here’s where the restoration begins!
As you probably saw in the photos, the condition was not the greatest and could certainly be better, enough to warrant a new paint job. Although I neglected to get any pictures of this, I stripped off the remaining paint, applied some white primer and then proceeded to repaint it. My intension with this one was pretty much the same as that VW I did previously, I wanted it to look reminiscent to what it was before while giving it a new and improved look. I wanted the colors to be brighter, more exaggerated versions of the original.
Ironically, I unintentionally chose a paint for the body that was a very close match to the original, Gloss Sunbeam by Krylon I think, but this wasn’t what I wanted and I didn’t realize it until I started spraying. Eventually, I found the paint I had wanted to use for it, that paint being Golden Sunset by the Rusto-Leum and just sprayed over what I did earlier.

And here it is:
IMG_0010.JPEG

So of course, the aforementioned Golden Sunset was applied and then I proceeded to detail the grill in black. I later used my brothers Molotov Chrome pen to detail the emblem and lights. I looked up a video of the real life version, or something close to it for some pointers. Don’t know if those behind the hood are lights are not, but they looked like it to me, so I detailed them anyway. Some of the details ran after clear coating, but it wasn’t bad, so I didn’t worry too much about it. I touched up the grill some to what you see here and this was the final result.
For the plow, although I didn’t get pictures of this either, I stripped off the remaining paint. However, before applying any paint, I decided to mask off the bottom of the plow with painters tape because if it’s going to be scraping the ground, why paint it? Besides, I think some plows in real life are made this way anyways, so it’s still fitting for it. So I did that and then primered it in white, painted it, removed the tape and applied some clear. I continued with what I said earlier and chose a brighter red than what it had originally, that red being Gloss Candy Apple Red by Rusto-Leum.

And here it is:
IMG_0013.JPEG

Despite it’s complex shape and having to get various places on it, it actually wasn’t hard to paint. The line where I masked off the bottom ain’t as smooth as I would have liked, but it’s at least passable. I almost considered detailing the letters on the side with the chrome pen, but decided against it because I did not feel like taking the risk of ruining it and I didn’t think it would look too great anyways.
The wheels were not in too bad of shape and I honestly didn’t really have a problem with them and saw no need to replace them. Rather, I just cleaned them up with soap and water and the took the wire brush on my Dremel and buffed the endcaps a bit so they didn’t look so bad. Originally, I intended to leave them black as they were, but I didn’t realize until later in the build my brother had got a new chrome pen and upon seeing how well it worked I decided to apply some chrome on the wheels. While not exactly fitting for a tractor in most cases, I really wanted to give it my own personal touch and I figured it was better than nothing.

And here they are finished:
IMG_0012.JPEG

Very very happy with how the chrome turned out and I am SO glad I decided to do it! :D
The interior was not terrible, but a little rough around the edges, especially on the exhaust. So I washed it in some soap and water and then decided to add some small details. I detailed part of the engine, the seat and the exhaust in black and then did the steering wheel and other parts of the engine with the chrome pen.

And here is the result:
IMG_0011.JPEG

Not much really, but it looks better than before, especially for the engine. I ended up taking the paint off the exhaust after this picture was made because I found it rubbed against the body.
Once all that was done, I applied some super glue where the tab originally was and reassembled the casting. And here is the finished result! :)
IMG_0015.JPEG
IMG_0016.JPEG

This was quite a different experience from every other custom I have ever done simply because it was a tractor, something I had never done before, but it was actually fun and I didn’t have many problems with it. While it has some minor imperfections and I hate I had to take the black off the exhaust, I am super happy with how this one turned out! :D I am so glad I decided to chrome the wheels because I think it really brings out the casting more and the colors are exactly what I had wanted from the start! Leaving the bottom of the plow unpainted I thought was a good move and it actually looks good with it in my opinion!

At the end of the day, my goal for this was the same as the Volkswagen 1300 that came before it, I wanted to give it a new and improved look while staying true to what it was before. And I feel I have done that and then some. What do ya’ll think? :)
 
Last edited:
Went out of my way to find a $2 Mystery Model from 2019. The colour scheme and deco look great, but it was missing further details. So I've added them in:

Datsun%2B240Z%2BMystery%2BModel%2B%2528detailed%2529.jpg


Datsun%2B240Z%2B-%2BMystery%2BModels%2B01.jpg


The grills and even the holes and lights underneath the bumper could be easily missed when the casting lacks the details. this plus the silver bumper brings it all together.

Datsun%2B240Z%2B-%2BMystery%2BModels%2B02.jpg


Tail lights, bumper, plate space and exhaust tips all hand-painted.
 
Last edited:
Back