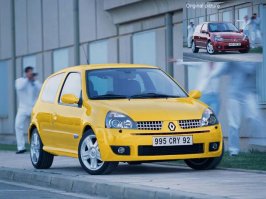
Let's review the process
1st-Copy & past the body(I mean by using the polygon lasso, make a copy of the chassis part)
2nd-Duplicate again the body layer & put the saturation to 100 to that duplication
3rd-Use "select->color range" & select the color reflexion of the car
4th-Do "Select->inverse" & "edit->cut"
5th-Take another duplication of the ->main<- body layer, be on that layer & click on the reflexion layer by holding "Ctrl" on your keyboard
6th-Do "Select->inverse" & "edit->cut"
6th-After blur that layer with "gaussian blur"
7th-& put the color that match the background there by using "Hue & Stauration"
8th-put multiply on that layer option & choose the opacity you want(Don't forget that you're working on a pic, so use your eye)
9th-After do whatever you want, but
Quite long for a process, but worth the work


") 👍
👍


 Is there a way to make the colour more reallistic on psp7?