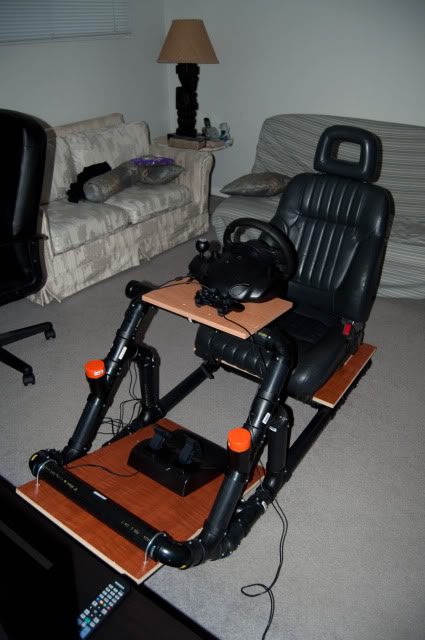
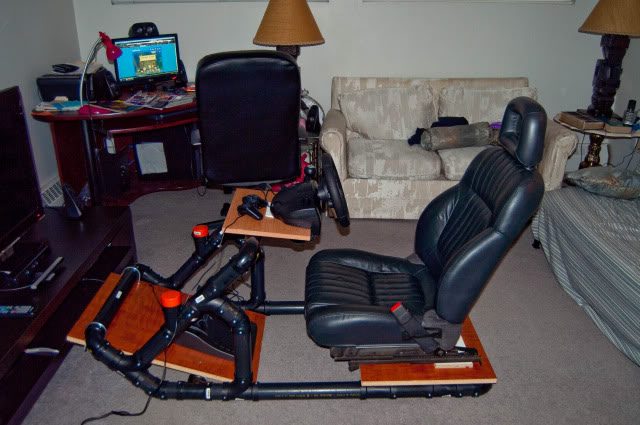
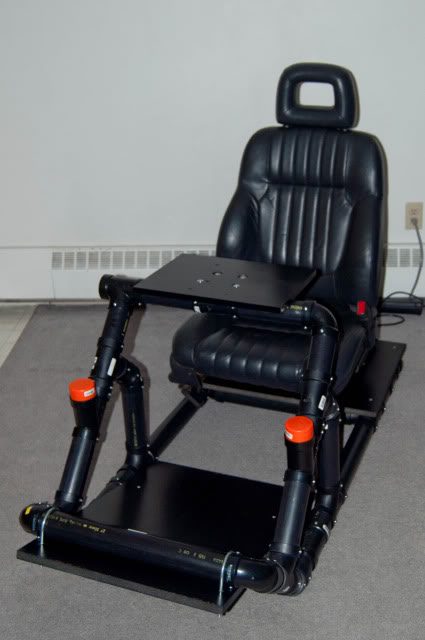
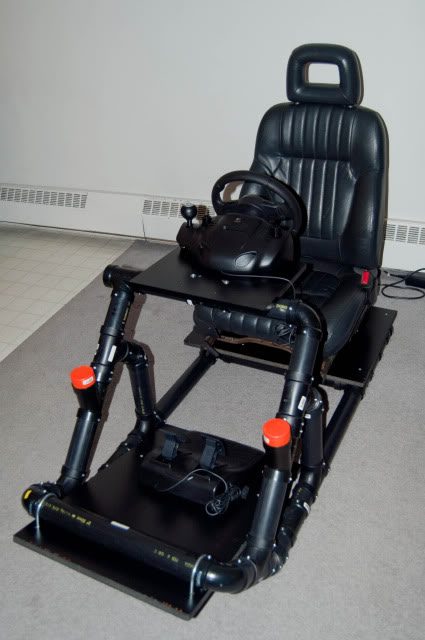
Eddy's PVC Rig from start to finish - (Inspired by SIMUL8R) - Now with Insturctions!

  • Thread starter SlowEddy
  • 284 comments
  • 556,109 views
Thank you for the quick reply. I now know what they look like and what the general description is. They are not available to me locally at my three home depots (go figure) but I can print a picture out and ask around at Lowes or Menards as well.

You can always try ordering these ties through Amazon.com.
 
Andretti, when I first saw the final version of your rig I noticed you used the Simpson ties for your pedal platform as well. I was wondering when you might be experiencing some of the discomfort you mentioned since the ties do add more to that angle due to it's design. In my original rig I readjusted and screwed the board to go underneath the front pipe rather than above and found the angle better and less strainuous to my ankles and shins. I also suggested this in my Lumenlab thread which you must have missed. I would expect with the ties reversed you could bring the angle of the pedals even further down which I trust you will find more to your liking.


Yeah, I initially saw that (and remember) you had yours the other way. I'm still not sold on what might be causing me the discomfort in my hip, though the change your suggesting is certainly on the radar.

I sit in my cockpit when I'm playing other games too, and when I play COD:MW2, I'm tensing up and flexing as I shoot and ultimately, I think that is the cause of my discomfort. When I drive, I catch myself doing it, but not near to the same extent that I do it when playing Call of Duty.

I might actually invert the clamps this weekend if time allows and see how I like it and more importantly how it feels. Ultimately, since it isnt my ankles that are hurting (or even knees), I'm really thinking it wont change my hip discomfort till I learn to relax while driving/killing, but I'd definately like to determine what might be causing it and address it as quickly and effeciently as possible.

Thanks Sim. Really appreciate the insight.


Andretti
 
hi eddy and simul8r...

thanks for the inspiration... have bought the materials today here in singapore... AW PVC Pipes (4.1mm thick) for Drainage use... will start the project on Thursday (Chinese New Year holiday)... wish me luck!
 
Eddy thank you very much for the most useful plans and part lists. When I have some spare time I start building my own rig using 60 mm PVC tubes. Wanted to do this for quite some time now and your info will make this much easier.
 
Guys, what's the minimum thickness the PVC can have in order to make this a stable rig? I found a type of PVC pipe that they called "sanitary" at the hardware store, but it didn't look/feel as if it would be able to manage a great deal of weight. I'd say it was around 2mm thick.

Should I be looking for a different type of PVC pipe, or am I just worrying too much?

There are several types of PVC pipe that are used for sanitary purposes. Schedule 40 is one type and is what you would be best using. I don't know the wall thickness off the top of my head but it is the thicker version of sanitary type pipe. I used 2" schedule 40 and though it does has some flex to the pipe itself, once it is cut to the needed sizes and glued with the necessary fittings it is very sturdy.

Hope that helps you out.
 
It does help me, thank you. In fact I thought the same thing -- A single pipe is not very strong but the combination of all the tees and elbows would make it sturdier.
 
The scheduled #40 PVC pipes I used for the original SIMUL8R seat are about 5mm in wall thickness and are intended for use in pressurized plumbing up to 270psi. The pipes do have some flex but combined with their joint fittings does make the rig surprisingly sturdy. There are other types of plastic plumbing out in the market such as ABS, PP, PE but currently PVC is the most widely used for it's stiffness and durability (check wikipedia). Hope this helps.
 
The scheduled #40 PVC pipes I used for the original SIMUL8R seat are about 5mm in wall thickness and are intended for use in pressurized plumbing up to 270psi. The pipes do have some flex but combined with their joint fittings does make the rig surprisingly sturdy. There are other types of plastic plumbing out in the market such as ABS, PP, PE but currently PVC is the most widely used for it's stiffness and durability (check wikipedia). Hope this helps.

Wow, 5 mm!

No wonder the quote I asked for ended up so cheap, whereas the costs of the pipe some of the people reported here got up to $100. I went to an average Joe's hardware store, though.

I'll have to go to Home Depot and see if they have this kind of pipe. Thanks. :)
 
Wow, 5 mm!

No wonder the quote I asked for ended up so cheap, whereas the costs of the pipe some of the people reported here got up to $100. I went to an average Joe's hardware store, though.

I'll have to go to Home Depot and see if they have this kind of pipe. Thanks. :)

Home Depot should have that pipe. I wanted ABS pipe (basically the same as PVC but black) and had to go to Lowes to get it as Home Depot didnt carry that type at all...but they did have the ABS.

Post pics when its done!


Andretti
 
Just wanna share my rig based on Eddy's and simul8r's plans, Thanks to you both!

worked on a REAL tight budget, used ABS (sourced from cheapest store I could find, not home depot!), leather car seat (free!, Kijiji! 👍), MDF (free!) Used hack saw and had to screw it down coz I live in an apartment.

RacingRig-5.jpg


RacingRig-2.jpg


After painting the boards:
RacingRig-10.jpg

RacingRig-12.jpg

did a real bad job with the paint but I guess that will do for now..

Now the only thing to do is learn to drive a wheel.. was good with a DS3 but now utterly shocked with my skills behind a wheel :grumpy:...
 
Funny you say that about the painting. I actually thought it looked really good. LOL

Great job. Soon, you'll be wondering how you ever drove with a controller.

Grats


Andretti
 
Hey guys, it's me with a few more questions.

1- Do you get the same stability/sturdiness if you bolt the rig down instead of gluing it together?
2- What size bolts/screws are used to go through the diameter of the pipe?
3- Should I use screws or bolts? Any difference/advantage of using one over the other?
4- Should I just hold both the pipe and the tee (or elbow) together (assembled) and drill a hole down for the screws/bolts, or is there a better method?
5- Those U-clamps for the MDF - How are they called and what size should I be looking for?

I'm sorry for the stupid questions. I'm not one of them "handy mans" nor have I ever built anything other than scale models in my life.

Thanks in advance.
 
Hey guys, it's me with a few more questions.

1- Do you get the same stability/sturdiness if you bolt the rig down instead of gluing it together?
I would definitely suggest gluing it together. the only reason I didn't glue them is because I live in an apartment. I noticed some play in the joints even though i screwed them together.

2- What size bolts/screws are used to go through the diameter of the pipe?
3- Should I use screws or bolts? Any difference/advantage of using one over the other?

I use 8x5/8 screws.

4- Should I just hold both the pipe and the tee (or elbow) together (assembled) and drill a hole down for the screws/bolts, or is there a better method?

I pre-assembled each section. laid them flat on a flat surface to check if they're level and drill holes and screwed them together.

5- Those U-clamps for the MDF - How are they called and what size should I be looking for?

I think they're called U-bolts. the size is 2 5/16"

word of advice: pre assemble every thing before gluing /screwing together specially if you're using ABS (like I did). I had to take mine apart alot of time to adjust sizes coz at first I didnt notice the Tee's are off center and the elbows radius don't match with the Tees. If I had the budget I would have gone for PVCs but that would cost me almost double..

Hope this helped.
 
Big thank you 👍 to SlowEddy, i used your plans to build my own rig. It turned out excelent!! Set up wil move to the attack the following days and wil be completed by a "28 LCD and a Pioneer 5.1 Dolby Surround set, will post that pics later.

For now:


Uploaded with ImageShack.us


Uploaded with ImageShack.us
 
Hey guys. :)

Just wanted to share my progress with you all.

5564879996_6f04c8d6db_b.jpg


The front section is finished and glued, the back assembly is going to have to wait, though... I ran out of piping for the joints of the tees supporting the seat base. :(

Will post more pictures once finished. :)
 
5577375695_6d94da033b_b.jpg


Finally finished mine, will paint it matte black so it matches the seat eventually (already have primer and paint).

I need some insight from some of you guys who built one, though. How would you mount a buttkicker to it? I looked around the buttkicker page and they say it'll mount to tubes with a diameter of up to 1.375" and these are 2". :(

Any ideas?
 
Hi people,

I started my PVC rig this weekend. Started of making it like Eddy's rig with his design and plans (huge thanks for those Eddy). I had problems finding 2" PVC fittings where I live (Dublin Ireland). One plumbing supplier had 2" PVC pipes but no fittings but he did have 1.5" PVC pipes and loads of fittings for them. I stod on 2" and a 1.5" PVC and the 2" broke but not the 1.5" so I hope that it will work ok with 1.5".

After starting of building my rig following Eddy's plan to the letter and started thinking and wanted to make my own version, mostly because its fun not because there is anything wrong with Eddy's and Simul8ors.

I have glued the front so and going to continue during the week with the rest, I decided to invert my G25 pedals and thats why I decided on making my rig the way it is. I also extended height of the front part a bit to compensate for have the wheel mount on the other side and because I like to sit a bit higher up.

Anywas nuff said now, I always type to much =)

1.jpg

2.jpg

3.jpg

4.jpg

5.jpg

6.jpg

7.jpg


Hoping to paint it all next weekend. Will upload som more pics when its done =)
 
This thread makes me want to build one now! I think I may actually go ahead with this... hmm.
 
BkS
This thread makes me want to build one now! I think I may actually go ahead with this... hmm.

Do it! 👍 And show progress pictures!

I made one and it works great. It was cheap too. I ended up spending about 150 when it was all said and done. (I used pine wood for the floorboard, and painted it with red spray paint) It's great.
 

Latest Posts

Back