General Model Kit Building Thread

Has anyone used automotive spray paint they had mixed at a paint shop for their models? Is it compatible with model primers and is it safe for the plastic?

You would have to be specific when you say automotive paint. There are many subtypes ranging form nitro cellulose paints to lacquers, acrylics, and enamels to urethane and polyurethane paints. Each with their own properties. I bring this up, because you would have to discuss this with your paint shop. Automotive paints have harsh "hot" solvents in them that give them their properties. Scale model paints have "cooler" solvents that protect the plastic.

In general, however, to paint your model with automotive paint you would need the the same type of automotive primer. Automotive primers would provide you with that barrier your plastic model needs. Otherwise you would find that score marks on your model during sanding, maybe even warping with nitro-cellulose. It depends.

Test it out on a plastic spoon first.
 
Last edited:
You would have to be specific when you say automotive paint. There are many subtypes ranging form nitro cellulose paints to lacquers, acrylics, and enamels to urethane and polyurethane paints. Each with their own properties. I bring this up, because you would have to discuss this with your paint shop. Automotive paints have harsh "hot" solvents in them that give them their properties. Scale model paints have "cooler" solvents that protect the plastic.

In general, however, to paint your model with automotive paint you would need the the same type of automotive primer. Automotive primers would provide you with that barrier your plastic model needs. Otherwise you would find that score marks on your model during sanding, maybe even warping with nitro-cellulose. It depends.

Test it out on a plastic spoon first.
What you said is exactly what was racing through my head. But of course! I forgot of the classic spoon test.
 
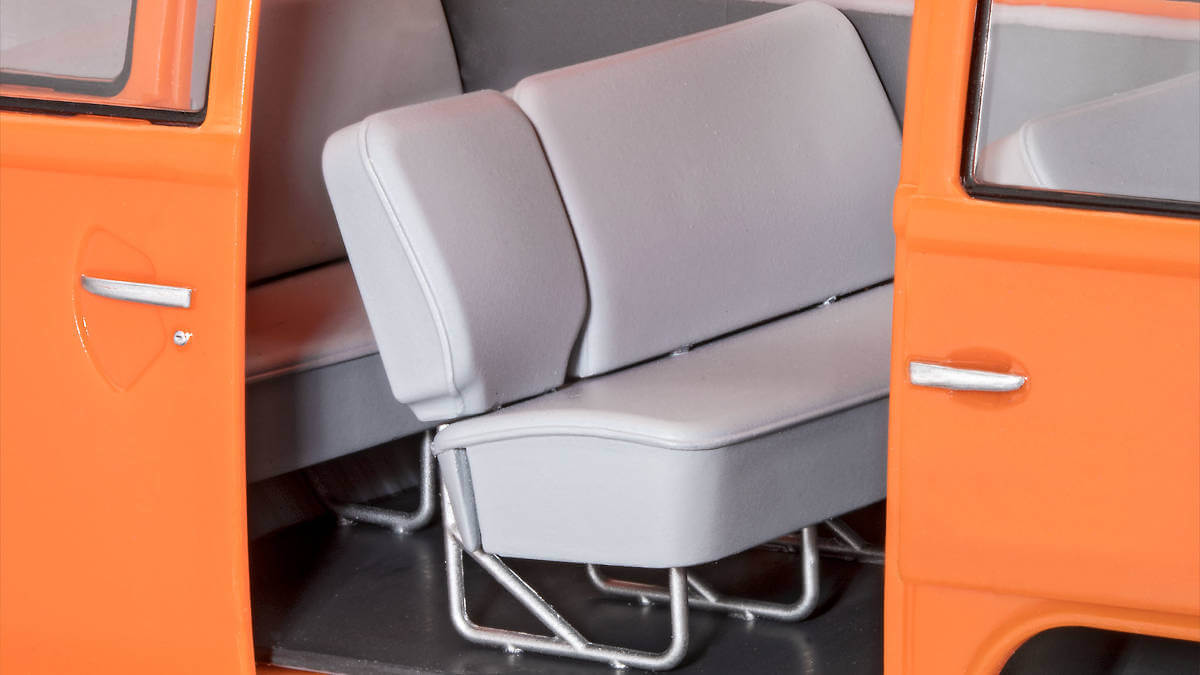
I applied some color to the outer seats and the bulkhead.
1B42E5D3-09D5-41F6-A2DA-8F6EA9C57FC9.jpeg


Trying to match photos of the original two tone upholstery colors (Basalt Gray and Silver White) for a ‘62/‘63 Deluxe is a little challenging due to camera lighting and accuracy of a restoration.
upload_2021-4-28_21-51-8.jpeg

upload_2021-4-28_22-12-57.jpeg

Tamiya light gray primer actually looks pretty close.
BD60F958-C903-454F-A8C6-48B9864C6BAD.jpeg


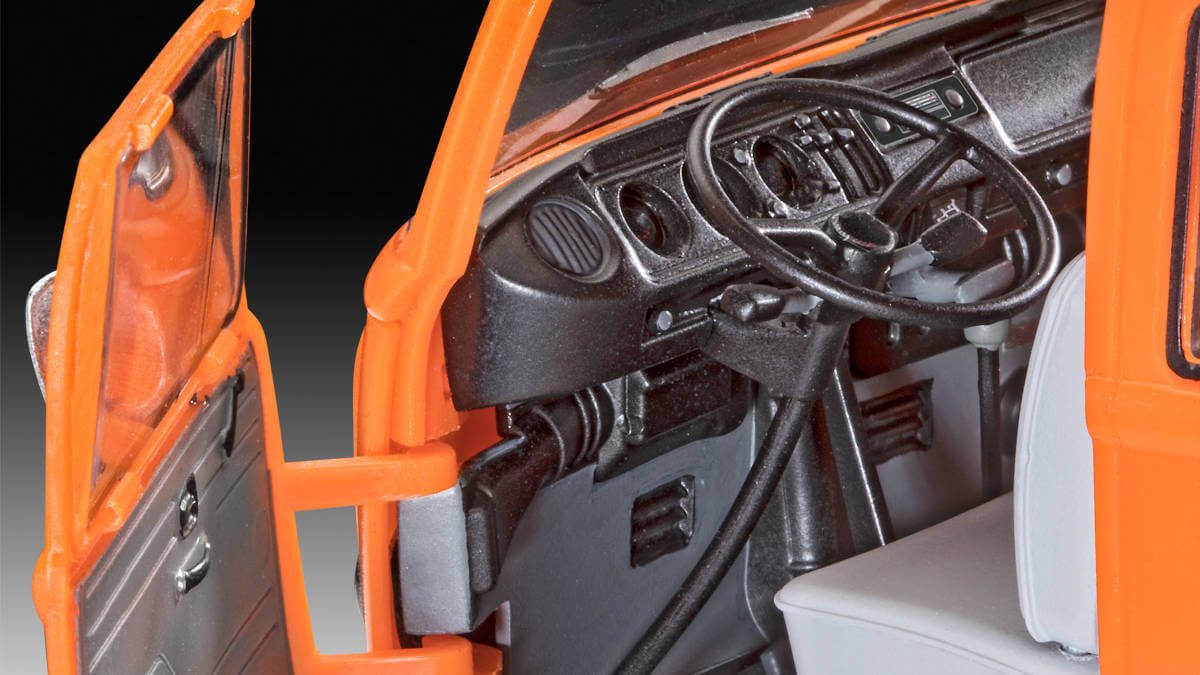
I also finished the weatherstripping around all the glass.
4D8638A4-5A9D-4710-ADFC-76C2B6E59A87.jpeg
 
Last edited:
I applied some color to the outer seats and the bulkhead.
View attachment 1007458

Trying to match photos of the original two tone upholstery colors (Basalt Gray and Silver White) for a ‘62/‘63 Deluxe is a little challenging due to camera lighting and accuracy of a restoration.
View attachment 1007459
View attachment 1007465
Tamiya light gray primer actually looks pretty close.
View attachment 1007466

I also finished the weatherstripping around all the glass.
View attachment 1007460

I can see what you're going for! Those seats are looking gorgeous. Been looking around and found this kit. It is expensive though!
 
I can see what you're going for! Those seats are looking gorgeous. Been looking around and found this kit. It is expensive though!
Revell makes the kit in 1/24 scale as well for a fraction of the price.
upload_2021-4-28_22-43-48.jpeg


If you didn’t want to build the Sambabus, Revell released a panel van variant in both 1/24 and 1/16.
upload_2021-4-28_22-54-56.jpeg

upload_2021-4-28_22-45-34.jpeg


They recently released a Westfalia Camper in 1/24 and I’m sure a 1/16 version will follow suit.
upload_2021-4-28_22-49-5.jpeg


Although not released yet, you can preorder Revell’s new Microbus/Kombi in 1/24 scale.
upload_2021-4-28_22-52-26.jpeg
 
Last edited:
Revell makes the kit in 1/24 scale as well for a fraction of the price.
View attachment 1007470

If you didn’t want to build the Sambabus, Revell released a panel van variant in both 1/24 and 1/16.
View attachment 1007477
View attachment 1007471

They recently released a Westfalia Camper in 1/24 and I’m sure a 1/16 version will follow suit.
View attachment 1007473

Although not released yet, you can preorder Revell’s new Microbus/Kombi in 1/24 scale.
View attachment 1007476

Thanks man! I'm loving this hobby too much already. I do need to get me at least the 1/24, along with a VW Bug. Maybe someday I can manage to get the bigger one.

There is one big kit that I dream of having though. It's a very old Tamiya 1/12 Fairlady 240zg. I remember seeing it as a kid in someone's house and it absolutely blew my mind. They can still be found, but they are very pricey. If I want to get it someday, I'll have to stop buying other kits and save for a while.
 
Getting ahead of myself here, but I wasn't sure what to do with the wheels. Technically, the wheels were color-matching on the gunmetal gray R32. Couldn't help myself to do some testing, and I actually love the look. going with brass calipers (inspired by the R34 GT-R and Z33 Fairlady) was a really good choice. I absolutely love the contrasting colors. Wheels are staying as-is.

20210428_220705.jpg

20210428_220930.jpg

20210428_220952.jpg


I'm loving the details on this kit!
 
Getting ahead of myself here, but I wasn't sure what to do with the wheels. Technically, the wheels were color-matching on the gunmetal gray R32. Couldn't help myself to do some testing, and I actually love the look. going with brass calipers (inspired by the R34 GT-R and Z33 Fairlady) was a really good choice. I absolutely love the contrasting colors. Wheels are staying as-is.

View attachment 1007486
View attachment 1007487
View attachment 1007488

I'm loving the details on this kit!
I agree with you, the contrast is great! Can’t wait to see your Skyline with some clear.
 
Last edited:
Looking for a bit of advice guys.

Does anyone know of a good way of removing decals from a plastic car body without damaging the paint beneath?

I have a Revell/Monogram 1/32rd slot car that i'm wanting to keep the paint on but replace the decals with some others.

My dad has recently moved house and has a spare room where he's decided to set up a Scalextric track "for the grandkids..." He wants to re-create some of the cars he and my uncle raced back in the day and up until we retired from it six years ago. Helping him do so is an ideal way of finding gifts for someone i'm finding increasingly difficult to buy for.

The Revell Lotus Cortina is pretty close to the one we raced, it just needs the Italian series decals replacing with the series sponsors that we ran with. I've also sourced from ebay a couple of Mk1 Escorts that i'm going to restore, modify the body with the spoilers/wings, and repaint in the colours/livery that they ran them in.

Does anyone have any tips or experience in using modelling putty?

Has anyone ever made or had made their own custom water-slide decals?
 
Last edited:
Does anyone know of a good way of removing decals from a plastic car body without damaging the paint beneath?
If the decals aren't underneath a clear coat, I'd try using some masking tape and pull the decals off. If any little pieces persist to stick afterwards, try rubbing gently with a paper towel and some water.
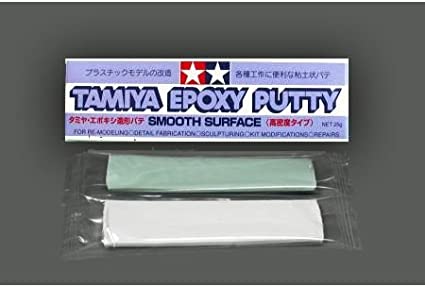
Does anyone have any tips or experience in using modelling putty?
I use Tamiya Basic Putty. Easy to use and sand. I've only used it in the past for mold imperfections or correcting mistakes I've made.
https://www.amazon.com/dp/B000BMYWYW/?tag=gtplanet-20
41FhzuebZcL._AC_SX425_.jpg


I haven't used this but this might work better for you since you plan on doing body modifications.
https://www.amazon.com/dp/B000BMTGX4/?tag=gtplanet-20
41NtYPOSSrL._AC_SX425_.jpg
 
Does anyone know of a good way of removing decals from a plastic car body without damaging the paint beneath?

Vinegar. Soak the decal in vinegar and it will come off. Might have to apply a few coats.

If you don't want to deal with the smell, soak it in water and scrape it off, or yank it off with tape as @Volksauto said.

Micro Sol. Readily available in hobby shops or online.

Does anyone have any tips or experience in using modelling putty?

The Tamiya modelling putty that Volksauto mentioned is excellent. You can dilute it with water to make textures or apply it as-is to make shapes/corrections and soften it with water. Easy to sand as @Volksauto said as well.

The epoxy putty I wouldn't recommend for a first time use. It dries fast, giving you a limited amount of working time, and it will absolutely tear your skin. Think of it like getting super glue on your thumb and then having to peel it off; the epoxy does this in one step. It's hard to wash off, and the effects will stay with you until your skin regrows.

Has anyone ever made or had made their own custom water-slide decals?

You can make your own with an inkjet printer and waterslide printing paper/decal but it requires an inkjet and the paper.

If you don't have that, you can order them from someone online. I don't want to recommend sites I've found on google because I don't personally have experience with them and stores are given on a region basis. I don't know how many stores there are in North Korea :P


@Volksauto Re: Camper van models


Why you gotta do this to me? :lol: I already have like 40 tank models and 5 aircraft models on my wishlist... now I gotta add the entire camper van lineup :grumpy:
 
Last edited:
This kit has a bad reputation of the side doors not lining up and closing all the way. I mocked up the body panels and I think I’ve been blessed with slightly tight fitting but decent panel lines.
45B4B0B0-A9FF-4038-989D-9FD573DC5B9E.jpeg

Joining up the panels is a chore. You have to wrestle with them. I’ll have to be extra careful with final assembly so I don’t damage the paint.
 
Last edited:
@Volksauto have you tried masking putty?

Here are some to consider for the next project:

MRP Masking Putty ~ $15 (best one IMO, no grease, no paint peel, can cut it up and it won't dry out)

AK's Camouflage Elastic Putty ~ $16

MIG Masking Putty ~ $30

Blu Tack ~ $5 (wouldn't really recommend it for masking purposes)

Micro Mask ~ $7 (wet medium that dries into a putty)
I have masking putty that I have never opened up. I'm not sure what brand it is, I'd have to check again.
Does it leave a clean paint line? That's why I've been putting off using it. I've used Tamiya tape with decent paint lines.
 
Last edited:
I have masking putty that I have never opened up. I'm not sure what brand it is, I'd have to check again.
Does it leave a clean paint line? That's why I've been putting off using it. I've used Tamiya tape with decent paint lines.

Yes it leaves a clean paint line. You can make straight edges by lining it with a toothpick, or by cutting it to size. The liquid medium would be easier to apply, imo, but also has the caveat of being difficult to take off if applied too thin.

You can also combine the two different methods so you're not wasting tape. Use Tamiya's fine masking tape for the edges and the masking putty for the bulk of the masking. Just a suggestion though, I know it would seem silly to combine them, you're already masking with tape, might as well just finish the job with it instead of experimenting with the putty :lol:
 
Yes! Some progress on the Skyline. This kit is definitely easier than the AMT Toyota truck. Everything seem to just slide in smoothly with very little fit testing.

20210503_133618.jpg

There is so much detail on this. I am totally ignoring the painting directions as the manual wants pretty much everything black. I have like 20 pictures of different RB26 engines and taking inspiration from all of them to do my own. Makes the detail pop out even more I want to think.
20210503_133634.jpg

20210503_133859.jpg

20210503_160700.jpg

Couldn't help to do a mock frame mount to see how everything fits.
20210503_160802.jpg

I am absolutely in love. Makes me wish I chose better colors for the Toyota's engine.
20210503_161111.jpg

I love how those brake calipers look.
20210503_161209.jpg

20210503_161351.jpg

20210503_161632.jpg

I was worried about the steering elements since they look super fragile, plus there are a lot of mounting points, some which require glue and others not. I'm glad I got it right. The wheels steer and they also spin freely. It was actually a lot easier than the Toyota truck. That one felt like I would need a third hand to hold various points while waiting for the glue to dry. Took my like half an hour to get it right and glued in place. This one took like five minutes.

Can't wait to finish. Still a lot more to go. By now the clear coat should be cured. I'll work on polishing it tomorrow.
 
Last edited:
Yes! Some progress on the Skyline. This kit is definitely easier than the AMT Toyota truck. Everything seem to just slide in smoothly with very little fit testing.

View attachment 1008654
There is so much detail on this. I am totally ignoring the painting directions as the manual wants pretty much everything black. I have like 20 pictures of different RB26 engines and taking inspiration from all of them to do my own. Makes the detail pop out even more I want to think.
View attachment 1008655
View attachment 1008656
View attachment 1008657
Couldn't help to do a mock frame mount to see how everything fits.
View attachment 1008658
I am absolutely in love. Makes me wish I chose better colors for the Toyota's engine.
View attachment 1008659
I love how those brake calipers look.
View attachment 1008660
View attachment 1008661
View attachment 1008662
I was worried about the steering elements since they look super fragile, plus there are a lot of mounting points, some which require glue and others not. I'm glad I got it right. The wheels steer and they also spin freely. It was actually a lot easier than the Toyota truck. That one felt like I would need a third hand to hold various points while waiting for the glue to dry. Took my like half an hour to get it right and glued in place. This one took like five minutes.

Can't wait to finish. Still a lot more to go. By now the clear coat should be cured. I'll work on polishing it tomorrow.
Beautiful paint detailing!
What kind of glue do you use for your chassis parts? Superglue? Cement?
 
Beautiful paint detailing!
What kind of glue do you use for your chassis parts? Superglue? Cement?

I'm still not sure about glues. This is my second build and I'm finding things the hard way. I use mostly Tamiya thin cement (green cap) on small parts that don't hold part of the structure. For parts like frame, engine mounts and suspension, which usually require some pressing to hold them together, I use regular super glue. So far it's worked for me somewhat okay. There are some parts that are very stubborn and often fall off when bumping them like the mirrors. But what I like about the thin cement is that you can reapply and it will stick again, unlike super glue. Being careful not to do it too much, of course, since I've noticed this cement actually melts the plastic to stick two parts.
 
All the models I have built in the past have been spray painted with spray cans using mist coats to build up color. This has led to undesirable/unavoidable orange peel in the paint that needs to be wet sanded.

I want to avoid as much orange peel as possible on this model due to large amount of body panels. So I’ve been practicing spraying wet coats about 5 inches away moving very fast. First spoon I had some runs but because I was too slow. Last three spoons came out acceptable in my eyes.

This is Tamiya TS-49 Bright Red straight from the can with no polishing or clear coat:
9AA78AC3-B7C2-4C98-A480-6ACBEF512328.jpeg
6F028798-6581-4A30-924E-643AEFF93FE4.jpeg
8CEE4A3D-912E-4690-9824-6EECB20E7A4D.jpeg
36A781CC-A960-40AD-82B4-325CB38E4879.jpeg
 
Last edited:
All the models I have built in the past have been spray painted with spray cans using mist coats to build up color. This has led to undesirable/unavoidable orange peel in the paint that needs to be wet sanded.

I want to avoid as much orange peel as possible on this model due to large amount of body panels. So I’ve been practicing spraying wet coats about 5 inches away moving very fast. First spoon I had some runs but because I was too slow. Last three spoons came out acceptable in my eyes.

This is Tamiya TS-49 Bright Red straight from the can with no polishing or clear coat:
View attachment 1008717 View attachment 1008714 View attachment 1008716 View attachment 1008715

Pretty good results. Maybe you should post a mini tutorial on how to do it exactly. I'm on my second model and I could use all the advice possible. I know I'm in my second model, but I am struggling quite a bit with the paint. Just crossing fingers that I do well with the clear coat polishing on the Skyline.
 
One thing to keep in mind about super glue is that it has no sheer strength, only mega tensile strength. You can't pull two pieces apart that are super-glued, but if you can slide them across each other they pop apart like never fastened. I've never used super glue on a model, I'm cement 100%. Yes, it softens the plastic to form the join, but that makes an incredibly strong join.

With either, do not over-use. Fixing a smear on a visible surface is hard work!
 
I finally gathered the courage to properly sand and polish the Skyline. As you know, with the Toyota I completely skipped the clear coat sanding and went straight to polishing. It still looked okay, but not as shiny as I would've hoped. I was very afraid I would mess up, plus the finer grit I have at the moment is 1500 and 2000. I still went for it... It worked!!

I'm very pleased with the result! Also applied some rubbing and then polishing compound very thoroughly. This is the unpolished side. I'm not going to lie, I did panic on how it looked after the sanding. I was ready to buy another kit and trash this one:
20210504_172700.jpg


But after about 40 minutes of polishing, this is the result. I don't feel the picture does it justice. It is smooth as glass and I can kind of see my reflection on it:
20210504_172541.jpg


I still suck at avoiding orange peel, but for now, I am in love with this little Skyline. Can't wait to see it finished!
 
So close to being done! I couldn't help to spoil myself and drop the body on the finished frame. Everything keeps just popping in place with almost zero issues. Just the interior, lights and minor details to go.

20210504_222759.jpg

20210504_230339.jpg

20210504_230414.jpg

Okay, those rear shocks were extremely difficult to get them in place, I must admit. Just like the front one I went the extra mile to detail them based on some coilover pictures, and now I realize they are completely hidden once the wheels are on :lol:
20210505_000730.jpg

20210505_001132.jpg

20210505_001821.jpg

The "GT" logos on the sides and the "S" on the hood were done under the clear coat as suggested. It worked pretty well. Can't really see the edges of the decals. Just need to put the "S" logos on the wheels.
 
I did panic on how it looked after the sanding. I was ready to buy another kit and trash this one:
Don't be discouraged if you ever ruin a paint job. You can always start over and repaint the body. I strip my car bodies in 71% isopropyl alcohol and submerse it for a day or two. It works for me and is safe enough for the styrene plastic. The paint bubbles up and you just scrub it off with an old tooth brush.
Anyways, great job polishing! The finish looks great. Metallic is a little scary to polish because as soon as you accidently buff through the clear and into the paint the metal flakes show through the paint.
 
So quick question. My dream car has always been the Dodge Viper, ever since I saw it back in 1990 in a magazine. Is there any decent Viper kits out there? I got a couple to try them out, but they have a few details I am not too excited about. There's got to be a better one out there, I just haven't found it. Maybe a retooled version of these that I don't know of?

So first up it's a very old AMT kit, which coincidentally I had as a kid. I mean, back then I had no dexterity to properly build a kit, so it was absolute trash. So it's nice to give myself a second chance, like 30 years later. I'm surprised how well kept this thing is, considering it is apparently not a reissue. It is a 30 year old kit. I was actually impressed with the detail down the frame, suspension parts, steering, brakes and engine, but there are a few things that I really hate about it, like the headlights, the lack of decals and the wheels which are improperly scaled; they are too small (funny enough, the actual tire is the right size). The car just looks odd when finished. Probably why they don't show it on the box.
20210505_130756.jpg


So I went ahead and go myself this Monogram kit, which build, it looks pretty spot on. However, it does have its negative points as well. Mainly the molding looks less detailed than the AMT. The engine is one solid plastic block with no separate parts, there is no steering, and the rear quarter of the car for some reason is part of the interior piece instead of the body as it should. So there is a weird indentation and an incorrect panel gap on the body below the rollbar.
20210505_130803.jpg


Also, I got this Revell GTS to have both original Viper models. It seems to be identical to the Monogram kit. Nothing special about it. It looks good when finished, except it has the wrong steering wheel, which for some reason I've seen in various Viper GTS models of different brands. Another thing that scares me is dealing with the body stripes.
20210505_130812.jpg


So leaving the GTS aside, I'm wondering if I can experiment a bit and modify the RT/10 to use the best parts of both models. Mainly see if I can somehow adapt the wheels and tires of the Monogram kit into the AMT, as well as the front bumper and headlight assembly which looks more correct. That or just keep on looking for a better kit. Either an RT/10 or a GTS. It doesn't have to be both.
 
Back