EDITOR’S NOTE: This is a guest review from a former member of staff here at GTPlanet. Jerome purchased the RSeat himself and offered to share his review with the community.
My name is Jerome and I’ve been a compulsive sim racer for nearly 20 years. Pre-kids, I used to help moderate GTPlanet.net. For my sim racing setup, I’m using a T300RS with Fanatec’s CSR Elite pedals via MrBasher’s CPX adapter.
For those that don’t know me, I’m a tall, slender guy at 6’4” and 180lb. I decided I wanted to upgrade my 11+ year-old Playseat Evo racing seat with something a little nicer, that sat a little higher, yet offered the same customization. Little did I know that was a big ask. I’ve been in the market for a new seat for a couple years now and after trying the Fanatec CSL (I couldn’t even fit in the seat itself if was so curved at the top) and the CNT seats, I realized I had to do a lot more research first.
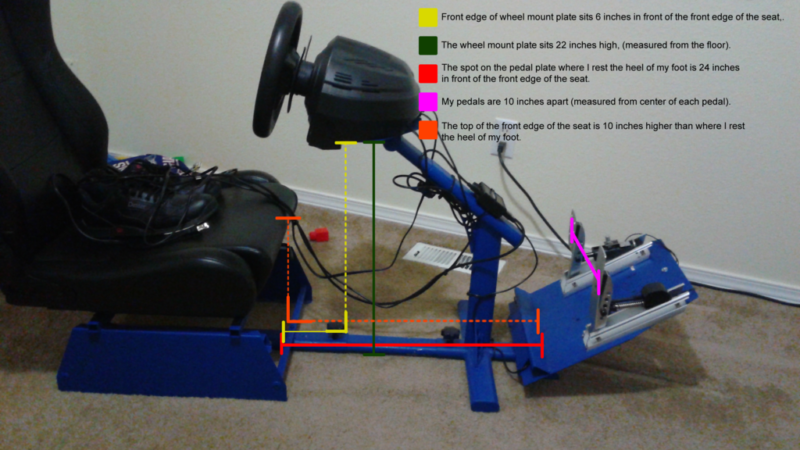
I went ahead and took measurements of my current cockpit, sat down and thought about what my needs were. The first thing I needed was a rig that let me independently adjust the pedals outward. That alone ruled out about 95% of all the cockpits on the market. I prefer to have my wheel a little closer to my body and my feet sticking out. My next thought was I needed a Formula-style rig. I did try out a Playseat F1 rig at my local Fry’s store; after 30 minutes of tweaking it still didn’t feel quite right. I also think my feet were getting cold from less circulation. At any rate, here’s the measurements I took on my old rig:
Back to square one with my measurements. I then turned to GTP’s Wheel Stand and Cockpit thread and scoured all the links in there to narrow down my findings to three options:
- RSeat N1
- Build/Buy An 80/20 Rig
- Stick with the Playseat Evo
I decided to take one for the team and pull the trigger on the RSeat N1, knowing I’d either pay through the nose in return shipping or find a way to make it work. Looking at the competition, it had the best chance to meet my stringent standards.
Quality & Finish –
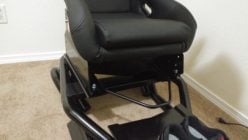
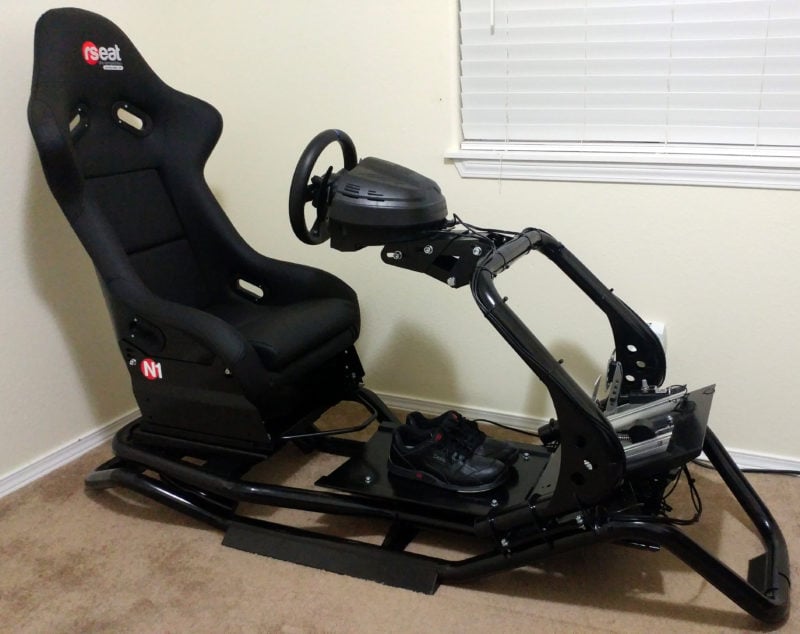
The build quality and finish of the RSeat N1 cockpit is next to none. Its design is aesthetically pleasing, and the black powdered coat finish is smooth and consistent.
This rig ships from Belgium so one of my first questions was “what condition will I get it in?” It came very well packed, so no scratches were visible when I gave it a quick once over.
Upon further inspection, there were a couple very minor spots where the paint finish seemed to stop or didn’t take. But you wouldn’t notice unless you were taking the time to look for them (or were a few inches away from the area). Since this rig looks so good, I don’t think anyone will notice them.
Adjustability
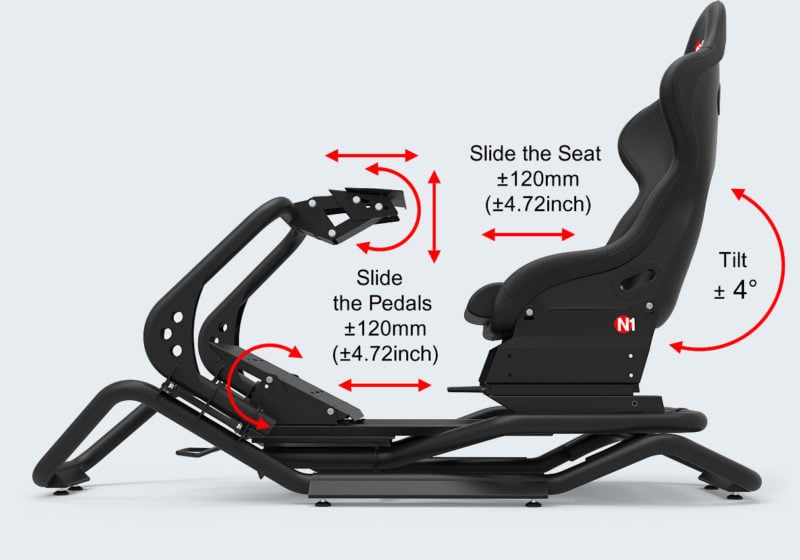
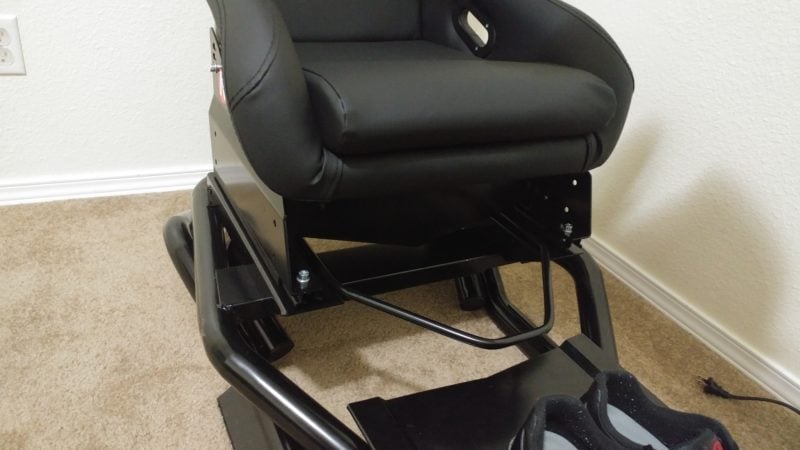
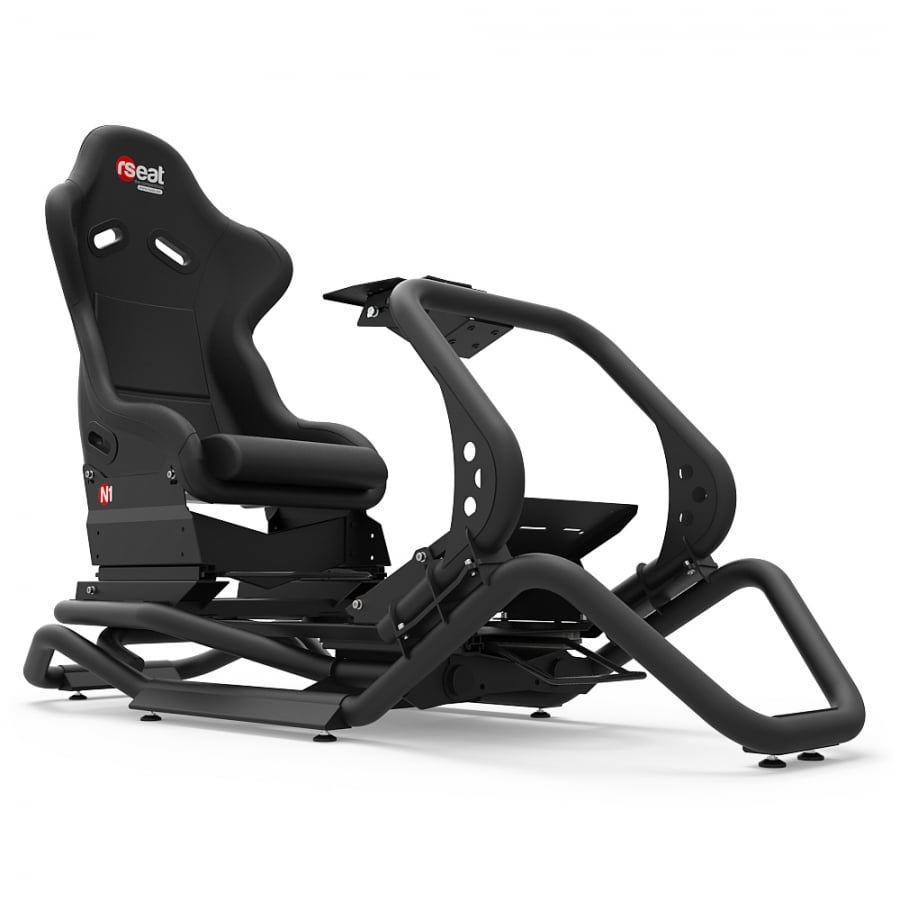
Adjustability and comfort are the two most important factors for me in determining what to buy. I must have the option to adjust the pedals independently from the wheel base, and out of the box I could do that. The R1 takes it one step further, including an adjustable wheel base to help bring the wheel closer to my body.
Add the nice seat slider and you’ve got a plethora of adjustability options at your disposal. Prefer the wheel base to sit higher up? No problem. Prefer your pedals to stick out the front more? No problem.
There was just one small issue I came across. I have really long legs with a 36” inseam. I thought there was a chance I’d have to make some of my own adjustments to make this work going in. Looking at how the seat was configured I thought I could drill some more holes in the pedal slider to extend the pedals outward.
Would that make the pedals flex down when I pressed the brake? Only one way to find out. After some measuring, I had to drill four holes 10” down from the pre-drilled ones. This allowed me to stretch my legs out, giving me the comfort I need. The good news is thanks to raised ridges on the sides, there is no flex at all under heavy braking loads.
I get the feeling RSeat knew people may want to try this and the fact that it’s so stable beyond the recommended specs speaks volumes to me about how sturdy this rig is.
The N1 cockpit also comes with a set of raised pedal base mounting brackets that lets you raise your pedal base another inch. I went ahead and installed them to help compensate for the seat sitting much higher and it seemed to help more than I expected.
Like my old rig, the N1 is modular in that you can add a shifter mount, or a keyboard/mouse tray. There’s even a triple monitor stand and a few other attachments for PC racers so the N1 can grow as your needs grow. Take it as good or bad: I’m sure some people would like to see some modular parts included for the price point, but more on that later.
Sure I had to get my hands dirty a little bit with measuring and drilling, but it’s easily worth the investment in time. 99% of people won’t have to worry about this — lucky them! For the remaining 1% of sim racers who are like me, this could be your next cockpit.
Comfort –
This is the other big half of my concern when choosing a new racing rig. I’m really big on comfort for sim racing. I think it’s nearly as important as any other aspect of racing; track memorization, car setup, you name it. If you aren’t comfortable, it will come back to bite you as time goes on.
The Playseat Evo seat really leaves a lot to be desired, especially for my bony back. It was too thin and I had to replace the seat on it. My replacement seat was an excellent seat, so good that I delayed upgrading my cockpit for a few years because of it. How would the N1 seat compare?
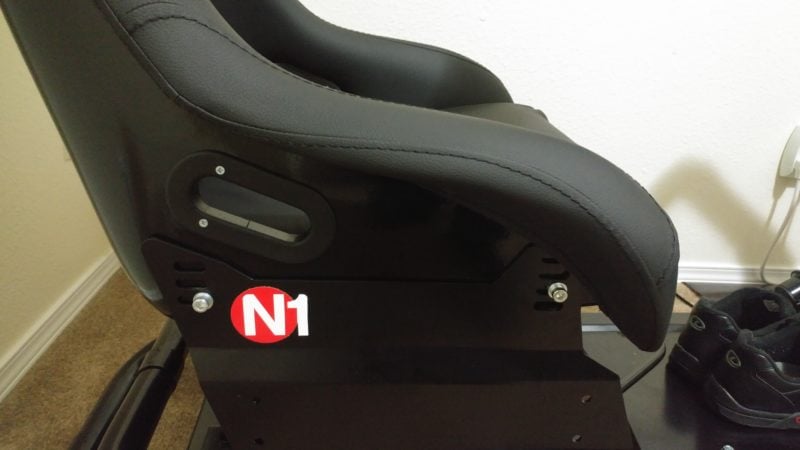
I find the seat on the N1 to be of very good build quality and I think it will last many years. The first ding I have on the seat is a lack of lumbar support. I’m curious to see if I can find some lumbar supports for the seat as the cushions are removable. If nothing else, I can replace them down the road if I need.
Second, I find myself shrugging my shoulders from time to time. The shoulder pads are slightly narrow. But I think if they added a lever to let me tilt the top of my seat back that would help a lot. While it does have the option to tilt the whole seat back, I don’t want the bottom part of the seat to raise up as it’d throw the positioning of my pedals off. I also fear it’d start to lessen circulation to my feet like the formula rig I tried a while back.
A lot of comfort for me derives from adjustability and while I had to drill my own holes, it works great. I’m within one inch of each of my old rig’s measurements (wheel base height, pedal base length, etc.) and have done some multi-hour sessions with relative ease. Over the past few weeks I’ve done some small tweaks here and there and it’s been even better.
The last factor I considered for comfort was the seat height. I’m sitting a full foot higher off the ground now. Which means it’s a lot easier to get in/out of. It also means I’m looking downward ever so slightly on my TV. Since I wear contacts that typically means my eyes won’t dry out as often. Just another comfort advantage and one less distraction while driving — overall I’m very pleased.
Ease of Assembly –
The N1 came in two very heavy boxes. It took up my whole living room just to unpack it. Imagine trying to keep a toddler away from a giant box!
I then had to haul it upstairs to my “office”. That was another chore I’m glad I’m done with and don’t look forward to moving day.
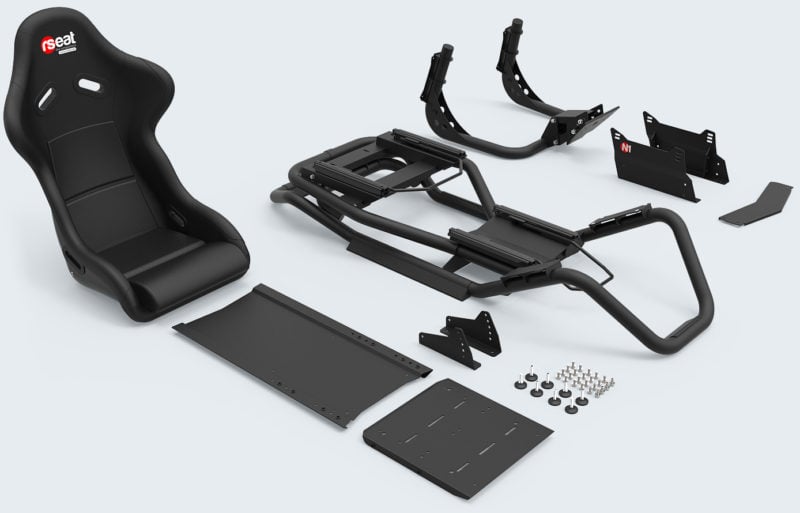
There’s actually just five main parts to the rig; the base, the wheel base, the seat, the pedal slider and the pedal base. Putting it together was really straight-forward, I bet it could be done just by looking at a picture of it online. But the instructions were great laying out all the pieces and the steps.
It also includes all the tools you’ll need; a hex/alan wrench set and a couple appropriately sized steel wrenches.
I started with the seat support and cross bar, put in eight M10 bolts onto the mount, moving on. Next was attaching the wheel base plate to the “neck” of the chassis. Another eight M10 bolts later it was on and I left it loose so I could fine tune how I wanted my wheel to sit.
The crucial slider plate and pedal base was next; more pre-drilled holes for M10 screws here. It was all very simple and straight forward, something I sort of feared with a monster setup like this.
The neck piece was installed just over the pedal plate with yet another eight M10 bolts and sits at a 45 degree angle. Like the rest of the unit, it’s all metal tubing. While it may seem cumbersome with a heavy piece of metal, all the bolts line up so well I found it very easy to hold in place and finger tighten a couple of them to hold it in place.
For the seat itself, I did request help from my wife to hold it in place while I screwed in a few bolts. Another quick and easy section to put together.
Finally, I just zip-tied my cables along the sides of my cockpit and voila, all finished. It took about 30 minutes to assemble the N1 (not counting the removal of the boxes, zip-tying my cables and hauling it upstairs). Overall, I’m pretty pleased.

Stability –
I decided not to install the foot pegs underneath the rig so that I could slide the R1 on my carpet when not in use. It slides on carpet pretty well considering its weight.
I’ll assume the unit is equally as stable with the foot pegs. This rig doesn’t move at all, especially compared to my Playseat Evo.
The 45-degree neck is an excellent design choice because it allows for superb stability while not compromising getting in and out of the cockpit.
I think anyone would be hard pressed to find a sturdier rig. Using my T300RS @ 80%, I think even Direct Drive wheels wouldn’t have any stability issues. Even carelessly and intentionally trying to extract some movement was met with failure.
Value –
At $1,250 for this unit, it is four times the list price of a Playseat Evo. But, it also looks four times as nice. It’s sturdier, and I must say, completely silent. Another driving factor for my upgrade is the noise my old rig would make anytime I went through a chicane. Pro tip: Never wake a sleeping baby, ever.
I chose the black-on-black version as I was tired of the silver (and tired of my blue paint job). The trim on the N1 is far superior and equal to that of any on the market.
While I no doubt understand the materials involved in this chassis are expensive, I would like to see this be priced closer to that of the RS1 model. They are both very similar, this one is more for taller/bigger racers. But the changes between them are pretty minimal, mostly that the pedal slider is included (a $200 add-on for the RS1). Excluding the pedal slider, this unit is $150 more. Add another $300 for the Alcantara seat finish if you want a little something extra.
I think there is room here for RSeat to lower the price a little and still get a good margin, especially since I’m paying another $80 to get it shipped to the USA. You get what you pay for, but I still feel that I overpaid slightly.
The seat itself should offer a little something extra for the price as well. Tilting just the upper part of the seat back and lumbar support come to mind.
Hopefully this investment pays off in the long run and I use the R1 for over a decade like my previous rig.
Verdict
While I am very happy that I bought the RSeat N1 rig, I think there is room for improvement. Nothing major, just little things here and there to help justify the steep price tag.
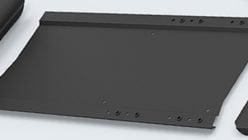
My biggest suggestion to RSeat would be regarding the long pedal slider tray. It comes pre-drilled with two spots to mount it on the main chassis. The company should drill holes all the way down the slider tray a couple inches apart so that us taller drivers could take advantage of the rig without the extra effort.
One other suggestion came to me once I was done building the rig. I’d like to see some holes drilled for cable management somewhere close to the wheelbase to help conceal it. Then have more holes near the front where the cables naturally go. I didn’t think of this while I was zip tying my cables, but rather the moment I stepped back to take my first picture of it. They do tend to stick out, even with good cable management.
Considering what you do get with the N1 is like justifying why you drive a Mercedes; you can use something that gets you from point A to point B. Or you can get there in style. And the N1 has style in spades.
Taking into account the great peripheral support for wheels, pedals and shifters, this cockpit will work for the vast majority of sim-racers. Check out the compatibility list:
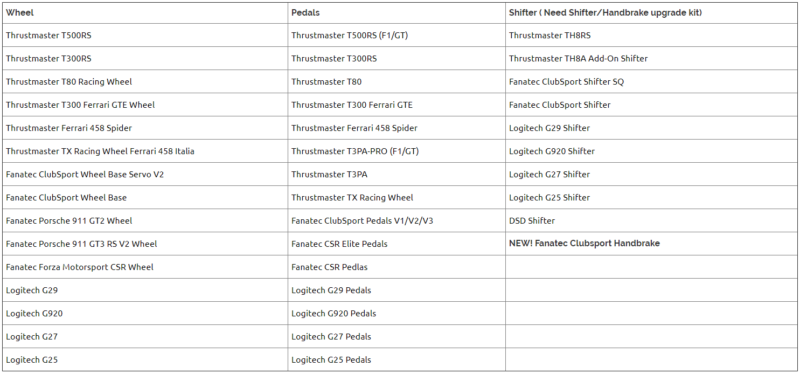
If you’re in the market for a new racing rig, or an upgrade, do your research, as I’ve done. Then take a good hard look at what RSeat has produced, especially if you are lanky like me. I bet you’ll be happy with it.
The RSeat N1 cockpit is available on the official RSeat site.
RSeat N1 Racing Cockpit
Learn more about how our rating system works.
See more articles on Cockpits, Gaming Rig, Racing Seats, Review, and rSeat.