Modified Track Path Editor + Tracks/Discussion

While working on the pit road for Portland I needed to figure out some maths having to do with the pit road. I knew where I wanted the blend line to start, where the wall should start and where the SF straight should be. So I took my data and made it into a calculator that will give us the positions for the pit road elements based on those variables. :-D

Not much testing but it worked in this single scenario. The reverse could be done if you wanted to work back from pit exit to the start of the pit wall but the calc would need some tweaking.

Also a side note... if you want a curved blend line you need to move the first control point to somewhere other than the pit straight. Never would have figured that out without @Mr Grumpy's Highlands track. That also solves the problem of banking into the home straight, so next time you start a track start it on the most nondescript part of the track :-p

Since I didn't originally but I did save my polygon I was able to use the left key to move the start position back a few hundred meters and everything was fine. Then I copied my bankings over in two sections (from new start to old end, old start to new end) and copied the height points over *cough* It'll crash if ya don't! *cough*. However it doesn't crash even though the height points are out of order. The id callups work just fine in the original positions. Not sure how the elevation/Ted+elevation editors will handle that though. Luckily I saved my backups as profiles so it shouldn't be an issue to redo it if need be when I go to rough up Portland a tick.

@eran0004 your course creator has made life so easy for road, deco and pit placement with the ruler!!! I'm half tempted to redraw Sebring again before deco placement. I just can't do it again though...
 

Attachments

  • Eifel Pit Road Calculator.xlsx
    5.2 KB · Views: 30
Looks great! đź‘Ť
But still I consider it as a unfinished process, as you see billboards on first turn, and boards after, logic learning thru track, evolving..
That billboard and many other object is "non stretchable", meaning resize only change distance between those two billboards, starting from side to side is 35m-41m depending place where you put them, then I played with three packs and singles, need to put some duals just for fun..

Polishing this and then starting real learning process of capabilities what these tools can make in my hands, but not even trying to go those tunnel stuff (yet) or other wild things.

Big thanks to all tool makers and additional component and information providers in this thread!

Edit: I have requested to bulldoze those buildings and church, if I select all on ted-editor and move everything bit am I expecting anything to broke? Same question if using "translate" on elevation editor?
One small thing, when track was edited on TED-Editor first time it changed total corner sum on header to 4, once tried to just change it to 13 (real-life corner count) and it failed on online loading, left it on 4 after it, but is that number just cosmetic and shouldn't make any changes if edited to i.e. 13, and that only load failure was just because of star positioning on current moment?
 
Last edited:
But still I consider it as a unfinished process, as you see billboards on first turn, and boards after, logic learning thru track, evolving..
That billboard and many other object is "non stretchable", meaning resize only change distance between those two billboards, starting from side to side is 35m-41m depending place where you put them, then I played with three packs and singles, need to put some duals just for fun..

Polishing this and then starting real learning process of capabilities what these tools can make in my hands, but not even trying to go those tunnel stuff (yet) or other wild things.

Big thanks to all tool makers and additional component and information providers in this thread!

Edit: I have requested to bulldoze those buildings and church, if I select all on ted-editor and move everything bit am I expecting anything to broke? Same question if using "translate" on elevation editor?
One small thing, when track was edited on TED-Editor first time it changed total corner sum on header to 4, once tried to just change it to 13 (real-life corner count) and it failed on online loading, left it on 4 after it, but is that number just cosmetic and shouldn't make any changes if edited to i.e. 13, and that only load failure was just because of star positioning on current moment?

Personally I like the buildings and the church, they make a nice scenery for the track. But I guess they're not there in real life.

Nothing should brake when using the translate feature in the elevation editor. I don't think anything will break in the ted-editor either, but just save a backup of the file before testing that.

I think that the corner count is just used for displaying the track stats so you can set it to whatever you want.
 
If you select & move the entire track in 1 go then nothing changes, it's only if you adjust segments then the elevation will return to default to match the scenery. Which is a bit of a pain :)
 
Personally I like the buildings and the church, they make a nice scenery for the track. But I guess they're not there in real life.
I like those two buildings before uphill now after they're hiding behind billboards, but church is catching eye while targeting exit marker..
I think that the corner count is just used for displaying the track stats so you can set it to whatever you want.
Will check again if that earlier load error was just misalignment of stars. ;)
If you select & move the entire track in 1 go then nothing changes, it's only if you adjust segments then the elevation will return to default to match the scenery. Which is a bit of a pain :)
Thanks for warning! :)
 
Course layout: I managed to make it generate height data by sampling the Eifel heightmap. It took a long time to make it work properly, but it looks like it's functional now. Not ready to be shared yet, but hopefully tomorrow.

Here is a kart track at Eifel. The only elevation changes I did was that I flattened a hill and applied the smoothing algorithm:

https://www.gran-turismo.com/gb/gt6/user/#!/friend/eran0004/course/2723184/
 
@eran0004 is that horizontal zoom on elevation editor still on to-do list? Eagerly waiting it to get all bumps of track on correct positions.. :) (just looking one GT3 car onboard video of 12h Zandvoort race, it's using all track area and having just brilliantly hard suspension which shows all track surface shapes and I'd really like to create those :bowdown::D)
 
While working on the pit road for Portland I needed to figure out some maths having to do with the pit road. I knew where I wanted the blend line to start, where the wall should start and where the SF straight should be. So I took my data and made it into a calculator that will give us the positions for the pit road elements based on those variables. :-D

Not much testing but it worked in this single scenario. The reverse could be done if you wanted to work back from pit exit to the start of the pit wall but the calc would need some tweaking.

Also a side note... if you want a curved blend line you need to move the first control point to somewhere other than the pit straight. Never would have figured that out without @Mr Grumpy's Highlands track. That also solves the problem of banking into the home straight, so next time you start a track start it on the most nondescript part of the track :-p

Since I didn't originally but I did save my polygon I was able to use the left key to move the start position back a few hundred meters and everything was fine. Then I copied my bankings over in two sections (from new start to old end, old start to new end) and copied the height points over *cough* It'll crash if ya don't! *cough*. However it doesn't crash even though the height points are out of order. The id callups work just fine in the original positions. Not sure how the elevation/Ted+elevation editors will handle that though. Luckily I saved my backups as profiles so it shouldn't be an issue to redo it if need be when I go to rough up Portland a tick.

@eran0004 your course creator has made life so easy for road, deco and pit placement with the ruler!!! I'm half tempted to redraw Sebring again before deco placement. I just can't do it again though...

If you ever run into this where you are copying banks over and the height point reference id's are out of order the track will work fine but the elevation editor doesn't like the data being mixed up. Just load the file in the TED editor and save a copy, it'll sort it out for you! Wish I'd have done that first instead of manually trying to fix the file. :-p

Time to rough up Portland a bit!
 
PortlandInternationalRaceway.png


Portland is done! Really looking forward to racing this one.

Enjoy!

https://www.gtplanet.net/forum/resources/portland-international-raceway.5793/
 
@eran0004 is that horizontal zoom on elevation editor still on to-do list? Eagerly waiting it to get all bumps of track on correct positions.. :) (just looking one GT3 car onboard video of 12h Zandvoort race, it's using all track area and having just brilliantly hard suspension which shows all track surface shapes and I'd really like to create those :bowdown::D)

It is, but it's not at the top of the list so I don't know when it can be done.
 
It is, but it's not at the top of the list so I don't know when it can be done.
It takes what it takes, no pushing.. Meanwhile slowing mouse move ratio, using Windows internal zoom and export elevation-MarkPoint-import elevation and attacking with slowed mouse and zoom.. :)
 
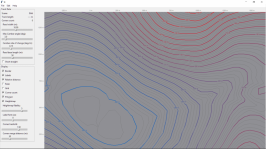
Colour-coded contour map!

The resolution is dynamic: the cell size (line resolution) depends on the zoom level and the heights resolution depends on the visible range of heights (flatter terrain gives higher resolution).

The highest elevation is red, and then it fades towards grey as it gets closer to the lowest elevation.

Skärmbild (49).png


Almost ready to be shared now, just a few more tweaks :)

Edit: Displaying the contour map requires Python 3.6 or higher, as support for half-precision floats (the format used in the apk heightmaps) was added in that version.
 
Will we be able to turn this off as well (the whole height generation feature)? Not very useful for what I do.

Nope, but you'll be able to switch to Eifel Flat and sample the heights used there, in which case the track will be flat.
Only, I can't find the raw heightmap for Eifel Flat right now, so the switch feature will have to wait until I can find it :P

You can also change the scene manually to Eifel Flat by hex editing the file, and then you can just flatten it in the elevation editor.

Anyway, here is version 1.4.0. I renamed the application to Track Layout Creator.

Changes:
  • Software requirement changed to Python 3.6 or above.
  • Scene switched from Eifel Flat to Eifel.
  • Heights are sampled from the heightmap. No processing applied to it at the moment, so you'll probably want to open the file in the Elevation Editor and smooth it out a bit.
  • The contours of the heightmap are displayed on the canvas (can be disabled by unchecking the box in the display panel).
  • Animation has changed to simulate a grid of 6 DTM spec cars racing around the track. Basic physics are calculated for these cars (power, weight, aerodynamic drag, cornering force, traction). Press <p> to initiate the grid and press <spacebar> to start the race. Pressing <spacebar> a second time cuts the ignition on all cars and they will coast until they come to a stop. Due to a hilarious bug they will then encounter a hurricane and start flying backwards, but let's not focus on that for now...
  • If you need inspiration you can click on the Edit menu and select <Random polygon>.
  • Export an Adobe PostScript image of the canvas by clicking on the File menu and selecting <Export PostScript>. The PostScript file can be found in the <img> folder. The PostScript file can be converted to jpg or other image formats online (just Google "postscript to <your image format here>").
Question: In the heightmaps there are two reference frames. One is the frame used in the TED file (with 0 being the midpoint between highest and lowest value of the heightmap). The other is using some sort of absolute zero, and the lowest value is about +6 meters. Would it be better to display the reference frame used in the TED file, or the absolute frame? For instance, seeing a label saying "10 m" and another saying "300 m" (absolute frame) might give you a better sense of the elevation difference than if the labels said "-200 m" and "90 m" (TED frame). What do you think would be more useful?
 

Attachments

  • Track Layout Creator 1.4.0.zip
    1.5 MB · Views: 27
Last edited:
Would purple represent sea level?

Purple is somewhere between red and blue, so it represents mid-level elevation. The colour coding is relative, based on what elevation range that is currently visible: red is the highest elevation currently on the screen and blue is the lowest currently on the screen. So as you pan across the map the lines change colour.

As for numbers, the TED frame of reference seems to be fixed to halfway between highest and lowest terrain, so elevation 0 is halfway between the deepest valley and the highest mountain. There is a second frame of reference in the height map file, but it's not used for anything as far as I know.

Edit: Replacing the square cells of the contour map with triangular cells, for better precision (no saddle points with triangular cells). Also, triangular cells look really cool :D

Skärmbild (51).png
 
Last edited:
Perhaps it's time to take good old Trademark or Rights into effect for this program.
Who knows when someone is going to prevent you from posting this to public any longer.
 
Perhaps it's time to take good old Trademark or Rights into effect for this program.
Who knows when someone is going to prevent you from posting this to public any longer.

I don't think there is anything in the code that can be protected. It's all very basic stuff.
 
Who knows when someone is going to prevent you from posting this to public any longer.

It's protected by copyright anyways, if @eran0004 doesn't provide some form of license nobody is allowed to distribute it. Since it's linked here everybody can download and use it privately but making profits by selling it wouldn't be possible since this would be a form of distribution and @eran0004 could sue. Putting some trademark or patent on it wouldn't be possible since @eran0004's link to the software establishes priority. Otoh it wouldn't be easy for eran to sell the software since it's out in the open right now. But since all the software here is based on the TED format made by PD they could stop distribution of it any time -- which they haven't done yet so i guess they don't care. :)
 
Do you have a list of the road items for each scenery, with the lengths and the id's?

See here, there are also the original raildef xml files in the ted-editor in the rd directory, they contain RailUnit elements of all road and deco elements with all the necessary info.:)đź‘Ť
 
Hi, after making my first track using tarnheld editor, i am working on a new track where i will need to manage elevation using eran0004 elevation editor ('e' command).

At the point i am, using information from several posts there:
  • i have designed the track using GT6 Editor so as 80% of the decorations are in place
  • i have extracted it through Razerman extractor
  • i have remapped the track accurately using 'Google Map' picture
  • i have extracted the profile using 'GeoContext'
  • i have translated it so lowest altitude is on the ground on eifel flat
  • i have ensured first and last points are set correctly
  • i have applied it through 'import' inside eran editor
  • i have exported it to GT6 : it works !
I am facing several points that i don't know how to solve and where i need guidance :
  1. I have got some 'TIGHT ROAD' corners coming from GT6 Editor creation
    Can i change them back to normal corners ?
    How to manage left-right orientation ?
  2. The track is bumpy due to GeoContext inaccuracy but globaly conform.
    Bugatti 15 elevation 2.png

    How to smooth/linearise the track by sections keeping the terrain movement shape ?
  3. The visual rendering on Eifel Flat is not good even if elevation change is around 60m only.
    Bugatti 15 elevation 1.png

    Is there a process to change to Eifel scenery ?
    How to translate globally the track around the new scenery ?
 
@VelociRaptor

1. To change from narrow road to normal road, just change the ROAD_TYPE for the relevant road segments.

There are three different sections of the narrow road:
10330172043828251336 (the start of the narrow road)
10441354659628960456 (the middle of the narrow road - there can be more than one of these)
11447346226392845000 (the end of the narrow road)

Change these to the normal road:
11774983099284048584

2. To smooth the track you can start by flattening all the bumps that you don't want to keep. Position the brush over the bump and press <f> to flatten. To smooth the transitioning between slopes you can position the brush over the transitioning and press <s> to smooth it out. You can also use the smoothen command in transform commands group in the left panel, which will smooth the entire track based on the parameters you set.

3. To change from Eifel Flat to Eifel simply change the sceneryIndex in the header from 5 to 2. You will need to raise / lower the entire track to get it back to ground level. You can use the translate command in the elevation editor for that.
 
Thank you eran.
I am currently playing with the 'smoothen' command on the overall track that seems to do a good job.
I will do what you proposed manually on the 3 or 4 locations where bumps are disrupted to slope flow.
I am trying to understand the red and blue lines in the bottom of the screen.
Am i correct if i imagine the 'blue' line as 'slope acceleration' meaning that when it's 'flat' the slopes changes are fluent ?
I don't figure what represents the 'red' line ?
 
Back